Happy Tuesday, everyone! The days to Christmas are ticking away quickly. Do you ever feel like time is a bit on fast-forward this time of year? I sure do!
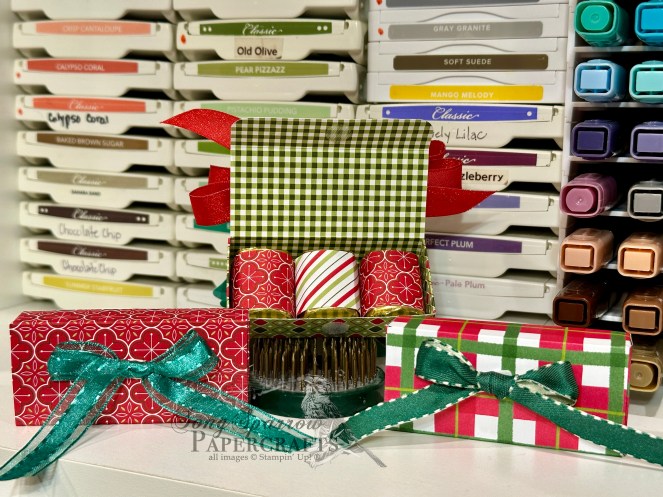
I’m sharing another fun treat box with you today. And it’s also another one I learned from The Paper Pixie. When I tell you that she is a 3D packaging genius, I’m not kidding! *wink* This cute little box perfectly holds 3 Hershey nugget treats. But you could easily use it for other things, as well.
I pulled out a combination of both old and new papers as I was making these little gift boxes. I have found that Christmas treats are the perfect way to use retired papers. While you tuck the lid right into the front of the box, I chose to make each of mine close with a tiny Velcro dot. I like the finished look that gives.
I like to use these little gifties for the mailman, my hair dresser, and anyone I think needs a little holiday cheer. And they’re great in combination with a host of other things in a goodie bag.
Happy Monday, everyone! It’s the official countdown to Christmas. Are you feeling prepared or are you like me and scrambling to the finish? It really didn’t help that I had the flu last week and didn’t feel well enough to do much crafting at all beyond Tuesday. I’m definitely in crunch mode now! But that’s okay. Christmas cards will come a little late and no one will keel over when it arrives after Christmas. *wink* Sometimes we just give ourselves the grace to get done what we can “on time” and make due with the rest.
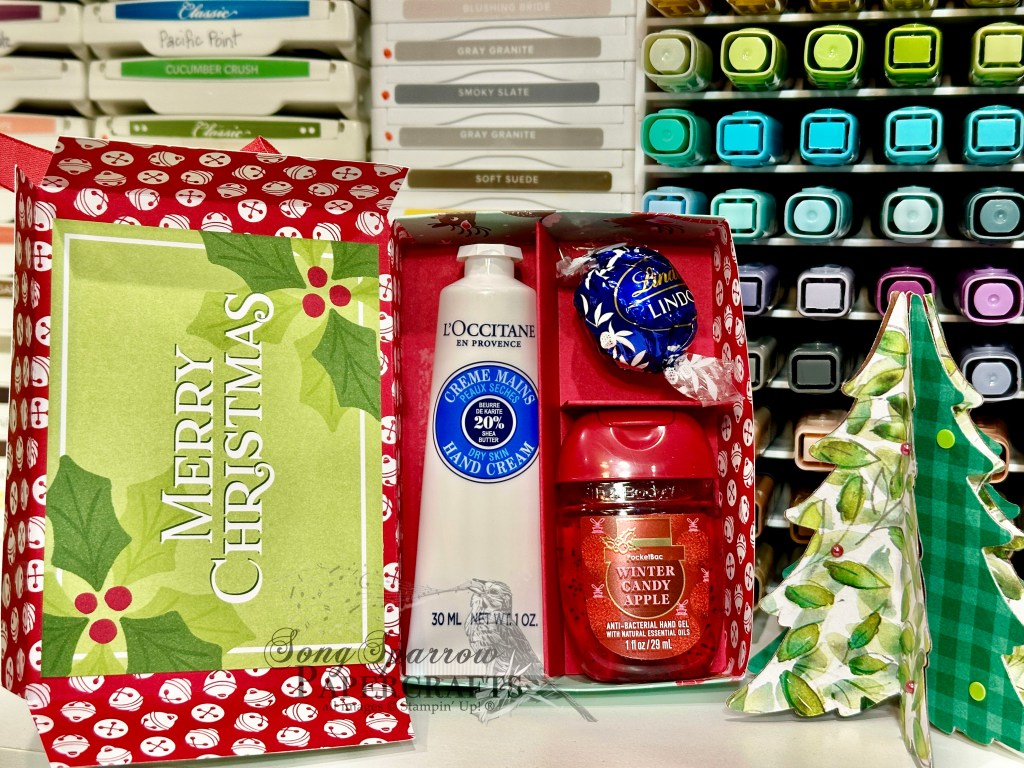
Today I’m sharing another gift box with you. I learned this box from The Paper Pixie and it’s been a huge hit. This little box is the perfect size for some hand cream, a little treat, and a pocket sanitizer. And I’ve had fun finding all the different ways to put this together. Today’s variation uses 100% patterned paper. Let’s check it out.
I just had to pull out the super fun Reindeer Days paper from last year’s holiday release. It’s so cute & festive and has the perfect front-backside combinations for this gift box. The inside dividers need to be a little more sturdy and so I chose some coordinating Real Red cardstock for that. I used the coordinating sticker sheet and Memories & More cards to decorate the box, along with some of the current shiny Real Red ribbon.
I whipped up a little tutorial that gives you some instructions both for the patterned paper and cardstock versions of this box. And you can always catch The Paper Pixie video tutorial if you’re like me and more of a visual, hands-on learner.
Welcome to the weekend! How is yours going so far? It’s been a busy one here just catching up on all of the things you don’t have time to deal with during the school week. But, of course, there’s always a little time for crafting too! *wink*
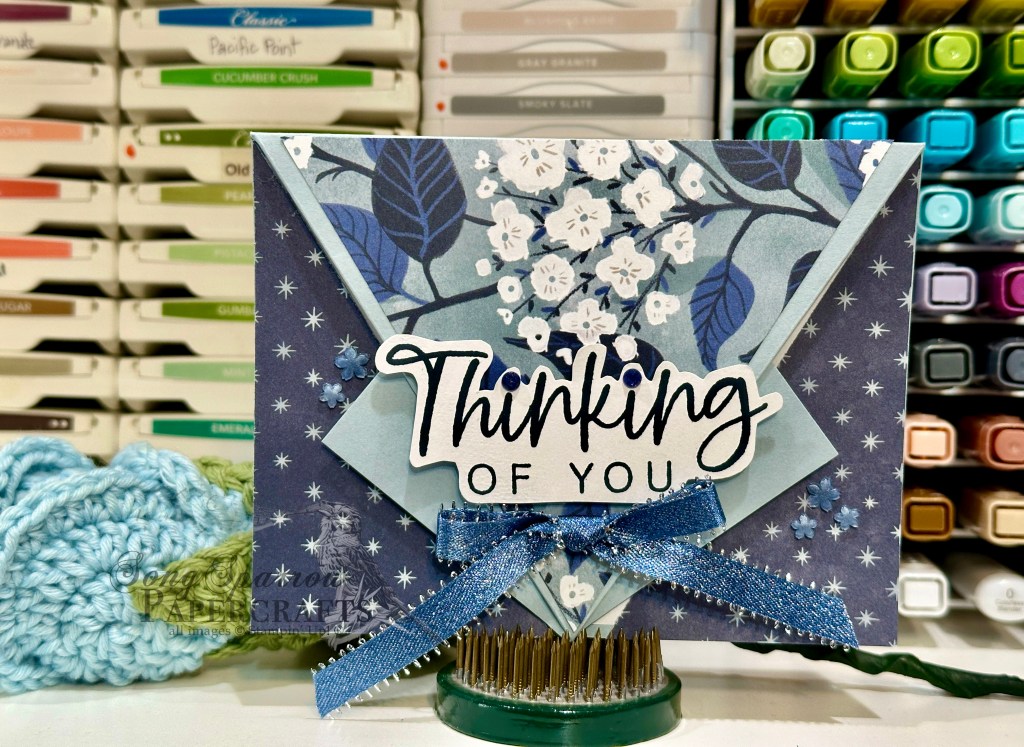
This week, we’ve been using the products in the SU! Peaceful Garden suite that will release in a few short weeks with all of the products in the new Holiday Mini catalog. Today we’re pairing up the paper with the With You in Mind stamp set and a cool fun fold I learned from fellow demo Patti Dolan called the Arrow Fun Fold.
We get started with a base of Cloud Cover cardstock. One sheet of patterned paper from the Peaceful Garden pack serves as the show-stopping focal elements in this card. The sentiment from With You in Mind is stamped in Secret Sea on white cardstock. I used paper snips to cut around the sentiment. It’s adhered to the arrow portion using dimensionals. I finished things off with some Misty Moonlight silver edged ribbon, Hues of Blue flowers, and charming shimmer gems.
Next week, we’re going to a stroll through another suite of products that will be releasing in September. And I can’t wait to show it to you!
Products used in today’s card: Cloud Cover, Basic White cardstock Peaceful Garden DSP (coming in Sept) With You in Mind stamps Misty Moonlight silver edged trim (coming in Sept) Hues of Blue flowers (coming in Sept), charming shimmer faceted dots Dimensionals Adhesives
Howdy, everyone, and happy Saturday! We are officially to the weekend. We’re counting down the last week of summer break over here, so there are lots of things on the to-do list to be sure the kiddo is ready for his first week of 8th grade! What about you? What will your weekend plans have you doing?
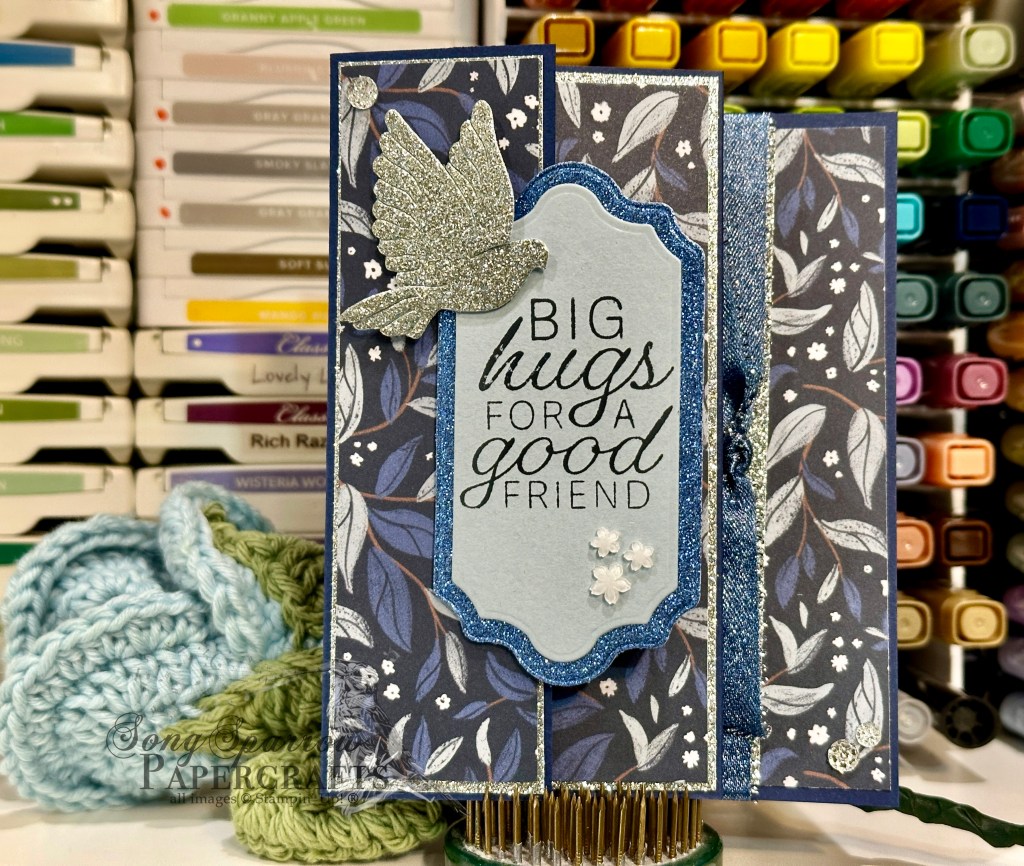
Here in the craft room, we’re wrapping up our full week of fun fold designs. And today, I’m giving you a sneak peek of a full suite of products that will be available in the Holiday Mini catalog on September 3rd. We’re using the Peaceful Garden Suite to create a 4-Panel Accordion Fold. Demos were able to purchase this suite early as part of the special Creativity Now event in June, and I’ve saved using it until we got closer to the official release date for customers.
We get started by cutting down a 12×12 piece of Night of Navy cardstock and then score it to create the accordion base. I chose the leaf and vine patterned sheet from the Peaceful Garden paper pack as my focal paper and then matted these strips with the coordinating silver glimmer paper. The sentiment panel is created using the Peace on Earth stamp & die bundle included in the Peaceful Garden suite. I finished things off with a few Hues of Blue flowers and Misty Moonlight trim from the suite, along with a few drusy embellishments.
I dressed this fun fold up a bit by adding mats for each of the patterned paper panels. When you’re using heavier glimmer paper, like the sheets from Peaceful Garden, this will add some extra weight to your card. You could simplify this by omitting the extra mats or using lighter weight glimmer paper.
How would you like to give the 4-panel accordion fold a try? You can download the free PDF tutorial here.
It’s been a lot of fun learning some new fun folds this week. And there are quite a few that will be going into my more regular rotation. Do you have a favorite from this week’s fun fold series? Tell me in the comments!
Next week, we’re going to be exploring a super fun stamp bundle called Sweet Jar that has a new coordinating holiday stamp set called Jar of Joy. I hope you’ll pop in and see all of the fun things we can do with these cute stamps & punch!
Products used in today’s card: Night of Navy, Cloud Cover, Basic White cardstock Peaceful Garden, Peaceful Garden glimmer DSP (coming in September!) Peace on Earth stamp & die bundle (coming in September!) Misty Moonlight & silver edged ribbon (coming in September!) Hues of blue flowers (coming in September!), Drusy embellishments Dimensionals Adhesives
Happy Friday, craft friends! We have made it to the end of the week and the weekend is fast approaching. What do you have on your weekend to-do list? We haven’t decided if this is going to be a productive weekend or not. Ever have those where you just decide to do fun stuff instead of the things on the to-do list? *wink*
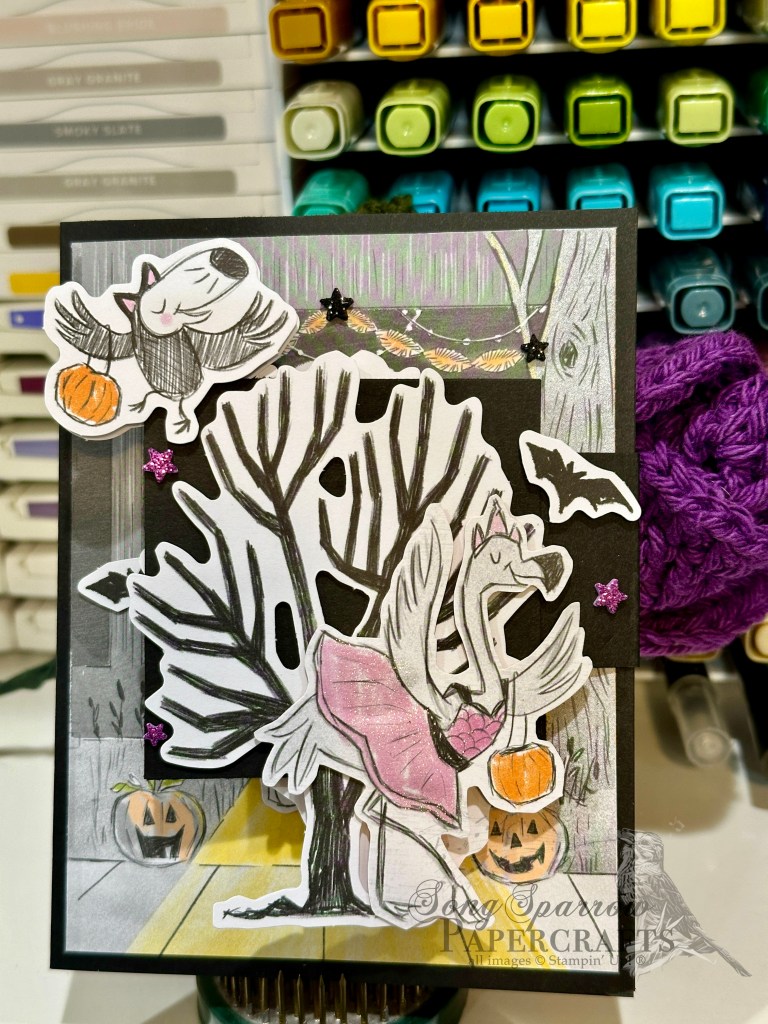
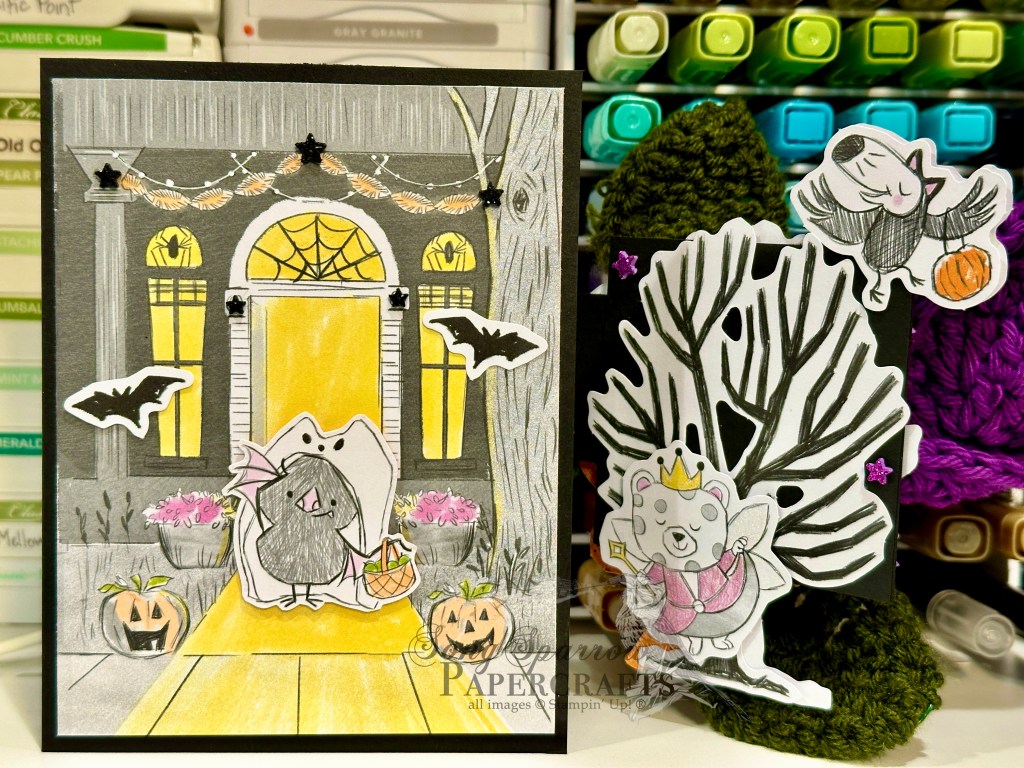
This week, we’re having a good time going through my stash of “must try” fun folds. And today, we’re trying out the Flip Flap fun fold that I saw over at Stampin’ on the Back Porch. I thought it would be super fun to build an unfolding Halloween scene with the SU! Spooky Sweet paper pack. And it turned out sooooo cute, if I do say so myself! Of all the cards I’ve made recently, I dare say this one is the simplest as far as the supply list goes. And the fold itself? Also easy peasy?
We get started with a standard sized base of Basic Black cardstock. This design uses most of a full 8 1/2 x 11 sheet. Half is dedicated to the card base, while the other goes into making the two-sided flap. I chose the door scene from the scene sheet found in the Spooky Sweet paper pack. This scene panel is adhered directly to the card base. I made my flaps next so I could get the placement of the fold correct. And then I used a combination of ephemera characters and a few characters cut from a sheet of the Spooky Sweet paper to create the scenes for each layer. The fold-over flap hides the final scene on the card front. And it’s all about the layers to make these scenes come to life, which means we’re using my most favorite tool – dimensionals!
So what do you think? Is it eerily delightful? Or just plain frightful?
Love this card and wanna give it a whirl yourself? You can download the free PDF instructions here.
This week, we’re having some fun exploring a whole new crop of fun folds that I’ve been dying to try. Today, we’re working on a “faux” fun fold I learned from my fellow Luv 2 Stamp team member Patti Dolan called the Fan Fold. I call this a faux fun fold because it’s made to look like a folded fan but doesn’t actually involve any special folding.
We’re working the lovely Floral Delight paper pack for this new fun fold design. And we get started with a base of Mossy Meadow. The card front uses two patterns from the Floral Delight pack — the daisy and fleur de lis patterns. Our fan element is created by cutting our card base and paper panels and then adhering them together to create the fan look. I used a More Messages sentiment and accented with Daffodil Delight satin ribbon and some Peach Pie glimmer paper. Drusy embellishments on either side draw the eye to the sentiment.
Our peek-through panel from the inside card panel also uses a sheet of the Floral Delight paper and is mounted on a quarter sheet of Cloud Cover to bring together the outside and inside color palettes.
This fun “fold” looks a little complicated but is super easy to put together. You can download the free tutorial here.
This week is all about fun folds. I have to admit that I was pretty intimidated by fun folds at first, but once you’re brave enough to try your first one, there’s really no going back! Now, there’s nothing more exciting than adding another fun fold to my arsenal, especially when it’s an easy one that looks hard. *wink*
Today, we’re trying out a fun fold that I learned from my Luv2Stamp team leader Patty Bennett called the Explosion Pop-Up. And there are tons of variations of this fold out there that really dress it up and dress it down. I went with a pretty simple version for my first go.
We get started with a standard A2-sized card base of Pool Party cardstock. The two-panel focal panel starts with a backdrop of Pretty in Pink plaid from the Wildflower Birthdays paper pack that is diecut using the largest Textured Notes rectangle die. Then we cut a circle from the Pool Party and gold sheet using the Spotlight on Nature dies. To help set off the center of our focal panel, I mounted the circle panel atop a faux bow of gold striped mesh ribbon. Our focal image is from the ephemera sheet included in the Wildflower Birthday pack and mounted with dimensionals. A few gold drusy embellishments on either side set things off nicely and really bring the eye in.
The inside pop-up panel is a 6×6 sheet of the striped paper from the Wildflower Birthdays pack. I used more ephemera to decorate the left side. The sentiment panel is a small square of white cardstock that is stamped with a sentiment from The Right Words set in Pool Party ink. A few drusy embellishments on either end of the gold banner tie the design together nicely.
It takes just a minute to get the hang of folding the pop-up panel correctly. But other than that, this is a really simple fun fold that packs so much visual fun. Wanna give it a try? You can snag the free tutorial for today’s card here.
Happy Monday, everyone! Our summer is flying by in a flash as we begin the last two weeks of summer break here in N. Texas. It’s hard to believe that school is just around the corner. And I don’t know about you, but that brings about a lot of anxious preparation as we begin gathering new school supplies and shopping for new clothes with a preteen (not for the faint of heart!).
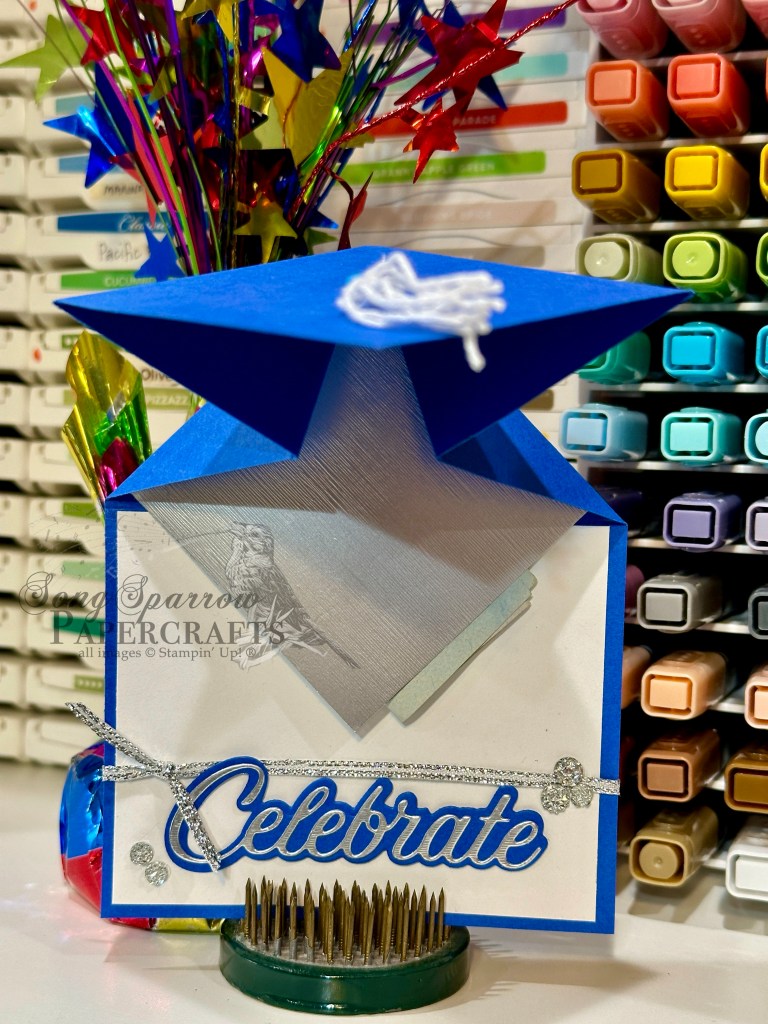
It also means that we’re beginning a new week of fun crafty designs. And this week we’re going to be working through a stash of fun folds that I’ve been dying to try. And first up comes a design of necessity as my oldest nephew is headed off to college in a few short weeks. I might be just a teensy bit behind in honoring his graduation, but there’s always the last-minute items to buy right? *wink* Today, I’m trying my hand at a super cute cap & tassel fun fold that I saw over at Beth’s Paper Cuts.
For a giftie like this one, I try to coordinate the color palette with the graduate’s school colors. In this case, I need to work with a palette of royal blue, white, and black. Finding just the right shade of blue proved a little tricky since I was out of Blueberry Bushel. BUT I happened to still have a supply of Pacific Point in my retired stash, so here we go.
I decided to have the royal blue serve as the predominant color in the design and then I used white and silver as accent colors. I used white baker’s twine to tie the tassel and happened to have some silver thread on hand that I used to bind the tassel together. I liked having this silver detail tie together with the sentiment. I used the recently-retired die set called Wanted to Say to cut the sentiment. Silver trim and drusy embellishments give us nice pops of festive shimmer around the sentiment.
As I was putting my card together, I got a little ahead of myself and ended up adhering the panel that was intended to be the gift pocket, which meant I had to improvise a solution. I cut an extra square of silver specialty paper to serve as the money pocket and placed it in the center of the folding section. It works, but it wasn’t exactly how envisioned this coming out. I’ll fix it on the next go-around. *grin*
I chose to use the top-inside panel to include a hand-written note, so it is not strongly affixed in this short demo. But I still wanted to show how this adorable fun fold opens and where that message panel will eventually be situated. I haven’t had time to make the how-to video for this design yet, but I did take the time to create a PDF tutorial which is free to download here.
Products used in today’s fun fold: Pacific Point (retired), Basic White cardstock Brushed metallic silver specialty paper Wanted to Say dies (retired) Silver trim White baker’s twine Drusy embellishments Brad Dimensionals
It’s been a tremendously busy week. I’ve been working away in the craft room as I’m down to the wire for my craft booth items. Today is setup day and tomorrow is booth day!
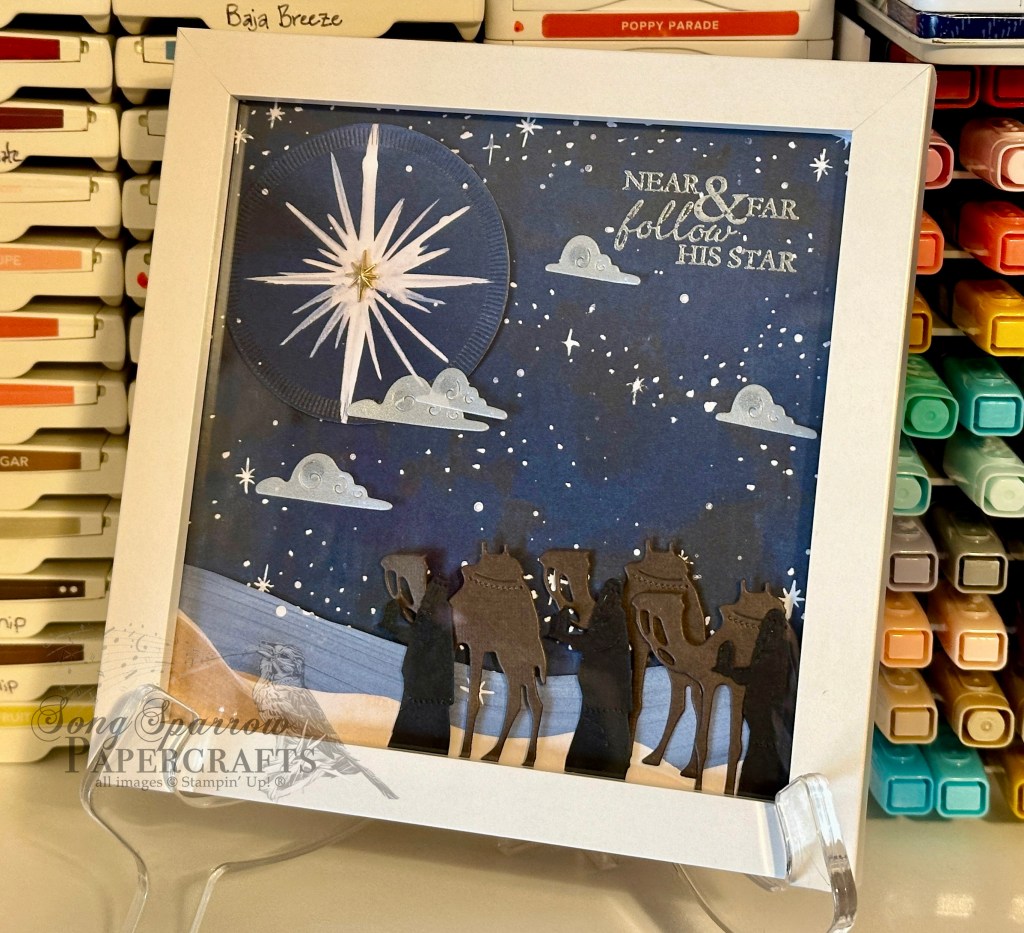
Today, I’m popping in to share another fun giftie that will be available in my shop — home decor items. On one of our recent virtual team events, we made a framed project and I just fell in love with the idea.
And as with most things I prefer to undertake in the craft room, projects don’t have to be overly complicated to have a WOW factor. Today’s sample is a Christmas project using the O Holy Night suite. This set of products retired last year and I’m still super sad about it! This particular project is a combination of patterned paper and diecut elements — most of them are repeated images. A simple bit of layering with dimensionals builds a gorgeous scene of the wisemen on their journey to find Jesus.
For those of you who have been following along over the last week and expressed some interest in the lip balm box, I was able to carve out a little time to make a video and PDF tutorial to walk you through putting a box together.
Next week, I’ll be popping in with a preview of my favorite soon-to-release Online Exclusive bundle. It’s otterly adorable! *wink wink*
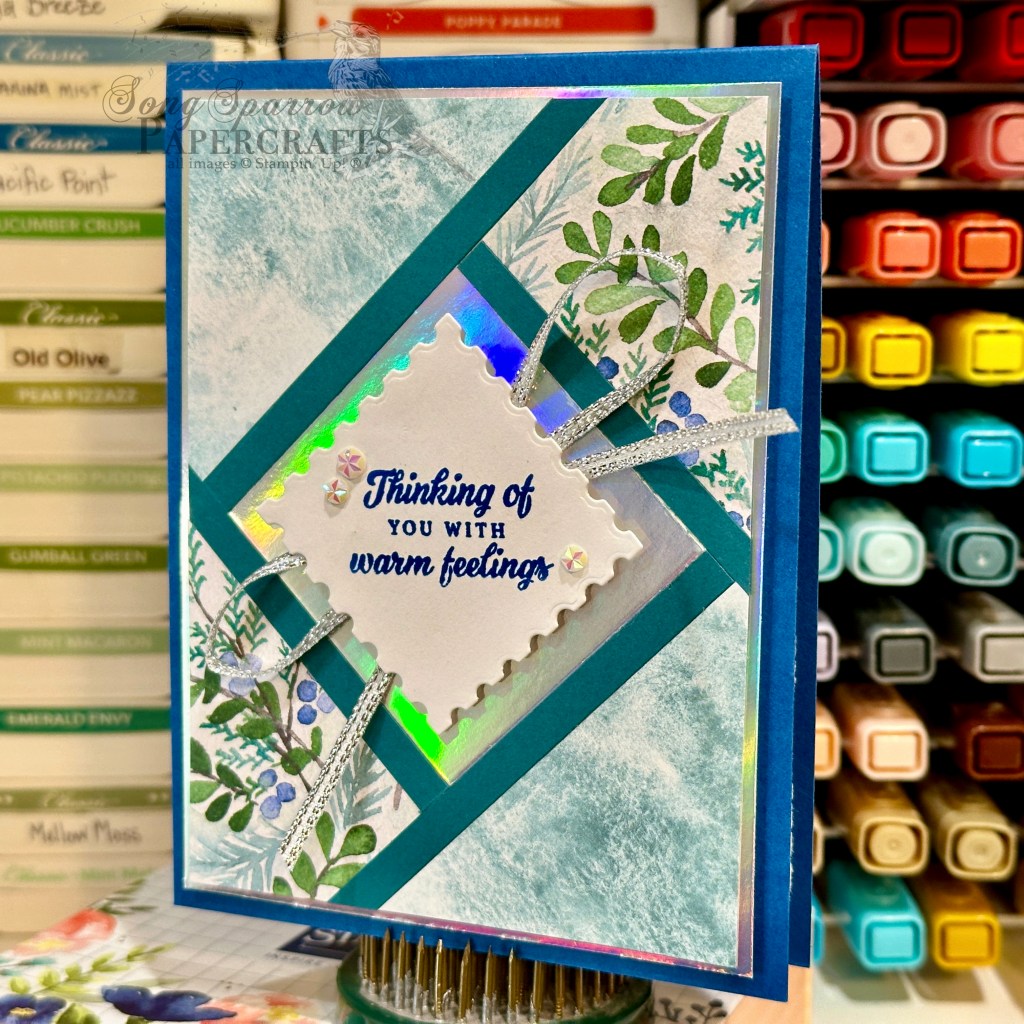
We’re continuing our trek through the woods today with a fun new-to-me card technique called a fractured card design. I’ve seen this card layout featured a number of times in my inspiration searches but, honestly, thought it was going to be too difficult to learn and so I passed it by. But I decided to do a little more research on fractured card designs and do you want to know what I discovered? It’s probably the easiest “hard” card you’ll ever learn! Let’s take a look and you’ll see what I mean.
What I love about this particular card layout is that it’s a great way to showcase designer series paper patterns. And there are all kinds of variations that make this card layout easy to adapt to any patterned paper and keep your cards interesting even when using the same patterns multiple times.
For today’s card, we get started with a base of Blueberry Bushel cardstock. I used white cardstock as the backing for the fractured panel. I chose to showcase the Winter Meadow designer series paper and chose two coordinating patterns. Silver serves as a nice compliment to the wintery feel and a terrific sparkly backdrop. Pretty Peacock serves as our fracture strips and draws out the predominant color in our patterned paper pieces. The sentiment from the new Peaceful Season stamp set is stamped in Blueberry Bushel and then diecut on the diagonal using the Perennial Postage die. A faux bow of silver ribbon and few iridescent faceted gems draw the eye front and center to the sentiment.
Want to know how to make today’s card step-by-step? You can catch this week’s of episode of Terrific Tuesdays to see a fractured card design come together from start to finish and see first-hand how versatile this design can be. I’ve also provided a FREE PDF tutorial here. Please note that some of the products shown will not be available until September 4th.
Products used in today’s card: Blueberry Bushel, Pretty Peacock, Basic White cardstock Winter Meadow, silver foil DSP Peaceful Season stamps (coming soon!) Perennial Postage dies Silver trim Iridescent faceted gems Dimensionals Adhesives

![Basic Black 12" X 12" (30.5 X 30.5 Cm) Cardstock [ 166786 ]](https://assets1.tamsnetwork.com/images/EC042017NF/166786s.jpg "Basic Black 12\" X 12\" (30.5 X 30.5 Cm) Cardstock [ 166786 ]")
![Spooky Sweet 12" X 12" (30.5 X 30.5 Cm) Specialty Designer Series Paper [ 166191 ]](https://assets1.tamsnetwork.com/images/EC042017NF/166191s.jpg "Spooky Sweet 12\" X 12\" (30.5 X 30.5 Cm) Specialty Designer Series Paper [ 166191 ]")
![Clear Wink Of Stella Glitter Brush [ 141897 ]](https://assets1.tamsnetwork.com/images/EC042017NF/141897s.jpg "Clear Wink Of Stella Glitter Brush [ 141897 ]")
![Shimmer Star Foam Stickers [ 166202 ]](https://assets1.tamsnetwork.com/images/EC042017NF/166202s.jpg "Shimmer Star Foam Stickers [ 166202 ]")
![Mini Glue Dots [ 103683 ]](https://assets1.tamsnetwork.com/images/EC042017NF/103683s.jpg "Mini Glue Dots [ 103683 ]")
![Stampin' Dimensionals [ 104430 ]](https://assets1.tamsnetwork.com/images/EC042017NF/104430s.jpg "Stampin' Dimensionals [ 104430 ]")
![Mini Stampin' Dimensionals [ 144108 ]](https://assets1.tamsnetwork.com/images/EC042017NF/144108s.jpg "Mini Stampin' Dimensionals [ 144108 ]")


![Mossy Meadow 8-1/2" X 11" Cardstock [ 133676 ]](https://assets1.tamsnetwork.com/images/EC042017NF/133676s.jpg "Mossy Meadow 8-1/2\" X 11\" Cardstock [ 133676 ]")
![Cloud Cover 8 1/2" X 11" Cardstock [ 165621 ]](https://assets1.tamsnetwork.com/images/EC042017NF/165621s.jpg "Cloud Cover 8 1/2\" X 11\" Cardstock [ 165621 ]")
![Smoky Slate 8-1/2" X 11" Cardstock [ 131202 ]](https://assets1.tamsnetwork.com/images/EC042017NF/131202s.jpg "Smoky Slate 8-1/2\" X 11\" Cardstock [ 131202 ]")
![Floral Delight 12" X 12" (30.5 X 30.5 Cm) Designer Series Paper [ 164700 ]](https://assets1.tamsnetwork.com/images/EC042017NF/164700s.jpg "Floral Delight 12\" X 12\" (30.5 X 30.5 Cm) Designer Series Paper [ 164700 ]")
![2024–2026 In Color™ Glimmer 12" X 12" (30.5 X 30.5 Cm) Specialty Paper [ 163771 ]](https://assets1.tamsnetwork.com/images/EC042017NF/163771s.jpg "2024–2026 In Color™ Glimmer 12\" X 12\" (30.5 X 30.5 Cm) Specialty Paper [ 163771 ]")
![More Messages Bundle (English) [ 165473 ]](https://assets1.tamsnetwork.com/images/EC042017NF/165473s.jpg "More Messages Bundle (English) [ 165473 ]")
![Smoky Slate Classic Stampin' Pad [ 147113 ]](https://assets1.tamsnetwork.com/images/EC042017NF/147113s.jpg "Smoky Slate Classic Stampin' Pad [ 147113 ]")
![Daffodil Delight 1/8" (3.2 Mm) Satin Ribbon [ 164715 ]](https://assets1.tamsnetwork.com/images/EC042017NF/164715s.jpg "Daffodil Delight 1/8\" (3.2 Mm) Satin Ribbon [ 164715 ]")
![Drusy Adhesive Backed Embellishments [ 164223 ]](https://assets1.tamsnetwork.com/images/EC042017NF/164223s.jpg "Drusy Adhesive Backed Embellishments [ 164223 ]")
![Tear & Tape Adhesive [ 154031 ]](https://assets1.tamsnetwork.com/images/EC042017NF/154031s.jpg "Tear & Tape Adhesive [ 154031 ]")


![Pool Party 8-1/2" X 11" Cardstock [ 122924 ]](https://assets1.tamsnetwork.com/images/EC042017NF/122924s.jpg "Pool Party 8-1/2\" X 11\" Cardstock [ 122924 ]")
![Basic White 8 1/2" X 11" Cardstock [ 166780 ]](https://assets1.tamsnetwork.com/images/EC042017NF/166780s.jpg "Basic White 8 1/2\" X 11\" Cardstock [ 166780 ]")
![Wildflower Birthday 12" X 12" (30.5 X 30.5 Cm) Specialty Designer Series Paper [ 164591 ]](https://assets1.tamsnetwork.com/images/EC042017NF/164591s.jpg "Wildflower Birthday 12\" X 12\" (30.5 X 30.5 Cm) Specialty Designer Series Paper [ 164591 ]")
![Textured Notes Dies [ 165555 ]](https://assets1.tamsnetwork.com/images/EC042017NF/165555s.jpg "Textured Notes Dies [ 165555 ]")
![Spotlight On Nature Dies [ 163580 ]](https://assets1.tamsnetwork.com/images/EC042017NF/163580s.jpg "Spotlight On Nature Dies [ 163580 ]")
![The Right Words Cling Stamp Set (English) [ 165316 ]](https://assets1.tamsnetwork.com/images/EC042017NF/165316s.jpg "The Right Words Cling Stamp Set (English) [ 165316 ]")
![Pool Party Classic Stampin' Pad [ 147107 ]](https://assets1.tamsnetwork.com/images/EC042017NF/147107s.jpg "Pool Party Classic Stampin' Pad [ 147107 ]")
![Gold Striped 3/8" (1 Cm) Mesh Ribbon [ 165599 ]](https://assets1.tamsnetwork.com/images/EC042017NF/165599s.jpg "Gold Striped 3/8\" (1 Cm) Mesh Ribbon [ 165599 ]")


 Designer Series Paper")
 Foil Sheets")


 Trim Combo Pack")

