Coming Soon

Make Today Otterly Amazing

In just two short weeks, Stampin’ Up! will release a brand new set of Online Exclusive products, including the too-cute-for-words Otterly Adorable suite. This week, I’m featuring this cute selection of products in hopes of providing some inspiration for your future projects. This bundle has so much potential — from playful designs to love-themed projects and all kinds of things in between!

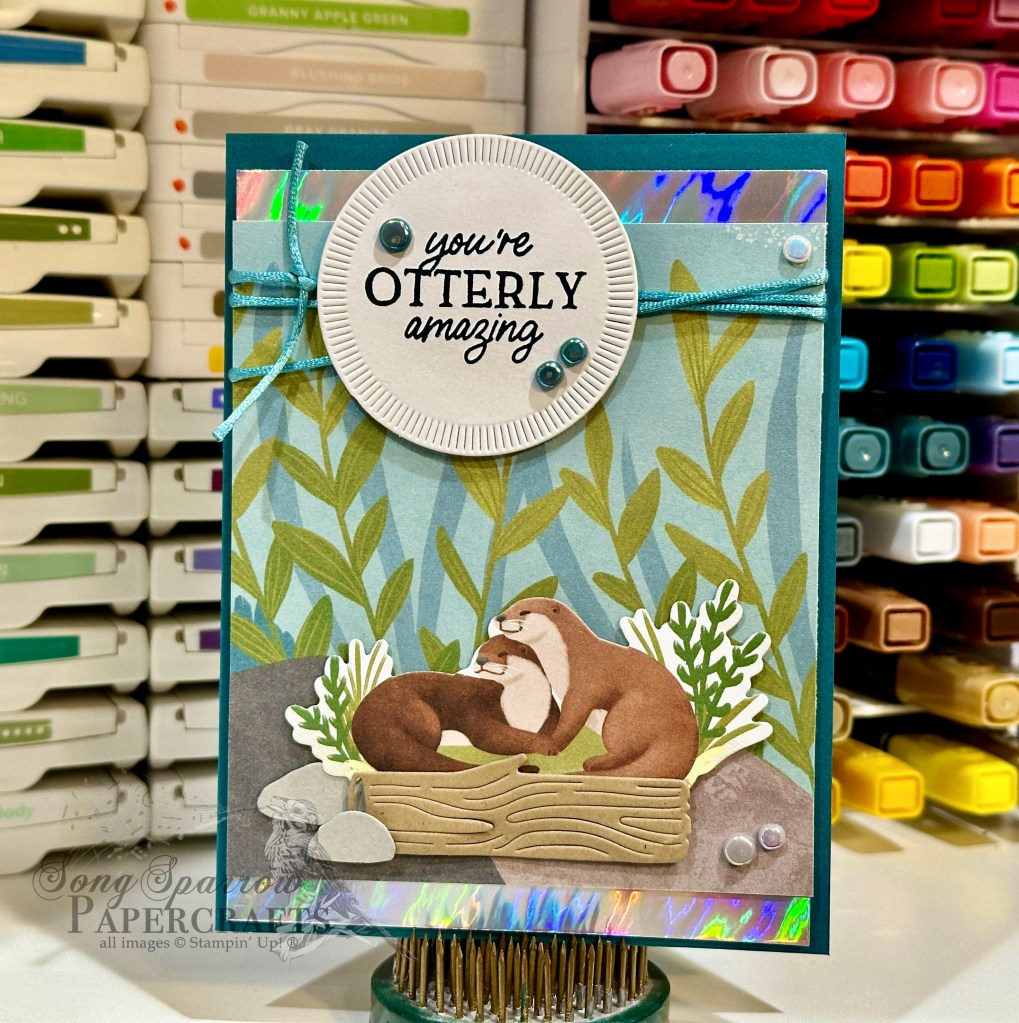
Today, we’re using the paper and embellishments to create an encouragement card. Pairing the paper with a few dies makes this the perfect scene to bring a smile to someone’s otherwise less than bright and happy day!

Our card starts with a base of Lost Lagoon cardstock. I chose the watery pattern from the Otterly Amazing paper pack to serve as the backdrop for our scene and matted it with the Pretty Peacock shimmer paper from my retired paper stash. Our focal panel consists of two sheets of paper — the water reed patterned sheet and a cute otter sitting in the reeds from one of the sheets full of otter vignettes. I used the Spotlight on Nature dies to cut the reed background and a smaller inset panel on which our sunbathing otter sits among the reeds. I used my paper snips to cut more detail in this cute vignette and to help it stand out from the background. All of these layers are adhered with varying heights of dimensionals to give more depth and pop to our scene. A twisted some of the new Lost Lagoon soft cording around the background panel before adhering the focal panel. The sentiment from the You Are Beautiful stamp set is stamped in Pretty Peacock directly on our background panel under the focal point. A few riverside irregular pearls are scattered about our card front to add a little sheen and draw the eye across the design.

Tomorrow we’re going to make a splash with a fun fold design!

Products used in today’s card:
Lost Lagoon cardstock
Otterly Amazing (coming soon), Soft Shimmer (retired) DSP
You Are Beautiful stamps
Spotlight on Nature dies
Lost Lagoon soft cording (coming soon)
Riverside irregular pearls (coming soon)
Dimensionals
Adhesives

Product List
Coming Soon

Otterly Amazing

Happy Monday, everyone! I don’t know about you, but I needed a weekend from my weekend. *grin* Craft shows, while always fun, are always exhausting. I got everything home, but I haven’t unpacked a single thing. It’s onward and upward to new products!

That’s right, in just a few short weeks, there will be a brand new bunch of Online Exclusives. And let me tell you, there are some C-U-T-E, CUTE things in this release, including the suite that I’m showcasing for you this week — the Otterly Adorable suite. This suite includes patterned paper, coordinating stamps & dies, some specialty cording, and iridescent pearls. We’re starting off with a super simple layout.

Our card base is a piece of Pretty Peacock cardstock. Our backdrop is a piece of the patterned scene papers from the Otterly Amazing designer series paper pack that’s releasing soon. I really loved the look of the (now retired) Holographic Trio silver foil and how it looks like a flowing river, and so while I don’t usually use too many products from my retired stash, this one just had to be a part of today’s card! Our cute otter pair is diecut from a sheet of the Otterly Adorable paper using the coordinating Otterly Amazing dies. To complete the scene, I cut our otter’s log den from Crumb Cake cardstock and the rocks from Smoky Slate. Dimensionals add depth and dimension to our scene. The sentiment from the Otterly Amazing stamp set is stamped in Pretty Peacock and diecut using the Spotlight on Nature dies and then mounted over the Lost Lagoon soft cording with dimensionals. A few Riverside Irregular Pearls finish things off with some iridescent sparkle.

This whole set is so cute and I can’t wait to show you all of the ideas I have floating in my head (pun intended!)!

Products used in this card:
Pretty Peacock, Crumb Cake, Smoky Slate, Basic White cardstock
Holographic Trio (retired), Otterly Adorable (coming soon) DSP
Otterly Amazing stamps & dies (coming soon)
Spotlight on Nature dies
Lost Lagoon Soft Cording (coming soon)
Riverside Irregular Pearls (coming soon)
Dimensionals
Adhesives

Product List
Gifting

Home Decor

It’s been a tremendously busy week. I’ve been working away in the craft room as I’m down to the wire for my craft booth items. Today is setup day and tomorrow is booth day!

Today, I’m popping in to share another fun giftie that will be available in my shop — home decor items. On one of our recent virtual team events, we made a framed project and I just fell in love with the idea.

And as with most things I prefer to undertake in the craft room, projects don’t have to be overly complicated to have a WOW factor. Today’s sample is a Christmas project using the O Holy Night suite. This set of products retired last year and I’m still super sad about it! This particular project is a combination of patterned paper and diecut elements — most of them are repeated images. A simple bit of layering with dimensionals builds a gorgeous scene of the wisemen on their journey to find Jesus.

For those of you who have been following along over the last week and expressed some interest in the lip balm box, I was able to carve out a little time to make a video and PDF tutorial to walk you through putting a box together.

Next week, I’ll be popping in with a preview of my favorite soon-to-release Online Exclusive bundle. It’s otterly adorable! *wink wink*

Gifting

Joy of Chocolate

It’s craft fair season, and I’m hard at work preparing for an upcoming show. I like to offer a wide variety of products outside of just cards because, quite honestly, it always seems like the gift items sell best.

One surefire hit is always chocolate. And today’s cute giftie is a custom-wrapped chocolate bar. I’ve seen lots of clever ways to wrap a chocolate bar, but I really love this particular envelope design because it’s super quick and simple to make! super helpful when you want to turn out a bunch in a short amount of time.

Using double-sided patterned paper means that your treat envelope is decorative from start to finish. Several glue dots in the chocolate bar help it stay put inside the envelope. I like to hold the envelope closed with ribbon and then add a cute decorative element on top. Isn’t this an adorable way to give a sweet treat?!

We’ll be continuing our look into my craft booth next week. I have lots more cute stuff to show you and a video tutorial to share!

Gifting

Lip Balm Gifts

It has been a busy week this week, and I wish I could say that it involved more time in the Song Sparrow Papercrafts studio. But alas, the call of work and homelife have prevailed. We’ve all had our share of homework to do. And I don’t know about you, but we’ve been watching the trek of Hurricane Milton with bated breath.

As I’m preparing for an upcoming craft show, we’re taking a look at some of the fun gifties that I’ll have in my booth. Aside from having the fun edible treats, I love to create little gift items that contain something useful. And who doesn’t love a good tube of lip balm? I have some in just about every room of the house, plus my car and my purse and at my office.

I found a super cute gift box tutorial over at The Paper Pixie that I have adapted/simplified a bit. Are these not the cutest little boxes? You can use solid or patterned cardstock for the box itself. I had some thicker patterned cardstock, and it worked super well. But as you can see, a plain box doesn’t have to look plain once you’re done dressing it up!

If you’re interested in a PDF tutorial for these cute boxes that includes my little shortcuts, simply drop me a comment with a link to your socials (or other means of sending it to you). I’ll be sending out all of the requested tutorials from this week’s projects over the weekend.

I’ll be popping in with a few more craft show goodies over the next few days. So I hope you’ll pop in and check out more cute gifties.

Gifting

Best Laid Plans

We’ve made it to a new week, and you may have noticed my absence at the end of last week. It’s crafting show season and I have 2 that fall very close together. Needless to say, I didn’t budget quite enough time to do ALL.THE.THINGS last week and so my planned blog post materials had to be set aside.

Over the weekend, I’m teamed up with my mom to set up a booth for an event in her area. We had a lot of fun, and I figured out just how much more work I have to do to be prepared for my next event in TWO short weeks!

So this week, I’ll be sharing some of the projects that I make especially for my craft fair booths. And first up are these super cute little Hershey nugget treat packages. I really love these for a quick little something to pass along to someone as a pick-me-up or thank-you.

When I’m preparing craft booth items, I always start by using the retired product in my stash. So these nuggets use several different packets of retired fall-inspired paper patterns. And then I dress up the packaging with dies that meet the theme. We have such lovely fall-inspired die sets that I, of course, had to reach for both Autumn Leaves and Changing Leaves for my dress-up elements for these nugget packets. I’ll be offering a variety of seasonal packaging for the nugget treats, including fall, Halloween, and Christmas.

If you’re interested in the tutorial for these Hershey nugget treats, drop me a comment with your e-mail or social media link so I can send you a copy.

Pop in tomorrow to see what else I’ll be offering in my craft show booth.

Autumn · No Stamp Design

Easy Easel that Failed

Welcome to today’s BONUS post! It’s the time of year where many of us crafty creators begin thinking about items that we will put in our booths at craft fairs. I have two upcoming craft fairs and am already well underway in the product creation department. One of the many items that I love to offer craft fair customers is an easel calendar. And this year, I’ve been playing around with several different layouts and methods of constructing them.

Today, I’m sharing a prototype with you that didn’t make the cut. Why am I sharing a “failure,” you might ask? Well, it may not work for my customers, but it’s still a lovely design that I intend to enjoy on my own desk. And we’re going to talk about why it doesn’t work because I think there’s value in sharing things that didn’t work out as planned and how we “fix” it.

I knew that I wanted to build a calendar on a standard-sized card base in an easel design. I wanted the calendar to lie flat and be mailable for anyone who purchased one in my craft booth and wanted to mail it to a loved one. So I began with the simplest of easel stands where the easel folds up in the back to prop up the front-facing portion. But what doesn’t work about this design is the prop catch in the back to ensure that the easel stays in place. The only thing I could find that worked to keep the easel in place was a very large stack of dimensionals, which is not at all pretty. And for me, I like for every angle of a crafty creation I made to be lovely to look at. And that’s how this lovely calendar (from the front) became my new desk companion. But let’s talk about how it comes together outside of my faulty easel design.

I love the new Splendid Autumn designer series paper pack and really wanted to pull out the lovely, more subtle colors in the patterned sheet I chose for this easel calendar. After placing a lot of different color combinations behind the Splendid Autumn sheet, I felt like the combination of Cajun Craze and Blackberry Bliss worked best at pulling forward the lovely shades of fall in the field of blooms AND all of the lovely colors of dusk in the sky. So our Cajun Craze sheet serves as our base for the calendar easel and the Blackberry Bliss serves as the mat directly behind the Splendid Autumn sheet. To pull forward the yellows, I matted the small tear-off calendar (by Taylored Expressions) in Crushed Curry. I added a few Peach Pie shimmer gems in the bottom corner for just a little sparkle. I just love how it turned out!

In this week’s episode of Terrific Tuesdays, I’m going to be sharing the full details on this easel calendar with you, including how this particular design was a fail for me PLUS how I changed things up to create an easel that works how I intended. So I hope you’ll tune in!

Products used in today’s featured design:
Cajun Craze, Blackberry Bliss, Crushed Curry cardstock
Splendid Autumn DSP
Taylored Expressions mini tear-off calendar
In Color shimmer gems

Product List
Back to School · Sketchy Fridays

Sketchy Fridays: Packed for Success

How is it Friday already?! Anyone else feel this way? Our last week of summer has just flown by. We’ve shopped for school clothes and last-minute supplies, cleaned out the backpack and started fresh for the year, set next week’s lunch box menu, and squeezed in some random fun. What do you typically do with your kiddos for their last week of summer break?

For this week’s Sketchy Fridays, we’re taking a little detour from the Annual Catalog and, instead, are taking a page from my personal sketch book. Our sketch is a little unconventional, but then again, so is today’s card!

Today, we’re continuing our back-to-school theme, and I just love how this card design came out! I knew that I wanted to make a design that included a backpack, but I definitely didn’t have a backpack image in my current product stash. So I started looking at everything a little differently as I sorted through sets again. And that’s when I realized that I could use the sled die from Sophisticated Sled die set to make it happen. Let’s take a closer look!

Our card gets started with a base of Basic Black cardstock. I wanted the focal panel to look like a wall in a classroom. Although difficult to see here, the focal panel is a quarter sheet of black cardstock that has been trimmed slightly on each side and then raised with dimensionals. I used the Bright & Beautiful patterned papers to help me create this look with the bottom of the wall being the striped pattern. And then I wanted the top portion to look like a bulletin board, so the star pattern is serving as the decorative border around the bulletin board and our printed sentiment is the inspirational message from the teacher.

To create our backpack, we’ll start with a quarter sheet of Pretty Peacock cardstock and use the top portion of the sled die to cut our backpack. Be sure to save all of the negative space pieces to serve as backpack pockets, and we’ll trim any portion of the bottom of the sled off to keep the look of a backpack. Using the die itself, I traced around the outside of the portion I used to cut the backpack and then fussy cut on my trace marks to create a base to which I adhered all of my pieces. This also creates a more realistic look of a stuffed backpack. I used my glue pen to adhere the outline portion and then I used several layers of glue dots on each of the “pockets” to adhere them and give them the look of having items inside. Using the letter “i” from the Alphabet a La Mode die set, I cut the handle for the backpack and adhere it using tear & tape. I used the handle for the toolbox from the Trusty Toolbox die set to create the backpack straps. The backpack is adhered to the background with dimensionals. I added a few stars cut from silver foil with the Merriest Trees dies to finish off the design.

Isn’t this the most fun? Our inside sentiment says “reach for the stars” so everything ties together nicely. I just love how it turned out!

I hope you’ll tune in tomorrow where we’ll be making some Lunchbox Lovin’. You won’t want to miss it!

Products used in today’s card:
Basic Black, Basic White, Pretty Peacock, Crushed Curry cardstock
Bright & Beautiful, Silver foil DSP
Sophisticated Sled, Trusty Tools, Merriest Trees dies
Dimensionals
Adhesives

Product List
Back to School

Color With Greatness

This week, we’re putting on our creative hats to make back-to-school designs. Why do I need my creative hat? Well, for me personally, my current stash of products (as in, not retired products) doesn’t make it easy to stick to this week’s theme without a little ingenuity. And today, we’re combining the Trusty Tools set with Filled With Fun to create our desktop of color. Let’s see how we can make this one happen.

We get started with a card base of Crumb Cake cardstock. Our focal panel background consists of two layers of patterned paper — the bottom from Take to the Sky and the top from Nature’s Sweetness — and is cut to leave a very small border of the card base peeking around on each side. We cut a focal point out of the top layer of our background panel with the Spotlight on Nature dies and then adhere our two focal panels together with dimensionals. To create the storage box for our paint brushes, we use the wagon fencing from the Filled With Fun die set to cut Crumb Cake cardstock and then tuck the box in the center of the circle. Our paintbrushes are diecut using the Trusty Tools dies. The handles are cut from textured metallic gold while the bristles are cut from Smoky Slate. A dab of paint is stamped in primary colors on the end of each set of bristles. We tuck our paintbrushes into the storage box and adhere with several layers of dimensionals to give the look of multiple planes of view. Once again, I turned to my trusty printer to provide my custom sentiment and diecut it with the Everyday Essentials die using the extension method. The sentiment is adhered with dimensionals, as well. I added a few splatters of paint that were diecut from Real Red and Daffodil Delight cardstock using the Bright Skies dies. A few dollops of rhinestone jewels add just the right amount of sparkle across the card front to help the eye glide easily across the design.

Tomorrow we’ll be packing up some tools for success. I hope you’ll tag along and check it out!

Products used in today’s card:
Crumb Cake, Smoky Slate, Real Red, Daffodil Delight, Basic White cardstock
Take to the Sky, Nature’s Sweetness, Gold textured metallic DSP
Trusty Tools, Filled with Fun, Bright Skies, Everyday Details, Spotlight on Nature dies
Trusty Tools stamps
Rhinestone jewels
Dimensionals
Adhesives

Product List
Back to School

To a Sharp Year

Welcome in to this wonderful Wednesday! We’re halfway through this week and about halfway through our back-to-school design series. I hope you’ve been enjoying things thus far. Today, we’re keeping things on the simple side with a design using the Trusty Tools stamps and dies. Let’s dive in and learn more about how this card comes together.

We get started with a card base of Cajun Craze cardstock. Our focal panel is a piece of white cardstock that has been cut down on either side to allow a border of our card base to shine through. Using the Trusty Tools stamps, I stamped a pencil on Crushed Curry cardstock and then diecut with the coordinating die. I colored the erasers with Stampin’ Blends to give a realistic look. Using the smaller heart die from the Friends for Life die set, I drew a heart in the center of the focal panel to serve as a guide while adhering the pencils to the focal panel. Once again, I’ve used my printer to print a sentiment that I created to fit the card theme. The sentiment, and its mat of Peach Pie glimmer paper, is diecut using the Friends for Life die set. A layer of dimensionals behind the sentiment gives it a nice rise above the busy focal panel. And we finish things off with a few shiny sequins.

Of the back-to-school designs thus far, this one is by far the one that has come together the quickest. This would be a super cute card to accompany a small gift to teachers on the first day, don’t you think?

I hope you’ll tune in tomorrow when we paint the halls with greatness!

Products used in today’s card:
Cajun Craze, Crushed Curry, Basic White cardstock
Peach Pie glimmer paper
Trusty Tools stamps & dies
Friends for Life dies
Stampin’ Blends
Shiny sequins
Dimensionals
Adhesives

Product List