Howdy, friends, and happy Friday! I’ve been anticipating this long weekend all week and it feels like we’ve lived 2 weeks in the last 5 days. It’s funny how that happens sometimes!
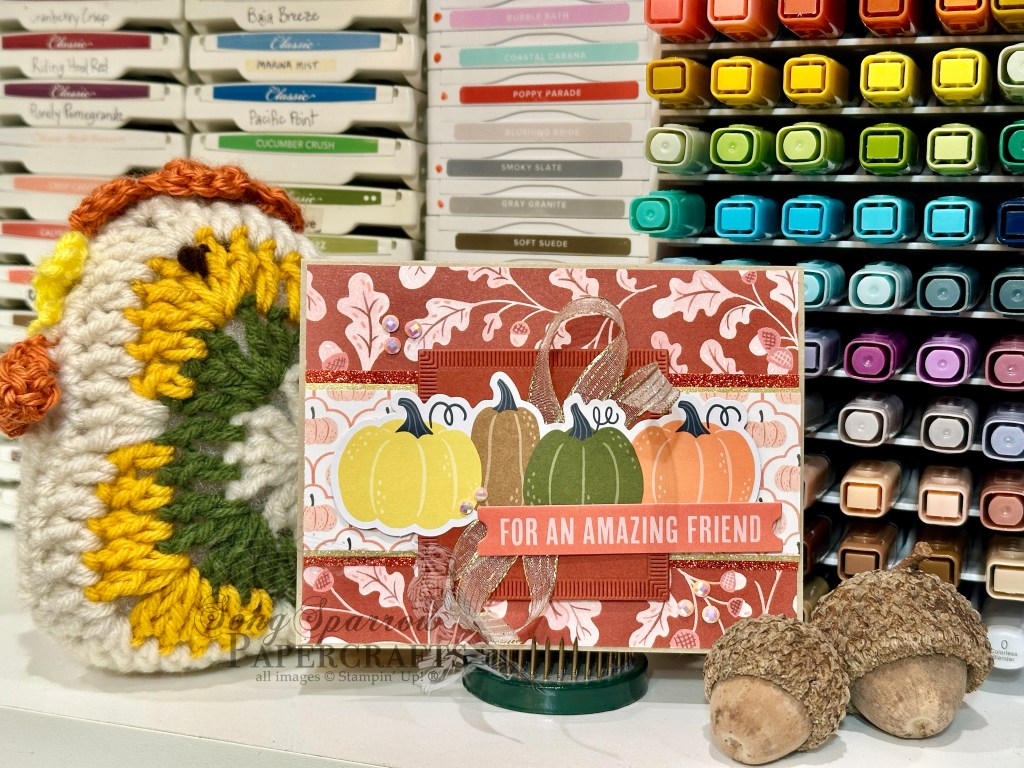
This week is all about the holidays and we’re working our way through the new crafty goodies that dropped in the store this week to make our projects. Fall happens to be my favorite season of the year, so I’m bringing you another fall card today using the new Painted Patch paper and Harvest Hues ephemera. And I’m borrowing the layout from the Coastal Crafter over on the Instas for this one.
We get started with a nice neutral base of Crumb Cake cardstock. Our background panel is a sheet of oak leaves and acorns from the Painted Patch paper pack. The backdrop for our focal panel begins with a strip of the reverse side of our background panel to reveal the small pumpkin design, which is then matted with a combination of gold Timeless Metallic paper and Autumn Woodland glimmer paper. Our focal section gets started with a square of Cajun Craze cut with the Tile Garden dies and then we layer our gold striped sheer ribbon, the patch of pumpkins from the Harvest Hues ephemera, and then the sentiment from the Sincerely Noted ephemera pack. We finish things off with some pearlized faceted circles.
I’m really loving this layout and definitely plan to add it to my sketch book. There are so many directions to take this particular layout that it should adapt easily to a whole host of seasons and occasions! I’ve got a cute Halloween project rolling around in the ol’ idea bin that I hope to bring to life. I hope you’ll drop by and see how that one comes together.
Happy hump day! We are already halfway through this week. Hey, have you guys checked out all the beautiful new crafty goodies that dropped in the store yesterday? Man oh man, the new stuff is amazing! And I’m not just saying that.
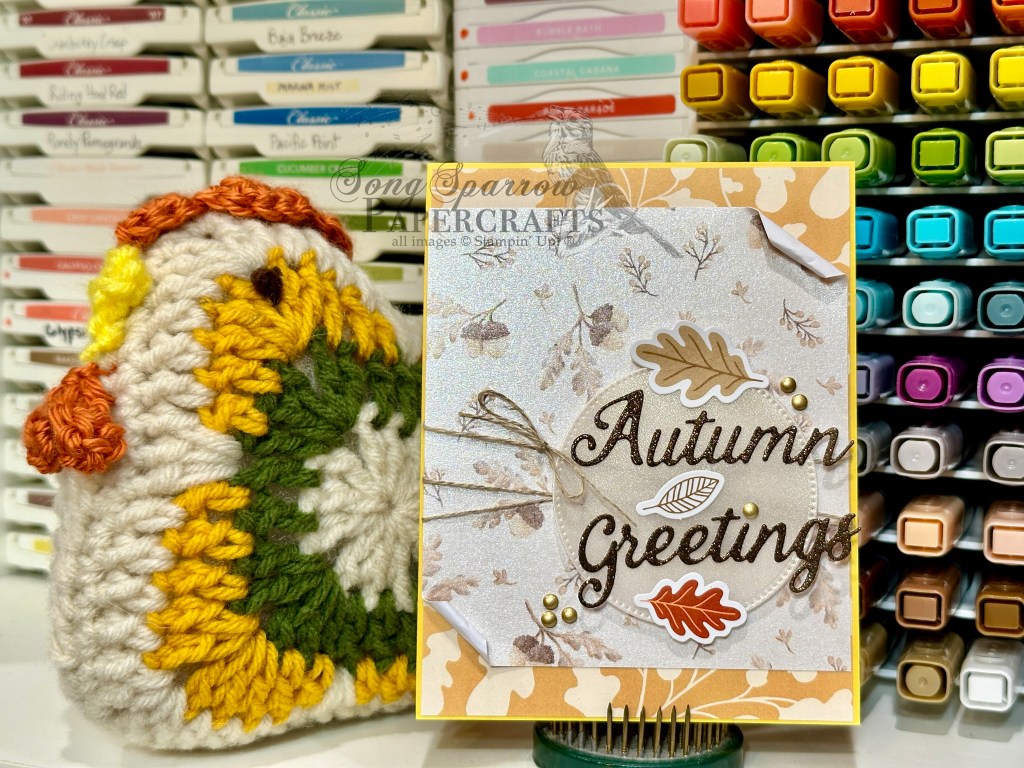
This week we’re touring all the holidays and today we’re dreaming of the cooler days of autumn! With a little inspiration from Stampin Dolce over on the Instas, we’re pairing up the August Product of the Month with some fall-inspired ephemera.
We get started with a base of Crushed Curry cardstock. A sheet of leaf pattern paper from the Painted Patch serves as the backdrop for our focal panel of Glow of Harvest pearlized paper. I love the look of the curled corners. It’s very reminiscent of fall leaves, don’t you think? We wrap our panels with some linen thread before placing the sentiment section. Our sentiment panel starts with a base of Sunset Shimmer vellum cut with the Stylish Shapes circle die. Next we make quick work of the sentiment by cutting the words from Early Espresso glimmer paper using the Words for the Season dies. We finish off with some leaves from the Harvest Hues ephemera pack and gold dots.
I hope you’ll drop by tomorrow to see what holiday products are featured next!
Welcome in on this beautiful Saturday, friends! It’s a stunning day here in North Texas as we’re getting our first real taste of fall weather this weekend. The sun is shining, the air is crisp, the leaves are just beginning to turn. It’s my time of year!
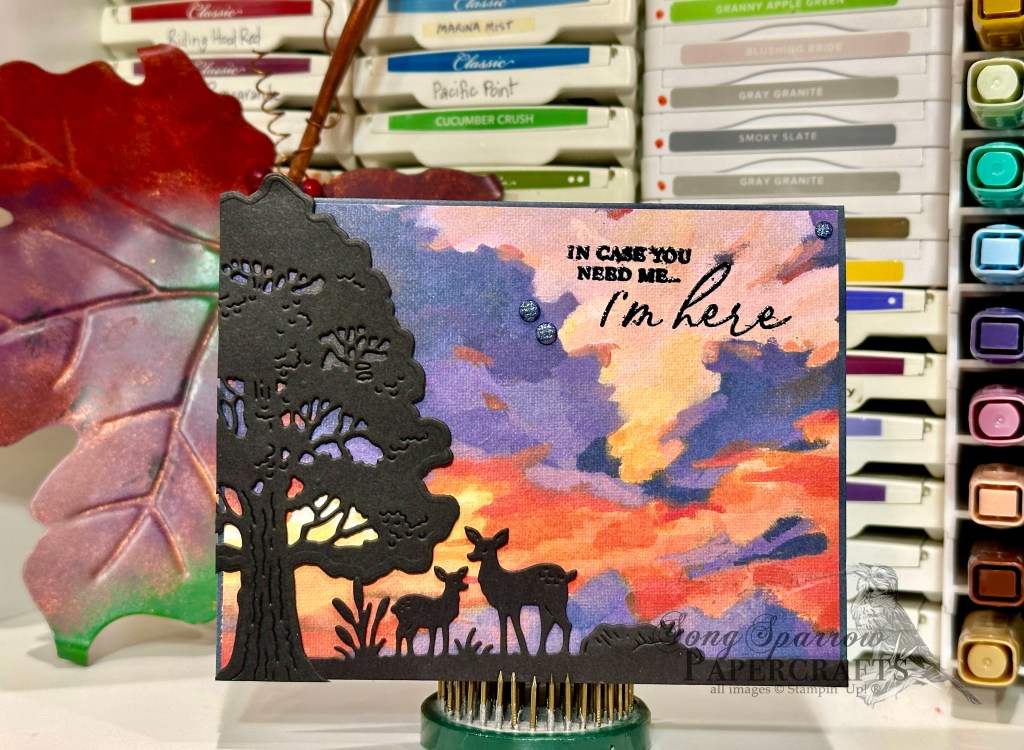
And speaking of fall, we’re closing out this week’s design series where we’ve been using the new Autumn Trees bundle by Stampin’ Up! to create this week’s projects. Today’s super clean & simple card design is inspired by all of the silhouette cards I’ve been seeing lately. It’s such a simple design technique, but it really does pack a punch!
So our design gets started today with a base of Secret Sea cardstock. This is the perfect blend of a blackish-blue that really brings out the moodiness in our beautiful backdrop from the Everyday Skies paper pack. We often see both sunrises and sunsets a lot like this scene, where it’s bright & beautiful and casts the perfect light for silhouettes. And here, our mighty oak and pair of deer are silhouetted by our beautiful sunset on the open prairie. To create this effect, we use the Autumn Trees dies to cut the shapes from black cardstock and then adhere them to our backdrop with dimensionals. I love how this accentuates the shadowing in our scene. The sentiment from the Beautiful Butterflies stamp set is heat embossed in black in top-right corner of our card and we flank the sentiment with some Secret Sea faceted shimmer dots as a finishing touch.
What do you think of this super easy design? I’m going to have to remember the silhouette technique more often with beautiful scene-building sets like this one! I hope you’ve enjoyed this week’s series. I look forward to spending a little more time in the woods next week as we feature some of the new sets that will go live on Tuesday!
Happy Friday, friends! I don’t know about you but I can’t believe that we’re already at the end of October. The last part of the year always feels like it’s on fast forward.
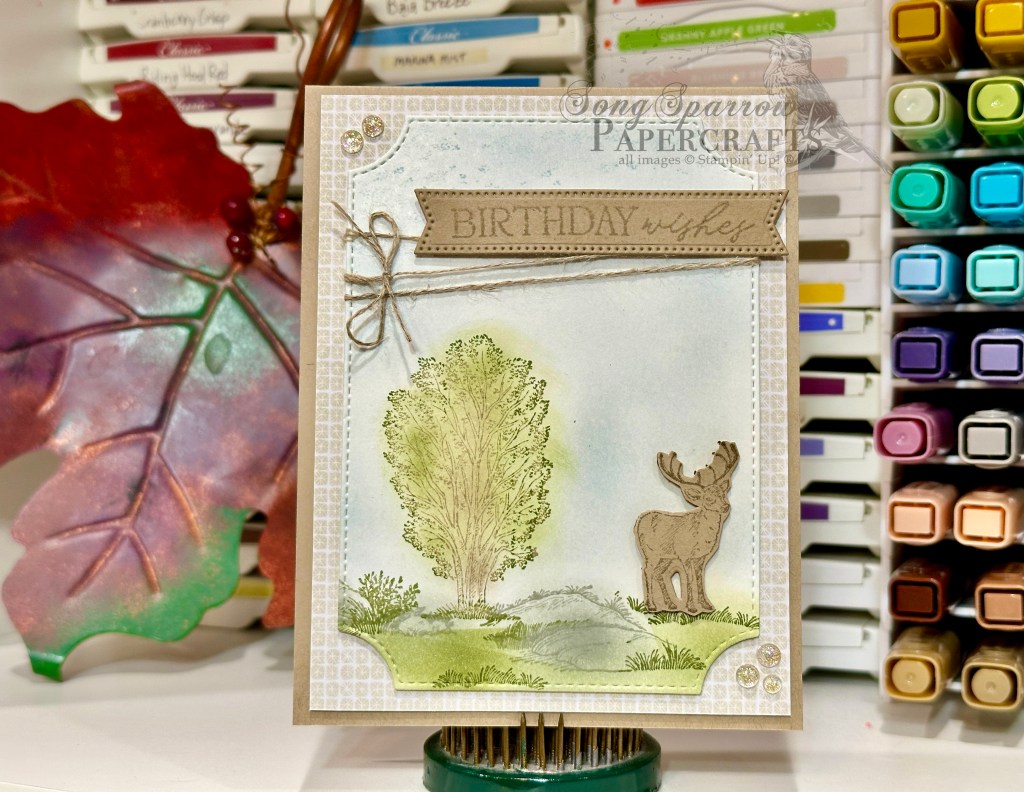
We are continuing our design series for this week using the new Autumn Trees bundle by Stampin’ Up! And today we’re really letting the stamps take center stage in this beautiful masculine design, where we’re pairing our featured bundle with designer series paper and several die sets.
We get started with a base of Crumb Cake cardstock. A sheet of the neutral dot-patterned paper from the Gathering Together paper pack serves as our focal panel backdrop. I stamped the focal panel scene on white cardstock before diecutting it with the largest die from the Branching Out set. I used most of the stamps from the Autumn Trees stamp set to create our tranquil scene and then shaded everything with ink and blending brushes. I love the soft look that this lends. Our deer is stamped on Crumb Cake and then diecut with the coordinating die from the Autumn Trees set and adhered with dimensionals to give some depth to our scene. The sentiment from the 12 Days of Crafting Advent Calendar is stamped on Crumb Cake and then diecut with the Stylish Shapes banner die using the extension method to get the perfect length. The sentiment is adhered with dimensionals over linen thread that is wrapped around the focal panel. And we finish things of with gold iridescent foil dots in opposing corners for a touch of twinkle.
We’ll be wrapping up our autumn series tomorrow. I hope you’ll drop in and see what’s in store!
So glad you’re back, friends! You probably noticed that my day shaped up as I expected and I didn’t have the opportunity to post yesterday. But never fear, the card design I had in mind is about halfway finished and coming your way tomorrow!
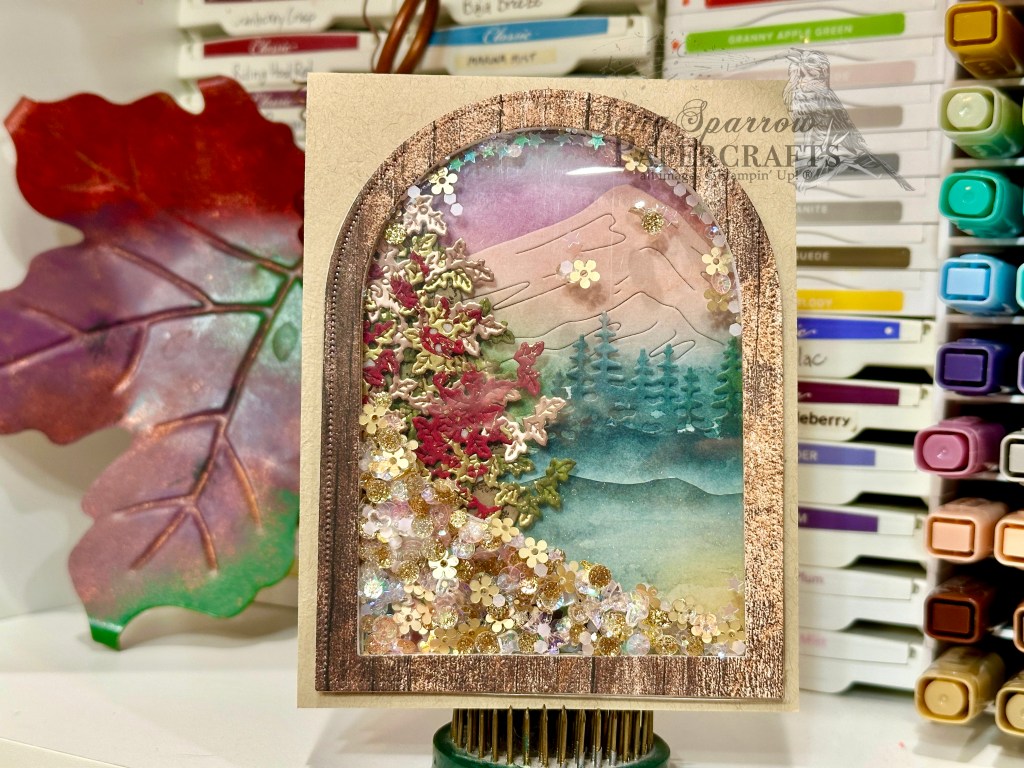
But today, we’re hopping along with the Luv 2 Stamp Group over on Instagram. And our card today continues our design series using the Autumn Trees bundle by Stampin’ Up! I thought it would be fun to do a variation of last month’s window card design by making it a double flap card to make room for a nice note section on the inside panel. Let’s take a look!
We get started with a base of Crumb Cake cardstock and cut a window using the largest Everyday Arches die. To make the shaker section, we cut a window frame from a sheet of Country Woods patterned paper using the largest and third largest dies to make the frame wide enough for our two-sided tape to adhere the window sheet. The front window frame is adhered directly to the card front. The second frame and window sheet is assembled and then we use adhesive foam strips to create the box in which the shaker elements will move about inside our window. Before adhering this window frame, we add our shaker bits to the back of the outside window sheet and then seal everything up with the inside window frame. I used the new shaker bits that I scored from my SU! 12 Days of Crafting Advent Calendar.
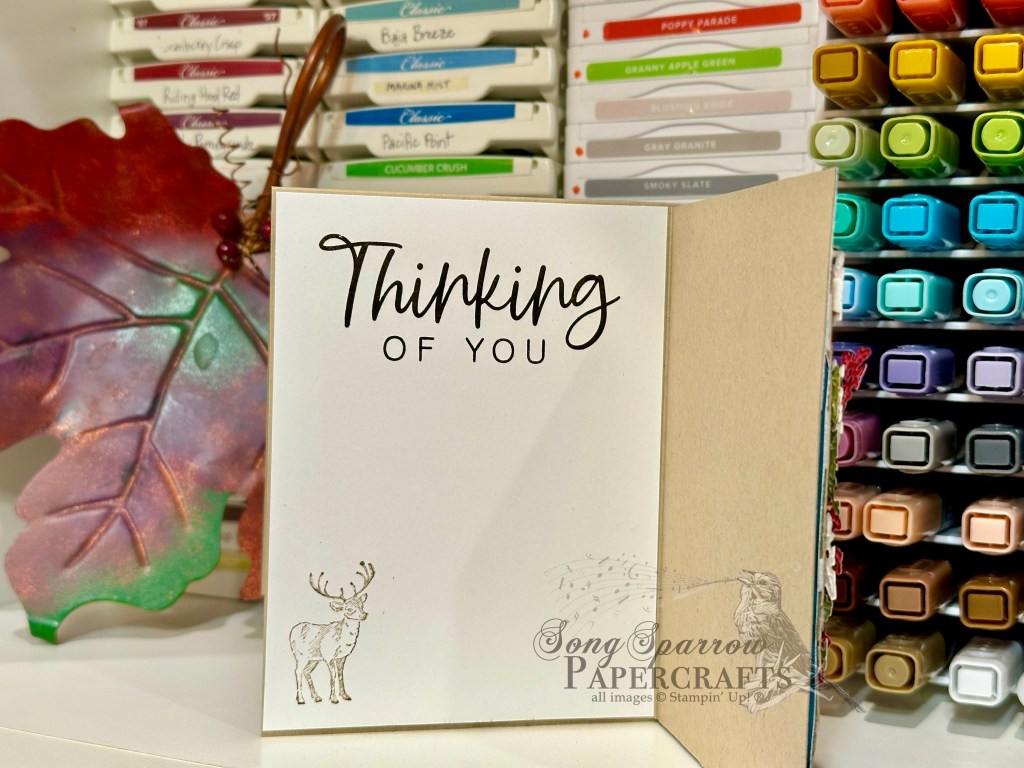
Now we move on to our inside fold-out panel where we build a fall scene using the Autumn Leaves bundle and a sheet of Thoughtful Journey patterned paper. The base is a quarter sheet that is cut a half-inch wider to allow for the small fold-over flap that is adhered to the inside card base under the message panel. We get started by building our background scene. The mountain is cut directly from our patterned paper using the Scenic Adventure dies. The top piece of the sky is cut down to size and then adhered at the top of our panel and then the mountain section is adhered over it with dimensionals. I added Wink of Stella to the portion resembling a lake, giving it time to dry while we work on the forefront of our scene.
From another sheet of Thoughtful Journey, we cut a small section of trees using the Light & Wonder die set and adhered at the water’s edge and just under the mountain ridge. Using a small scrap of black cardstock, we use the deer die from the Autumn Trees set to cut the doe and fawn. They’re adhered directly to the background. Next up, I stamped the tree image from Autumn Trees in Early Espresso on the slightly smaller quarter sheet of Crumb Cake and shaded the trunk with blending brushes and Crumb Cake ink. We cut leaves in several different colors. I especially love the look of the red and green leaves from the Season of Elegance paper. Each set of colored leaves is adhered on top of the other with dimensionals and slightly askew of one another to create lots of depth. The tree is then adhered at the base of our scenic panel along the edge using dimensionals. We finish things off with some grass in the foreground that is cut from the other sheet of Thoughtful Journey using the Scenic Adventure die. This panel is then adhered to our inside panel with tear-n-tape along the small fold-over flap. The inside message panel has a small buck in the bottom corner and the sentiment from With You in Mind at the top.
This card is even prettier in person. And I thought you might enjoy seeing it in action to get an idea. *grin*
Today’s card is a part of the Luv 2 Stamp Group Instagram Hop, which goes live at 9 AM Pacific Time (PST). Click here to head over to my Instagram feed at 9 AM Pacific/11 AM Central and check out what the other demos in our L2S Group have created for you today!
Howdy, friends, and welcome back! I’m so excited to be bringing you some fall cards this week. I almost feel like that maybe inspired Mother Nature to send us our first real cool weather here in North Texas. *snicker* If only that were true, but we really are cooling off here and the trees are starting to look like the fall show is imminent. Man, I love fall!
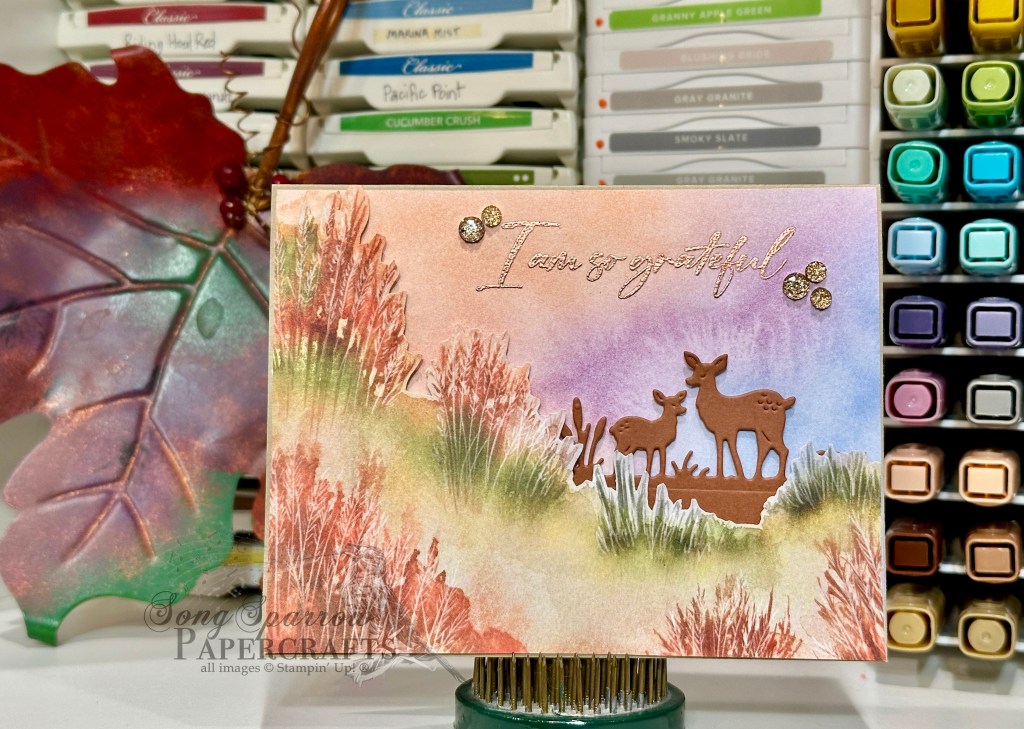
This week is all about autumn as we pull together things in our crafty stash that pair well with the new Stampin’ Up! bundle called Autumn Trees. This is a gorgeous stamp and die set that allows you to finish all of your fall scenes with the perfect complimentary trees and things. And today the dies from the set take center stage in this very clean & simple (and incredibly easy) design.
We get started with a base of Crumb Cake cardstock. I left a teensy border of it exposed around the edges of the card to pull out some of the lighter colors in our sheet of Thoughtful Journey patterned paper. This sheet of fall grasses provides the perfect meadow backdrop for our doe and fawn pair from the Autumn Trees die set. The pair of deer are cut from a sheet of Cajun Craze cardstock and tucked behind our grassy panel to give the effect of them standing in an open part of the meadow. To create this look, I used the full 6×6 sheet of Thoughtful Journey and started by cutting around the top set of grasses to allow us to create some depth of field by adhering it over the top portion of the sheet with dimensionals. The sentiment from the Sentimental Framing stamp set is heat embossed in copper at the top of the sheet. A few drusy embellishments flank either side of the sentiment to draw the eye in and provide some sparkle in the sky.
And that’s all there is to this design. What do you think of this simple scene? The paper and dies really do all the work here with a stunningly simple result!
I have a full day at the office tomorrow but hope to have some time to bring you another clean & simple design using the Autumn Trees set. But you definitely want to tune in on Thursday when I’ll be bringing you a fun fold design as part of the Luv 2 Stamp Group Instahop. It’ll be worth the wait if it turns out half as well as the design idea!
We’re rounding out this week’s design series with some home decor. I have a craft show in a couple of weeks, and I’m still working feverishly to prepare all of the things I have on my display wish list. Last year was the first year I offered home decor items, and they generated a lot of interest.
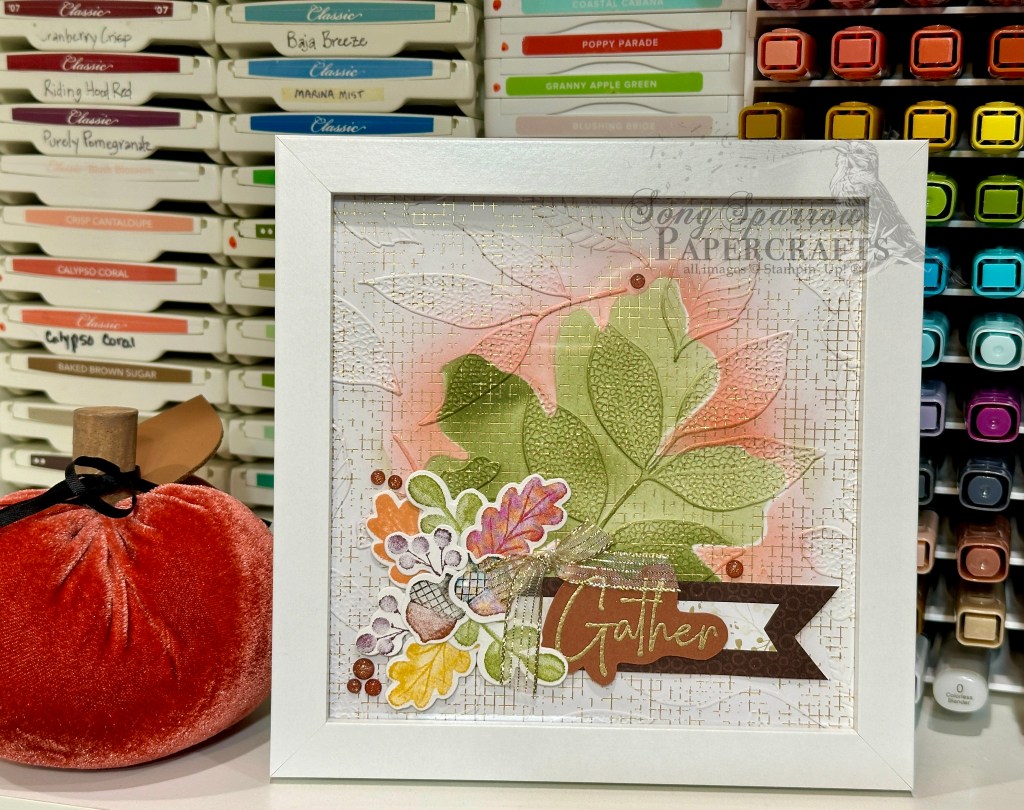
Today’s design is inspired by a recent post on the Stampin’ Up! official Instagram page. I, of course, put my own twist on it. And isn’t that the best thing about inspiration?! So let’s dig in and see how this comes together.
This is a 6×6 frame I found on Amazon. So we get started with a 6×6 card base. HINT: Before you fully commit to your layout, be sure that it shows through the frame as you intend. I neglected this step this time so my Cajun Craze base – that was supposed to be a small border around the focal panel – doesn’t show at all. *womp-womp*
The focal panel base is a sheet of the gold foil hashed patterned paper from the Nature’s Sweetness paper pack. I decided to use the retired Changing Leaves embossing folder to create the background texture because I wanted the pattern to more closely tie with the image theme. The focal image is an image rub using blending brushes.
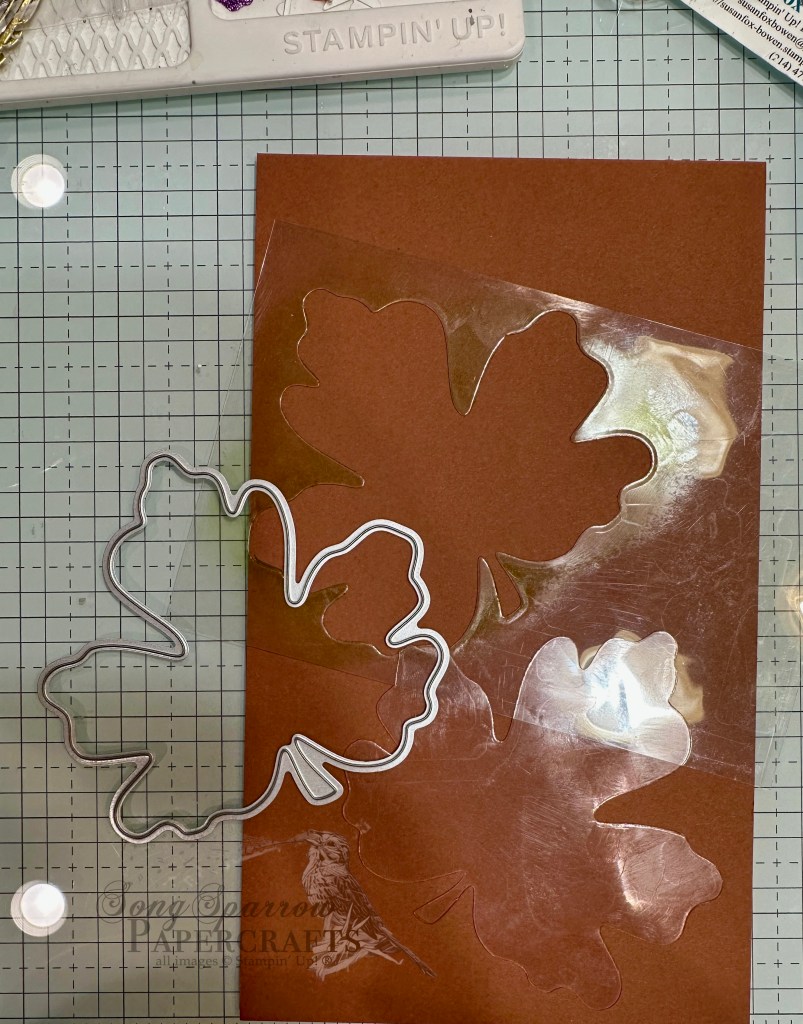
I decided to create a mask and negative that I could use more than once using some of the acetate sheets I had saved in my stash. When I unpack my acrylic stamps, I always save the thicker acetate sheet to use for shakers and window cards later on. It’s the perfect thickness for a mask and negative too! I used the larger leaf from the Gathering Moments dies to cut through the acetate. I used both pieces to create my focal image. The negative creates the center image, which is rubbed in Mossy Meadow, and then the shape is used to create the highlight around the leaf image, which is rubbed in Flirty Flamingo.
The sentiment panel has several layers. The backdrop is a banner created from two strips of the Gathering Together patterned paper. The sentiment from the Gathering Moments set is stamped in Versamark on Cajun Craze and then heat embossed in gold. I cut around the sentiment using paper snips. The fall foliage arrangement on the left is created using the Gathering Moments images and dies. We finish up with a bow of gold striped iridescent ribbon and some Cajun Craze & gold dots.
I hope you’ve enjoyed this week’s series. I’ll be in and out over the next two weeks as I prepare for the big educational program at the office and then head off to the woods for a little family fall break get-away. But I have new goodies arriving that I hope to be able to show you so don’t go too far!
Although the weatherman tells us it’s fall here in North Texas, in usual Texas fashion, summer refuses to go out quietly. While it’s certainly not August, we’re not quite into the glorious chill of fall mornings or altogether pleasant days either.
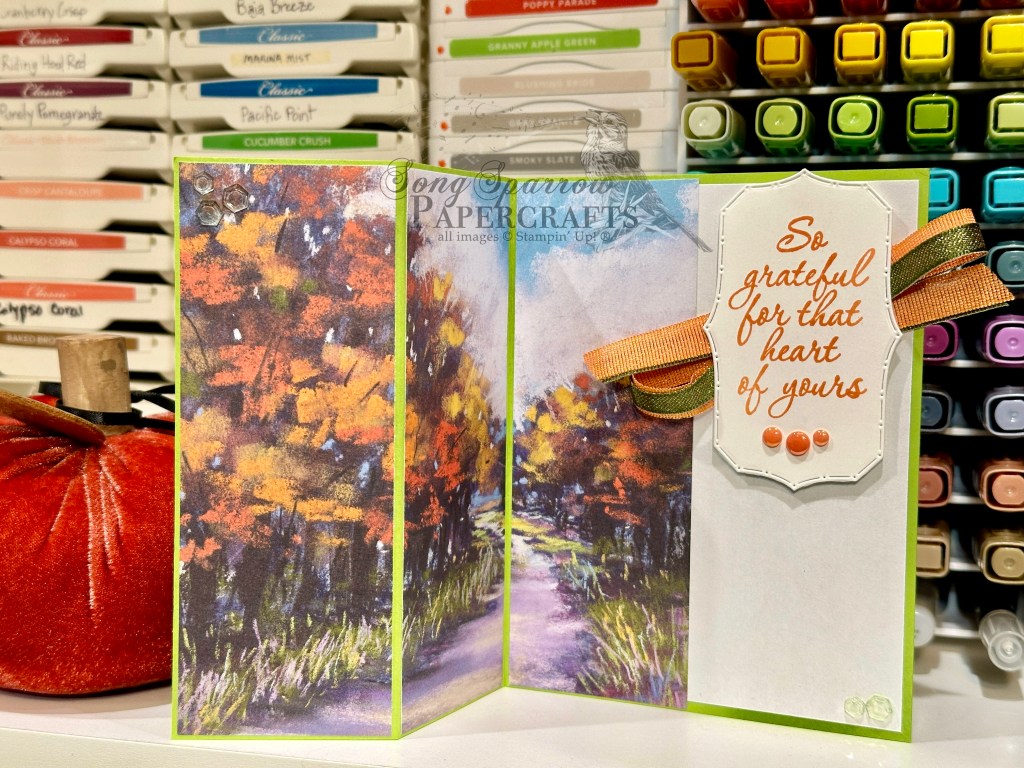
But that won’t stop us from continuing this week’s design series – all about fall. And today we’re revisiting the beautiful Splendid Autumn patterned paper and pairing it up with the Label Me Grateful stamps to create a super easy fun fold card. When you have paper as pretty as this, finding a design that takes full advantage is a must! And the simple z-fold design allows you to use the full sheet of paper.
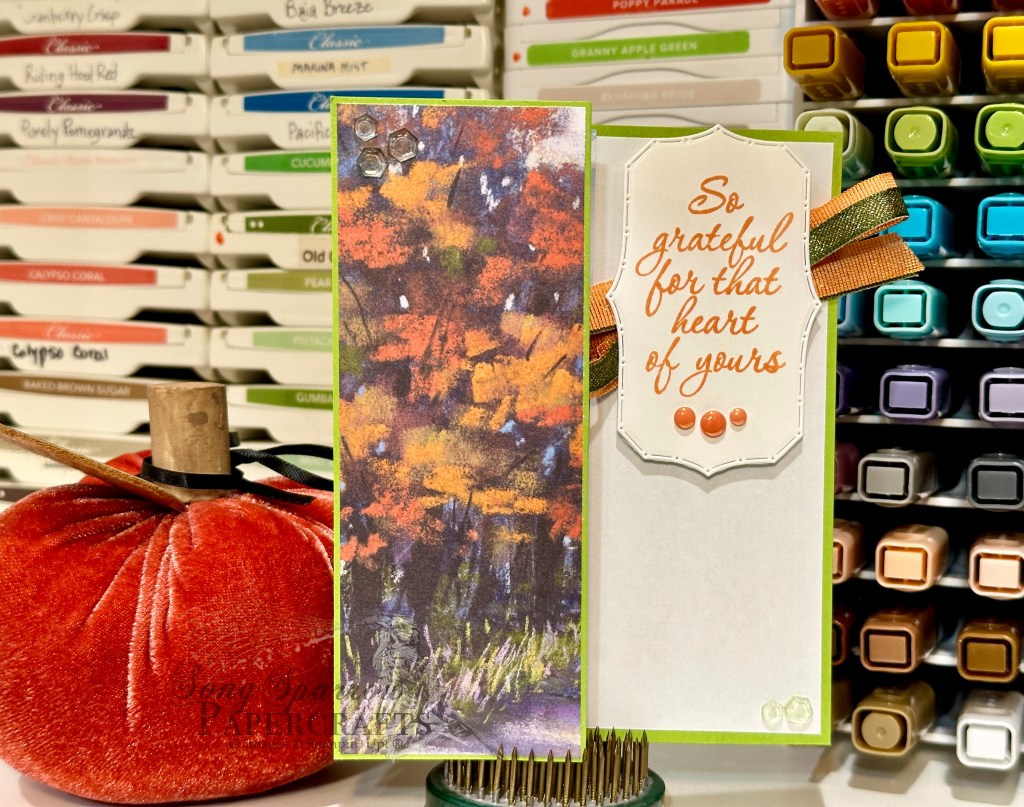
I chose Granny Apple Green as the card base. It really allows all of the colors of the leaves and flowering grasses in our patterned paper to shine. The Splendid Autumn sheet features a winding path through a small grove of fall trees. And as you open the fold, you see the full scene. The sentiment panel is facing front when the card is closed. The sentiment from the Label Me Grateful stamp set is stamped in Timid Tiger ink on white cardstock and then cut out with the Traditional Labels dies. A few In Color flat pearls add the perfect finishing touch to the sentiment panel. It’s adhered over a bow of Timid Tiger and Mossy Meadow & Gold ribbon using dimensionals. We add some green hexagons in opposing corners of the card front. I chose the lightest color so they’re more sparkle than they are a pop of color.
What do you think of this clean & simple design? I hope you’ll tune in for tomorrow’s Sketchy Fridays to see what else we can pull together with our crafty stash of fall-inspired products.
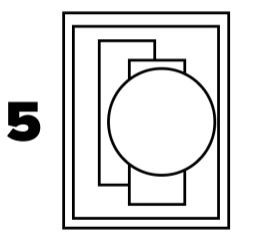
This week, we’re exploring our fall-themed crafty stash as we create our projects. And today, the Gathering Together suite is taking center stage. Because I’m a little pressed for time today, I decided to make things a lot simpler by using a sketch to get started. So I’m using Sketch #5 from the recent SU! Craft-a-Long, which takes the cards on page 42 of the Holiday Mini Catalog and turns them into versatile sketches.
Screenshot
Sketch #5 is the perfect way to use a few scraps of patterned paper and allows for an easy diecut focal point. Here we start with a base of white cardstock, which isn’t visible on the card front itself. A sheet of the white woodgrain pattern from the Country Woods paper pack. A sheet of the lovely Gathering Together paper serves as the backdrop for all of our focal elements. The Cajun Craze leaf pattern is the background panel, while the plaid and foliage strips provide the grounding for the focal leaf element. The leaf is cut from a combination of Gathering Together and Country Woods papers using the Gathering Moments die. To help the pattern leaf stand out against the busy background, I used a darker woodgrain-patterned leaf to provide the shadowing, which really brings out the brown details of the pattern nicely. The sentiment from the Simply Said stamp set is heat embossed in copper and then adhered over gold cording with dimensionals. Some Cajun Craze & Gold dots are scattered around the card front to provide the perfect pops of twinkly color.
Tune in tomorrow to see some more autumn inspiration!
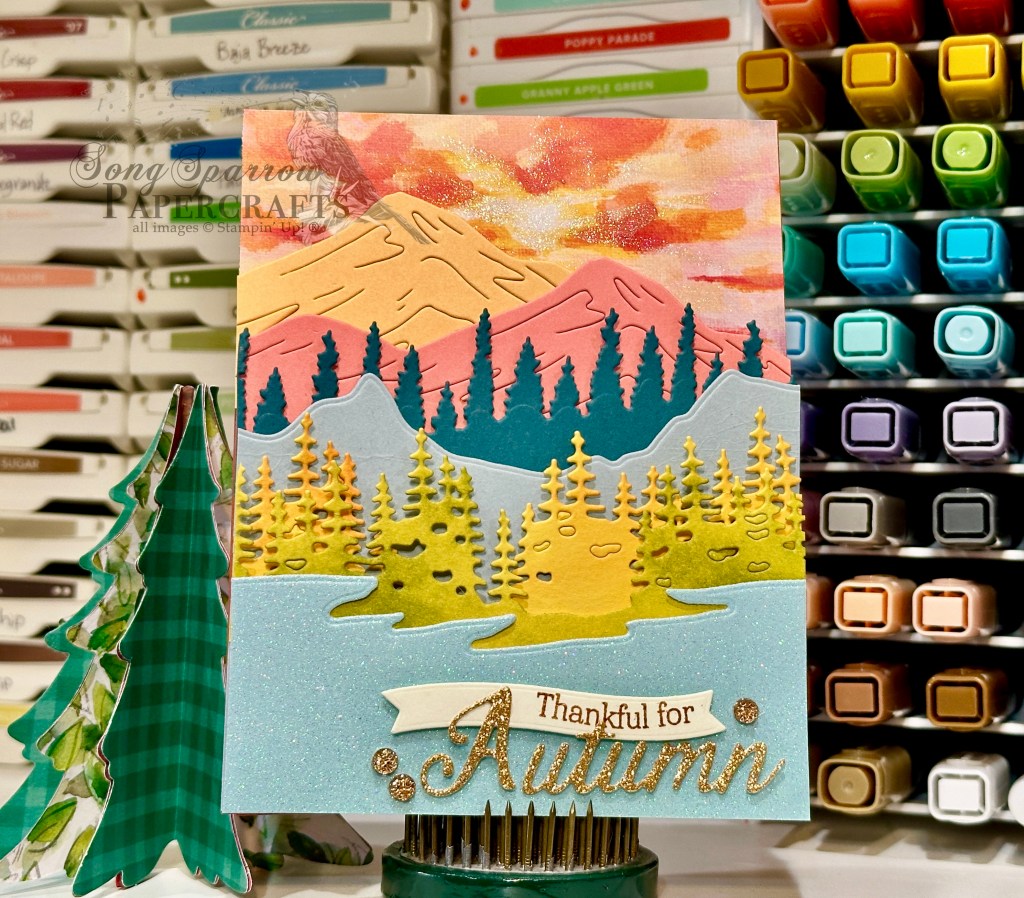
I’m having a good time with this week’s design theme – we’re all about fall! And today’s card is inspired by the Luv 2 Stamp Group monthly team challenge where I had to create a Thanksgiving card. Being in the heart of Autumn, my mind immediately goes to beautiful foliage when I think of Thanksgiving and, of course, we all tend to focus on what we are thankful for. So being that fall happens to my favorite season of the year, it only made sense to tie all of that together!
I drew inspiration from a gorgeous card I saw over on Insta from @didyoustamptoday. I really wanted to bring out the thoughts of fall when I worked on my version of the card. And so I drew on all of my favorite fall hues when selecting the foliage elements. I also wanted to recreate that sunrise/sunset feel from the inspiration card, which translates into some beautifully colored mountains in the background. And, of course, Everyday Skies and Wink of Stella do all of the work with the twinkling of the sun over the mountains.
So although it’s not readily visible on the front panel, we get started with a base of Cajun Craze cardstock. Our mountain scene is built with a combination of the Scenic Adventure and Lights & Wonder dies. I chose Peach Pie and Flirty Flamingo for the tall mountain range in the back that is catching all of the sun’s rays and they’re cut with the larger mountain die in the Scenic Adventure set. A sheet of the Everyday Skies gives us the gorgeous sunrise, and some carefully placed Wink of Stella draws the eye in to the rising sun and its rays peeking up over the range. To give the look of division between mountain ridges, I added the tree line of Pretty Peacock pines next. The next ridge is cut using the largest mountain die in the Lights & Wonder set. And then we have our trees along the water’s edge. These trees are cut from Daffodil Delight using Lights & Wonder die, and then to give the look of changing leaf colors, I used my blending brushes to give touches of Old Olive and Timid Tiger. The lake is cut from a sheet of the blue pastel ombre glimmer paper with the Lights & Wonder die. Each of our layers of mountains and trees are separated by dimensionals to give a more realistic depth of field. The sentiment is a combination of the Words for the Season dies and Beautiful Pumpkin sentiment stamp. A few drusy embellishments on either side really let the Autumn pop.
While some scene cards take a bit of time to build, I find it fun to stretch the creative wings and see if I can bring life to the picture in my mind’s eye. Do you like to undertake designs that take a bit more time sometimes? Tomorrow we’re going to get started with a sketch and see where that takes us. I hope you’ll drop by and check it out!

![Crumb Cake 8-1/2" X 11" Cardstock [ 120953 ]](https://assets1.tamsnetwork.com/images/EC042017NF/120953s.jpg "Crumb Cake 8-1/2\" X 11\" Cardstock [ 120953 ]")
![Cajun Craze 8-1/2" X 11" Cardstock [ 119684 ]](https://assets1.tamsnetwork.com/images/EC042017NF/119684s.jpg "Cajun Craze 8-1/2\" X 11\" Cardstock [ 119684 ]")
![Painted Patch 12" X 12" (30.5 X 30.5 Cm) Designer Series Paper [ 168430 ]](https://assets1.tamsnetwork.com/images/EC042017NF/168430s.jpg "Painted Patch 12\" X 12\" (30.5 X 30.5 Cm) Designer Series Paper [ 168430 ]")
![Timeless Metallic 12" X 12" (30.5 X 30.5 Cm) Specialty Paper [ 168548 ]](https://assets1.tamsnetwork.com/images/EC042017NF/168548s.jpg "Timeless Metallic 12\" X 12\" (30.5 X 30.5 Cm) Specialty Paper [ 168548 ]")
![Autumn Woodland 12" X 12" (30.5 X 30.5 Cm) Glimmer Specialty Paper [ 168335 ]](https://assets1.tamsnetwork.com/images/EC042017NF/168335s.jpg "Autumn Woodland 12\" X 12\" (30.5 X 30.5 Cm) Glimmer Specialty Paper [ 168335 ]")
![Tile Garden Dies [ 168573 ]](https://assets1.tamsnetwork.com/images/EC042017NF/168573s.jpg "Tile Garden Dies [ 168573 ]")
![Harvest Hues Mix & Match Ephemera Pack [ 168495 ]](https://assets1.tamsnetwork.com/images/EC042017NF/168495s.jpg "Harvest Hues Mix & Match Ephemera Pack [ 168495 ]")
![Sincerely Noted Mix & Match Ephemera Pack (English) [ 167706 ]](https://assets1.tamsnetwork.com/images/EC042017NF/167706s.jpg "Sincerely Noted Mix & Match Ephemera Pack (English) [ 167706 ]")
![Pearlized Faceted Circles [ 166978 ]](https://assets1.tamsnetwork.com/images/EC042017NF/166978s.jpg "Pearlized Faceted Circles [ 166978 ]")
![Gold Striped 3/8" (1 Cm) Mesh Ribbon [ 165599 ]](https://assets1.tamsnetwork.com/images/EC042017NF/165599s.jpg "Gold Striped 3/8\" (1 Cm) Mesh Ribbon [ 165599 ]")
![Stampin' Dimensionals [ 104430 ]](https://assets1.tamsnetwork.com/images/EC042017NF/104430s.jpg "Stampin' Dimensionals [ 104430 ]")
![Crushed Curry 8-1/2" X 11" Cardstock [ 131199 ]](https://assets1.tamsnetwork.com/images/EC042017NF/131199s.jpg "Crushed Curry 8-1/2\" X 11\" Cardstock [ 131199 ]")
![Glow Of Harvest 12" X 12" (30.5 X 30.5 Cm) Specialty Designer Series Paper [ 168598 ]](https://assets1.tamsnetwork.com/images/EC042017NF/168598s.jpg "Glow Of Harvest 12\" X 12\" (30.5 X 30.5 Cm) Specialty Designer Series Paper [ 168598 ]")
![Sunset Shimmer Vellum 12" X 12" (30.5 X 30.5 Cm) Specialty Paper [ 167784 ]](https://assets1.tamsnetwork.com/images/EC042017NF/167784s.jpg "Sunset Shimmer Vellum 12\" X 12\" (30.5 X 30.5 Cm) Specialty Paper [ 167784 ]")
![Words For The Season Dies (English) [ 165797 ]](https://assets1.tamsnetwork.com/images/EC042017NF/165797s.jpg "Words For The Season Dies (English) [ 165797 ]")
![Gold Adhesive Backed Dots [ 168467 ]](https://assets1.tamsnetwork.com/images/EC042017NF/168467s.jpg "Gold Adhesive Backed Dots [ 168467 ]")
![Linen Thread [ 104199 ]](https://assets1.tamsnetwork.com/images/EC042017NF/104199s.jpg "Linen Thread [ 104199 ]")
![Mini Stampin' Dimensionals [ 144108 ]](https://assets1.tamsnetwork.com/images/EC042017NF/144108s.jpg "Mini Stampin' Dimensionals [ 144108 ]")
![Secret Sea 8 1/2" X 11" Cardstock [ 165624 ]](https://assets1.tamsnetwork.com/images/EC042017NF/165624s.jpg "Secret Sea 8 1/2\" X 11\" Cardstock [ 165624 ]")
![Basic Black 8-1/2" X 11" Cardstock [ 121045 ]](https://assets1.tamsnetwork.com/images/EC042017NF/121045s.jpg "Basic Black 8-1/2\" X 11\" Cardstock [ 121045 ]")
![Everyday Skies 6" X 6" (15.2 X 15.2 Cm) Designer Series Paper [ 164622 ]](https://assets1.tamsnetwork.com/images/EC042017NF/164622s.jpg "Everyday Skies 6\" X 6\" (15.2 X 15.2 Cm) Designer Series Paper [ 164622 ]")
![Autumn Trees Dies [ 165899 ]](https://assets1.tamsnetwork.com/images/EC042017NF/165899s.jpg "Autumn Trees Dies [ 165899 ]")
![Beautiful Butterflies Photopolymer Stamp Set (English) [ 164608 ]](https://assets1.tamsnetwork.com/images/EC042017NF/164608s.jpg "Beautiful Butterflies Photopolymer Stamp Set (English) [ 164608 ]")
![Versamark Pad [ 102283 ]](https://assets1.tamsnetwork.com/images/EC042017NF/102283s.jpg "Versamark Pad [ 102283 ]")
![Basics Wow! Embossing Powder [ 165679 ]](https://assets1.tamsnetwork.com/images/EC042017NF/165679s.jpg "Basics Wow! Embossing Powder [ 165679 ]")
![Charming Shimmer Faceted Dots [ 166139 ]](https://assets1.tamsnetwork.com/images/EC042017NF/166139s.jpg "Charming Shimmer Faceted Dots [ 166139 ]")
![Basic White 8 1/2" X 11" Cardstock [ 166780 ]](https://assets1.tamsnetwork.com/images/EC042017NF/166780s.jpg "Basic White 8 1/2\" X 11\" Cardstock [ 166780 ]")
![Gathering Together 12" X 12" (30.5 X 30.5 Cm) Specialty Designer Series Paper [ 165969 ]](https://assets1.tamsnetwork.com/images/EC042017NF/165969s.jpg "Gathering Together 12\" X 12\" (30.5 X 30.5 Cm) Specialty Designer Series Paper [ 165969 ]")
![Autumn Trees Cling Stamp Set [ 165896 ]](https://assets1.tamsnetwork.com/images/EC042017NF/165896s.jpg "Autumn Trees Cling Stamp Set [ 165896 ]")
![Crumb Cake Classic Stampin' Pad [ 147116 ]](https://assets1.tamsnetwork.com/images/EC042017NF/147116s.jpg "Crumb Cake Classic Stampin' Pad [ 147116 ]")
![Mossy Meadow Classic Stampin' Pad [ 147111 ]](https://assets1.tamsnetwork.com/images/EC042017NF/147111s.jpg "Mossy Meadow Classic Stampin' Pad [ 147111 ]")
![Cloud Cover Classic Stampin' Ink Refill [ 165279 ]](https://assets1.tamsnetwork.com/images/EC042017NF/165279s.jpg "Cloud Cover Classic Stampin' Ink Refill [ 165279 ]")
![Branching Out Dies [ 165775 ]](https://assets1.tamsnetwork.com/images/EC042017NF/165775s.jpg "Branching Out Dies [ 165775 ]")
![Stylish Shapes Dies [ 159183 ]](https://assets1.tamsnetwork.com/images/EC042017NF/159183s.jpg "Stylish Shapes Dies [ 159183 ]")
![Iridescent Foil Gems [ 162842 ]](https://assets1.tamsnetwork.com/images/EC042017NF/162842s.jpg "Iridescent Foil Gems [ 162842 ]")
![Small Blending Brushes [ 160518 ]](https://assets1.tamsnetwork.com/images/EC042017NF/160518s.jpg "Small Blending Brushes [ 160518 ]")

![Crumb Cake 12" X 12" (30.5 X 30.5 Cm) Cardstock [ 166787 ]](https://assets1.tamsnetwork.com/images/EC042017NF/166787s.jpg "Crumb Cake 12\" X 12\" (30.5 X 30.5 Cm) Cardstock [ 166787 ]")
![Country Woods 12" X 12" (30.5 X 30.5 Cm) Designer Series Paper [ 163393 ]](https://assets1.tamsnetwork.com/images/EC042017NF/163393s.jpg "Country Woods 12\" X 12\" (30.5 X 30.5 Cm) Designer Series Paper [ 163393 ]")
![Thoughtful Journey 6" X 6" (15.2 X 15.2 Cm) Designer Series Paper [ 163303 ]](https://assets1.tamsnetwork.com/images/EC042017NF/163303s.jpg "Thoughtful Journey 6\" X 6\" (15.2 X 15.2 Cm) Designer Series Paper [ 163303 ]")
![Season Of Elegance 12" X 12" (30.5 X 30.5 Cm) Specialty Designer Series Paper [ 164144 ]](https://assets1.tamsnetwork.com/images/EC042017NF/164144s.jpg "Season Of Elegance 12\" X 12\" (30.5 X 30.5 Cm) Specialty Designer Series Paper [ 164144 ]")
![Window Sheets [ 142314 ]](https://assets1.tamsnetwork.com/images/EC042017NF/142314s.jpg "Window Sheets [ 142314 ]")
![With You In Mind Photopolymer Stamp Set (English) [ 164747 ]](https://assets1.tamsnetwork.com/images/EC042017NF/164747s.jpg "With You In Mind Photopolymer Stamp Set (English) [ 164747 ]")
![Autumn Trees Bundle [ 165900 ]](https://assets1.tamsnetwork.com/images/EC042017NF/165900s.jpg "Autumn Trees Bundle [ 165900 ]")
![Everyday Arches Dies [ 164629 ]](https://assets1.tamsnetwork.com/images/EC042017NF/164629s.jpg "Everyday Arches Dies [ 164629 ]")
![Light & Wonder Dies [ 165762 ]](https://assets1.tamsnetwork.com/images/EC042017NF/165762s.jpg "Light & Wonder Dies [ 165762 ]")
![Scenic Adventure Dies [ 165467 ]](https://assets1.tamsnetwork.com/images/EC042017NF/165467s.jpg "Scenic Adventure Dies [ 165467 ]")
![Clear Wink Of Stella Glitter Brush [ 141897 ]](https://assets1.tamsnetwork.com/images/EC042017NF/141897s.jpg "Clear Wink Of Stella Glitter Brush [ 141897 ]")
![Foam Adhesive Strips [ 141825 ]](https://assets1.tamsnetwork.com/images/EC042017NF/141825s.jpg "Foam Adhesive Strips [ 141825 ]")
![Sentimental Framing Photopolymer Stamp Set (English) [ 165475 ]](https://assets1.tamsnetwork.com/images/EC042017NF/165475s.jpg "Sentimental Framing Photopolymer Stamp Set (English) [ 165475 ]")
![Metallics Wow! Embossing Powder [ 165678 ]](https://assets1.tamsnetwork.com/images/EC042017NF/165678s.jpg "Metallics Wow! Embossing Powder [ 165678 ]")
![Drusy Adhesive Backed Embellishments [ 164223 ]](https://assets1.tamsnetwork.com/images/EC042017NF/164223s.jpg "Drusy Adhesive Backed Embellishments [ 164223 ]")
![Nature's Sweetness 12" X 12" (30.5 X 30.5 Cm) Specialty Designer Series Paper [ 162616 ]](https://assets1.tamsnetwork.com/images/EC042017NF/162616s.jpg "Nature's Sweetness 12\" X 12\" (30.5 X 30.5 Cm) Specialty Designer Series Paper [ 162616 ]")
![Changing Leaves Hybrid Embossing Folder [ 164138 ]](https://assets1.tamsnetwork.com/images/EC042017NF/164138s.jpg "Changing Leaves Hybrid Embossing Folder [ 164138 ]")
![Gathering Moments Bundle (English) [ 165980 ]](https://assets1.tamsnetwork.com/images/EC042017NF/165980s.jpg "Gathering Moments Bundle (English) [ 165980 ]")
![Flirty Flamingo Classic Stampin' Pad [ 147052 ]](https://assets1.tamsnetwork.com/images/EC042017NF/147052s.jpg "Flirty Flamingo Classic Stampin' Pad [ 147052 ]")
![Real Red Classic Stampin' Pad [ 147084 ]](https://assets1.tamsnetwork.com/images/EC042017NF/147084s.jpg "Real Red Classic Stampin' Pad [ 147084 ]")
![Crushed Curry Classic Stampin' Pad [ 147087 ]](https://assets1.tamsnetwork.com/images/EC042017NF/147087s.jpg "Crushed Curry Classic Stampin' Pad [ 147087 ]")
![Timid Tiger Classic Stampin' Pad [ 165278 ]](https://assets1.tamsnetwork.com/images/EC042017NF/165278s.jpg "Timid Tiger Classic Stampin' Pad [ 165278 ]")
![Old Olive Classic Stampin' Pad [ 147090 ]](https://assets1.tamsnetwork.com/images/EC042017NF/147090s.jpg "Old Olive Classic Stampin' Pad [ 147090 ]")
![Blackberry Bliss Classic Stampin' Pad [ 147092 ]](https://assets1.tamsnetwork.com/images/EC042017NF/147092s.jpg "Blackberry Bliss Classic Stampin' Pad [ 147092 ]")
![Early Espresso Classic Stampin' Pad [ 147114 ]](https://assets1.tamsnetwork.com/images/EC042017NF/147114s.jpg "Early Espresso Classic Stampin' Pad [ 147114 ]")
![Cajun Craze Classic Stampin' Pad [ 147085 ]](https://assets1.tamsnetwork.com/images/EC042017NF/147085s.jpg "Cajun Craze Classic Stampin' Pad [ 147085 ]")
![Cajun Craze & Gold Dots [ 165984 ]](https://assets1.tamsnetwork.com/images/EC042017NF/165984s.jpg "Cajun Craze & Gold Dots [ 165984 ]")
![Mini Glue Dots [ 103683 ]](https://assets1.tamsnetwork.com/images/EC042017NF/103683s.jpg "Mini Glue Dots [ 103683 ]")
![Granny Apple Green 8-1/2" X 11" Cardstock [ 146990 ]](https://assets1.tamsnetwork.com/images/EC042017NF/146990s.jpg "Granny Apple Green 8-1/2\" X 11\" Cardstock [ 146990 ]")
![Splendid Autumn 6" X 6" (15.2 X 15.2 Cm) Designer Series Paper [ 164173 ]](https://assets1.tamsnetwork.com/images/EC042017NF/164173s.jpg "Splendid Autumn 6\" X 6\" (15.2 X 15.2 Cm) Designer Series Paper [ 164173 ]")
![Label Me Grateful Cling Stamp Set (English) [ 166108 ]](https://assets1.tamsnetwork.com/images/EC042017NF/166108s.jpg "Label Me Grateful Cling Stamp Set (English) [ 166108 ]")
![Traditional Labels Dies [ 165864 ]](https://assets1.tamsnetwork.com/images/EC042017NF/165864s.jpg "Traditional Labels Dies [ 165864 ]")
![Timid Tiger 3/8" (1 Cm) Faux Linen Ribbon [ 165275 ]](https://assets1.tamsnetwork.com/images/EC042017NF/165275s.jpg "Timid Tiger 3/8\" (1 Cm) Faux Linen Ribbon [ 165275 ]")
![Mossy Meadow & Gold 1/4" (6.4 Mm) [ 166158 ]](https://assets1.tamsnetwork.com/images/EC042017NF/166158s.jpg "Mossy Meadow & Gold 1/4\" (6.4 Mm) [ 166158 ]")
![2025–2027 In Color™ Flat Pearls [ 165192 ]](https://assets1.tamsnetwork.com/images/EC042017NF/165192s.jpg "2025–2027 In Color™ Flat Pearls [ 165192 ]")
![Shades Of Green Hexagons [ 165233 ]](https://assets1.tamsnetwork.com/images/EC042017NF/165233s.jpg "Shades Of Green Hexagons [ 165233 ]")

![Gathering Moments Dies [ 165979 ]](https://assets1.tamsnetwork.com/images/EC042017NF/165979s.jpg "Gathering Moments Dies [ 165979 ]")
![Simply Said Mix & Match Photopolymer Stamp Set (English) [ 163756 ]](https://assets1.tamsnetwork.com/images/EC042017NF/163756s.jpg "Simply Said Mix & Match Photopolymer Stamp Set (English) [ 163756 ]")
![Gold Twisted Thread [ 164603 ]](https://assets1.tamsnetwork.com/images/EC042017NF/164603s.jpg "Gold Twisted Thread [ 164603 ]")
![Peach Pie 8 1/2" X 11" Cardstock [ 163799 ]](https://assets1.tamsnetwork.com/images/EC042017NF/163799s.jpg "Peach Pie 8 1/2\" X 11\" Cardstock [ 163799 ]")
![Flirty Flamingo 8-1/2" X 11" Cardstock [ 141416 ]](https://assets1.tamsnetwork.com/images/EC042017NF/141416s.jpg "Flirty Flamingo 8-1/2\" X 11\" Cardstock [ 141416 ]")
![Pretty Peacock 8-1/2" X 11" Cardstock [ 150880 ]](https://assets1.tamsnetwork.com/images/EC042017NF/150880s.jpg "Pretty Peacock 8-1/2\" X 11\" Cardstock [ 150880 ]")
![Cloud Cover 8 1/2" X 11" Cardstock [ 165621 ]](https://assets1.tamsnetwork.com/images/EC042017NF/165621s.jpg "Cloud Cover 8 1/2\" X 11\" Cardstock [ 165621 ]")
![Daffodil Delight 8-1/2" X 11" Cardstock [ 119683 ]](https://assets1.tamsnetwork.com/images/EC042017NF/119683s.jpg "Daffodil Delight 8-1/2\" X 11\" Cardstock [ 119683 ]")
![Very Vanilla 8 1/2" X 11" Cardstock [ 166784 ]](https://assets1.tamsnetwork.com/images/EC042017NF/166784s.jpg "Very Vanilla 8 1/2\" X 11\" Cardstock [ 166784 ]")
![Pastel Ombre Glimmer 12" X 12" (30.5 X 30.5 Cm) Specialty Paper [ 164851 ]](https://assets1.tamsnetwork.com/images/EC042017NF/164851s.jpg "Pastel Ombre Glimmer 12\" X 12\" (30.5 X 30.5 Cm) Specialty Paper [ 164851 ]")
![2024–2026 In Color™ Glimmer 12" X 12" (30.5 X 30.5 Cm) Specialty Paper [ 163771 ]](https://assets1.tamsnetwork.com/images/EC042017NF/163771s.jpg "2024–2026 In Color™ Glimmer 12\" X 12\" (30.5 X 30.5 Cm) Specialty Paper [ 163771 ]")
![Beautiful Pumpkins Photopolymer Stamp Set (English) [ 166009 ]](https://assets1.tamsnetwork.com/images/EC042017NF/166009s.jpg "Beautiful Pumpkins Photopolymer Stamp Set (English) [ 166009 ]")

