Welcome back, friends. I’ve been under the weather the last several days, which is really cutting into my crafting time. Because quite frankly, I don’t feel like crafting. *gasp* I know — I can’t even believe I said it either.
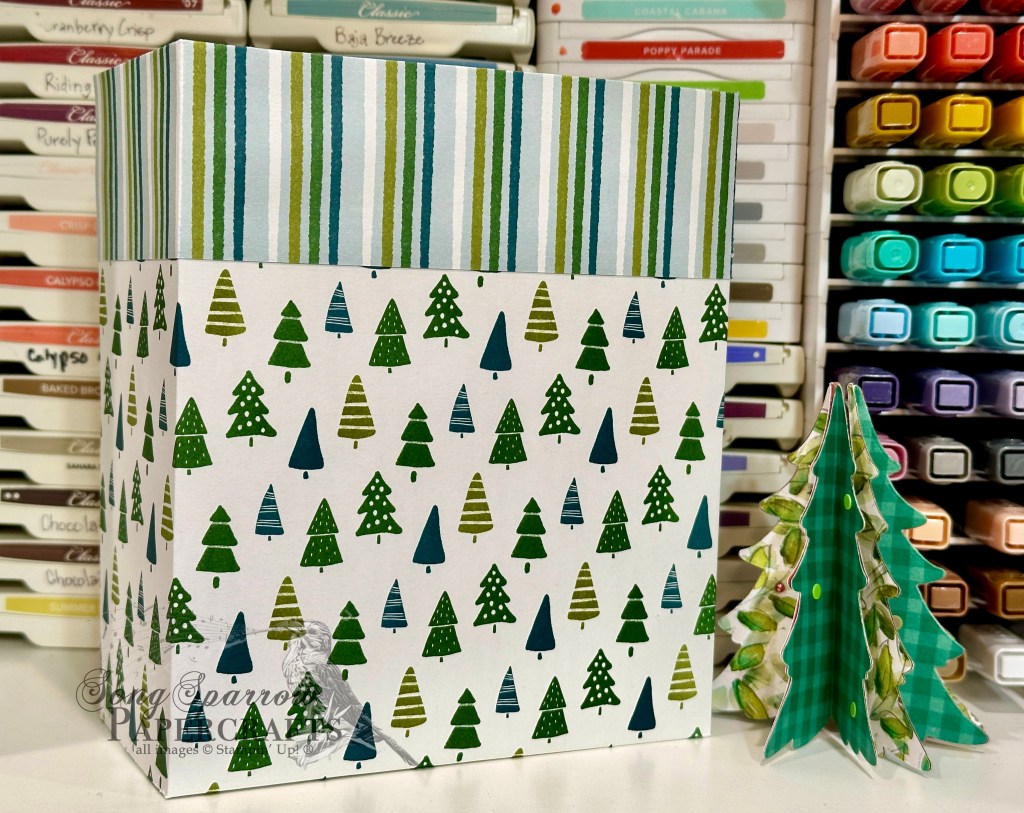
Luckily I had made some fairly decent progress on office gifties and I’ve been able to share those projects with you. I’ll be giving my coworkers gift bags filled with handmade goodies. And today you’re getting a look at the gift bag shell. Why just a shell? Because I’ll be putting all the finishing touches on once all of the giftie goodies are tucked inside.
I learned how to make an assortment of gift bag sizes from my upline Patty Bennett. This particular bag uses 2 sheets of 12×12 patterned paper. I happened to pull from some of my favorite retired paper packs to make my gift bags. These come together quickly and easily and I love being able to coordinate all of the items in the bag! I’ll show you the finished product once I get all of them finished. Hopefully I’ll be well enough to finish them before our office party on Thursday!
Tune in tomorrow as I show you a super cute gift set in a handmade box!
Happy Mother’s Day to all of the moms, moms-to-be, grands, and moms in the gap. What a privilege it is to love and care for another. There isn’t more truth than a child is a piece of your heart walking outside your chest.
This week we’re exploring all the ways we can use our crafty stash to make lovely things for our moms. And we’re finishing out our series with the Thankful Garden bundle.
This lovely gets started with a base of Blackberry Bliss cardstock. The focal panel backdrop starts with a quarter panel of white cardstock that is machine embossed with the Dotted Circles embossing folder and is then matted with the Thoughtful Designs specialty paper. Our Thankful Garden bundle takes center stage here with the hydrangea bloom in the center. After stamping the image on white cardstock several times, I used the decorative masks to color the image. I chose to have the blooms be a combination of pink and purple — which was my grandmother’s favorite hues to aim for with her hydrangea (easier said than done). A layer of Wink of Stella over the blooms makes them shimmer in the light. The coordinating dies made quick work of cutting out the bloom and adding the life-like dimension. A combination of pink and purple regal dots serve as the floret centers. I cut some extra stems of leaves from a combination of the Lovely Garden patterned paper and a sheet of Shaded Spruce and laid the hydrangea bunch on top. The sentiment is created using a combination of Sweet Blooms dies and She’s the Greatest stamps. The lovely is cut from purple silver foil and Berry Burst glimmer paper. I adhered the two layers together with the glue pen before adhering over a bow of iridescent striped ribbon. I stamped Mom in Blackberry Bliss on white cardstock and used a heart punch to cut it out. It’s adhered with a dimensional. A few drusy embellishments finish things off with an extra sparkle.
We’re going to be honoring our teachers next week as prepare to wind down the last couple of weeks of school. I hope you’ll drop by for some cute ideas to thank the folks who work selflessly and tirelessly all year to impart knowledge into the next generation!
This week is all about MOM as we pull out all the stops to create some super fun designs worthy of all of the love, care, and encouragement that moms give. Today’s card is a combination of products that might be akin to the kitchen sink. *haha* But our biggest stars of the show are the Country Woods bundle (hurry, it’s on Last Chance in the shop!) and the new Notes & Totes bundle, along with two new paper packs called Florals in Bloom and Flower Garden foils. Together, they build this cute little scene you might find on the front porch next to the porch swing.
I love this color palette of soft blue hues. We get started with a very neutral base of Basic White cardstock. We turn to the Florals in Bloom papers for our backdrop which we cut using the largest Textured Notes die. And then we follow it with a sheet of the Flower Garden foil and cut it with the next Textured Notes die. I love how the foil is just a tick darker than the striped pattern sheet underneath and how the cross-hatch pattern of the foil plays so well off the stripes below. I adhered the two layers together with dimensionals.
Next up, we work on our focal images. The stool and water jug are stamped onto sheets of the Country Woods woodgrain papers using the Country Flowers set and then diecut with their coordinating dies. The smaller flowers are cut from the Florals in Bloom paper using the coordinating Sweet Blooms die. I layered the stool and jug of flowers using varying layers of dimensionals on focal panel background. I used the scarf die from the Notes & Totes setto cut a gold accent ribbon for the water jug of flowers. I made a smaller handbag using the Notes & Totes bundle. I stamped the hibiscus pattern onto Pretty Peacock and then used the pocket die to cut it out. For the flap, I used the pocket die and cut just the top portion out of the Pretty Peacock Season of Elegance foiled paper. I fussy cut to clean it up and then adhered to the stamped layer. I cut the latch and handle from Crumb Cake cardstock, again using the Notes & Totes set, and adhered with glue dots. The purse is affixed next to the flowers with dimensionals.
The sentiment combines two stamps from the She’s the Greatest set and are stamped in Balmy Blue on white cardstock. I fussy cut the letters of MOM and then diecut a banner for love you using the Nested Essentials small banner die. I loved the look of them in the top corner and affixed them with dimensionals. I added adhesive hearts to finish of the sentiment and a few of the new In Color flat pearls around the flowers for a little touch of shine.
We’ll be closing out our series tomorrow with the last little bit of Mother’s Day inspiration. I hope you’ll drop by!
We’re continuing our sneak peeks at some of my favorite products from the upcoming Stampin’ Up! January Mini and Sale-a-Bration catalogs. And today, we’re making a super easy easel calendar using the new Everyday Skies designer paper and (what is clearly showing as one of my top favorites) the pastel ombre glimmer paper. I just love all of the skies depicted in this paper pack — from moody to dark to beautiful sunrises & sunsets, this pack has them all!
I needed some simple Christmas gift stuffers, so I whipped up these two easel calendars last night. Let’s see how these two beauties come together.
For the first calendar, we get started with Basic Black cardstock. This is cut so that the card would be in portrait orientation and the score mark is at the top. To make the easel holder in the center of the base, I cut down a quarter panel of black to 4-inches by 5.5-inches and scored it in half and then a half-inch from each side on the short edge. I chose a lovely sunrise sheet from the Everyday Skies paper pack and matted it with the pink/purple ombre glimmer paper. I moved the mini calendar around until I got the placement just right to show off the beautiful sky. A few two-tone sparkle gems give us some twinkle.
For the second calendar, we start with a base of Night of Navy cardstock. This time I chose a night sky from the Everyday Skies paper pack. I kept the mat color the same but varied the direction of the ombre coloring to really bring out the subtle colors in the sky. Two-tone sparkle gems give little glints of twinkle like stars.
These calendars are super easy to put together. I made the two of these in less than 30 minutes. You can try it out for yourself by downloading the full PDF instructions here.
Products used in today’s featured designs: Taylored Expressions mini calendars Basic Black, Night of Navy cardstock Everyday Skies (coming soon), Pastel ombre glimmer (coming soon) DSP Two-tone sparkle gems (coming soon) Adhesives
I really, really love this week’s theme, which is one of the reasons that I wanted to spend today showing you the designs I had planned for you throughout the last week. One of the most valuable things I have learned over the last several years is that flexibility is key when things don’t work out exactly as you planned.
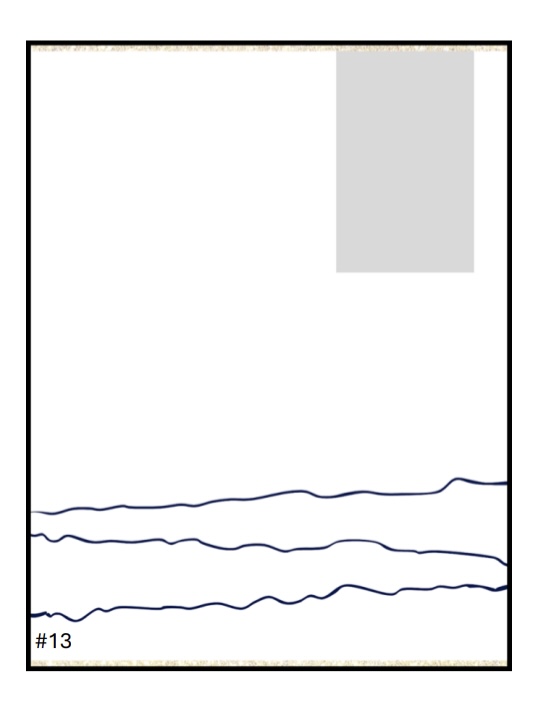
So this post is the ode to Sketchy Fridays. Each week we’re using a card sketch to design our featured card. Right now, we’re working through a full series of designs using the card sketches found in current Stampin’ Up! catalogs.
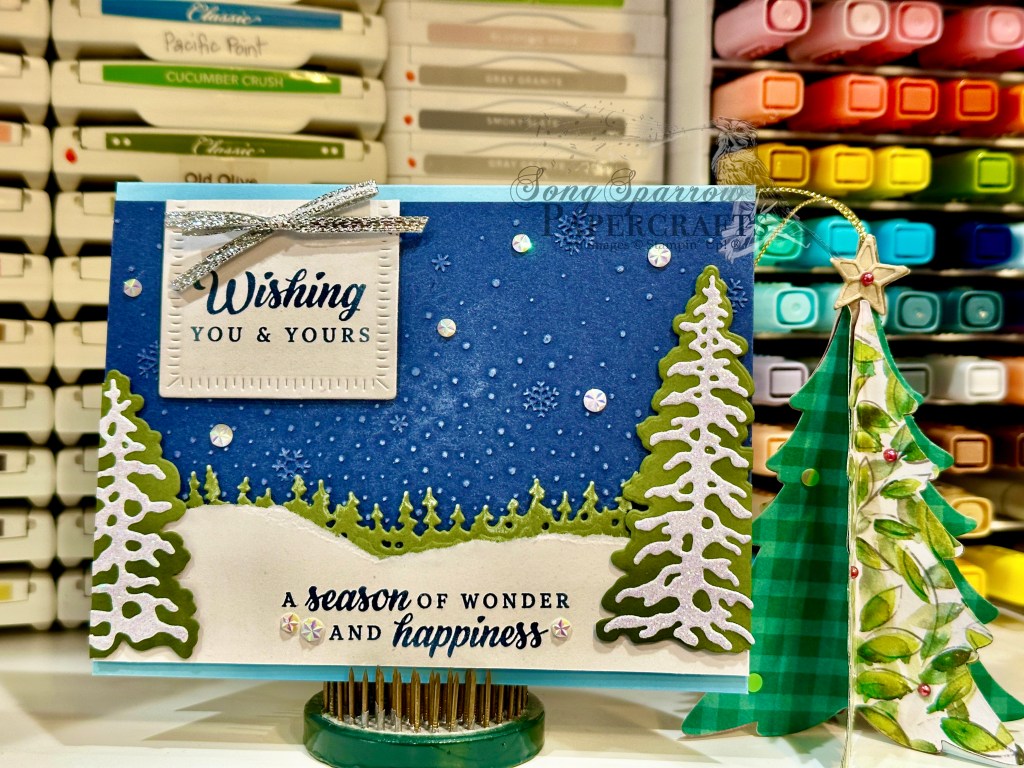
This week’s card is based on Sketch #13 from the Stampin’ Up! Annual Catalog and features the Peaceful Evergreens and In the Grove Dies, along with the ever-lovely Snowflake Sky embossing folder. Today’s card design is inspired by the very talented demo known on Instagram as Craftsomnia.
This week’s design theme is stopping by the woods on a snowy evening. This Robert Frost poem is all about taking the time to bask in the wonder of falling snow, and I can’t help but think how well the idea of stopping to take in the wonder and joy everyday moments of life has to be one of the best life lessons. And outside of this wonderful life lesson, the theme lends itself so well to a variety of lovely winter cards, don’t you think?
We get started with a base of Balmy Blue cardstock. Our backdrop is a panel of Night of Navy that is machine embossed with the Snowflake Sky embossing folder and then lightly brushed with white craft ink to really bring out the beautiful soft snowflakes. Our snowbank is a simple piece of white cardstock that is torn to create the soft edges of a snowy hill. The Mossy Meadow trees are diecut with a combination of the In the Grove and Peaceful Evergreen dies. A touch of craft ink to the edges of the treeline and a bit of white glimmer paper on the larger evergreens in the foreground make for the perfect dusted evergreen grove. The sentiment from the Peaceful Season stamp set is stamped in Night of Navy in the center of a white banner cut with the Radiating Stitches die and then finished in the snowbank. Dimensionals help give lots of depth to our scene, and the silver trim and iridescent faceted gems lend the sparkle.
This design is even more stunning in person as the lighting in my craft room just wasn’t quite right today to capture the true colors and details. I hope you’ll drop in a little later as I bring you one final clean & simple design in this series.
Well, to say that my week didn’t exactly go as planned is likely obvious to you all by now. I had everything planned out, but when all was said and done, I simply didn’t have the time to execute. I had to travel out of town for work and then had some other obligations that simply overran the time I allotted for them. Such is life sometimes, eh? So today, I’m going to play a little catchup and bring you all the content I had planned for Thursday, Friday, and Saturday of this week.
If you’re new here, for the last month or so, I’ve been working with themes to inspire designs. This week, we’re stopping by the woods on a snowy evening. And today’s card was inspired by a design that was recently posted by Stampin’ Up! Artisan crafter the Crafty O’ Ink Pen. When I saw her design, I knew it would be perfect for this week’s theme, and I wanted to do my own take on it. That’s the wonderful thing about design inspiration — you get to make it your own!
So we get started with a base of Night of Navy cardstock. The background panel is a sheet of Pool Party that is machine embossed with the Snowflake Sky embossing folder, which is then lightly inked with a sponge dauber and Pool Party ink to give the look of a cloudy sky. To create the snowdrifts, I tore a quarter panel of white cardstock in half and then very lightly inked the torn edges with the Pool Party ink to give some definition and detail and layered them to the snowdrifts. They’re ultimately adhered to the background panel with dimensionals. Using the Merriest Trees dies, I cut two of the smaller sized trees from Shaded Spruce cardstock and lightly rubbed some craft ink over the tops to give them the look of having a dusting of snow. They’re tucked in and behind the snowdrifts to give depth and dimension to the scene. The sled is diecut with the Sophisticated Sled and Filled With Fun die sets from gold foil and Early Espresso cardstocks and then cut in half to create the side view of our sled. Isn’t this brilliant?! Such a great idea, Crafty O’ Ink Pen! The sled is filled with holiday goodness which has been stamped on white cardstock using the Filled With Cheer stamp set and then colored with Stampin’ Blends. Our sentiment from Filled With Cheer is stamped in Night of Navy on white cardstock and then diecut using the Peaceful Season small banner die and adhered with dimensionals over some gold trim. Adhesives snowflakes finish our snowy scene with a little sparkle.
Check back in a little later in the afternoon for our Sketchy Fridays snowy evening design.
Happy Veterans’ Day to all of those who have served in the Armed Forces! We are ever so thankful for the sacrifices you and your family have made to make our way of life possible. Your service is always respected and appreciated!
I can’t believe we’re already starting another week. Is it just me or does it feel like August to the end of the year is always on fast forward?! Another new week means another new theme for our card designs. And this week, we’re going to be in the woods, which is one of my favorite places to be! I look forward to showing you some unique ways to use this theme in your designs.
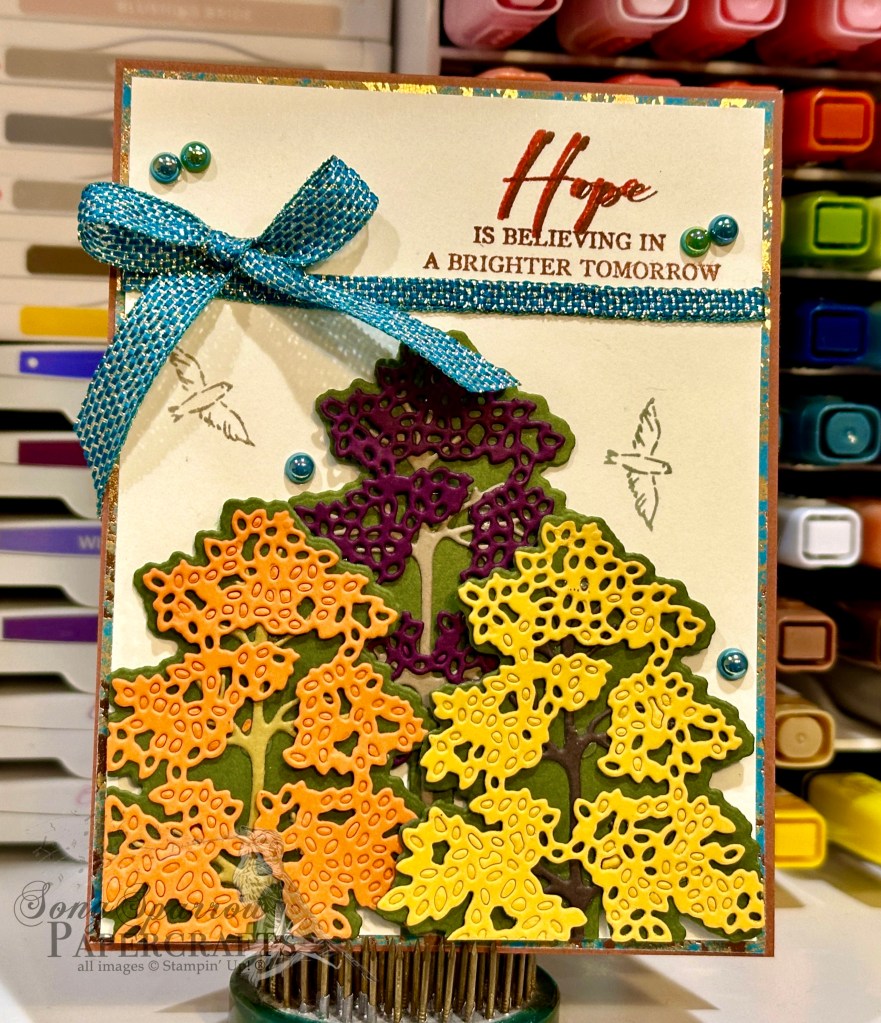
Today, we’re getting started in the treetops. My favorite stretch of road in our neighborhood is just starting to show hints that the foliage is about to put on its fall foray. And I can’t wait! Before it’s all done, this stretch of road will look like it’s on fire. So today’s design is another nod to the changing foliage of fall.
We get started with a base of Copper Clay cardstock. Our focal panel consists of a background of Very Vanilla and a mat of Oxidized Copper. We build our forest of trees using the Frosted Forest dies. The base color is Mossy Meadow and then the changing foliage is a combination of Blackberry Bliss, Daffodil Delight, and Pumpkin Pie. The trees are adhered on varying levels of dimensionals to give some dimension to the scene and realism to the depth of forest. A few birds stamped using the Frosted Forest stamps add another layer of realism to our forest scene. The sentiment from Unbounded Love is stamped on the vanilla backdrop. The strip of Pretty Peacock & Gold metallic ribbon add some sparkle and help draw the eye to the top and the sentiment. A few Blooming Pearls help finish things off.
We’re going to be in the forest all week. So I hope you’ll tag along for the trip!
Products used in today’s card: Copper Clay, Very Vanilla, Crumb Cake, Early Espresso, Pecan Pie, Blackberry Bliss, Daffodil Delight, Pumpkin Pie, Mossy Meadow cardstock Oxidized Copper DSP Frosted Forest bundle Unbounded Love stamps Pretty Peacock & Gold metallic ribbon Blooming Pearls Dimensionals Adhesives
We’re continuing with our sneak peeks of the upcoming Stampin’ Up! Online Exclusives release, which releases in just a week! This week, we’re pairing up the lovely Marbled Elegance designer series paper with other products in the Stampin’ Up! lineup.
Today, we’re combining a whole host of fun products from the current stash, including Sending Love, Perennial Postage, and Playing in the Rain just to name a few. So let’s see how we put this cutie together.
We get started with a Basic White cardstock base. Our background panel is the heart patterned sheet from the Marbled Elegance paper pack that is diecut using the Perennial Postage dies. Our focal panel background is a piece of vellum that is also diecut with the Perennial Postage dies. Our little envelope is made from Marbled Elegance paper and the Sending Love die set. Inside the envelope are stems of heart flowers. The floral stems are cut from Mossy Meadow using the Playing in the Rain dies, while the heart flowers are cut from white glimmer paper using the Sending Love dies. A few gold hearts finish the flower centers and add a pop of golden sparkle to compliment the gold foiling of the envelope and the twist of gold trim in the background. The sentiment from Country Flowers is stamped in black on white cardstock and then fussy cut with paper snips. The design is finished off with iridescent rhinestones basic jewels.
I’ll be taking a little break tomorrow due to my kiddo’s band concert but will be back Thursday morning with the Luv 2 Stamp Group Instahop. Hope you’ll drop in and check it out!
Products used in today’s card: Basic White, Mossy Meadow cardstock Marbled Elegance (coming soon), vellum, white glimmer DSP Country Flowers stamps Perennial Postage, Sending Love dies Playing in the Rain dies Gold trim Gold hearts (coming soon), iridescent rhinestones basic jewels Dimensionals Adhesives
Happy Monday, crafty friends! Our weekend turned out to be waaaaaay busier than I anticipated. Between the kiddo’s bowling league and lessons and my own singing engagements, we kinda met each other coming and going this weekend. And that left no time to craft – womp, womp!
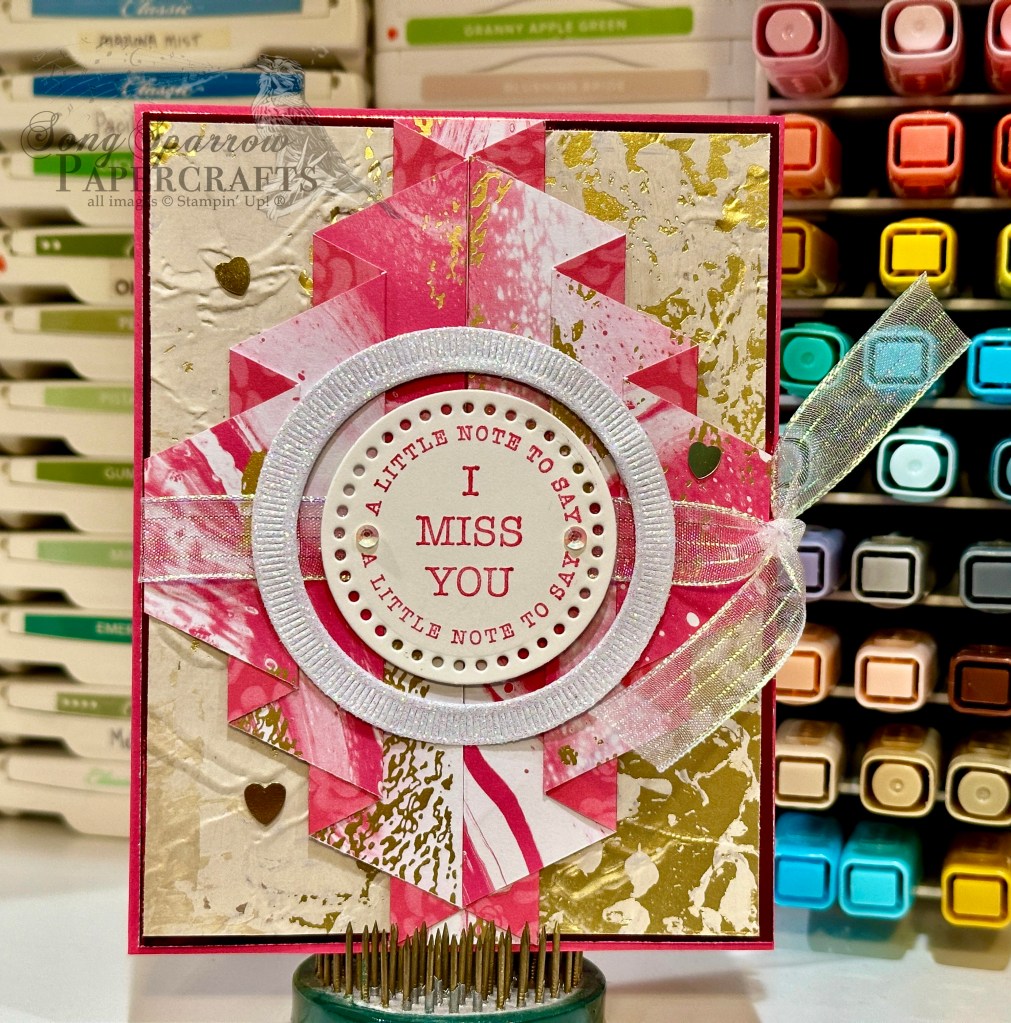
But here we are starting a bright, shiny new week and I have some bright & shiny new things to share with you from the upcoming Stampin’ Up! Online Exclusives release that will go live next week! This week, we’re going to pair some gorgeous new patterned paper with all sorts of things from the crafty stash — from other new Online Exclusives to current products. It’s going to be a fun week.
We’re getting started with a really cool fun fold called the Curtain Fold because it really shows off the new Marbled Elegance paper beautifully! Our card starts with a base of Melon Mambo cardstock. The backdrop for our gorgeous curtain fold is a combination of Melon Mambo foil paper (sadly retired) and the creamy Season of Elegance foiled paper that’s been embossed using the Painted Texture embossing folder. The sheet of Marbled Elegance is a combination of pinks, shades of white, and gold foil. Our sentiment from Sending Love is stamped in Melon Mambo on Very Vanilla and then diecut with the Everyday Details circle die. I used the leftover portion of a piece of white glimmer paper cut with Spotlight on Nature dies as the eye-catching border around our sentiment. A strip of iridescent striped trim anchors it against our sparkly background. A few iridescent rhinestones basic jewels and gold hearts finish things off with the perfect amount of twinkle.
The Marbled Elegance paper really is stunning, and I’m looking forward to showing you all the ways you can incorporate it into your everyday designs to give a little extra pop.
Products used in today’s card: Melon Mambo, Basic White cardstock Marbled Elegance (coming soon), Season of Elegance, White glimmer, Melon Mambo foil (retired) DSP Painted Texture embossing folder Sending Love stamps Spotlight on Nature, Everyday Details dies Iridescent striped trim Iridescent rhinestones basic jewels, gold hearts (coming soon) Dimensionals Adhesives
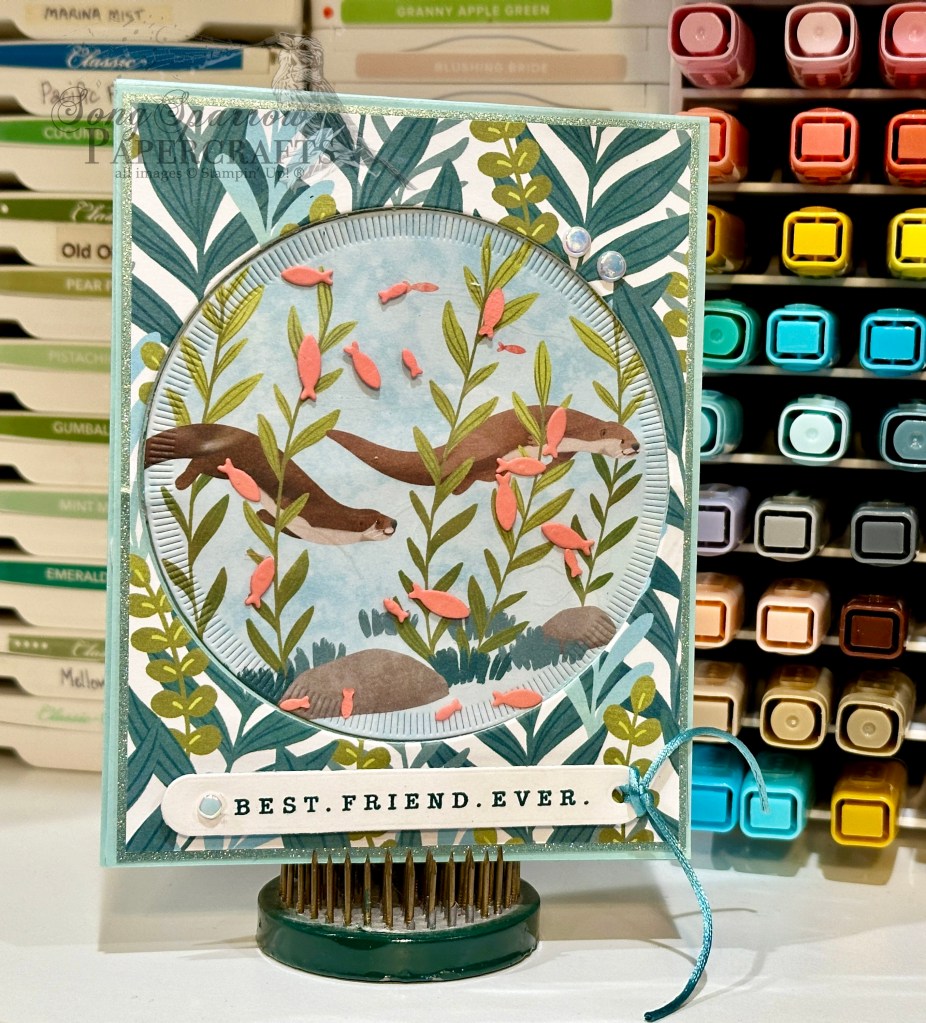
This week, we’re getting a closeup at one of the latest Stampin’ Up! Online Exclusive releases called Otterly Adorable, coming to a cart near you on November 5! This adorable suite of products includes coordinating stamps, dies, and patterned paper, along with some silky cording and pearlized embellishments.
Today, I had planned to show you a super cute flip-panel design, but it turned out to be an otter failure. *snicker* In all seriousness though, my design was flawed from the start and I realized why after I switched gears to salvage the design. So I promise to make good on a cute flip-panel design later this week when I have a bit more time to execute a more complicated design. In the meantime, let’s get a closer look at how a failure turned into a cute peek-through panel.
Today’s card starts with a base of Pool Party cardstock. Our backdrop is a combination of Lost Lagoon shimmer pape (sadly retired) and the water foliage pattern from the Otterly Adorable paper pack. Using the largest circle from the Spotlight on Nature die set, I cut a circle through all layers of the card front. Separately, I also used the die to cut the two swimming otters from a separate patterned sheet from the Otterly Adorable pack. I adhered the swimming otters panel to the Pool Party circle and then to a quarter sheet of Pool Party to keep the inside of the card neat and tidy and one color. Behind our backdrop panel, I mounted some acetate to serve as the peek-through window into the water below and adhered all of this to the card front. From Flirty Flamingo, I cut several sets of the smaller fish using the Otterly Amazing dies and let them free-float on the acetate. Our swimming otter panel is adhered to the inside of the card using dimensionals to allow a little room for our fish to swim in the window. The sentiment from Country Flowers is stamped in Pretty Peacock on white cardstock diecut using the Greetings of the Season die and finished off with the Lost Lagoon soft cording. A few riverside irregular pearls add that last touch of sparkle to the design.
When I showed my son my “otter failure,” he said, “but mom, that doesn’t look like a failure….that’s cute!” One of the many lessons I’ve learned is that sometimes you just need to pivot when your first idea doesn’t work out. Not ever failure turns out to be something for the trash bin. Sometimes it’s cute!
Products used in today’s card: Pool Party, Flirty Flamingo, Basic White cardstock Soft Shimmer (retired), Otterly Adorable (coming soon), acetate DSP Otterly Amazing (coming soon), Spotlight on Nature, Greetings of the Season dies Country Flowers stamps Lost Lagoon soft cording (coming soon) Riverside irregular pearls (coming soon) Dimensionals Adhesives

![Blackberry Bliss 8-1/2" X 11" Cardstock [ 133675 ]](https://assets1.tamsnetwork.com/images/EC042017NF/133675s.jpg "Blackberry Bliss 8-1/2\" X 11\" Cardstock [ 133675 ]")
![Shaded Spruce 8-1/2" X 11" Cardstock [ 146981 ]](https://assets1.tamsnetwork.com/images/EC042017NF/146981s.jpg "Shaded Spruce 8-1/2\" X 11\" Cardstock [ 146981 ]")
![Basic White 8 1/2" X 11" Cardstock [ 166780 ]](https://assets1.tamsnetwork.com/images/EC042017NF/166780s.jpg "Basic White 8 1/2\" X 11\" Cardstock [ 166780 ]")
![Lovely Garden 12" X 12" (30.5 X 30.5 Cm) Designer Series Paper [ 165524 ]](https://assets1.tamsnetwork.com/images/EC042017NF/165524s.jpg "Lovely Garden 12\" X 12\" (30.5 X 30.5 Cm) Designer Series Paper [ 165524 ]")
![Thoughtful Designs 12" X 12" (30.5 X 30.5 Cm) Specialty Designer Series Paper [ 163317 ]](https://assets1.tamsnetwork.com/images/EC042017NF/163317s.jpg "Thoughtful Designs 12\" X 12\" (30.5 X 30.5 Cm) Specialty Designer Series Paper [ 163317 ]")
![Berry Burst, Old Olive & White 12" X 12" (30.5 X 30.5 Cm) Glimmer Specialty Paper [ 163769 ]](https://assets1.tamsnetwork.com/images/EC042017NF/163769s.jpg "Berry Burst, Old Olive & White 12\" X 12\" (30.5 X 30.5 Cm) Glimmer Specialty Paper [ 163769 ]")
![Silver Foil 12" X 12" (30.5 X 30.5 Cm) Specialty Pack [ 163096 ]](https://assets1.tamsnetwork.com/images/EC042017NF/163096s.jpg "Silver Foil 12\" X 12\" (30.5 X 30.5 Cm) Specialty Pack [ 163096 ]")
![Dotted Circles 3 D Embossing Folder [ 163789 ]](https://assets1.tamsnetwork.com/images/EC042017NF/163789s.jpg "Dotted Circles 3 D Embossing Folder [ 163789 ]")
![Thankful Garden Bundle (English) [ 165534 ]](https://assets1.tamsnetwork.com/images/EC042017NF/165534s.jpg "Thankful Garden Bundle (English) [ 165534 ]")
![She's The Greatest Photopolymer Stamp Set (English) [ 165439 ]](https://assets1.tamsnetwork.com/images/EC042017NF/165439s.jpg "She's The Greatest Photopolymer Stamp Set (English) [ 165439 ]")
![Sweet Blooms Dies (English) [ 165186 ]](https://assets1.tamsnetwork.com/images/EC042017NF/165186s.jpg "Sweet Blooms Dies (English) [ 165186 ]")
![Jet Black Stāzon Ink Pad [ 101406 ]](https://assets1.tamsnetwork.com/images/EC042017NF/101406s.jpg "Jet Black Stāzon Ink Pad [ 101406 ]")
![Pretty In Pink Classic Stampin Pad [ 163807 ]](https://assets1.tamsnetwork.com/images/EC042017NF/163807s.jpg "Pretty In Pink Classic Stampin Pad [ 163807 ]")
![Blackberry Bliss Classic Stampin' Pad [ 147092 ]](https://assets1.tamsnetwork.com/images/EC042017NF/147092s.jpg "Blackberry Bliss Classic Stampin' Pad [ 147092 ]")
![Shy Shamrock Classic Stampin Pad [ 163808 ]](https://assets1.tamsnetwork.com/images/EC042017NF/163808s.jpg "Shy Shamrock Classic Stampin Pad [ 163808 ]")
![Clear Wink Of Stella Glitter Brush [ 141897 ]](https://assets1.tamsnetwork.com/images/EC042017NF/141897s.jpg "Clear Wink Of Stella Glitter Brush [ 141897 ]")
![Iridescent 1/2" (1.3 Cm) Striped Trim [ 163299 ]](https://assets1.tamsnetwork.com/images/EC042017NF/163299s.jpg "Iridescent 1/2\" (1.3 Cm) Striped Trim [ 163299 ]")
![Regal Foiled Adhesive Backed Dots [ 164038 ]](https://assets1.tamsnetwork.com/images/EC042017NF/164038s.jpg "Regal Foiled Adhesive Backed Dots [ 164038 ]")
![Drusy Adhesive Backed Embellishments [ 164223 ]](https://assets1.tamsnetwork.com/images/EC042017NF/164223s.jpg "Drusy Adhesive Backed Embellishments [ 164223 ]")
![Stampin' Dimensionals [ 104430 ]](https://assets1.tamsnetwork.com/images/EC042017NF/104430s.jpg "Stampin' Dimensionals [ 104430 ]")
![Mini Glue Dots [ 103683 ]](https://assets1.tamsnetwork.com/images/EC042017NF/103683s.jpg "Mini Glue Dots [ 103683 ]")
![Fine-Tip Glue Pen [ 138309 ]](https://assets1.tamsnetwork.com/images/EC042017NF/138309s.jpg "Fine-Tip Glue Pen [ 138309 ]")

![Pretty Peacock 8-1/2" X 11" Cardstock [ 150880 ]](https://assets1.tamsnetwork.com/images/EC042017NF/150880s.jpg "Pretty Peacock 8-1/2\" X 11\" Cardstock [ 150880 ]")
![Crumb Cake 8-1/2" X 11" Cardstock [ 120953 ]](https://assets1.tamsnetwork.com/images/EC042017NF/120953s.jpg "Crumb Cake 8-1/2\" X 11\" Cardstock [ 120953 ]")
![Florals In Bloom 12" X 12" (30.5 X 30.5 Cm) Designer Series Paper [ 165175 ]](https://assets1.tamsnetwork.com/images/EC042017NF/165175s.jpg "Florals In Bloom 12\" X 12\" (30.5 X 30.5 Cm) Designer Series Paper [ 165175 ]")
![Flower Garden Foils 12" X 12" (30.5 X 30.5 Cm) Specialty Paper [ 165511 ]](https://assets1.tamsnetwork.com/images/EC042017NF/165511s.jpg "Flower Garden Foils 12\" X 12\" (30.5 X 30.5 Cm) Specialty Paper [ 165511 ]")
![Season Of Elegance 12" X 12" (30.5 X 30.5 Cm) Specialty Designer Series Paper [ 164144 ]](https://assets1.tamsnetwork.com/images/EC042017NF/164144s.jpg "Season Of Elegance 12\" X 12\" (30.5 X 30.5 Cm) Specialty Designer Series Paper [ 164144 ]")
![Country Woods 12" X 12" (30.5 X 30.5 Cm) Designer Series Paper [ 163393 ]](https://assets1.tamsnetwork.com/images/EC042017NF/163393s.jpg "Country Woods 12\" X 12\" (30.5 X 30.5 Cm) Designer Series Paper [ 163393 ]")
![Textured Metallic 12" X 12" (30.5 X 30.5 Cm) Specialty Paper [ 163772 ]](https://assets1.tamsnetwork.com/images/EC042017NF/163772s.jpg "Textured Metallic 12\" X 12\" (30.5 X 30.5 Cm) Specialty Paper [ 163772 ]")
![Country Flowers Bundle (English) [ 163411 ]](https://assets1.tamsnetwork.com/images/EC042017NF/163411s.jpg "Country Flowers Bundle (English) [ 163411 ]")
![Notes & Totes Bundle (English) [ 165241 ]](https://assets1.tamsnetwork.com/images/EC042017NF/165241s.jpg "Notes & Totes Bundle (English) [ 165241 ]")
![Balmy Blue Classic Stampin' Pad [ 147105 ]](https://assets1.tamsnetwork.com/images/EC042017NF/147105s.jpg "Balmy Blue Classic Stampin' Pad [ 147105 ]")
![Textured Notes Dies [ 165555 ]](https://assets1.tamsnetwork.com/images/EC042017NF/165555s.jpg "Textured Notes Dies [ 165555 ]")
![Nested Essentials Dies [ 161597 ]](https://assets1.tamsnetwork.com/images/EC042017NF/161597s.jpg "Nested Essentials Dies [ 161597 ]")
![2025–2027 In Color™ Flat Pearls [ 165192 ]](https://assets1.tamsnetwork.com/images/EC042017NF/165192s.jpg "2025–2027 In Color™ Flat Pearls [ 165192 ]")
![Adhesive Backed Heart Sequins [ 164920 ]](https://assets1.tamsnetwork.com/images/EC042017NF/164920s.jpg "Adhesive Backed Heart Sequins [ 164920 ]")
![Mini Stampin' Dimensionals [ 144108 ]](https://assets1.tamsnetwork.com/images/EC042017NF/144108s.jpg "Mini Stampin' Dimensionals [ 144108 ]")


")


 Trim Combo Pack")


")
")


 Specialty Designer Series Paper")

")
")


 Metallic Ribbon")


")


 Foil Sheets")


")


 Specialty Paper")


