Christmas · Gifting

Nugget Treat Trio

Happy Tuesday, everyone! The days to Christmas are ticking away quickly. Do you ever feel like time is a bit on fast-forward this time of year? I sure do!

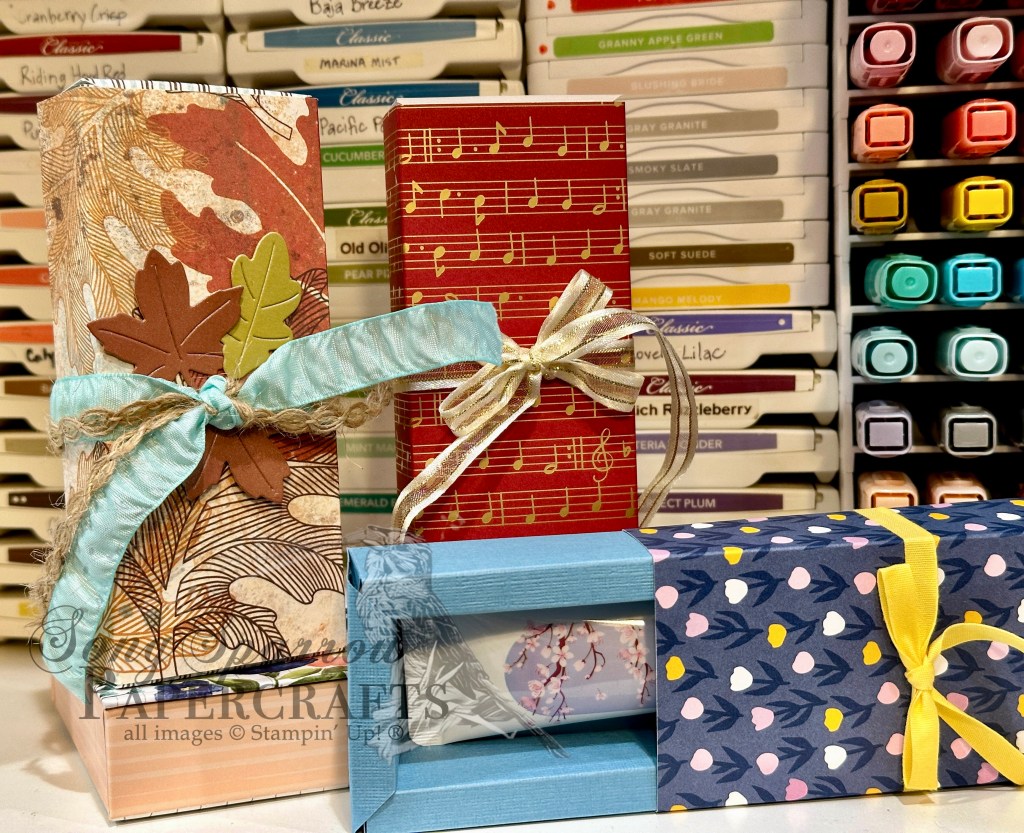
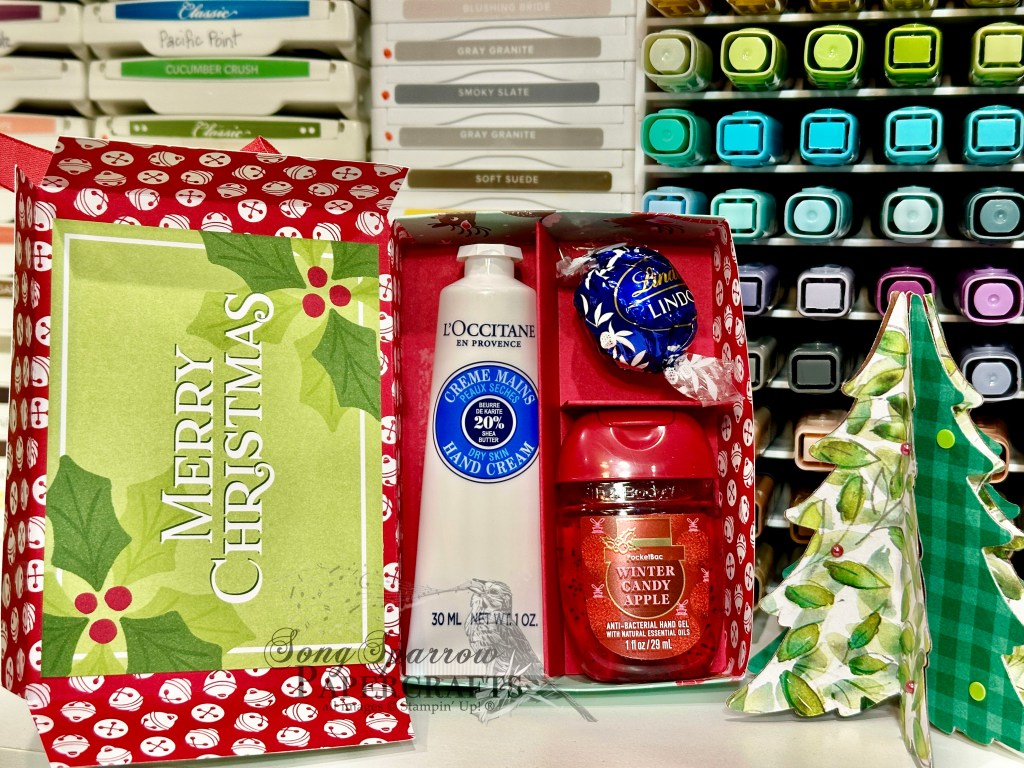
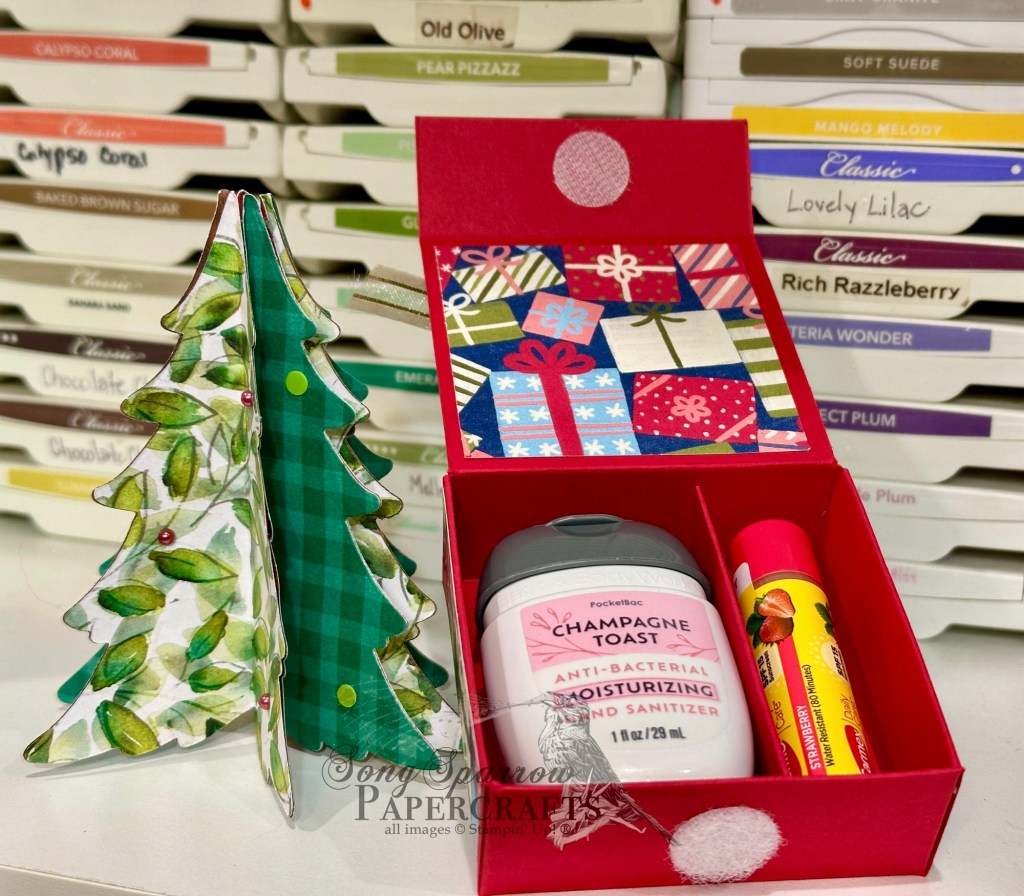
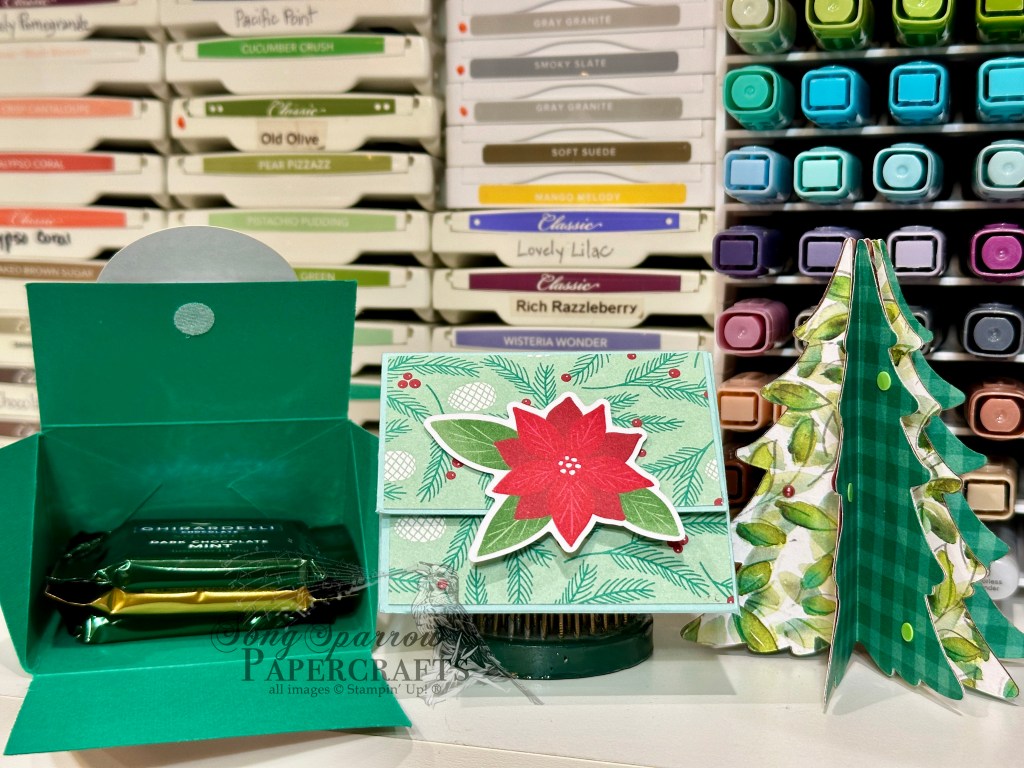
I’m sharing another fun treat box with you today. And it’s also another one I learned from The Paper Pixie. When I tell you that she is a 3D packaging genius, I’m not kidding! *wink* This cute little box perfectly holds 3 Hershey nugget treats. But you could easily use it for other things, as well.

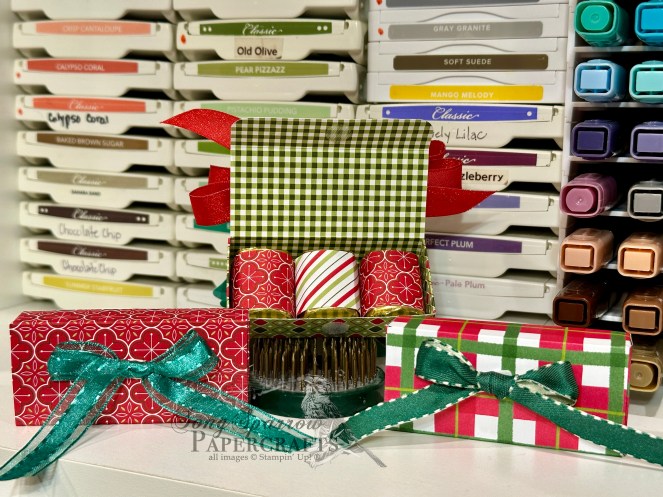
I pulled out a combination of both old and new papers as I was making these little gift boxes. I have found that Christmas treats are the perfect way to use retired papers. While you tuck the lid right into the front of the box, I chose to make each of mine close with a tiny Velcro dot. I like the finished look that gives.

I like to use these little gifties for the mailman, my hair dresser, and anyone I think needs a little holiday cheer. And they’re great in combination with a host of other things in a goodie bag.

Wanna give this cute little treat box a try? You can download the PDF tutorial here.

Christmas · Gifting

Holiday Gift Trio

Happy Monday, everyone! It’s the official countdown to Christmas. Are you feeling prepared or are you like me and scrambling to the finish? It really didn’t help that I had the flu last week and didn’t feel well enough to do much crafting at all beyond Tuesday. I’m definitely in crunch mode now! But that’s okay. Christmas cards will come a little late and no one will keel over when it arrives after Christmas. *wink* Sometimes we just give ourselves the grace to get done what we can “on time” and make due with the rest.

Today I’m sharing another gift box with you. I learned this box from The Paper Pixie and it’s been a huge hit. This little box is the perfect size for some hand cream, a little treat, and a pocket sanitizer. And I’ve had fun finding all the different ways to put this together. Today’s variation uses 100% patterned paper. Let’s check it out.

I just had to pull out the super fun Reindeer Days paper from last year’s holiday release. It’s so cute & festive and has the perfect front-backside combinations for this gift box. The inside dividers need to be a little more sturdy and so I chose some coordinating Real Red cardstock for that. I used the coordinating sticker sheet and Memories & More cards to decorate the box, along with some of the current shiny Real Red ribbon.

I whipped up a little tutorial that gives you some instructions both for the patterned paper and cardstock versions of this box. And you can always catch The Paper Pixie video tutorial if you’re like me and more of a visual, hands-on learner.

Christmas · Gifting

Gift Set Box

Hi, friends, and welcome back. This week, I’m taking you along on a journey of handmade gifting. And today we have a very special gift box.

As I prepare for craft fairs — and also just for my own gifting purposes — I like to find new ways to package items that make great stocking stuffers or small gifts. In years past, I’ve made separate little packages for lip balms and hand sanitizer, but this year I thought it would be fun to find packaging that combines them into a little gift set. And here we are!

I wish I could claim credit for creating this box from start to finish, but I’m terrible at creating 3D items on my own. I just don’t think dimensionally like that. But I’m a wicked template follower and I found a great template over at Stampin’ Gala that I adapted to make this adorable gift box.

This box uses a sheet of 8.5×11 paper for the box and a quarter panel for the inside divider. And then it’s decorated with patterned paper and whatever embellishments you might like to dress it up. Here, I’ve used just a simple bow. But it looks equally as snazzy to make little popped up panels with ephemera and the like.

I’m still feeling pretty under the weather. Turns out I have the flu. So needless to say that has very much slowed down my crafting this week. Assuming I start feeling a little better, I hope to bring you another gifty project and to get the PDF tutorial for this cute box posted. Not sure if that will be tomorrow or Friday. We shall see how it goes.

Christmas · Gifting

Festive Treats

Happy Monday, everyone! We’re on the downhill slide to Christmas which means we’re all in the last-minute scramble to gather all the things and make all the treats.

Speaking of which, this week we’re going to be exploring all of the ways we can use our crafty stash to create unique gifts and goodies for our friends and neighbors and family. We’re getting started with a fun little treat box that I learned from The Paper Pixie. If you don’t follow her, you totally should. She makes the best 3D crafty items and provides spot-on, easy-to-follow instructions.

For the particular batch of boxes shown, I pulled out some of my retired stash of holiday papers. I’ve found that treat boxes are often a great way to use up leftover paper. For the box itself, you’ll need one sheet of 8.5×11-inch cardstock. I typically coordinate the box color with the selected patterned paper I’m going to use to decorate it. Here I’ve used Pool Party and Shaded Spruce for these two boxes. I cut three pieces of patterned paper to cover the front flaps and back of the box. I chose not to cover the inside flaps, but you definitely could if you so chose. I used one of the small Velcro dots to fasten the box closed. The front is decorated with some retired ephemera. I’ve filled the current batch of boxes with Ghiradelli squares, but these boxes easily fit other treats too.

I’m making a bunch of these this year — for coworkers, for my choir members, for the mailman, and anyone else who I think just needs a little holiday pick-me-up. They make great stocking stuffers too! I hope you’ll pop in tomorrow to see the next giftie item on the list.

EDITED TO ADD: You can download the PDF tutorial here.

Fun Folds · Gifting

Birthday Duo

We’re closing out our 3D design series this week with a fun combination of designs. Do you ever find yourself looking for a cute way to give a gift card? This combo is the perfect way to dress it up! Our gift box has the Timeless Plaid paper and up-and-coming Label Me Thankful set sitting front & center, while our card pairs the Everyday Arches and Scenic Adventure dies.

The card and gift box have coordinating bases of Misty Moonlight cardstock. The gift card box is covered with a sheet of the Timeless Plaid cardstock. The sentiment panel is cut from white cardstock using the Everyday Arches dies and then the sentiment from The Right Words stamp set is stamped in Early Espresso. I used one of the newest Online Exclusive die sets called Label Me Thankful (releasing Tuesday!) to cut the leaves and acorns and finished things off with a few of the Earth Tones shimmer gems.

I wanted the card to give the feeling of looking through an old window, so I used the Everyday Arches dies to cut a window shape out of the sheet of Country Woods patterned paper that serves as the focal panel. I set this panel aside to build the scene using the Scenic Adventure dies. The underlying scene panel starts with a sheet of white cardstock that I cut with the largest arch die to fit behind the focal panel that will ultimately sit on top. I started by filling in the top with Cloud Burst ink using a blending brush to create a soft sky. Next, we move to creating the water element at the bottom using the detail die in the Scene Adventure set. Moving the die around and passing through several times gives us the realist-looking shimmery water. To bring out the details of the water, I went over that section with Pool Party ink and a blending brush. The grass at the shore is cut from Mossy Meadow cardstock, while the small stand of flowers is cut from Granny Apple Green for a pop of contrast. The flowers are cut from pastel ombre glimmer paper and adhered to the floral stems with glue dots and then tucked behind the grass at the shore. The trees are a combination of Pecan Pie and Shaded Spruce cardstock and layered both behind and in front of the grass at the shore. The mountain in the distance is cut from Thoughtful Journey paper and adhered behind the grass and trees in the foreground. Dimensionals help give this scene a lot of depth and layers. The window pane layer is adhered on top using several layers of dimensionals to ensure that the scene looks as though it’s outside the window. We finish things off with the sentiment cut from Flower Garden Foil using the Wanted to Say dies. An assortment of riverside pearls, two tone gems, and In Color pearls add the finishing touches and help the eye pass across the design.

I hope you’ve found some inspiration in this week’s designs and have maybe even downloaded a tutorial or two to try out sometime soon! I hope you’ll stop in next week as we take a look at some new Online Exclusives!

Product List for Card
Product List for Gift Card Box
birthday · Gifting · Treat Boxes

Birthday Pinch Box

We’re already halfway through this week. I’m not quite sure how that happened! This week, we’re making 3D designs. And today’s design is a super simple fold-over pinch treat box. There are all sorts of variations of this box out there – mostly varying in size or shape. Regardless of which one you choose to make, the box comes together in a snap! And today’s birthday box uses the Wildflower Birthday paper pack and ephemera sheet.

The box itself is made from a full sheet of Pool Party cardstock. After scoring along both the long and short edges and making some strategic cuts, you fold in the flaps to create the bottom of the bag and the top flap. A quick little pinch of the sides at the top create the closure for the fold-over flap. I use small Velcro dots to act as my bag closure because I find it the simplest and most effective method, but I know some folks have used magnets and some have chosen to have a ribbon closure. But for me, I’ll stick with the easy button! *wink-wink*

I used two coordinating sheets of the Wildflower Birthday paper to decorate the bag. I intend to use this as a little birthday giftie, so I chose the sheet with cakes on it as the focal section (both front & back of the box) and then used the decorative scalloped sheet for the bag flap portion. I tied a bow using the gold striped sheer ribbon and decided I needed a little more oom-pah-pah for the bag flap, so I pulled a few gold twigs and a small leaf from the Wildflower Birthday ephemera sheet. Together, these elements provide the perfect eye-catching addition to the bag flap.

These gift boxes come together so quickly that it would be easy to trim and score a whole stack of cardstock in no time flat! If you’d like to give this cute gift box a try, you can download the tutorial here.

Product List
Gifting

Hand Cream Gifts

It’s a bright and shiny new week, and I don’t know about you, but last week was a doozy. I felt like we were meeting ourselves coming and going! This week should be a little less frantic with the kiddos being out of school for fall break.

Last week, we got a special treat here in North Texas as the conditions were perfect (for those who live in areas without light pollution) to see the aurora. My parents had the absolute best view. Just look at that sky! What a terrific reminder of the majesty of God’s creation!

This week, I’m still frantically working to finish up items for my booth for this weekend’s craft fair. And since so many of these things are gift items and we’re heading into the gift-giving time of year, I thought it the perfect opportunity to continue sharing some of the things that go in my booth.

This year, I’m trying something new. I found a wonderful gift box by The Paper Pixie to hold small tubes of hand cream. Once I got the hang of making the box, which is a little tricky at first, these cute gifties come together pretty quickly. I try to have a good variety of seasons and occasions represented in the packaging. I found a really nice variety pack of hand creams that came in a whole assortment of fragrances on Amazon, but this box is also perfectly sized for the smaller L’Occitane hand creams if you happen upon a good deal for a variety pack.

If you’re a craft fair-goer, what types of things are you looking for? Tell me in the comments!