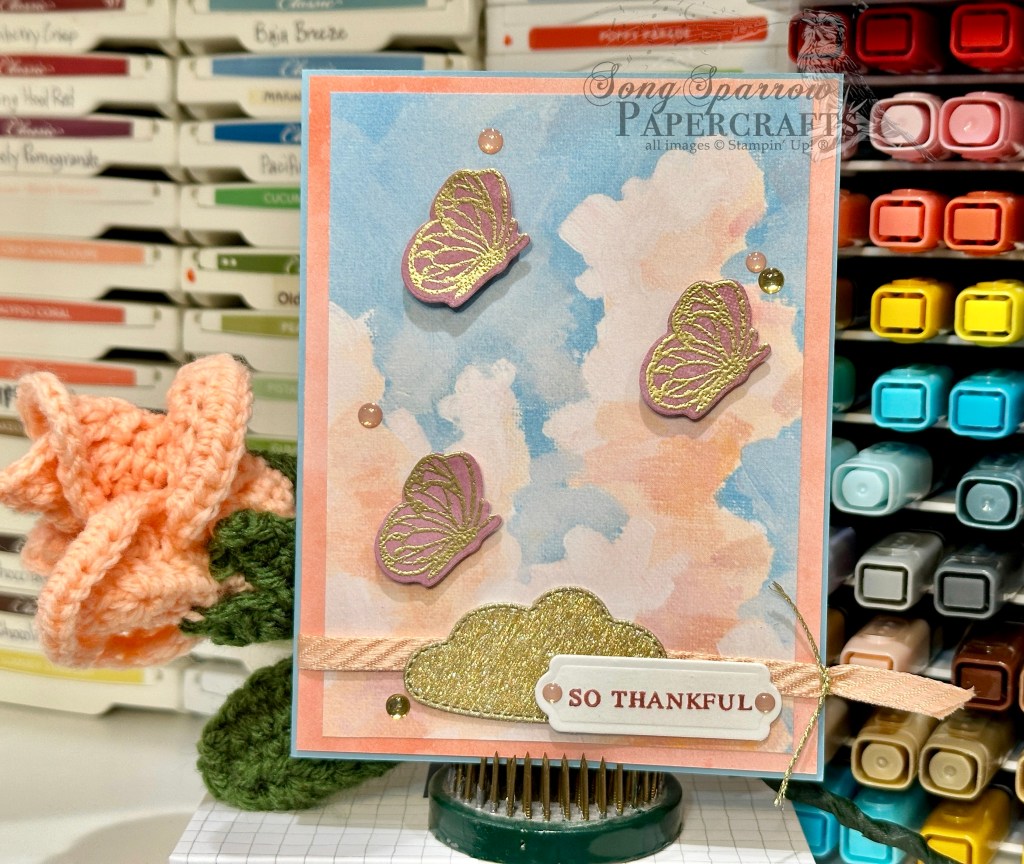
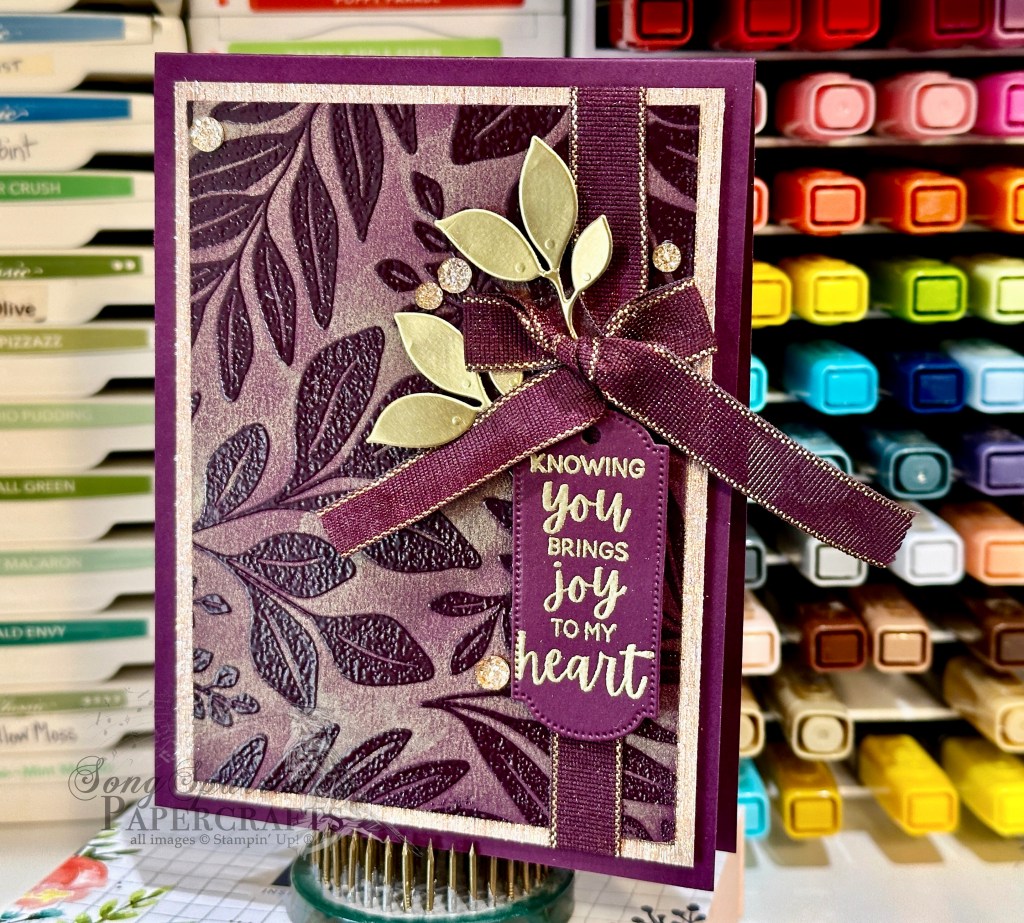
Autumn · Fall · sketches · Sketchy Fridays

Sketchy Fridays: Accomplished So Much

This week is all about autumn, and we’re using unique combinations of Stampin’ Up! products to make some beautiful card designs.

And it’s already time again for another installment of Sketchy Fridays, where each week we’ll be using a card sketch to design our featured card. Right now, we’re working through a full series of designs using the card sketches found on page 22 of the current Stampin’ Up! Annual Catalog.

This week’s card is based on Sketch #14 and features the gorgeous Splendid Autumn designer paper from the new Stampin’ Up! Holiday Mini catalog.

As I was thumbing through the papers in the Splendid Autumn paper pack, I was looking for a sheet that would lend itself to an unexpected combination of products. When I saw this beautiful sheet of the groves of trees separated by a stream with its hues of greens and purples, along with the usual fall foliage colors, I knew I had found the sheet I was looking for.

The beauty of today’s Sketch #14 is it lets us use this gorgeous paper as the focal point and then support it with mats as complements. We get started with a base of Calypso Coral cardstock. I love how this base color makes the oranges in the trees pop over the golden hues. Our sheet of Splendid Autumn is matted in two different colors. We use a very thin mat of Peach Pie glimmer paper right up against the Splendid Autumn, and it’s such a nice complement to the golden hues in our paper. Then we’re using a larger secondary mat of Old Olive Season of Elegance designer paper. Just look at how this brings out the grass along either side of our creek that’s reflecting our gorgeous dusky sky. And in person, the sparkle of the gold foiling in this sheet plays along perfectly with the glimmer paper. The sentiment from Wonderful Thoughts is heat embossed in gold on a sheet of white vellum from the Graceful Greenery vellum pack and then diecut using the Greetings of the Season dies using the extension method to give us a full banner. We finish things off with a twist of ribbons, including iridescent striped sheer ribbon, gold trim, and two colors of linen thread from the new Natural Tones pack, and a few of the new Earth Tones shimmer gems in opposing corners for a little sparkle.

I hope you tune in tomorrow as we round out our All About Autumn card series. I’ll be bringing you another emboss resist project, as well as a BONUS post showing how you can make a simple easel project that packs a big punch!

Products used in today’s card:
Calypso Coral cardstock
Season of Elegance, Splendid Autumn, Graceful Greenery vellum, Gold textured DSP
Wonderful Thoughts stamps
Greetings of the Season dies
Iridescent striped ribbon
Gold trim
Natural Tones linen thread
Earth Tones shimmer gems
Dimensionals
Adhesives

Product List
Autumn · Fall

Feel Better

This week’s designs are all about autumn. Aside from using some great new product from Stampin’ Up!, we’re using some fun new techniques to boot!

Today, we’re pairing up the beautiful new Splendid Autumn patterned paper pack with the new Birch Wood embossing folder and a cool heat embossing effect that I learned from a team member. So let’s check it out.

For today’s color palette, we’re drawing out all of the beautiful autumn hues in our Splendid Autumn patterned paper — Copper Clay, Moody Mauve, and Very Vanilla. So we get started with a card base of Copper Clay. Our focal panel is a piece of Moody Mauve that’s been embossed using the new Birch Wood embossing folder. I then filled in all of the debossed sections with Versamark and embossed with copper, BUT I did not completely set the embossing powder. Instead, I only embossed it to the point of looking grainy and then quickly moved on to another section. I felt like the grainy texture looks much more like bark. I wanted a polaroid look for the sentiment panel, so we get started by diecutting a cross-hatch gold foiled sheet from the Nature’s Sweetness paper pack using the largest Nested Essentials banner die. The sheet of Splendid Autumn is then cut to size to fit within, leaving a small border. The sentiment from Unbounded Love is heat embossed in copper on a banner diecut from a sheet of the white Graceful Greenery vellum using the Happy Little Things die. The top of the sentiment panel is wrapped in the new Copper Clay linen thread and the full panel is adhered to the focal panel using dimensionals. A few of the new drusy embellishments in each corner help move the eye across the card.

Isn’t this such a fun embossing technique? I really love the realism it adds to the woodgrain embossed panel. Speaking of embossing techniques, tomorrow we’ll be using another oldie but goodie. I hope you’ll pop by and check it out!

Products used in today’s card:
Copper Clay, Moody Mauve cardstock
Nature’s Sweetness, Splendid Autumn DSP
Graceful Greenery vellum
Birch Wood embossing folder
Unbounded Love stamps
Nested Essentials, Happy Little Things dies
Copper embossing powder
Copper Clay linen thread
Drusy embellishments
Dimensionals
Adhesives

Product List
Fall

Piles of Blessings

Welcome to a brand new week AND month, crafty friends! This week, we have a new design theme — All About Autumn. And I have all kinds of fun new twists and techniques to show you using a whole host of products from Stampin’ Up! We get started today with the Changing Leaves bundle and the emboss resist watercolor technique.

Our card base is Copper Clay cardstock and scored at the top for this portrait orientation design. For our focal panel, we start with a panel of watercolor paper. I stamped the largest leaf from Changing Leaves and heat embossed with white embossing powder. Using the water color painter, I used a combination of Blackberry Bliss, Copper Clay, and Flirty Flamingo ink to watercolor the leaves. The focal panel is then matted with a frame of Blackberry Bliss that has been embossed with the Changing Leaves embossing folder and the center portion is cut out using the Deckled Rectangles dies to make the frame. The framed panel is then mounted to the card base with dimensionals. The sentiment from Unbounded Love is stamped in black on Very Vanilla cardstock and then diecut with the decorative circle from Changing Leaves. The leaves are cut from Pretty Peacock Oxidized Copper paper using the elm leaves from the Changing Leaves die set. A twist of Blackberry Bliss & Gold textured ribbon is adhered over the leaves at the bottom of the sentiment panel using glue dots. The sentiment panel is adhered to the focal panel with dimensionals.

I just love the emboss resist technique and need to remember to incorporate it more into card designs. There are so many different applications and effects that can be achieved with this one technique!

Tune in tomorrow as we get a second look at the very cool Stampin’ Blends acetate rub technique.

Products used in today’s card:
Copper Clay, Blackberry Bliss, Very Vanilla cardstock
Oxidized Copper, watercolor SP
Changing Leaves bundle
Unbounded Love stamps
Deckled Rectanges dies
White embossing powder
Blackberry Bliss & Gold textured ribbon (coming tomorrow!)
Dimensionals
Adhesives

Product List
Changing Leaves · Fun Folds

Not Without You

Welcome to another bright & shining Monday. I don’t know about you, but it was a busy weekend for us. The kiddo finished up his summer bowling league and took some lessons in preparation for the start of the fall league. So we spent a lot of time at the bowling alley. But given the inferno we’re experiencing here in North Texas, that worked out just fine!

This week, we’re starting a new card series called In the Woods. Each we’ll be using products from Stampin’ Up! that fit our weekly theme. Today, I’m feeling all the fall vibes and thought it would be appropriate to get started with the Changing Leaves bundle paired up with the Splendid Autumn designer series paper that launches next week on September 6th.

To give an opportunity for our gorgeous leaves from the Changing Leaves bundle to take center stage, we’re working with the barn fold today. And we get started on today’s card with a base of Crushed Curry cardstock. We cover each of the front flaps of our barn fold with a strip of paper from the Splendid Autumn paper pack. The pattern is a very subtle brushed, grainy texture that gives some nice depth in our color palette. Next up, we emboss a quarter panel of Blackberry Bliss cardstock using the Changing Leaves hybrid embossing folder and then diecut it into a smaller panel with one of the larger Deckled Rectangles dies. On a quarter sheet of white cardstock, I traced the outside of the trio of leaves from the Changing Leaves die set in pencil to make it easier to stamp each of the leaf images and then diecut all at once. I used a combination of fall colors to ink each leaf from the stamp set, including Copper Clay, Blackberry Bliss, and Crushed Curry, and imitated the look of leaves in a color metamorphosis by going over sections of each leaf with other colors for a subtle two-toned look. I diecut a few additional leaves in gold foil and Blackberry Bliss and then layered everything together to create a leafy focal section behind the sentiment panel. Our hexagonal sentiment panel consists of a white center panel and mat of Peach Pie glimmer paper. The sentiments from Everyday Greetings and Changing Leaves are stamped in Blackberry Bliss. Our focal panel section is finished off with Blackberry Bliss & Gold textured ribbon from the upcoming Holiday Mini catalog, releasing next week on September 6th. A few shiny sequins finish things off with a little extra sparkle and help draw the eye across all the gorgeous design elements on the front of this card.

Tomorrow we’re working with another fun fold design and another gorgeous sheet from the Splendid Autumn paper pack to create a gorgeous peek-through scene. You won’t want to miss it!

Products used in today’s card:
Crushed Curry, Blackberry Bliss, Basic White cardstock
Splendid Autumn (coming soon!), gold foil, In Color glimmer DSP
Changing Leaves stamps, dies & hybrid embossing folder
Deckled Rectangles
Everyday Greetings stamps
Hexagon punch
Blackberry Bliss & Gold textured ribbon (coming soon!)
Shiny sequins
Dimensionals
Adhesives

Product List
Inspiration

Where There is Heartache

I love finding new ways to use product in my stash. And I realized that I often look at the “holiday” products as just that – products for the holidays and not for the everyday. So I wanted to challenge myself to expand designs with those holiday products.

Today, we’re using the Season of Green & Gold patterned paper to create a stunning sympathy card. I feel like sympathy cards should offer love, hope, and encouragement. And while it’s certainly a somber occasion, a design of carefully selected colors and elements can convey hope without words.

We get started on our card with a base of Lost Lagoon cardstock. Our focal panel backdrop consists of a panel of Lost Lagoon embossed on an angle with the Cute Crochet embossing folder and then matted with the gold mercury vellum. The Lost Lagoon panel has gold trim tied around it with a small bow. The sentiment from Everyday Greetings is stamped in Versamark on Soft Sea Foam and then heat embossed in gold. This is then diecut with the Spotlight on Nature dies. I love that the Season of Green & Gold designer paper coordinates with the Golden Greenery dies and have used the two together to cut out several of the stalks of greenery for the sentiment panel. I also cut a sheet of textured gold with the greenery dies. All of these greenery pieces are layered behind the sentiment panel. The drusy embellishments add extra sparkle.

Next week, we’re going to be in the woods. I hope you’ll come along!

Products used in today’s card:
Lost Lagoon, Soft Sea Foam cardstock
Season of Green & Gold, mercury vellum, textured gold DSP
Cute Crochet embossing folder
Everyday Greetings stamps
Spotlight on Nature, Golden Greenery dies
Gold embossing powder
Gold trim
Drusy embellishments
Dimensionals
Adhesives

Coming Soon · Holiday Mini Catalog

Christmas in the Air

I don’t know about you, but I’ve had a ball digging into my box of Stampin’ Up! Holiday Mini catalog preorder goodies and sharing sneak peeks with you. One of the many perks of being a demonstrator is having the opportunity to order new items early, and I love being able to share my excitement about new products with you.

Today, we’re getting a look at a new embossing folder called Painted Trees, which is part of the larger suite that we worked with yesterday. This embossing folder is on the larger side, which is perfect for anyone who prefers making larger-sized cards. For today’s card, I kept things really simple. Let’s take a look.

We get started with a card base of Basic White cardstock. While cut to a standard size, I did orient the score line at the top of the portrait orientation. The base of our front panel is a sheet of the new Take a Bow designer paper. For our focal panel, we start with a quarter panel of Pool Party cardstock, which is cut down so that a narrow border of our base shows on all sides. I then machine embossed this panel using the Painted Trees embossing folder. I oriented the tallest tree so that it would be in the center of my panel, which gives just partial images of the smaller trees on either side. Using my sponge daubers, I went over the embossed portions with Mossy Meadow and Old Olive inks to bring out the details of each tree. I then sponged around the trees with Pool Party ink to give more depth and variation to the sky in the background. I used my water painter to flick diluted white craft ink on the panel to give the look of fluffy falling snow. Our sentiment panel is diecut from Garden Green cardstock using the Peaceful Season dies and then the sentiment from Peaceful Season is heat embossed in white. The word Christmas is diecut from white glimmer paper using the Peaceful Season die. I thread the silver & white sheer ribbon through the ends of the sentiment panel and tied a bow on one end to affix it to the card front. A few adhesive snowflakes finish things off.

I just love this embossing folder and can think of so many other sets that could be paired with it to create some really beautiful scenes. But this design is super simple and easy to replicate and is definitely going into my rotation of Christmas cards this year!

Next week, we’re going to look at our designer papers a little differently. I hope you’ll tag along as we turn patterns that may seem seasonal into designs for all occasions.

Products used in today’s card:
Basic White, Pool Party, Garden Green cardstock
White glimmer, Take a Bow (coming soon!) DSP
Peaceful Season stamps & dies (coming soon!)
Painted Trees embossing folder (coming soon!)
White embossing powder
Silver & white sheer ribbon
White snowflakes
Dimensionals
Adhesives

Winter

Fun & Laughter

Our unseasonably cool weather continues here in North Texas, and I’m looking forward to taking a longer walk today. What do you do when you’re having nicer weather in your area? I like to take advantage of cooler weather in the summer, for sure, and aside from taking a longer walk, I hope to knock out some gardening-related things outside this afternoon.

This week, we’re focusing on winter-themed products in the current Stampin’ Up! lineup in anticipation of the new winter mini catalog that will be launching in September. Today’s card is actually a nod to an older SU! wood-mounted set called Home for Christmas. The main image in that stamp set included a sled leaning against a door with a snow-filled threshold. Anyone remember that one?

So we get started on this card with a base of Shaded Spruce cardstock. Our background panel is the Mossy Meadow polka dot pattern sheet from the Season of Green & Gold designer paper pack. The door is “built” using a sheet of lighter woodgrain from the Country Woods designer paper pack. The door is adorned with an evergreen wreath which uses Shaded Spruce, Old Olive, and Garden Green cardstock and the greenery sprig from the Sophisticated Sled die set. The greenery is layered in a circle to create a wreath and then affixed to the door with dimensionals. Our sled is diecut from Pecan Pie and gold foil using the sled dies in the Sophisticated Sled die set and then leaned against the door and affixed with dimensionals. I added a few rhinestone jewels to serve as the sled rivets. To give the look of a snowy landscape, I diecut the white snowy vellum sheet from the Graceful Greenery vellum pack using the cloud dies from the Bright Skies die set. The sentiment from Sophisticated sled is stamped in Versamark on Very Vanilla cardstock and heat embossed with gold embossing powder. It’s then diecut using the Autumn Leaves dies and then affixed in the center of the wreath with dimensionals. To help draw the eye to the sentiment, I added a few Blooming Pearls on either side.

Tomorrow we’re going to fill our hearts with cheer. I hope you’ll drop in and find out how!

Did you know that TODAY and today only, you can stack two specials on your order? With a $75 order, you qualify for both free shipping AND a $5 Bonus Days coupon. So if you’ve got items on your shopping list, now is the perfect time to order! Click here to head over to my online store and take advantage of these great specials.

Products used in today’s card:
Shaded Spruce, Pecan Pie, Old Olive, Garden Green, Very Vanilla cardstock
Country Woods, Season of Green & Gold, Graceful Greenery vellum, Gold Foil DSP
Sophisticated Sled stamps & dies
Bright Skies, Autumn Leaves dies
Blooming Pearls, Rhinestone basic jewels
Dimensionals
Adhesives

Product List
Frosted Forest

Birthday as Great as You

We are already halfway through July, people. How is this possible??! Sometimes I’m amazed at just how quickly time flies by. And all of the Christmas-in-July and back-to-school posts are reminding me of it, for sure.

Well, we’re in a shiny new week and that means a shiny new featured product from Stampin’ Up! This week, we’re going to be working with the new Online Exclusive bundle called Frosted Forest, which includes a photopolymer stamp set, coordinating decorative masks, and coordinating dies. The images include both deciduous and evergreen trees, along with some sentiments. And this week, I’m working with decorative masks for the first time. To be honest, I have avoided them. They just seemed a little too fussy for me, but I have to admit that they’re not all that much trouble. And without them, I would be hand-coloring my tree images and we all know how well that would go for me! (Not very well. *wink*) So let’s take a closer look at today’s card, shall we?

I wanted to keep this design super clean and simple since it’s my first time using the masks. I decided to use the window pane technique as the layout but punched it up a little bit by changing up the standard window shape.

So we get started on our card with a base of Very Vanilla cardstock. The tall tree from the Frosted Forest stamp set is stamped in black in the center of the card front. Using the coordinating decorative masks, the tree is shaded with a combination of Early Espresso, Flirty Flamingo, and Versamark. The Versamark layer is last and heat embossed using copper embossing powder. Some of the copper embossing powder also stuck in the cracks of the trunk because the ink was still a little wet, but I actually liked the look at kept it. Once embossing was finished, I then added a very light sky behind the tree using Pool Party ink. Our patterned paper window pane is a sheet of Country Woods designer series paper that has been diecut in the center using the largest oblong hexagon from the Nested Essentials die set. The die was placed so that the tree would be centered in the window. The sentiment from Frosted Forest is stamped in Cajun Craze on Very Vanilla cardstock and then diecut with the Autumn Leaves die. The sentiment mat is diecut from the shimmery Cajun Craze cardstock with the larger Autumn Leaves sentiment die using the extension method. A twist of linen thread is adhered behind the sentiment panel and this panel is adhered to the mat with the dimensionals and then the full panel is adhered to the designer paper panel with dimensionals, as well. I added a few copper sequins from the Neutrals set for sparkle and to draw the eye across the design.

I love the simplicity of this design and look forward to playing around with different window pane shapes and a variety of foliage colors on the tree. So many different looks can be achieved with just those simple changes! Maybe we’ll try some later this week.

Tomorrow, though, we’ll be making a regal looking birthday card using our evergreens from Frosted Forest. I hope you’ll pop in and check it out!

Products used in today’s card:
Very Vanilla, Cajun Craze In Color cardstock
Country Woods DSP
Frosted Forest stamps & masks
Nested Essentials, Autumn Leaves dies
WOW embossing powder
Linen thread
Neutrals sequins
Dimensionals
Adhesives

Product List
Saying Hey

Hey, Thinking of You

It’s hard to believe, but we’re rounding out another week of fabulous crafty fun. This week, we’ve been using the Saying Hey photopolymer stamp set by Stampin’ Up! We’ve mixed it and matched it and everything in between.

Today, we’re combining an embossing folder and paper piecing to make this lovely right here. I was inspired by a card posted by SU! Artisan Verena Shapiro. And honestly, I’ve been wanting to try paper piecing with the Friends for Life dies for quite a while but just haven’t taken the time until now. Wanna know what I think? I should have done it long ago!

We get started on this card with a base of Pool Party cardstock. I embossed a quarter panel of Pool Party using the Cute Crochet embossing folder. I splattered some ink on the corners of the panel using my water brush and ink — Pretty Peacock and white craft reinker, to be exact. And then I cut down the panel so that I had an even border all around and mounted it on the base with dimensionals. I stamped the HEY from the Saying Hey set in Pretty Peacock and then heat embossed with clear embossing powder for a custom embossing color and then cut it out with paper snips. The second portion of the sentiment is from the Friends for Life stamp set and is stamped in Pretty in Pink and then heat embossed. The panel is then diecut using the Unbounded Love frame.

I chose a color combo of Pretty Peacock, Pretty in Pink, Summer Splash, and white for the heart die from the Friends for Life set. I cut the large heart from Pretty Peacock first and then diecut just the pattern center heart out of the other colors. I applied adhesive from my tape runner on my silicone mat and then began assembling the paper pieced heart. I carefully lifted the heart and placed it on white cardstock so that all of the pieces would remain in place and the back would be adhesive-free. It was a quick fussy cutting job to have it ready to adhere to the card front. Both the framed sentiment and heart are adhered with one layer of dimensionals, while the HEY is adhered on two. I added iridescent ribbon behind and jewels and pearls around for some extra eye-catching sparkle.

The paper piecing didn’t take all that long. But if you’re not feeling up to it, there are a number of ways to accomplish a similar look in the white spaces — making a watercolor panel to mount behind, using the baby wipe technique to make a back panel, using a piece of patterned paper from Meandering Meadow or Thoughtful Journey …. I’m sure we could think of many more but you get the idea.

I hope you’ve enjoyed this week’s look at the Saying Hey stamp set. Tune in next week as we dive in to a brand new Online Exclusive bundle. Who’s up for a trip to the forest?

Products used in today’s card:
Pool Party, Pretty Peacock, Summer Splash, Pretty in Pink, Basic White cardstock
Saying Hey, Friends for Life stamps
Friends for Life, Unbounded Love dies
Cute Crochet embossing folder
WOW embossing powder
Water painter
Iridescent striped ribbon
Blooming pearls, rhinestone basic jewels
Dimensionals
Adhesives

Product List
Saying Hey

You Are Incredible

We’ve enjoyed a few days of cooler weather here in North Texas. I suppose we can thank Hurricane Beryl for this cooler weather pattern and definitely for the higher humidity. So while we may not be melting into puddles from the heat, you certainly come back inside drenched from the humidity. But it’s allowed for some outdoor cleaning projects that we would ordinarily save for the fall. My mom and I tackled cleaning the exterior of her windows a few days ago.

Today, I’m enjoying some more time in the craft room bringing you another fun card using the Stampin’ Up! Saying Hey photopolymer stamp set. We’re pairing it with a fun patterned paper and the Happy Little Things stamp set. Let’s take a closer look at how this card comes together.

We get started with a card base of Pool Party cardstock. I love how this plays on the colorful patterned paper sheet from the Bright & Beautiful paper pack. Our focal panel is our sentiment panel, which has been diecut from white cardstock using the Nested Essentials dies. The sentiment combines the Saying Hey and Happy Little Things stamps and is stamped in a combination of Pretty Peacock and Melon Mambo and then heat embossed with clear embossing powder to create our custom embossed colors. To draw the eye and really make the sentiment panel pop, we add banners diecut from Berry Burst and In Color glimmer papers using nesting banners from the Nested Essentials die set, as well as a twist of Pretty Peacock & Gold metallic ribbon. A few sequins from the Sequins Trio set pull our color palette together and add some additional eye-catching sparkle.

Tomorrow we’re closing out our series using the Saying Hey stamp set with a little crochet fun. I hope you’ll stop by and check it out!

Products used in today’s card:
Pool Party, Basic White cardstock
Bright & Beautiful, In Color glimmer, Berry Burst glimmer DSP
Saying Hey, Happy Little Things stamps
Nested Essentials dies
WOW embossing powder
Pretty Peacock & Gold metallic ribbon
Sequins trio
Dimensionals
Adhesives

Product List