Autumn · Fall

Feel Better

This week’s designs are all about autumn. Aside from using some great new product from Stampin’ Up!, we’re using some fun new techniques to boot!

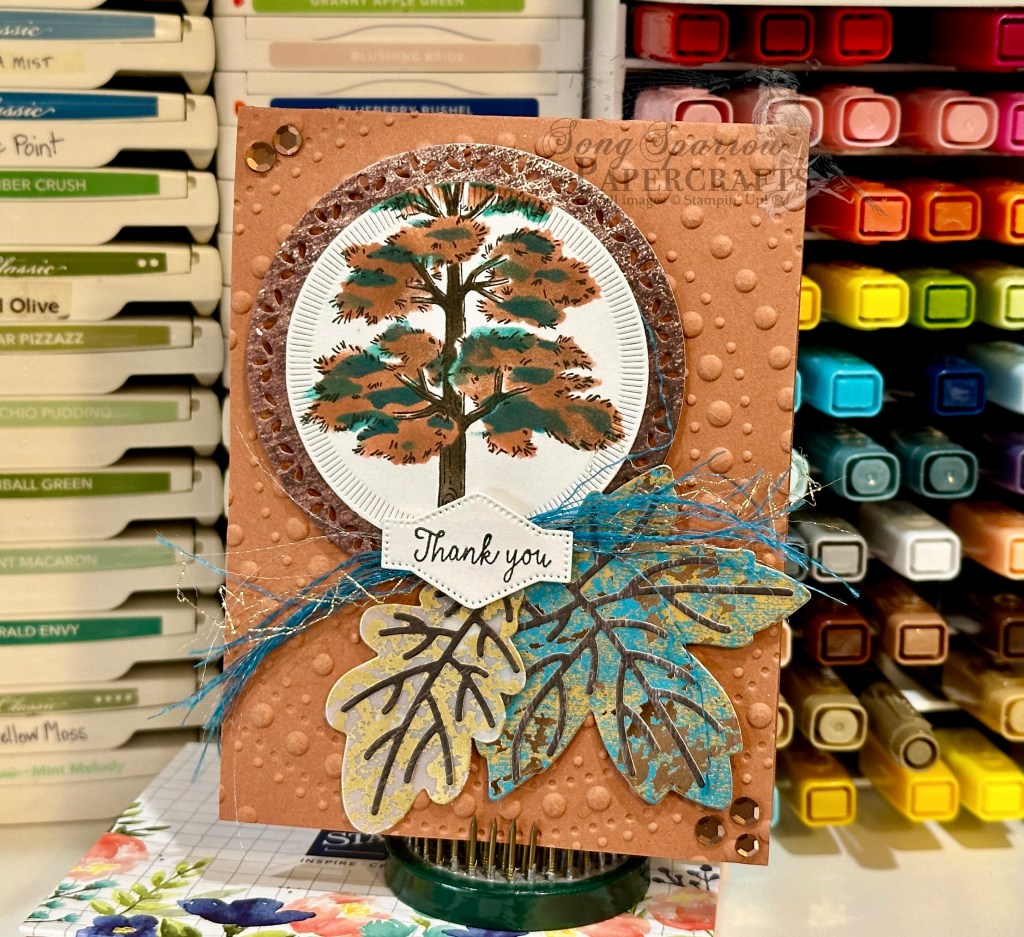
Today, we’re pairing up the beautiful new Splendid Autumn patterned paper pack with the new Birch Wood embossing folder and a cool heat embossing effect that I learned from a team member. So let’s check it out.

For today’s color palette, we’re drawing out all of the beautiful autumn hues in our Splendid Autumn patterned paper — Copper Clay, Moody Mauve, and Very Vanilla. So we get started with a card base of Copper Clay. Our focal panel is a piece of Moody Mauve that’s been embossed using the new Birch Wood embossing folder. I then filled in all of the debossed sections with Versamark and embossed with copper, BUT I did not completely set the embossing powder. Instead, I only embossed it to the point of looking grainy and then quickly moved on to another section. I felt like the grainy texture looks much more like bark. I wanted a polaroid look for the sentiment panel, so we get started by diecutting a cross-hatch gold foiled sheet from the Nature’s Sweetness paper pack using the largest Nested Essentials banner die. The sheet of Splendid Autumn is then cut to size to fit within, leaving a small border. The sentiment from Unbounded Love is heat embossed in copper on a banner diecut from a sheet of the white Graceful Greenery vellum using the Happy Little Things die. The top of the sentiment panel is wrapped in the new Copper Clay linen thread and the full panel is adhered to the focal panel using dimensionals. A few of the new drusy embellishments in each corner help move the eye across the card.

Isn’t this such a fun embossing technique? I really love the realism it adds to the woodgrain embossed panel. Speaking of embossing techniques, tomorrow we’ll be using another oldie but goodie. I hope you’ll pop by and check it out!

Products used in today’s card:
Copper Clay, Moody Mauve cardstock
Nature’s Sweetness, Splendid Autumn DSP
Graceful Greenery vellum
Birch Wood embossing folder
Unbounded Love stamps
Nested Essentials, Happy Little Things dies
Copper embossing powder
Copper Clay linen thread
Drusy embellishments
Dimensionals
Adhesives

Product List
Fall

Piles of Blessings

Welcome to a brand new week AND month, crafty friends! This week, we have a new design theme — All About Autumn. And I have all kinds of fun new twists and techniques to show you using a whole host of products from Stampin’ Up! We get started today with the Changing Leaves bundle and the emboss resist watercolor technique.

Our card base is Copper Clay cardstock and scored at the top for this portrait orientation design. For our focal panel, we start with a panel of watercolor paper. I stamped the largest leaf from Changing Leaves and heat embossed with white embossing powder. Using the water color painter, I used a combination of Blackberry Bliss, Copper Clay, and Flirty Flamingo ink to watercolor the leaves. The focal panel is then matted with a frame of Blackberry Bliss that has been embossed with the Changing Leaves embossing folder and the center portion is cut out using the Deckled Rectangles dies to make the frame. The framed panel is then mounted to the card base with dimensionals. The sentiment from Unbounded Love is stamped in black on Very Vanilla cardstock and then diecut with the decorative circle from Changing Leaves. The leaves are cut from Pretty Peacock Oxidized Copper paper using the elm leaves from the Changing Leaves die set. A twist of Blackberry Bliss & Gold textured ribbon is adhered over the leaves at the bottom of the sentiment panel using glue dots. The sentiment panel is adhered to the focal panel with dimensionals.

I just love the emboss resist technique and need to remember to incorporate it more into card designs. There are so many different applications and effects that can be achieved with this one technique!

Tune in tomorrow as we get a second look at the very cool Stampin’ Blends acetate rub technique.

Products used in today’s card:
Copper Clay, Blackberry Bliss, Very Vanilla cardstock
Oxidized Copper, watercolor SP
Changing Leaves bundle
Unbounded Love stamps
Deckled Rectanges dies
White embossing powder
Blackberry Bliss & Gold textured ribbon (coming tomorrow!)
Dimensionals
Adhesives

Product List
Changing Leaves · Fun Folds

Not Without You

Welcome to another bright & shining Monday. I don’t know about you, but it was a busy weekend for us. The kiddo finished up his summer bowling league and took some lessons in preparation for the start of the fall league. So we spent a lot of time at the bowling alley. But given the inferno we’re experiencing here in North Texas, that worked out just fine!

This week, we’re starting a new card series called In the Woods. Each we’ll be using products from Stampin’ Up! that fit our weekly theme. Today, I’m feeling all the fall vibes and thought it would be appropriate to get started with the Changing Leaves bundle paired up with the Splendid Autumn designer series paper that launches next week on September 6th.

To give an opportunity for our gorgeous leaves from the Changing Leaves bundle to take center stage, we’re working with the barn fold today. And we get started on today’s card with a base of Crushed Curry cardstock. We cover each of the front flaps of our barn fold with a strip of paper from the Splendid Autumn paper pack. The pattern is a very subtle brushed, grainy texture that gives some nice depth in our color palette. Next up, we emboss a quarter panel of Blackberry Bliss cardstock using the Changing Leaves hybrid embossing folder and then diecut it into a smaller panel with one of the larger Deckled Rectangles dies. On a quarter sheet of white cardstock, I traced the outside of the trio of leaves from the Changing Leaves die set in pencil to make it easier to stamp each of the leaf images and then diecut all at once. I used a combination of fall colors to ink each leaf from the stamp set, including Copper Clay, Blackberry Bliss, and Crushed Curry, and imitated the look of leaves in a color metamorphosis by going over sections of each leaf with other colors for a subtle two-toned look. I diecut a few additional leaves in gold foil and Blackberry Bliss and then layered everything together to create a leafy focal section behind the sentiment panel. Our hexagonal sentiment panel consists of a white center panel and mat of Peach Pie glimmer paper. The sentiments from Everyday Greetings and Changing Leaves are stamped in Blackberry Bliss. Our focal panel section is finished off with Blackberry Bliss & Gold textured ribbon from the upcoming Holiday Mini catalog, releasing next week on September 6th. A few shiny sequins finish things off with a little extra sparkle and help draw the eye across all the gorgeous design elements on the front of this card.

Tomorrow we’re working with another fun fold design and another gorgeous sheet from the Splendid Autumn paper pack to create a gorgeous peek-through scene. You won’t want to miss it!

Products used in today’s card:
Crushed Curry, Blackberry Bliss, Basic White cardstock
Splendid Autumn (coming soon!), gold foil, In Color glimmer DSP
Changing Leaves stamps, dies & hybrid embossing folder
Deckled Rectangles
Everyday Greetings stamps
Hexagon punch
Blackberry Bliss & Gold textured ribbon (coming soon!)
Shiny sequins
Dimensionals
Adhesives

Product List
Inspiration

Where There is Heartache

I love finding new ways to use product in my stash. And I realized that I often look at the “holiday” products as just that – products for the holidays and not for the everyday. So I wanted to challenge myself to expand designs with those holiday products.

Today, we’re using the Season of Green & Gold patterned paper to create a stunning sympathy card. I feel like sympathy cards should offer love, hope, and encouragement. And while it’s certainly a somber occasion, a design of carefully selected colors and elements can convey hope without words.

We get started on our card with a base of Lost Lagoon cardstock. Our focal panel backdrop consists of a panel of Lost Lagoon embossed on an angle with the Cute Crochet embossing folder and then matted with the gold mercury vellum. The Lost Lagoon panel has gold trim tied around it with a small bow. The sentiment from Everyday Greetings is stamped in Versamark on Soft Sea Foam and then heat embossed in gold. This is then diecut with the Spotlight on Nature dies. I love that the Season of Green & Gold designer paper coordinates with the Golden Greenery dies and have used the two together to cut out several of the stalks of greenery for the sentiment panel. I also cut a sheet of textured gold with the greenery dies. All of these greenery pieces are layered behind the sentiment panel. The drusy embellishments add extra sparkle.

Next week, we’re going to be in the woods. I hope you’ll come along!

Products used in today’s card:
Lost Lagoon, Soft Sea Foam cardstock
Season of Green & Gold, mercury vellum, textured gold DSP
Cute Crochet embossing folder
Everyday Greetings stamps
Spotlight on Nature, Golden Greenery dies
Gold embossing powder
Gold trim
Drusy embellishments
Dimensionals
Adhesives

Holiday Mini Catalog · Holidays

Let’s Celebrate

Happy Monday, everyone! Can you believe we’re halfway through August already?! Me either! But that means, we’re just a few short weeks away from the launch of the Stampin’ Up! Holiday Mini catalog. And trust me when I say you’re gonna love it!

This week, we’re starting a new design series. We’re going to be looking at our holiday products from a different angle, taking them beyond the holidays into the everyday.

And today, we’re starting with the new Nests of Winter designer paper. We’re using the detailed bird patterned paper to create a celebratory card. While it’s a little wintery, the design doesn’t feel like a holiday card. This card would be perfect for a winter birthday, promotion, retirement, or graduation.

We get started with a base of Night of Navy cardstock. Our focal panel backdrop consists of a narrow panel of Night of Navy embossed with the Snowflake Sky embossing folder and two mats — white glimmer paper and textured gold specialty paper. The cluster of birds are diecut from the Nests of Winter designer paper using the Spotlight on Nature dies. The sentiments are stamped in navy on white cardstock using the Happy Little Things and Friends for Life stamp sets and then diecut using the Greetings of the Season banner die. I’ve tied Night of Navy & Gold sheer ribbon through the end. Our sentiment panel overlays the focal images. And the design is finished with a few gold sequins to draw the eye across the design.

Tune in tomorrow for another twist on the Nests of Winter.

Products used in today’s card:
Basic White, Night of Navy cardstock
White glimmer, textured gold, Nests of Winter (coming soon!) DSP
Happy Little Things, Friends for Life stamps
Spotlight on Nature, Greetings of the Season dies
Snowflake Sky embossing folder
Night of Navy & Gold sheer ribbon
Neutrals sequins
Dimensionals
Adhesives

Coming Soon · Holiday Mini Catalog

Christmas in the Air

I don’t know about you, but I’ve had a ball digging into my box of Stampin’ Up! Holiday Mini catalog preorder goodies and sharing sneak peeks with you. One of the many perks of being a demonstrator is having the opportunity to order new items early, and I love being able to share my excitement about new products with you.

Today, we’re getting a look at a new embossing folder called Painted Trees, which is part of the larger suite that we worked with yesterday. This embossing folder is on the larger side, which is perfect for anyone who prefers making larger-sized cards. For today’s card, I kept things really simple. Let’s take a look.

We get started with a card base of Basic White cardstock. While cut to a standard size, I did orient the score line at the top of the portrait orientation. The base of our front panel is a sheet of the new Take a Bow designer paper. For our focal panel, we start with a quarter panel of Pool Party cardstock, which is cut down so that a narrow border of our base shows on all sides. I then machine embossed this panel using the Painted Trees embossing folder. I oriented the tallest tree so that it would be in the center of my panel, which gives just partial images of the smaller trees on either side. Using my sponge daubers, I went over the embossed portions with Mossy Meadow and Old Olive inks to bring out the details of each tree. I then sponged around the trees with Pool Party ink to give more depth and variation to the sky in the background. I used my water painter to flick diluted white craft ink on the panel to give the look of fluffy falling snow. Our sentiment panel is diecut from Garden Green cardstock using the Peaceful Season dies and then the sentiment from Peaceful Season is heat embossed in white. The word Christmas is diecut from white glimmer paper using the Peaceful Season die. I thread the silver & white sheer ribbon through the ends of the sentiment panel and tied a bow on one end to affix it to the card front. A few adhesive snowflakes finish things off.

I just love this embossing folder and can think of so many other sets that could be paired with it to create some really beautiful scenes. But this design is super simple and easy to replicate and is definitely going into my rotation of Christmas cards this year!

Next week, we’re going to look at our designer papers a little differently. I hope you’ll tag along as we turn patterns that may seem seasonal into designs for all occasions.

Products used in today’s card:
Basic White, Pool Party, Garden Green cardstock
White glimmer, Take a Bow (coming soon!) DSP
Peaceful Season stamps & dies (coming soon!)
Painted Trees embossing folder (coming soon!)
White embossing powder
Silver & white sheer ribbon
White snowflakes
Dimensionals
Adhesives

Botanicals

Incredible

We’re moving right along here in our tour of the garden this week. And today, we’re keeping things simple with a focal image taken directly from the Nature’s Sweetness designer paper pack by Stampin’ Up! Did you know that SU! will often have at least one pattern in a 12×12 pack of paper that can be divided evenly into 6 card front panels? Several current packs that include a sheet like this are Nature’s Sweetness, Perennial Lavender, and Flowering Zinnias. These types of sheets are what I often refer to as one sheet wonders, where one sheet of paper creates 6 cards. I’m sure other stamps refer to these sheets by other names, but that’s how I like to think of them.

For today’s card, we get started with a base of Moody Mauve cardstock. Our background panel is a sheet of Pretty Peacock cardstock that is cut slightly smaller than our card front and is then machine embossed using the Dotted Circles embossing folder. Our focal image mat is the gold-flecked bookprint sheet from the Nature’s Sweetness paper pack that has been diecut using one of the largest circles from the Spotlight on Nature die set. I then pulled the one sheet wonder pattern sheet from the Nature’s Sweetness designer paper pack and cut one 4-inch strip and then cut the two-image panel in half in order to use one image for our card front. The image is colored using Stampin’ Blends and then cut out using paper snips before being adhered to the diecut circle. Our sentiment from Happy Little Things is stamped in black on white cardstock and then diecut with the Everyday Details dies using the extension method. The mat is Moody Mauve luster paper diecut with the smallest Deckled Rectangle die, also using the extension method. The sentiment is adhered over a faux bow of gold trim using dimensionals. A few shiny sequins finish things off with a little sparkle.

The beauty of these one sheet wonder patterned paper sheets is how quickly you can make a whole stack of cards without sacrificing a single bit of ooo-la-la. And speaking of ooo-la-la, you must tune in tomorrow to check out the newest installment of Sketchy Fridays.

Products used in today’s card:
Moody Mauve, Pretty Peacock, Basic White cardstock
Nature’s Sweetness, Moody Mauve luster DSP
Happy Little Things stamps
Spotlight on Nature, Deckled Rectangles, Everyday Details dies
Stampin’ Blends
Gold trim
Shiny sequins
Dimensionals
Adhesives

Product List
Botanicals

You Matter

As we are wrapping up our final two weeks of summer before the kiddo heads back to school, we’re squeezing in lots of last-minute fun. One of things we enjoy doing every summer is going to our local bowling alley. The USBC hosts a program known as Kids Bowl Free and our local bowling alley participates. For a one-time fee, you can enroll the whole family and get 2 free games every weekday. My son has taken a particular interest in bowling and is actually quite good at it. This summer, he has added the youth bowling league to his list of regular activities and is planning to continue for the fall league. Right now, his team is about midway in the pack as far as standings so he’s working hard to improve his game. As with any sport, this is adding up to new equipment and lessons and time, but we absolutely love how much he loves it! And I can think of far worse things to spend money on!

We’re continuing our series this week called In the Garden. And today, we’re making our way through the cut flowers. One of my absolute favorite summer flowers is the zinnia. They come in so many happy colors and their blooms just keep going and going. I also love that they’re fairly hard to kill. *wink* Stampin’ Up! has a wonderful bundle of products called Flowering Zinnias that includes paper, stamps, dies, and embellishments; and today’s card features a portion of those products.

I recently saw a card by Stamp With Brenda that combined shades of red and light pink and just loved it, so that inspires our card today. We get started with a base of Poppy Parade cardstock. A quarter sheet of embossed Poppy Parade serves as our backdrop. It’s been cut down slightly and then machine embossed using the Zinnia embossing folder. Our focal panel has lots of beautiful layers. We get started by cutting a large square of white cardstock using the largest square from the Nested Essentials die set. Using the Painted Lavender and Simply Zinnia dies, we cut a combination of greenery stems. Our zinnia blooms are cut from Real Red cardstock to give a little contrast and help them pop against the busy backdrop. Our sentiment from the Something Fancy set is stamped in Poppy Parade on Petal Pink cardstock and then diecut using the smallest diamond die from the Nested Essentials set. This is all layered on top of a bit of iridescent striped trim and adhered to our card front with varying layers of dimensionals. A few iridescent discs are scattered on our card front to draw the eye to our focal section.

Tomorrow we’re going to look at several ways to use busy patterned paper to create stunning floral card designs. I hope you’ll drop by.

Products used in today’s card:
Poppy Parade, Shaded Spruce, Summer Splash, Mossy Meadow, Petal Pink, Real Red, Basic White cardstock
Something Fancy stamps
Deckled Rectangles, Painted Lavender, Simply Zinnia dies
Zinnia embossing folder
Iridescent striped trim
Iridescent discs
Dimensionals
Adhesives

Product List
Frosted Forest

Towering Thank You

Happy Wednesday, crafty friends! It’s hard to believe we’re already halfway to the weekend. This week, we’re exploring designs using the new Stampin’ Up! Online Exclusive bundle called Frosted Forest. Like so many other sets, Frosted Forest can be paired with a whole host of products in the current catalog to give you a variety of looks. Today, we’re using Autumn Leaves for a fall-inspired design.

I have seen so many wonderful cards using the Dotted Circles embossing folder and some sort of circular diecut, and I really wanted to give it a try. This card really just fell together. And I certainly can’t say that about very many cards that I make!

We get started with a card base of Cajun Craze cardstock and emboss just the front-facing portion of the card base using the Dotted Circles embossing folder. The tall tree from Frosted Forest is stamped on a quarter panel of white cardstock in black ink and then shaded using the decorative masks and a combination of Early Espresso, Cajun Craze, Pretty Peacock, and Shaded Spruce inks to tie with our other leaf elements. Our image panel is two layers — a mat diecut from Country Woods and the image panel, both cut using the Spotlight on Nature dies. I chose the two larger leaf dies from the Autumn Leaves set to complete our focal element. The larger leaf is cut from the Pretty Peacock sheet of Oxidized Copper, while the smaller leaf is cut from the Gold Mercury vellum. The leaf veining is cut from the darkest woodgrain patterned sheet in the Country Woods designer paper pack. The full focal section is adhered to the card front with dimensionals. The sentiment from Frosted Forest is stamped in black on white cardstock and then diecut with the decorative banner die in the Unbounded Love die set. I frayed an entire section of Pretty Peacock & Gold metallic ribbon by “unzipping” the gold and then separating the strands of thread. After gathering them together, I tied a small knot in the center and adhered it to the back of the sentiment panel and then adhered the sentiment panel with dimensionals. To help the eye move across the design, copper sequins are placed in opposite corners.

I hope you’ll tune in tomorrow to see how you can use the Frosted Forest bundle to build beautiful scenes. You won’t want to miss it!

Products used in this card:
Cajun Craze, Basic White cardstock
Country Woods, Oxidized Copper DSP
Gold Mercury vellum
Frosted Forest stamps & decorative masks
Spotlight on Nature, Unbounded Love, Autumn Leaves dies
Dotted Circles embossing
Pretty Peacock & Gold metallic ribbon
Neutrals sequins
Dimensionals
Adhesives

Product List
Saying Hey

Hey, Thinking of You

It’s hard to believe, but we’re rounding out another week of fabulous crafty fun. This week, we’ve been using the Saying Hey photopolymer stamp set by Stampin’ Up! We’ve mixed it and matched it and everything in between.

Today, we’re combining an embossing folder and paper piecing to make this lovely right here. I was inspired by a card posted by SU! Artisan Verena Shapiro. And honestly, I’ve been wanting to try paper piecing with the Friends for Life dies for quite a while but just haven’t taken the time until now. Wanna know what I think? I should have done it long ago!

We get started on this card with a base of Pool Party cardstock. I embossed a quarter panel of Pool Party using the Cute Crochet embossing folder. I splattered some ink on the corners of the panel using my water brush and ink — Pretty Peacock and white craft reinker, to be exact. And then I cut down the panel so that I had an even border all around and mounted it on the base with dimensionals. I stamped the HEY from the Saying Hey set in Pretty Peacock and then heat embossed with clear embossing powder for a custom embossing color and then cut it out with paper snips. The second portion of the sentiment is from the Friends for Life stamp set and is stamped in Pretty in Pink and then heat embossed. The panel is then diecut using the Unbounded Love frame.

I chose a color combo of Pretty Peacock, Pretty in Pink, Summer Splash, and white for the heart die from the Friends for Life set. I cut the large heart from Pretty Peacock first and then diecut just the pattern center heart out of the other colors. I applied adhesive from my tape runner on my silicone mat and then began assembling the paper pieced heart. I carefully lifted the heart and placed it on white cardstock so that all of the pieces would remain in place and the back would be adhesive-free. It was a quick fussy cutting job to have it ready to adhere to the card front. Both the framed sentiment and heart are adhered with one layer of dimensionals, while the HEY is adhered on two. I added iridescent ribbon behind and jewels and pearls around for some extra eye-catching sparkle.

The paper piecing didn’t take all that long. But if you’re not feeling up to it, there are a number of ways to accomplish a similar look in the white spaces — making a watercolor panel to mount behind, using the baby wipe technique to make a back panel, using a piece of patterned paper from Meandering Meadow or Thoughtful Journey …. I’m sure we could think of many more but you get the idea.

I hope you’ve enjoyed this week’s look at the Saying Hey stamp set. Tune in next week as we dive in to a brand new Online Exclusive bundle. Who’s up for a trip to the forest?

Products used in today’s card:
Pool Party, Pretty Peacock, Summer Splash, Pretty in Pink, Basic White cardstock
Saying Hey, Friends for Life stamps
Friends for Life, Unbounded Love dies
Cute Crochet embossing folder
WOW embossing powder
Water painter
Iridescent striped ribbon
Blooming pearls, rhinestone basic jewels
Dimensionals
Adhesives

Product List