Changing Leaves · Coming Soon

Grateful Leaves

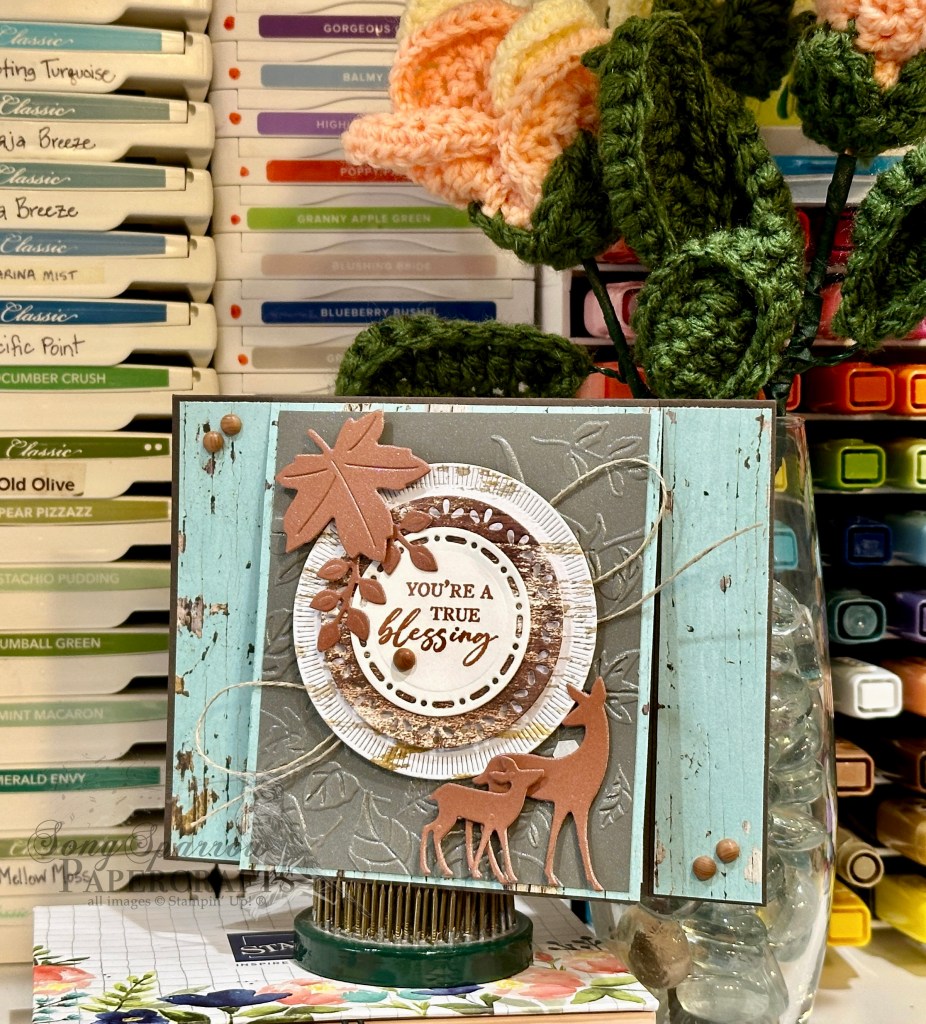
We’re closing out our sneak peek of the upcoming Online Exclusive bundle called Changing Leaves. This bundle, which includes a photopolymer stamp set, coordinating dies, and a hybrid embossing folder, launches in my online store on July 3rd! We’re rounding out this week’s designs with an earth tone color palette and a simple layout.

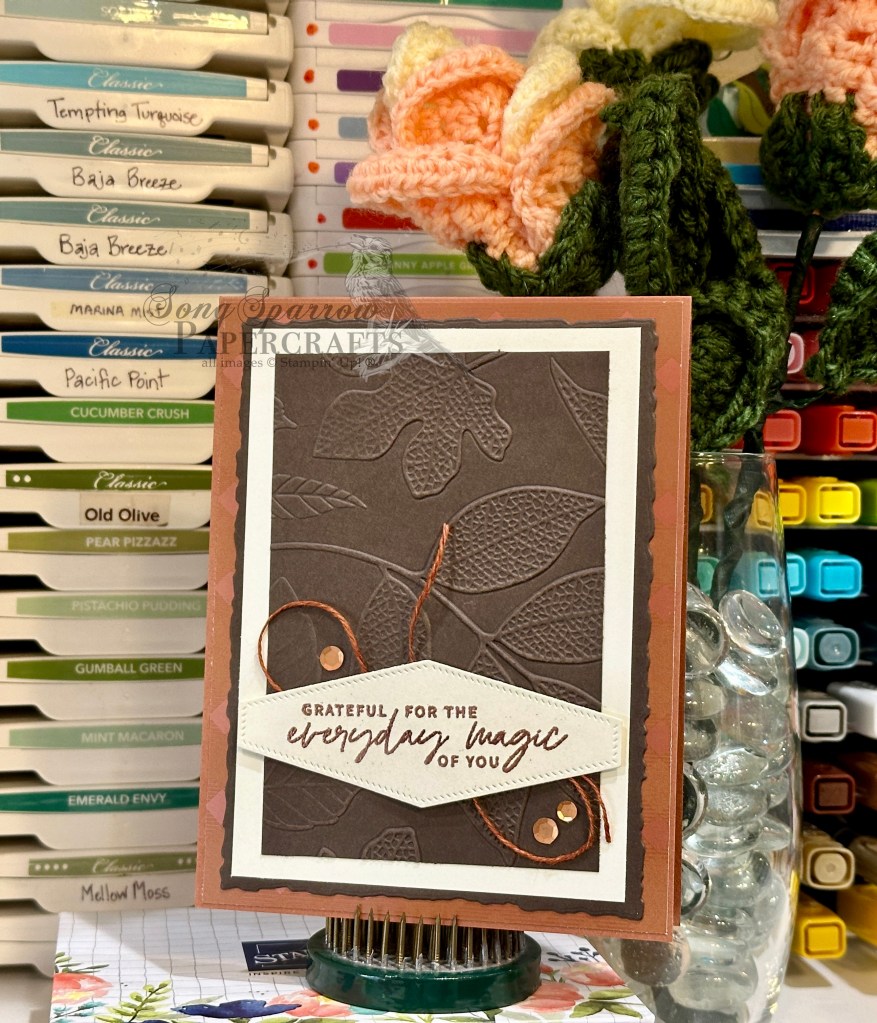
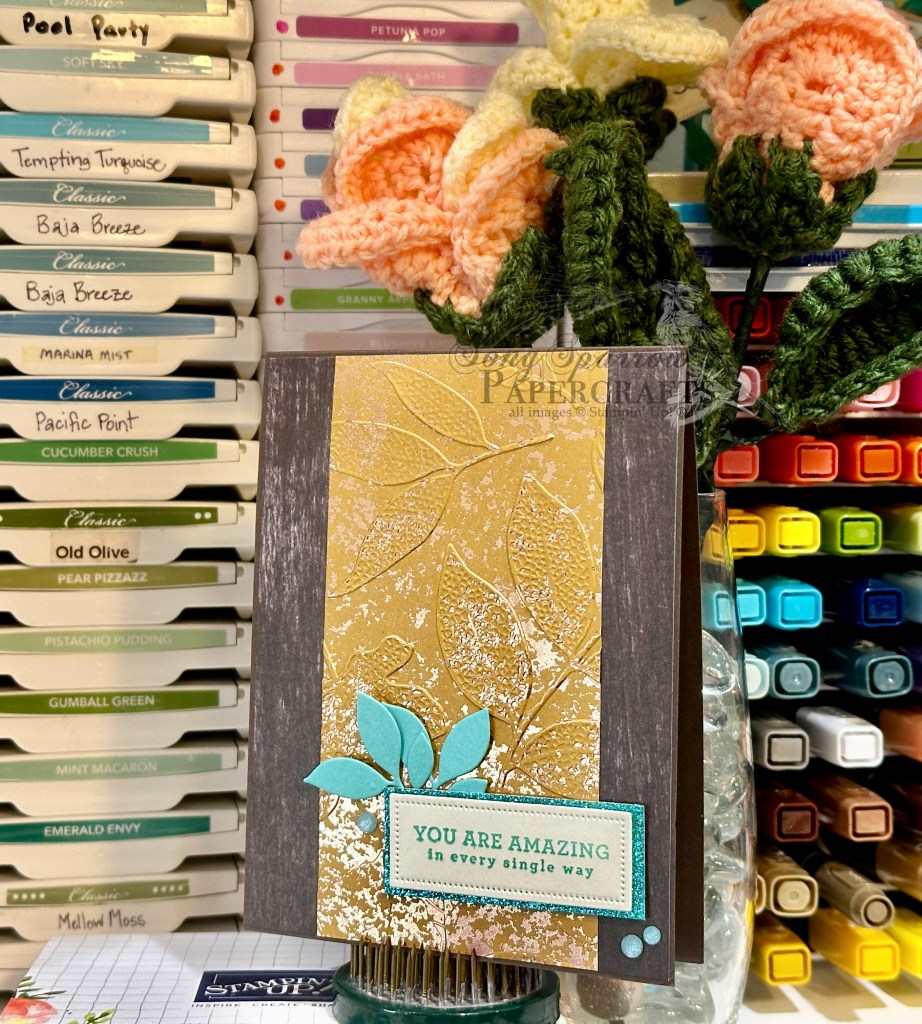
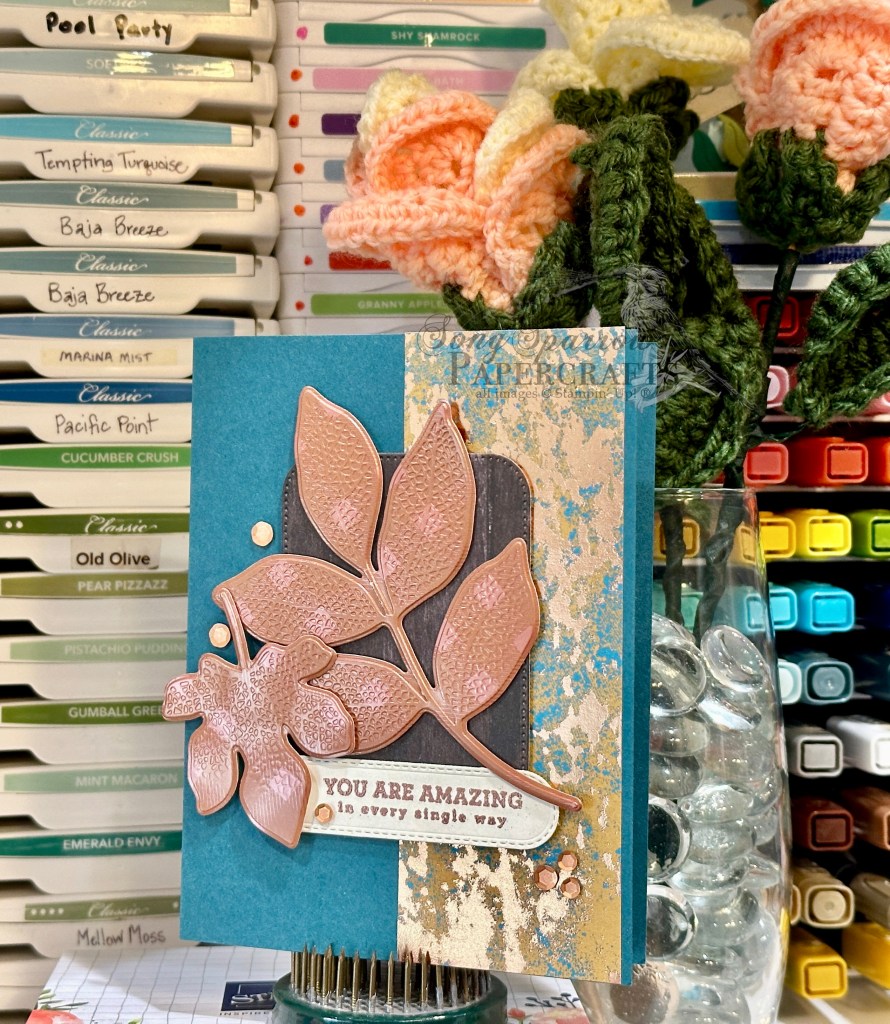
We get started on today’s card with a base of Cajun Craze cardstock. The background panel is a piece of the Cajun Craze Tartan Foil designer paper. Our focal panel is three layers of neutral goodness with a Deckled Rectangle mat of Early Espresso, a larger straight-edged mat of Very Vanilla, and an embossed layer of Early Espresso using the Changing Leaves embossing folder. I just love the deep impression you get every time with this embossing folder. It shows so much detail in the leave patterns. The sentiment panel is a piece of Very Vanilla cardstock diecut using the Nested Essentials dies, and the sentiment from Something Fancy is heat embossed in copper. I used a twist of Cajun Craze twine (releasing in the fall!) and added some copper sequins around the panel for eye-catching sparkle. A piece of linen thread would also work perfectly behind the sentiment.

This week, I really wanted to highlight how you can use the new Changing Leaves bundle in so many different ways. We’ll run another series closer to fall to showcase how you can pair this beautiful bundle with many other Stampin’ Up! products to stretch the design possibilities even further. But next week, we’re going to say HELLO to the Hollyhocks. I hope you’ll join me!

Products used in today’s card:
Cajun Craze, Early Espresso, Very Vanilla cardstock
Tartan Foil DSP
Changing Leaves embossing folder (coming soon)
Something Fancy stamps
Nested Essentials, Deckled Rectangles dies
Cajun Craze linen thread (coming Fall 2024)
Neutrals sequins
Dimensionals
Adhesives

Product List
Changing Leaves · Coming Soon · L2S Group Instahop

Words Fail

This week we’re taking a sneak peek at the upcoming Online Exclusive by Stampin’ Up! called Changing Leaves. This bundle of products includes a stamp set, dies, and hybrid embossing folder. I love all of the detail included in the images in this set, and I’ve enjoyed thinking outside the box when designing with it. This set, although full of gorgeous fall foliage images, lends itself to all sorts of fun designs that don’t immediately make you think of fall. And today’s card is another example. So let’s get started.

I wanted a light and bright color palette for this thank-you card. I did let Mother Nature do a little of the talking with the choices in leaf color but then I worked to fill in with some fun complimentary colors. Our card begins with a base of Flirty Flamingo cardstock. The background panel is a quarter panel of Petal Pink embossed with the soon-to-release Changing Leaves embossing folder. I cut this panel down a bit to have a nice border of Flirty Flamingo all around. Our focal images are a whole smattering of stamped and diecut leaves from the soon-to-release Changing Leaves stamp set. All of the images are stamped tone-on-tone. Two of the larger leaves are stamped on Old Olive and Summer Splash with the two smaller leaves stamped on Lemon Lolly and Peach Pie. I added a few sparkly elements with the Peach Pie and Summer Splash foliage tucked in the mix. The sentiment from Simply Zinnia is stamped on Very Vanilla cardstock and diecut with the Autumn Leaves die set using the extension method. (For more on using the die extension method, check out this quick tutorial.) I tucked a faux bow of Petal Pink diagonal trim behind the sentiment panel and added a few Peach Pie shimmer gems across the card front for added sparkle.

Today’s card is a part of the Luv 2 Stamp Group Instagram Hop, which goes live at 9 AM Pacific Time (PST). Click here to head over to my Instagram feed and check out what the other demos in our L2S Group have created for you today!

Products used in today’s card:
Flirty Flamingo, Petal Pink, Very Vanilla, Lemon Lolly, Old Olive, Peach Pie, Summer Splash cardstock
In Color Glimmer paper
Changing Leaves stamps, dies, hybrid embossing folder (coming soon)
Autumn Leaves dies
Simply Zinnia stamps
Diagonal trim
In Color shimmer gems
Dimensionals
Adhesives

Product List
Changing Leaves · Coming Soon

Couldn’t Have Done It Without You

It’s hard to believe we’re already halfway through this bright and shiny week. I’m having such a good time working with the brand new Online Exclusive from Stampin’ Up! called Changing Leaves, which releases just one week from TODAY! This new bundle includes a photopolymer stamp set, which happens to be my favorite kind of stamps! And it also includes coordinating dies and a hybrid embossing folder. If you’re not familiar with a hybrid embossing folder, check out yesterday’s blog post where I have a video showing you all about it!

But without further adieu, let’s get to today’s card, shall we? I think the fun thing about any stamp set is finding unique ways to use it. When sitting down with a leaf-themed set, my mind naturally walks down the path to fall. But you know what? You don’t HAVE to make a fall card just because your stamp set has images of leaves. And today’s card does a little thinking outside the box to show you how you can use this gorgeous new bundle of leaf images and make something that doesn’t scream fall.

So we get started with a card base of Summer Splash cardstock. I embossed a full quarter panel of Summer Splash using the soon-to-release Changing Leaves embossing folder and adhered it to the card front. (You could simply emboss the card front itself if you want to lighten up the layers and card weight.) On a quarter sheet of white cardstock, I stamped the Hey sentiment from the Saying Hey stamp set in Summer Splash and then cut the strip with my paper trimmer. On the remaining portion of the white cardstock, I stamped the sentiment from the soon-to-release Changing Leaves stamp set and then punched it out with the Heartfelt Hexagon punch and adhered to the sentiment strip. The full sentiment panel is then adhered to the card front. Using the soon-to-release Changing Leaves dies, I diecut a set of leaves from Shaded Spruce and then a twig from Pretty In Pink shimmer paper. These are adhered to the sentiment panel with glue dots. A bow tied with the white diagonal trim is then adhered on top so tha it looks like a tied greenery bunch. A few Pretty in Pink shimmer gems on either side of the sentiment add a bit of sparkle and draw your eye across the card design.

Isn’t this a super fun design? Swap out colors and sentiments and you can have a quick and easy card for just about any occasion! Tune in tomorrow when we get a closer look at our Changing Leaves stamps. You won’t want to miss it!

Products used in today’s card:
Summer Splash, Shaded Spruce, Basic White cardstock
In Color glimmer paper
Changing Leaves stamps, dies, embossing folder (coming soon)
Saying Hey stamps
Diagonal trim
In Color shimmer gems
Glue dots
Adhesives

Product List
Changing Leaves · Coming Soon

Amazing Leaves

Welcome to another fabulous day and another sneak peek at the new Stampin’ Up! Online Exclusive bundle called Changing Leaves. This brand new bundle is set to launch on July 3rd and includes a set of photopolymer stamps, coordinating dies, and a hybrid embossing folder. Today, we’re taking a closer look at that gorgeous hybrid embossing folder and putting it to work.

We get started with a card base of Pretty Peacock cardstock. A strip of the Pretty Peacock Oxidized Copper designer paper serves as a backdrop for our center focal point. The base of our focal point is a sheet of the Early Espresso woodgrain paper from the Country Woods designer paper pack that has been diecut using the Nested Essentials set and then adhered to the card base using dimensionals. The gorgeous leaves are diecut from a sheet of the Copper Clay Tartan Foil specialty paper using the soon-to-release Changing Leaves hybrid embossing folder, which both cuts and embosses at the same time, and then adhered to the focal panel with dimensionals. The sentiment from the soon-to-release Changing Leaves stamp set is stamped in Versamark on Very Vanilla cardstock and then heat embossed with copper embossing powder. The sentiment is then diecut using the banner die from the soon-to-release Changing Leaves die set. A few copper sequins are scattered across the card front to draw the eye diagonally down the card.

Want to see this beautiful new hybrid embossing folder in action? Check out today’s episode of Terrific Tuesdays and watch this card come together from start to finish:

Need something easy and maybe not so fall-ish? Tune in tomorrow to check out a unique thank-you card. You won’t want to miss it!

Products used in today’s card:
Pretty Peacock, Very Vanilla cardstock
Oxidized Copper, Country Woods, Tartan Foil DSP
Changing Leaves stamps, dies, hybrid embossing folder (coming soon!)
Nested Essentials dies
Copper embossing powder
Neutrals sequins
Dimensionals
Adhesives

Product List
Changing Leaves · Coming Soon

Amazing in Every Way

Welcome to a bright and shiny new week, everyone! This week, we’re going to be taking a sneak peek at a brand NEW Stampin’ Up! Online Exclusive bundle that launches in just a little over a week. Eeek — I’m so excited! The upcoming Online Exclusives release has a little bit of everything, including some holiday items. And all this week, I’ll be showing you the gorgeous Changing Leaves bundle, which includes a set of photopolymer stamps, coordinating dies, and a hybrid embossing folder. So let’s get started!

For today’s design, I wanted to keep things super simple. And in particular, I wanted to highlight the beautiful embossing folder with its detailed leaf prints and a few of the coordinating leaves in the die set.

So we get started with a card base of Early Espresso cardstock. A sheet of the Early Espresso woodgrain pattern from the Country Woods designer series paper pack serves as the backdrop. The center panel is a sheet of the Copper Clay Oxidized Copper specialty paper that has been machine embossed using the soon-to-release Changing Leaves hybrid embossing folder. The sentiment from the soon-to-release Changing Leaves stamp set is stamped in Coastal Cabana on Very Vanilla cardstock and then diecut using the smallest frame from the Everyday Details die set. The sentiment is matted with a piece of the Summer Splash In Color Glimmer Paper and adhered with dimensionals. Two sets of leaves from the soon-to-release Changing Leaves die set have been diecut from Coastal Cabana cardstock and tucked behind the sentiment panel. I finished things off with a few In Color Shimmer Gems.

Like what you see so far? Tune in tomorrow for a closer look at the Changing Leaves hybrid embossing folder!

Products used in today’s card:
Early Espresso, Coastal Cabana, Very Vanilla cardstock
Country Woods, Oxidized Copper, In Color Glimmer DSP
Changing Leaves stamps, dies, hybrid embossing folder (coming soon!)
Everyday Details dies
In Color shimmer gems
Dimensionals
Adhesives

Product List
Fun Folds · Masculine Designs

True Blessing

This week, we’re working through our stash of Stampin’ Up! products to honor all the guys. It’s hard to believe that it’s already June and Father’s Day is quickly approaching. I hope one of this week’s designs inspires you to create something special for your fellas.

Today, we’re combining some gorgeous designer series paper with our dies to create this stunning fun fold called the Faux Fold-Over. We get started with a base of Early Espresso cardstock that has been cut to give us a flip-up panel, or the faux fold-over panel, in the center. Our full background layer is the sheet of Pool Party woodgrain from the Country Woods designer series paper pack.

For the center panel, we emboss a piece of the Pebbled Path luster paper using the Leaf Fall embossing folder. The sentiment panel consists of three layers — the bottom two layers utilize both sides of the white woodgrain sheet from the Country Woods paper pack and the third panel is white cardstock. Each circle is cut using the Spotlight on Nature dies. The white sentiment panel is stamped with the Unbounded Love sentiment in Copper Clay. The sentiment panel is adhered to the darker circle to create a matted sentiment. This layer is then adhered with dimensionals to the largest circle and the full panel is adhered using dimensionals to the center panel over a twist of linen thread. From Copper Clay luster paper, we diecut deer and branches from the Grove die set and a maple leaf from the Autumn Leaves dies and then adhere them to our panel to create our scene. The card front is finished off with swirl dots. Our inside sentiment from the Something Fancy set is stamped atop the small leaves from the Autumn Leaves stamp set in the bottom-right corner of the message panel.

This week’s Terrific Tuesdays episode walks you through making this card step-by-step. Missed the episode? You can watch the full episode right here:

You can also download the FREE step-by-step PDF tutorial for today’s card by clicking here.

Tomorrow we’ll be heading through the grove. I hope you’ll stop by and check it out!

Products used in today’s card:
Early Espresso, Basic White cardstock
Country Woods, In Color Luster DSP
Unbounded Love, Something Fancy, Autumn Leaves stamps
Spotlight on Nature, Grove, Autumn Leaves dies
Leaf Fall embossing folder
Linen thread
Swirl dots
Dimensionals
Adhesives

Botanicals · sketches

Flower for a Friend

We’re rounding out our week of designs using the Stampin’ Up! Inspiring Snapdragons bundle, which includes coordinating cling stamps and dies. Today, we have a clean and simple design that was inspired by a sketch from my sketchbook.

We get started with a base of Shy Shamrock cardstock. I also cut a quarter-sheet of Shy Shamrock and then embossed using the Cute Crochet embossing folder. The embossed quarter panel is then trimmed down to be 1/4-inch smaller than the standard card front. The panel is adhered to the card front using dimensionals. I next diecut the middle-sized snapdragon from white cardstock using the Inspiring Snapdragons dies. Using Pretty in Pink and Shaded Spruce Stampin’ Blends, I colored the decorative layer of the snapdragon. I used a glue pen to apply adhesive to the decorative layer and adhere it to the snapdragon base. The sentiment is diecut from Shy Shamrock glimmer paper and Basic White cardstock using the Friends for Life dies. I used a glue pen to apply adhesive and adhere to the two sentiment layers together.

To assemble the focal section of the card, I began with a glue dot in the center of the card. I cut linen thread and made a decorative faux bow and used the glue dot to hold it in place. Using dimensionals, I next adhered the snapdragon over the linen thread and then the sentiment over the snapdragon blossom. To ensure the sentiment stands above everything else, the dimensional layer is doubled. I finished things off with a scattering of Shy Shamrock shimmer gems.

I really love this card design because it’s super simple to make and replicate quickly, but it looks like a million bucks. If you have other sentiment diecuts in your stash, you could easily substitute a different one for a multitude of occasions.

Next week, we’ll be focusing on the Friends for Life bundle. I hope you’ll pop in and see how many different ways we can use this fabulous bundle!

Products used in today’s design:
Shy Shamrock, Basic White cardstock
In Color glimmer paper
Inspiring Snapdragons, Friends for Life dies
Cute Crochet embossing folder
Stampin’ Blends
In Color shimmer gems
Linen thread
Dimensionals
Adhesives

Flowering Zinnias · Shop the catalog

Thanks, Friend

This week is all about the Stampin’ Up! Flowering Zinnias suite. And today we are looking at the Zinnia embossing folder and Simply Zinnia dies. What I think this card design illustrates so beautifully is how easily you can pair the Flowering Zinnias products with other gems from the Stampin’ Up! lineup, like the Friends for Life bundle featured here.

We get started with a card base of the new In Color Petunia Pop. I also cut a quarter-sheet and embossed using the Zinnia embossing folder. This embossed panel is cut 1/8-inch smaller than the card base and adhered with dimensionals. For the focal section of this card design, I diecut a square of Petunia Pop using the largest square die from the Nested Essentials die set and built the focal elements on top. The zinnias are diecut using the Simply Zinnia die set. The petals are cut from Pretty in Pink with each flower having Peach Pie and Lemon Lolly centers. The lovely foliage is cut from Shy Shamrock using the Friends for Life dies. Dimensionals help give a layered look to the zinnias. The sentiment panel base is white cardstock diecut using the banner die from Friends for Life. Thanks is stamped in black on one end of the panel using the Wonderful Thoughts stamp set. The word friend is mounted next to it. Friend is shadowed with black cardstock and a white glimmer paper helps the word sparkle and pop on the card front. The sentiment panel has extra layers of dimensionals to ensure it stands tall above the rest of the design and catches the eye.

Tomorrow we’re going to be keeping things simple. I hope you’ll pop in to see how a stamp, paper, and die can make a beautiful card in a snap.

Products used in today’s card design:
Petunia Pop, Pretty in Pink, Peach Pie, Lemon Lolly, Shy Shamrock, Basic Black, Basic White cardstock
Flowering Zinnias, glimmer DSP
Simply Zinnia, Friends for Life dies
Zinnia embossing folder
Wonderful Thoughts stamps
Shiny sequins
Dimensionals
Adhesives

Mother’s Day

Sure of Things Unseen

Happy Mother’s Day, everyone!

Faith is being sure of what we cannot see is the theme of today’s card design. As a mom and, in particular, a mom who struggled with infertility, these words resonate a little differently. Faith has to become a part of your inmost being—to simply trust that you will carry a baby to term and hold that precious and healthy part of you in your arms and have the privilege of raising this baby to adulthood.

It is such an honor to be a mom! It teaches you so much about our Creator and His love. And it teaches you a lot about humility and faith.

Today we’re wrapping up a series using a sketch and a small stash of crafty supplies. I loved this sentiment from the Unbounded Love stamp set and thought it was the perfect compliment to Mother’s Day.

We get started on today’s card with a base of Berry Burst cardstock. I also cut a quarter- sheet and embossed it using the Dotted Circles embossing folder. To give a bit more definition to the embossed pattern, I used my finger to spread a very light layer of white craft ink over the panel. Once dry, which didn’t take too long, I cut the embossed panel to be just a smidge smaller than the card base. I cut a small strip of the Thoughtful Journey designer paper so that a small scene would be exposed and then adhered it to the right side of the embossed panel. The embossed panel is adhered to the card base using dimensionals, and the sentiment panel is also adhered using dimensionals. The sentiment from Unbounded Love is stamped on white cardstock that is diecut using the Autumn Leaves die set. I chose to stamp the word faith in Fresh Freesia ink to emphasize the word and draw the eye to the sentiment. I wanted to add a soft eye-catching element behind the sentiment panel and chose to diecut some sprigs of greenery from vellum using the Painted Lavender dies and then added a paper butterfly and some paper white sequins from the Sequins Trio.

I hope that you are able to enjoy this Mother’s Day—whether through a family celebration or a remembrance.

I hope to be able to post a little more regularly in the coming week, assuming we’re able to come home from the hospital.

Products used in this card design:
Berry Burst, Basic White, vellum cardstock
Thoughtful Journey DSP
Unbounded Love stamps
Autumn Leaves, Painted Lavender dies
Dotted Circles embossing folder
Paper butterflies
Sequins trio
Dimensionals
Adhesives

Clean and Simple

True Blessing

Thus far this week, we’ve been exploring how a sketch and a few supplies can give you to terrific cards in no time flat. Today’s card is a slight variation on yesterday’s card design with a slightly wider designer paper section that begins on the edge of the embossed panel.

I really love this particular sheet of the Thoughtful Journey designer paper pack. The cedars set on the hill with the wildflowers down below reminds me of the prairie that was behind my childhood home.

This card begins with a base of Berry Burst. I cut an additional quarter-panel and embossed with the Eyelet embossing folder then cut the panel down to be one-quarter inch smaller, leaving just a small border behind on the base. I wanted to ensure that the beautiful embossed pattern stood out to compliment the soft white in the patterned paper, so I used my finger to rub a thin layer of silver ink over the top of the pattern. Then I adhered the designer paper panel to the right side of the embossed panel before adhering the full panel to the base using dimensionals. The sentiment from Unbounded Love is stamped on white cardstock diecut using the coordinating Unbounded Love dies. To draw the eye to the sentiment, I finished the card with tinsel gems and silver trim tied in a small bow.

Tomorrow, I’ll be rounding out this series with one final variation. I hope you’ll come check it out!

Products used in this card design:
Berry Burst, Basic White cardstock
Thoughtful Journey DSP
Unbounded Love stamps & dies
Eyelet embossing folder
Tinsel gems
Silver trim
Dimensionals
Adhesives