Coming Soon

Pocket Full of Love

We’re continuing with our sneak peeks of the upcoming Stampin’ Up! Online Exclusives release, which releases in just a week! This week, we’re pairing up the lovely Marbled Elegance designer series paper with other products in the Stampin’ Up! lineup.

Today, we’re combining a whole host of fun products from the current stash, including Sending Love, Perennial Postage, and Playing in the Rain just to name a few. So let’s see how we put this cutie together.

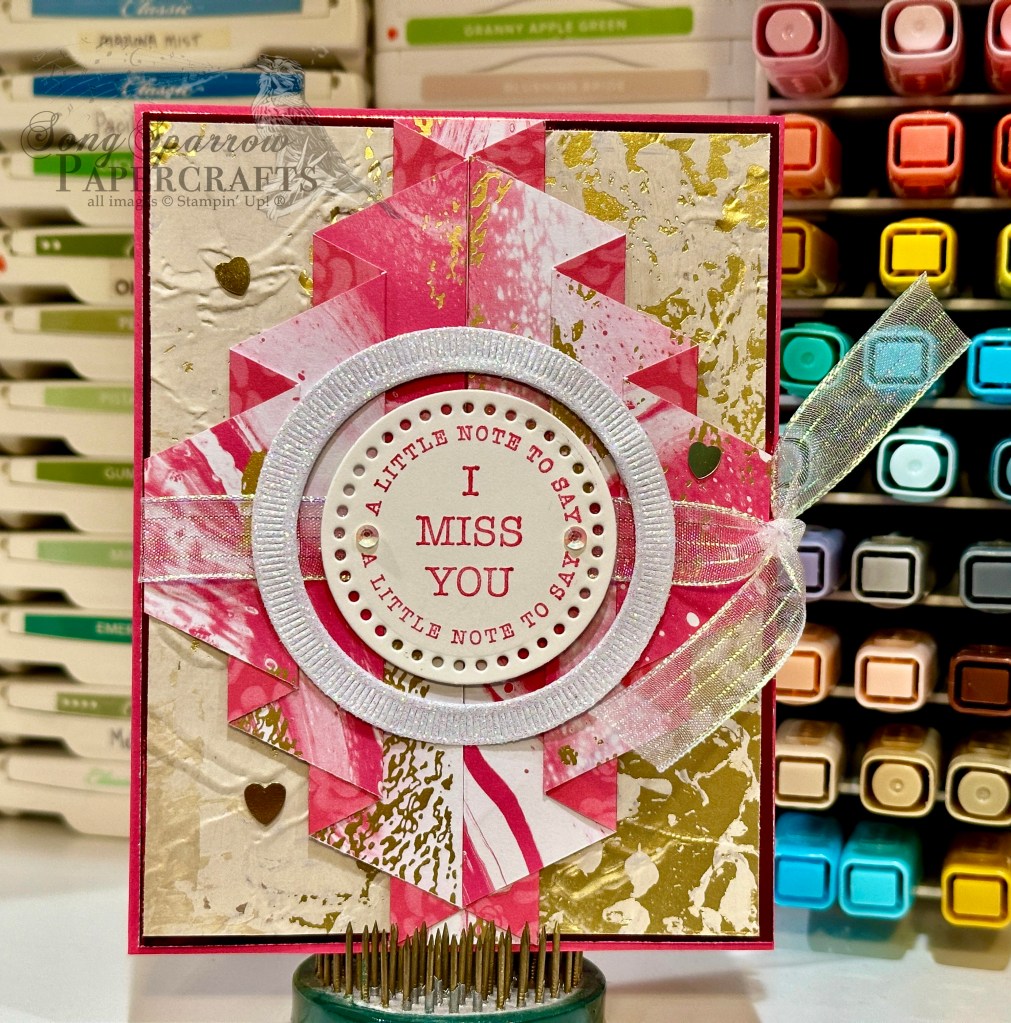
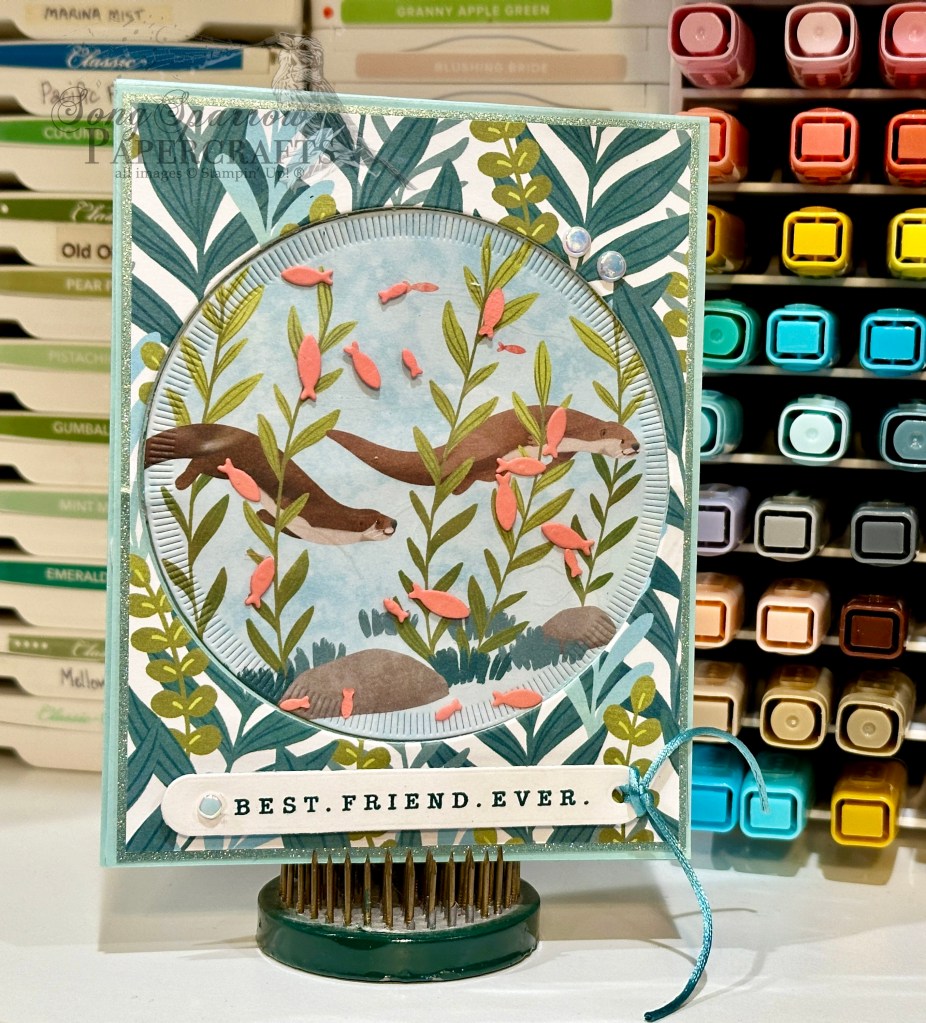
We get started with a Basic White cardstock base. Our background panel is the heart patterned sheet from the Marbled Elegance paper pack that is diecut using the Perennial Postage dies. Our focal panel background is a piece of vellum that is also diecut with the Perennial Postage dies. Our little envelope is made from Marbled Elegance paper and the Sending Love die set. Inside the envelope are stems of heart flowers. The floral stems are cut from Mossy Meadow using the Playing in the Rain dies, while the heart flowers are cut from white glimmer paper using the Sending Love dies. A few gold hearts finish the flower centers and add a pop of golden sparkle to compliment the gold foiling of the envelope and the twist of gold trim in the background. The sentiment from Country Flowers is stamped in black on white cardstock and then fussy cut with paper snips. The design is finished off with iridescent rhinestones basic jewels.

I’ll be taking a little break tomorrow due to my kiddo’s band concert but will be back Thursday morning with the Luv 2 Stamp Group Instahop. Hope you’ll drop in and check it out!

Products used in today’s card:
Basic White, Mossy Meadow cardstock
Marbled Elegance (coming soon), vellum, white glimmer DSP
Country Flowers stamps
Perennial Postage, Sending Love dies
Playing in the Rain dies
Gold trim
Gold hearts (coming soon), iridescent rhinestones basic jewels
Dimensionals
Adhesives

Product List
Coming Soon · Fun Folds

Miss You

Happy Monday, crafty friends! Our weekend turned out to be waaaaaay busier than I anticipated. Between the kiddo’s bowling league and lessons and my own singing engagements, we kinda met each other coming and going this weekend. And that left no time to craft – womp, womp!

But here we are starting a bright, shiny new week and I have some bright & shiny new things to share with you from the upcoming Stampin’ Up! Online Exclusives release that will go live next week! This week, we’re going to pair some gorgeous new patterned paper with all sorts of things from the crafty stash — from other new Online Exclusives to current products. It’s going to be a fun week.

We’re getting started with a really cool fun fold called the Curtain Fold because it really shows off the new Marbled Elegance paper beautifully! Our card starts with a base of Melon Mambo cardstock. The backdrop for our gorgeous curtain fold is a combination of Melon Mambo foil paper (sadly retired) and the creamy Season of Elegance foiled paper that’s been embossed using the Painted Texture embossing folder. The sheet of Marbled Elegance is a combination of pinks, shades of white, and gold foil. Our sentiment from Sending Love is stamped in Melon Mambo on Very Vanilla and then diecut with the Everyday Details circle die. I used the leftover portion of a piece of white glimmer paper cut with Spotlight on Nature dies as the eye-catching border around our sentiment. A strip of iridescent striped trim anchors it against our sparkly background. A few iridescent rhinestones basic jewels and gold hearts finish things off with the perfect amount of twinkle.

The Marbled Elegance paper really is stunning, and I’m looking forward to showing you all the ways you can incorporate it into your everyday designs to give a little extra pop.

Products used in today’s card:
Melon Mambo, Basic White cardstock
Marbled Elegance (coming soon), Season of Elegance, White glimmer, Melon Mambo foil (retired) DSP
Painted Texture embossing folder
Sending Love stamps
Spotlight on Nature, Everyday Details dies
Iridescent striped trim
Iridescent rhinestones basic jewels, gold hearts (coming soon)
Dimensionals
Adhesives

Product List
Coming Soon · Sketchy Fridays

Sketchy Fridays: Otterly Love

We’ve made it to another Friday, and you know what that means? It’s time for another Sketchy Fridays!

Each week we’ll be using a card sketch to design our featured card. Right now, we’re working through a full series of designs using the card sketches found in current Stampin’ Up! catalogs.

This week’s card is based on Sketch #1 in the Stampin’ Up! Annual Catalog and features the Otterly Adorable products which will release on November 5, along with a whole bunch of other new Online Exclusives.

In all honesty, I’ve had a really hard time finding a way to use this sketch. Until today. This sketch just seems to be made for this suite! While I’m not usually one to mix a lot of busy patterns, this sketch gives you the opportunity to break up busy patterns with the offset center focal panels.

Our card starts today with a base of Lost Lagoon cardstock. I used the pond flora sheet from the Otterly Adorable paper pack as the backdrop for our two offset focal panels. The sweet scene of the mom and baby otter sit atop the rippling water pattern. The sentiment from the Otterly Amazing stamp set is stamped in Pretty Peacock on a banner diecut from white cardstock using the Greetings of the Season dies. A small bow tied from the Lost Lagoon soft cording and the riverside pearls add nice touches of soft shimmer to this cute and lovable design.

Tomorrow I hope to bring you the promised fun fold that failed earlier in the week. I hope you’ll pop in and see if I was able to pull it off!

Products used in today’s card:
Lost Lagoon, Basic White cardstock
Otterly Adorable DSP (coming soon)
Otterly Amazing stamps (coming soon)
Greetings of the Season dies
Lost Lagoon soft cording (coming soon)
Riverside irregular pearls (coming soon)
Dimensionals
Adhesives

Coming Soon

Otter Failure

This week, we’re getting a closeup at one of the latest Stampin’ Up! Online Exclusive releases called Otterly Adorable, coming to a cart near you on November 5! This adorable suite of products includes coordinating stamps, dies, and patterned paper, along with some silky cording and pearlized embellishments.

Today, I had planned to show you a super cute flip-panel design, but it turned out to be an otter failure. *snicker* In all seriousness though, my design was flawed from the start and I realized why after I switched gears to salvage the design. So I promise to make good on a cute flip-panel design later this week when I have a bit more time to execute a more complicated design. In the meantime, let’s get a closer look at how a failure turned into a cute peek-through panel.

Today’s card starts with a base of Pool Party cardstock. Our backdrop is a combination of Lost Lagoon shimmer pape (sadly retired) and the water foliage pattern from the Otterly Adorable paper pack. Using the largest circle from the Spotlight on Nature die set, I cut a circle through all layers of the card front. Separately, I also used the die to cut the two swimming otters from a separate patterned sheet from the Otterly Adorable pack. I adhered the swimming otters panel to the Pool Party circle and then to a quarter sheet of Pool Party to keep the inside of the card neat and tidy and one color. Behind our backdrop panel, I mounted some acetate to serve as the peek-through window into the water below and adhered all of this to the card front. From Flirty Flamingo, I cut several sets of the smaller fish using the Otterly Amazing dies and let them free-float on the acetate. Our swimming otter panel is adhered to the inside of the card using dimensionals to allow a little room for our fish to swim in the window. The sentiment from Country Flowers is stamped in Pretty Peacock on white cardstock diecut using the Greetings of the Season die and finished off with the Lost Lagoon soft cording. A few riverside irregular pearls add that last touch of sparkle to the design.

When I showed my son my “otter failure,” he said, “but mom, that doesn’t look like a failure….that’s cute!” One of the many lessons I’ve learned is that sometimes you just need to pivot when your first idea doesn’t work out. Not ever failure turns out to be something for the trash bin. Sometimes it’s cute!

Products used in today’s card:
Pool Party, Flirty Flamingo, Basic White cardstock
Soft Shimmer (retired), Otterly Adorable (coming soon), acetate DSP
Otterly Amazing (coming soon), Spotlight on Nature, Greetings of the Season dies
Country Flowers stamps
Lost Lagoon soft cording (coming soon)
Riverside irregular pearls (coming soon)
Dimensionals
Adhesives

Product List
Coming Soon

Make Today Otterly Amazing

In just two short weeks, Stampin’ Up! will release a brand new set of Online Exclusive products, including the too-cute-for-words Otterly Adorable suite. This week, I’m featuring this cute selection of products in hopes of providing some inspiration for your future projects. This bundle has so much potential — from playful designs to love-themed projects and all kinds of things in between!

Today, we’re using the paper and embellishments to create an encouragement card. Pairing the paper with a few dies makes this the perfect scene to bring a smile to someone’s otherwise less than bright and happy day!

Our card starts with a base of Lost Lagoon cardstock. I chose the watery pattern from the Otterly Amazing paper pack to serve as the backdrop for our scene and matted it with the Pretty Peacock shimmer paper from my retired paper stash. Our focal panel consists of two sheets of paper — the water reed patterned sheet and a cute otter sitting in the reeds from one of the sheets full of otter vignettes. I used the Spotlight on Nature dies to cut the reed background and a smaller inset panel on which our sunbathing otter sits among the reeds. I used my paper snips to cut more detail in this cute vignette and to help it stand out from the background. All of these layers are adhered with varying heights of dimensionals to give more depth and pop to our scene. A twisted some of the new Lost Lagoon soft cording around the background panel before adhering the focal panel. The sentiment from the You Are Beautiful stamp set is stamped in Pretty Peacock directly on our background panel under the focal point. A few riverside irregular pearls are scattered about our card front to add a little sheen and draw the eye across the design.

Tomorrow we’re going to make a splash with a fun fold design!

Products used in today’s card:
Lost Lagoon cardstock
Otterly Amazing (coming soon), Soft Shimmer (retired) DSP
You Are Beautiful stamps
Spotlight on Nature dies
Lost Lagoon soft cording (coming soon)
Riverside irregular pearls (coming soon)
Dimensionals
Adhesives

Product List
Coming Soon

Otterly Amazing

Happy Monday, everyone! I don’t know about you, but I needed a weekend from my weekend. *grin* Craft shows, while always fun, are always exhausting. I got everything home, but I haven’t unpacked a single thing. It’s onward and upward to new products!

That’s right, in just a few short weeks, there will be a brand new bunch of Online Exclusives. And let me tell you, there are some C-U-T-E, CUTE things in this release, including the suite that I’m showcasing for you this week — the Otterly Adorable suite. This suite includes patterned paper, coordinating stamps & dies, some specialty cording, and iridescent pearls. We’re starting off with a super simple layout.

Our card base is a piece of Pretty Peacock cardstock. Our backdrop is a piece of the patterned scene papers from the Otterly Amazing designer series paper pack that’s releasing soon. I really loved the look of the (now retired) Holographic Trio silver foil and how it looks like a flowing river, and so while I don’t usually use too many products from my retired stash, this one just had to be a part of today’s card! Our cute otter pair is diecut from a sheet of the Otterly Adorable paper using the coordinating Otterly Amazing dies. To complete the scene, I cut our otter’s log den from Crumb Cake cardstock and the rocks from Smoky Slate. Dimensionals add depth and dimension to our scene. The sentiment from the Otterly Amazing stamp set is stamped in Pretty Peacock and diecut using the Spotlight on Nature dies and then mounted over the Lost Lagoon soft cording with dimensionals. A few Riverside Irregular Pearls finish things off with some iridescent sparkle.

This whole set is so cute and I can’t wait to show you all of the ideas I have floating in my head (pun intended!)!

Products used in this card:
Pretty Peacock, Crumb Cake, Smoky Slate, Basic White cardstock
Holographic Trio (retired), Otterly Adorable (coming soon) DSP
Otterly Amazing stamps & dies (coming soon)
Spotlight on Nature dies
Lost Lagoon Soft Cording (coming soon)
Riverside Irregular Pearls (coming soon)
Dimensionals
Adhesives

Product List
Gifting

Home Decor

It’s been a tremendously busy week. I’ve been working away in the craft room as I’m down to the wire for my craft booth items. Today is setup day and tomorrow is booth day!

Today, I’m popping in to share another fun giftie that will be available in my shop — home decor items. On one of our recent virtual team events, we made a framed project and I just fell in love with the idea.

And as with most things I prefer to undertake in the craft room, projects don’t have to be overly complicated to have a WOW factor. Today’s sample is a Christmas project using the O Holy Night suite. This set of products retired last year and I’m still super sad about it! This particular project is a combination of patterned paper and diecut elements — most of them are repeated images. A simple bit of layering with dimensionals builds a gorgeous scene of the wisemen on their journey to find Jesus.

For those of you who have been following along over the last week and expressed some interest in the lip balm box, I was able to carve out a little time to make a video and PDF tutorial to walk you through putting a box together.

Next week, I’ll be popping in with a preview of my favorite soon-to-release Online Exclusive bundle. It’s otterly adorable! *wink wink*

Gifting

Hand Cream Gifts

It’s a bright and shiny new week, and I don’t know about you, but last week was a doozy. I felt like we were meeting ourselves coming and going! This week should be a little less frantic with the kiddos being out of school for fall break.

Last week, we got a special treat here in North Texas as the conditions were perfect (for those who live in areas without light pollution) to see the aurora. My parents had the absolute best view. Just look at that sky! What a terrific reminder of the majesty of God’s creation!

This week, I’m still frantically working to finish up items for my booth for this weekend’s craft fair. And since so many of these things are gift items and we’re heading into the gift-giving time of year, I thought it the perfect opportunity to continue sharing some of the things that go in my booth.

This year, I’m trying something new. I found a wonderful gift box by The Paper Pixie to hold small tubes of hand cream. Once I got the hang of making the box, which is a little tricky at first, these cute gifties come together pretty quickly. I try to have a good variety of seasons and occasions represented in the packaging. I found a really nice variety pack of hand creams that came in a whole assortment of fragrances on Amazon, but this box is also perfectly sized for the smaller L’Occitane hand creams if you happen upon a good deal for a variety pack.

If you’re a craft fair-goer, what types of things are you looking for? Tell me in the comments!

Gifting

Joy of Chocolate

It’s craft fair season, and I’m hard at work preparing for an upcoming show. I like to offer a wide variety of products outside of just cards because, quite honestly, it always seems like the gift items sell best.

One surefire hit is always chocolate. And today’s cute giftie is a custom-wrapped chocolate bar. I’ve seen lots of clever ways to wrap a chocolate bar, but I really love this particular envelope design because it’s super quick and simple to make! super helpful when you want to turn out a bunch in a short amount of time.

Using double-sided patterned paper means that your treat envelope is decorative from start to finish. Several glue dots in the chocolate bar help it stay put inside the envelope. I like to hold the envelope closed with ribbon and then add a cute decorative element on top. Isn’t this an adorable way to give a sweet treat?!

We’ll be continuing our look into my craft booth next week. I have lots more cute stuff to show you and a video tutorial to share!

Gifting

Best Laid Plans

We’ve made it to a new week, and you may have noticed my absence at the end of last week. It’s crafting show season and I have 2 that fall very close together. Needless to say, I didn’t budget quite enough time to do ALL.THE.THINGS last week and so my planned blog post materials had to be set aside.

Over the weekend, I’m teamed up with my mom to set up a booth for an event in her area. We had a lot of fun, and I figured out just how much more work I have to do to be prepared for my next event in TWO short weeks!

So this week, I’ll be sharing some of the projects that I make especially for my craft fair booths. And first up are these super cute little Hershey nugget treat packages. I really love these for a quick little something to pass along to someone as a pick-me-up or thank-you.

When I’m preparing craft booth items, I always start by using the retired product in my stash. So these nuggets use several different packets of retired fall-inspired paper patterns. And then I dress up the packaging with dies that meet the theme. We have such lovely fall-inspired die sets that I, of course, had to reach for both Autumn Leaves and Changing Leaves for my dress-up elements for these nugget packets. I’ll be offering a variety of seasonal packaging for the nugget treats, including fall, Halloween, and Christmas.

If you’re interested in the tutorial for these Hershey nugget treats, drop me a comment with your e-mail or social media link so I can send you a copy.

Pop in tomorrow to see what else I’ll be offering in my craft show booth.