Botanicals · Hot Foil

Gilded Thoughts

Welcome to a new week, friends! I don’t know about you, but the weekend went by in a blur. And now here we are at the beginning of a brand new school year. It’s a big transition year for us as the kiddo starts his freshman year of high school. When they tell you time flies, they are not kidding!

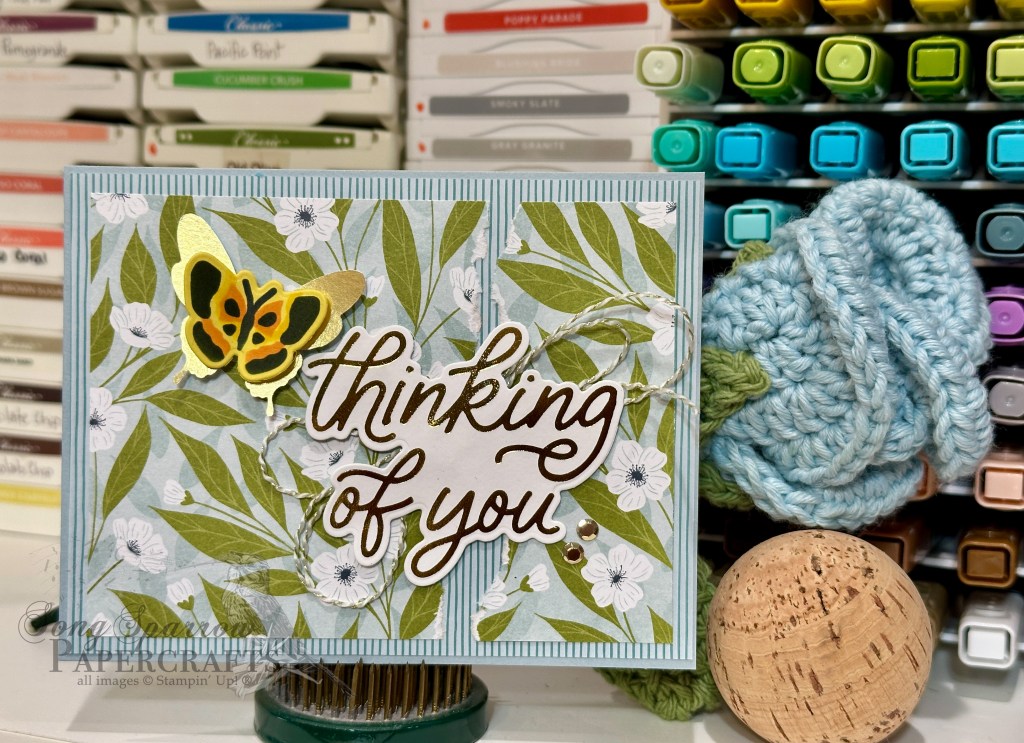
This week brings about a new design theme as we take things outside. Sometimes I like having a broad, open-ended theme because it leaves a lot of possibilities for inspiration. And today’s card was inspired by the Hot Foil Craft Class. I really loved this card layout and knew it would easily adapt to fit this week’s theme. I loved having the opportunity to play with the new hot foil goodies in my stash this weekend, and today’s design uses the Classic Greetings and Butterfly Flight bundles.

So we get started with a base of Cloud Cover cardstock. The striped pattern from the Everyday Essentials paper pack serves as our backdrop. I chose the sheet of white florals from the Lovely Blossoms paper pack that provided the perfect amount of blue contrast against the striped backdrop. This panel is torn to leave a rough-edged section on the right-hand side. Because I had a particular recipient in mind when making this card, I chose the thinking of you sentiment from the Classic Greetings sentiment set and hot foiled it in gold on white cardstock and then cut it out with the coordinating die. It’s adhered over a double bow of gold & white baker’s twine right over our fissure section. The double-layered butterfly is a combination of a gold gilded wing butterfly and a small butterfly created with the Butterfly Flight masks. I used a sheet of Crushed Curry as the base and then blended a combination of Crushed Curry, Timid Tiger, and Secret Sea inks to create the smaller butterfly. We finish things off with a few metallic gems to give a nice diagonal of gold elements.

I just love the little pop of contrast the butterfly provides. It’s the perfect eye-catcher for the sentiment. This layout is one that can truly be used for a whole host of color and pattern combinations, as well as a myriad of occasions.

Tomorrow’s design might bring in some of our other senses as we continue our trek in the great outdoors. I hope you’ll drop by!

Product List
Hot Foil

Violets & Butterflies

Happy weekend, everyone! I don’t know about you, but I have a lot on the weekend to-do list. I’ve crossed quite a few things off already but still have quite a bit to go.

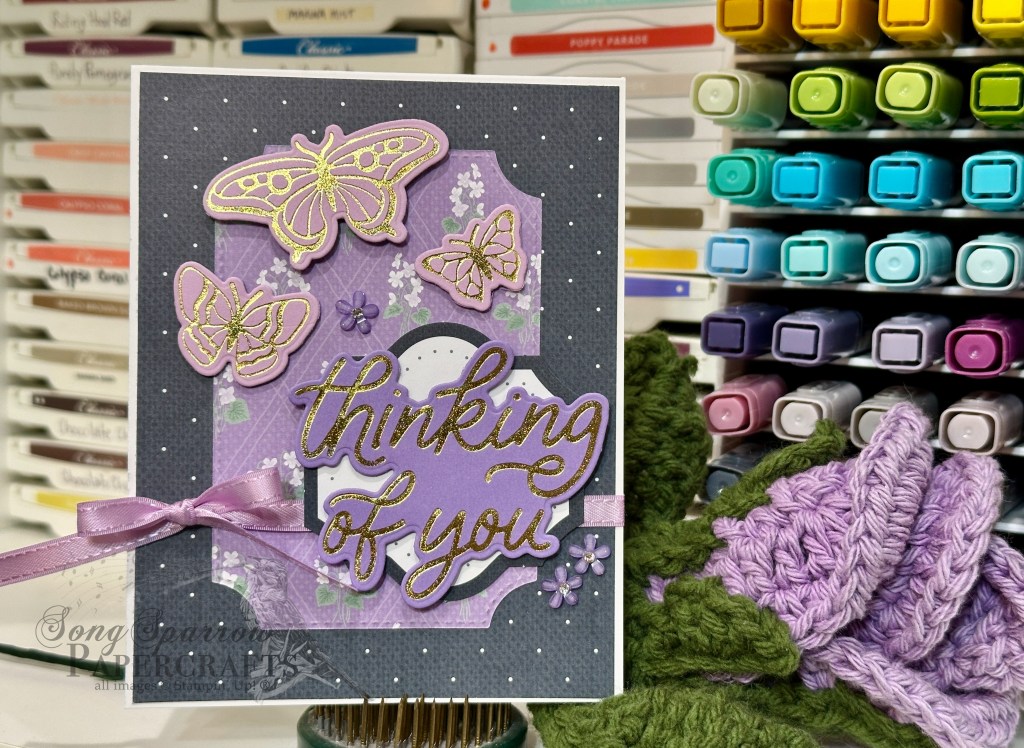
But I took a nice crafty break to try out my new Stampin’ Up! Hot Foil System that launched last month. Can I be honest with you? I’ve actually been a little afraid to use it. *looking around* Don’t ask me why because it is SO easy to use! But there was just something intimidating about it to me and it had me frozen in my tracks. So if you ever find yourself there, you are not alone. I’ve been watching all sorts of videos and finally just sat down and gave it a try. Easy peasy! So we’re pairing up two sets of hot foil dies — Butterfly Flight and Classic Greetings — with the beautiful Violet Dreams paper to create this project.

We get started with a very neutral base of white cardstock. I tried all sorts of colors back there but love how this made all of the elements pop so much better. The backdrop is the Secret Sea polka dot pattern from the Violet Dreams paper pack. The focal panel starts with a leftover panel I had diecut with the Branching Out dies for another project and just so happens to be the back side of the background panel. After getting both panels adhered to the card front, I wrapped the whole sheebang with some Fresh Freesia satin ribbon and then adhered the decorative panel (from the coordinating Violet Dreams precut pieces) with dimensionals.

Here’s where the fun part comes in — hot foil! I kept my foiling super simple since it was the first roll of the dice. I used the thinking of you sentiment from the Classic Greetings die set to create the sentiment by foiling in gold on Highland Heather cardstock and then cutting it out with the coordinating die. It’s adhered on our decorative panel with a layer of dimensionals. Next up are the butterflies using the Butterfly Flight hot foil die set. I lightened things up a bit by using Fresh Freesia cardstock to have a hue of contrast and help the butterflies stand out amongst the business of the patterns and elements on the card front. They’re adhered with varying layers of dimensionals above the sentiment. A few adhesive blooms in a darker shade of purple finish things off.

I’m looking forward to having a little bit more time to really play around with the foiling system. And the new foiling goodies that will arrive in the studio SOON! I’ll try to share some of the bonus foiling projects over on the socials. Next week we’re gonna be in the woods. I hope you’ll come along for the hike!

Product List
Coming Soon

Dreamy Warm Wishes

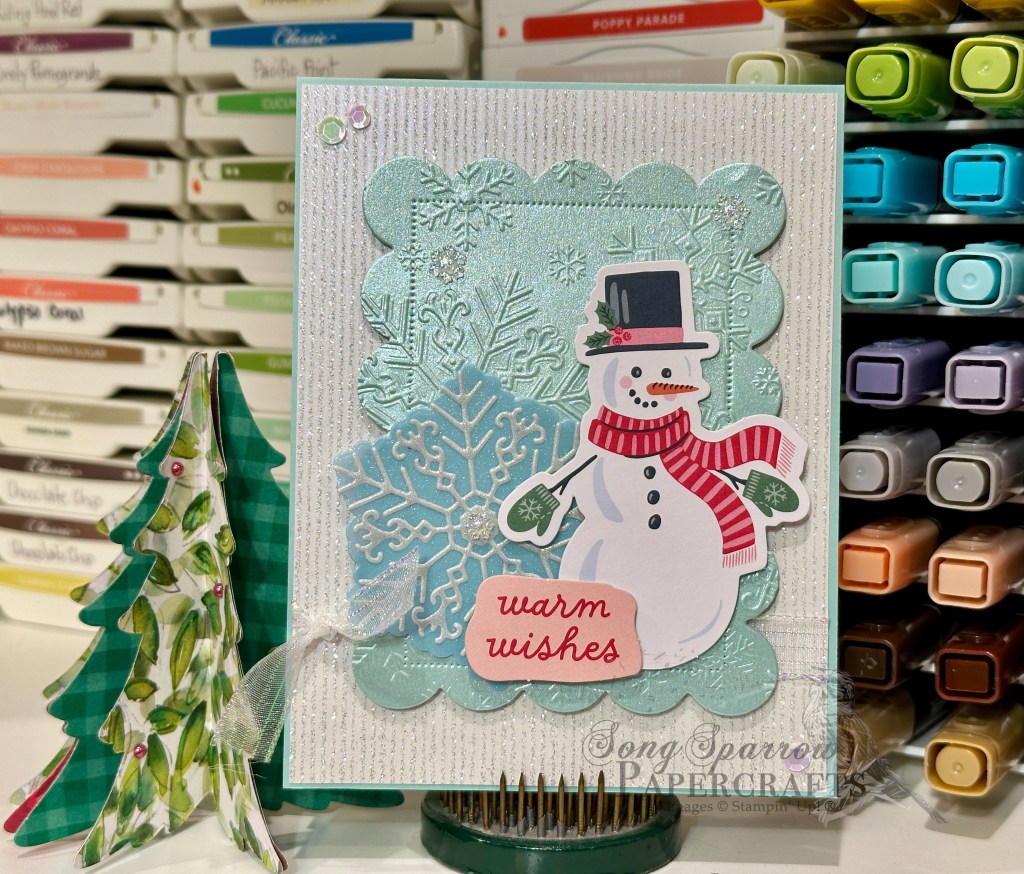
Welcome back for another sneak peek at all the new goodies in my crafty stash and a whole batch of products that will release in the September holiday catalog! I loved yesterday’s layout so much that I decided to do a little variation and throw in a few more glimpses of what’s to come. Just look at those dreamy snowflakes! The new bundle is just a gorgeous as it looks here!

So we get started with a base of Pool Party cardstock and let just a tiny bit peek around the edges of our background panel of Shimmering Stripes glittery paper. The panel is wrapped with some iridescent striped ribbon for a little touch of see-through sparkle. We’re using the Scalloped Christmas Cheer dies again to create our focal panel out of some Pool Party shimmer paper and then add some extra texture by running it through the new Dreamy Snowflakes embossing folder. And we’re using quite a few layers of dimensionals to be sure the panel stands nice and proud. Our focal section consists of three elements. In the background we have our delicate snowflake cut from blue and white shimmer vellum using the new Dreamy Snowflakes dies. Our focal image is the cute snowman from the Season of Celebration ephemera, along with the warm wishes sentiment. Dimensionals give us some depth of scene here. And we finish things off with the twinkle of clear snowflakes on our focal panel and a few iridescent sequins in opposing corners to draw the eye across our card.

This layout is super simple and very eye-catching. Definitely one to have in the stash when you want to put together a cute card in a hurry! Tomorrow I’m setting aside some time to complete the new gold foiling class and can’t wait to show you some of the results!

Products used in today’s card:
Pool Party CS
Shimmering Stripes, pastel shimmer, sunset shimmer vellum DSP
Season of Celebration ephemera (coming in Sept)
Scalloped Christmas Cheer, Dreamy Snowflakes dies (coming in Sept)
Dreamy Snowflakes EF (coming in Sept)
Adhesive sparkle sequins, adhesive snowflakes (coming in Sept)
Iridescent striped ribbon (retired)
Dimensionals
Adhesives

Clean and Simple · Coming Soon

Fancy Heartfelt Thanks

Hey, friends, guess what day it is?! We’re halfway through this week already. Whew. Just like that. And we’re also halfway through a week of designs using new products fresh to the crafty stash!

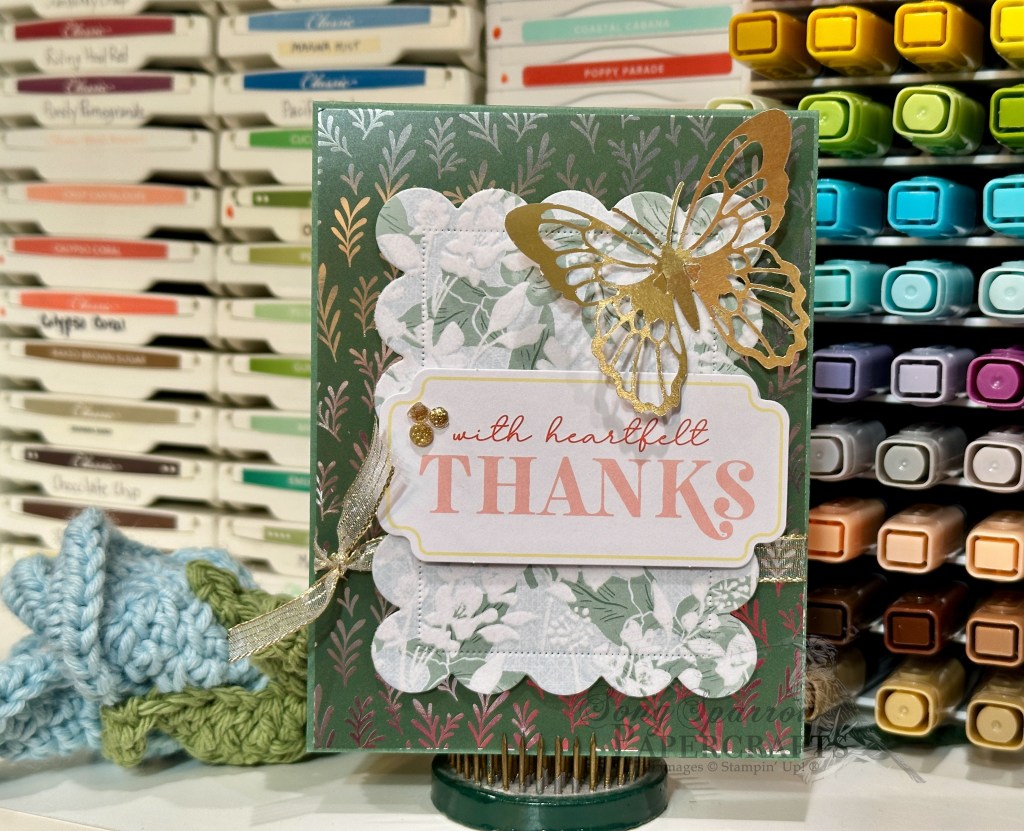
As promised, today we’re getting a sneak peek at a new set of dies that will release with the September holiday catalog — Scalloped Christmas Cheer dies. These scalloped rectangles are the perfect dress-me-up addition to your designs. And we’re pairing it up today with another peek into the new All Wrapped Up paper pack that will also release in the new holiday catalog. I tossed in a few of my current faves, like the Sincerely Noted ephemera, and a couple of my super loved retired goodies, like the butterflies.

We get started with a base of Peaceful Pine cardstock. The foiled backdrop from the All Wrapped Up paper pack coordinates perfectly. The focal panel backdrop is a scalloped rectangle cut from a sheet of the Velvet Meadow paper using the new Scalloped Christmas Cheer dies and adhered over some gold striped sheer ribbon using dimensionals. The sentiment is from the Sincerely Noted ephemera pack — a current go-to of mine for something quick and mess-free — and is mounted on the scalloped panel with dimensionals. We finish things off with a beautiful gold butterfly and a few gold glitter dots from the 2025 Advent calendar.

I’m still in the clean and simple frame of mind, and there are lots of things in the crafty stash that make it a snap to put together a clean and simple card. Tomorrow we’ll preview some Christmas product for grins. I hope you’ll stop by!

Products used in today’s card:
Peaceful Pine CS
Velvet Meadow, All Wrapped Up (coming in Sept) DSP
Scalloped Christmas Cheer dies (coming in Sept)
Sincerely Noted ephemera
Gilded wings butterflies
Gold striped sheer ribbon
Gold glitter pieces (retired)
Dimensionals
Adhesives

Clean and Simple

A Friend Like You

TGIF and happy weekend, everybody! I actually had this card all ready to go last night but ran out of juice to do the photo editing and write-up. So it goes sometimes. We’re midway into a busy Saturday as we shuttle the kiddo around for bowling league and school supplies and the like. What are you up to this weekend?

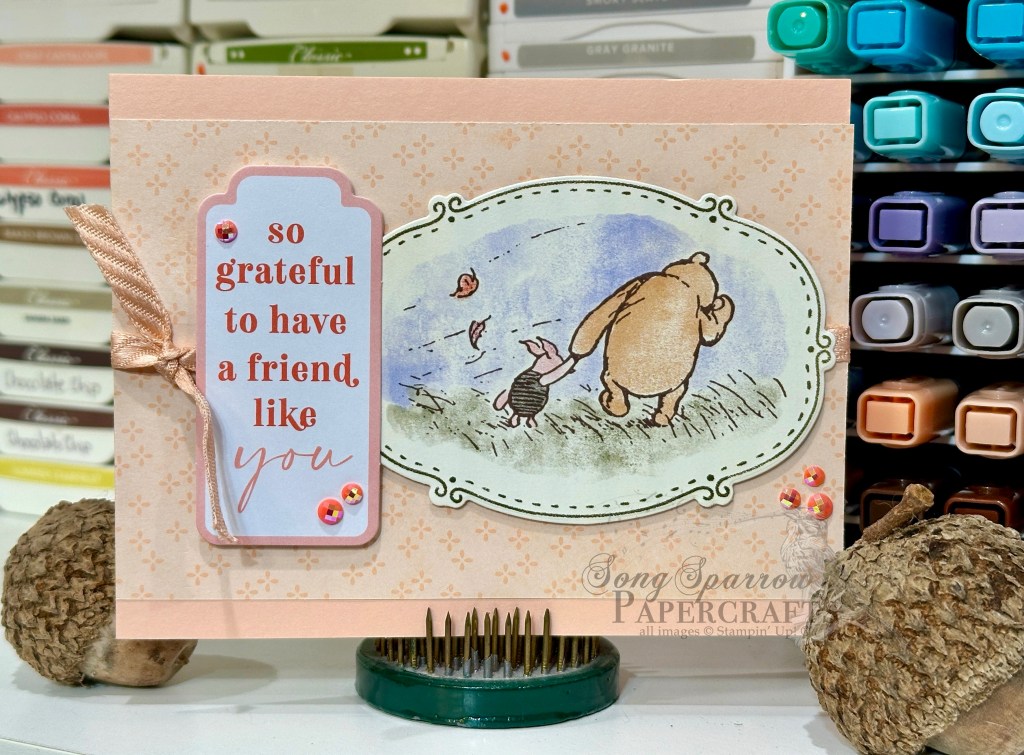
This week, we’re keeping clean & simple at the forefront as I continue to hunt for my crafty mojo. I have to say that this particular card was a struggle for me. I knew what I wanted to put together but was having a hard time getting it right. So I picked the kiddo’s brain. Do you ever do that? Phone a friend? Sometimes it can be super helpful when you’re feeling stuck. What I needed to make this card right was the appropriate color palette, which seemed obvious after the kiddo pointed it out!

We get started with some Petal Pink cardstock as our card base and then use a sheet of the Lovely Blossoms paper as the backdrop for our focal section. The backdrop is wrapped in some retired Petal Pink striped ribbon before the panel is adhered to the card front with adhesive runner. Our focal section consists of the cute Pooh & Piglet image panel and then sentiment. The image panel is cut from a sheet of the Silly Old Bear paper using the coordinating Sweet Words & Labels dies. Both panels are adhered to our card front using layers of dimensionals. And we finish things off with some of the Petal Pink pearlized faceted circles for a little sparkle.

I just love how the image and the sentiment work together for this one, which I think is why I struggled so much with the layout at first. I was dead set on using the sentiment because nothing says wonderful friend like someone who holds your hand through life’s topsy-turvy moments!

I’m hoping to bring you one more clean and simple design to round out our week. But first….we have a few more things to knock off our Saturday to-do list!

Product List
Fun Folds · L2S Group Instahop

Fun in the Sun

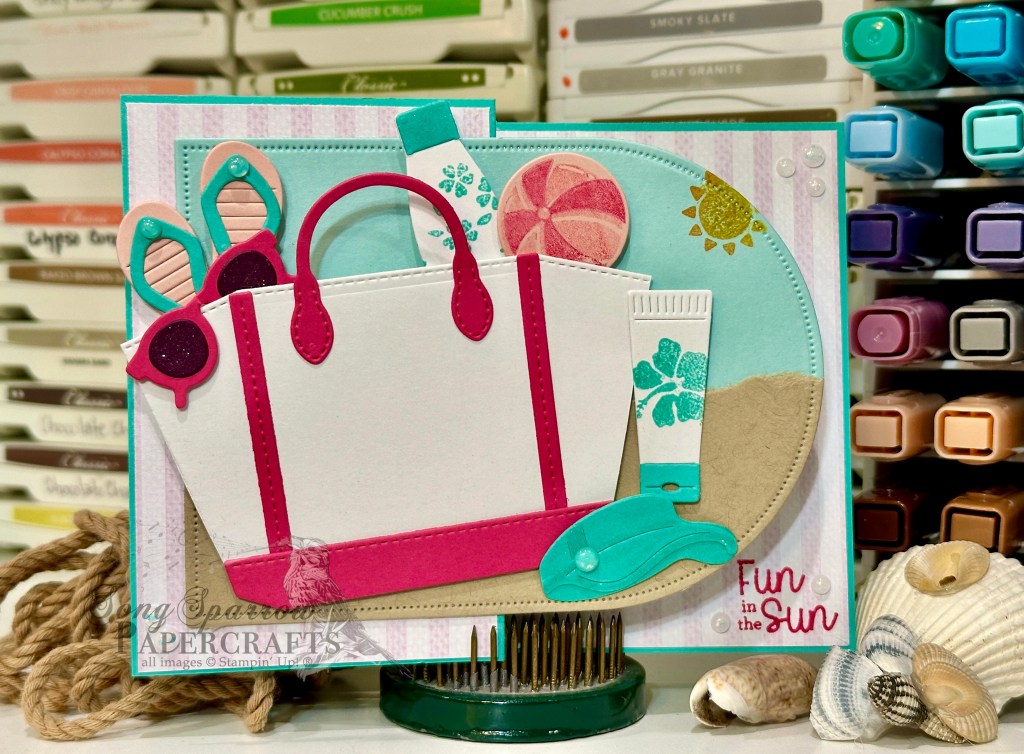
Welcome back, crafty friends! It seems fitting that we’re working with the summer theme this week as it really starts to feel like summer here in North Texas. We’ve had a nice run of some unseasonably cooler days, but we’re headed for the frying pan as we head into the weekend. But today’s card is sure to cool us off as we head back to the beach for a day of fun in the sun with all of the accoutrements! Today’s fun fold combines the new Splash & Relax bundle with the Notes & Totes bundle to create this cute summer hello.

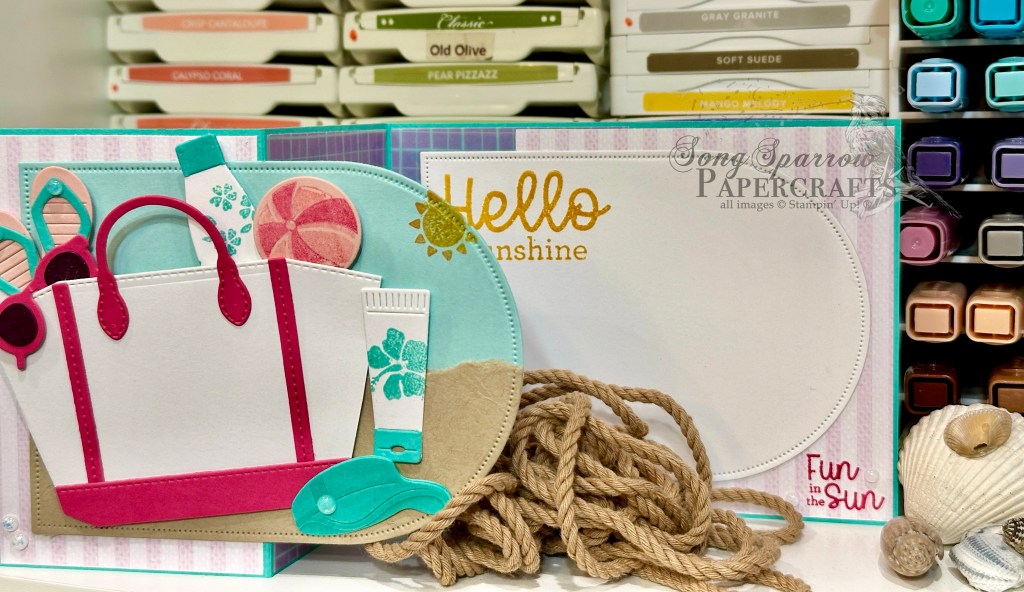
We get started with a base of Summer Splash cardstock and score it so we have a z-fold. A sheet of the striped Violet Dreams patterned paper (coming out in just a little over a week!) serves as our backdrop, along with the grid pattern from the Berry Botanical vellum pack (a Product of the Month that is still available with a qualifying olrder!). Our front focal panel has all the fun and we get started with a base of Pool Party cardstock that’s cut with one of the larger Everyday Arches dies. I cut a Crumb Cake arch at the same time and then tore it to create the sand. Our beach bag is a combination of white and Melon Mambo and the pieces are cut out with the Notes & Totes dies and adhered to our background panel with dimensionals.

All of our beachy essentials come next. The flip flops, beach ball, sunglasses and visor are all created with the Splash & Relax dies, while our water bottle and sunscreen are stamped and cut with the Notes & Totes set. We punch things up with a touch of Wink of Stella on the sunglasses lenses, the water bottle cap, the sunscreen bottle, and the visor. And then we add a few shimmering dots to finish off our flip flops and visor. Dimensionals help all of these fun beach essentials tuck in, around, and behind one another. We finish things off with our sun shining above which is stamped with the Notes & Totes stamps.

We complete the card by adding the finishing touches to our inside panel with the hello sunshine and fun in the sun sentiments. Some white shimmering dots give us sparkles in all the corners and help our eyes to easily move from the front panel to the message panel.

Today’s card is a part of the Luv 2 Stamp Group Instagram Hop, which goes live at 9 AM Pacific Time (PST).  Click here to head over to my Instagram feed at 9 AM Pacific/11 AM Central and check out what the other demos in our L2S Group have created for you today! 

Product List
Sunset Coast

Sunny Skies

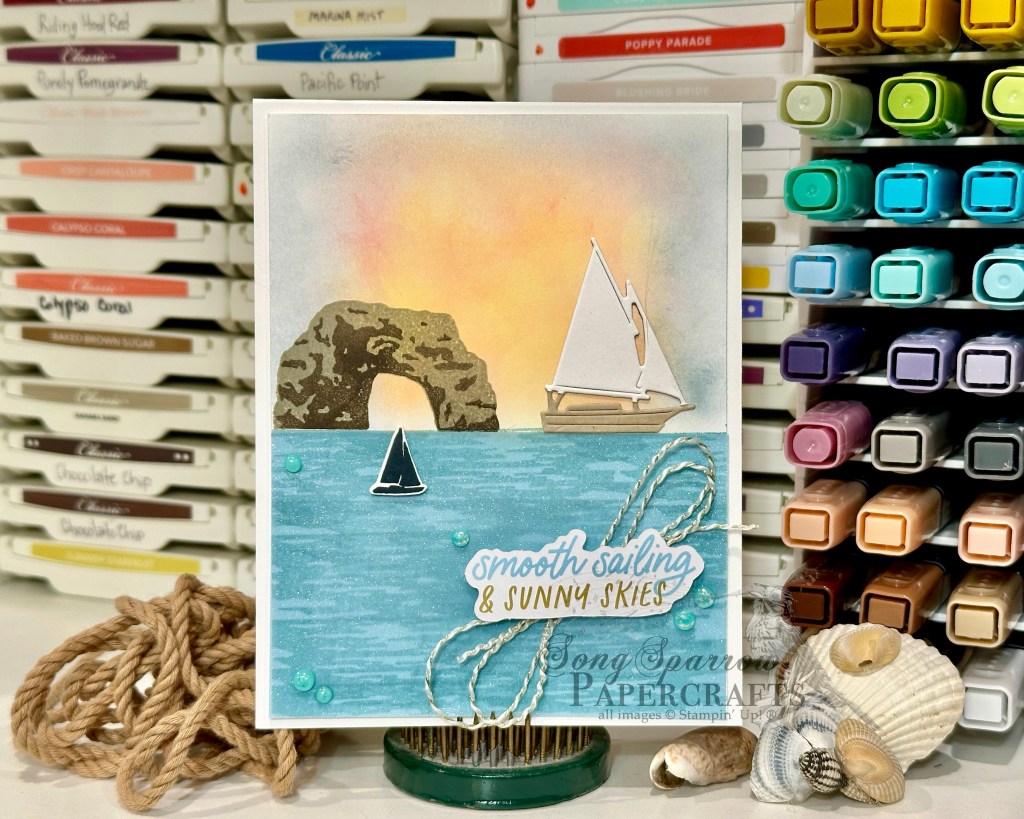
Happy Wednesday, friends, and welcome back as we pay homage to summer this week with all of our projects. There are so many goodies in the crafty stash that are perfect for celebrating summer. And today we’re giving the Sunset Coast stamp & die bundle a little more love.

We keep the backdrop a neutral white cardstock to allow the focal panel to really pop. Our focal panel is built on a quarter panel of white cardstock and starts with stamping the water in Lost Lagoon ink using the Sunset Coast stamps. I really wanted the water to sparkle, so I covered the stamped portion with blue shimmer vellum and I just love the effect it gives to this panel. The sky is filled in with blending brushes in a combination of yellow, orange, pink, and blue. The rock formation in the background is stamped in combination of browns. Our two sailboats are created with a combination of the stamps and dies from the Sunset Coast set. The larger boat is paper pieces, while the smaller boat is stamped and then diecut. Our sentiment comes from the Saying Something ephemera pack and is mounted over gold & white baker’s twine with dimensionals. We finish things off with some extra spots of twinkle with the shimmering dots.

Tomorrow we’re going to punch things up with a fun fold. I hope you’ll drop in and check it out!

Product List
Splash & Relax

Happiness Floats

Howdy, friends, and happy Tuesday! Yesterday just completely got away from me, and by the time I got this card finished, it was well past time for me to be snoozing.

This week, our designs are going to be all about summer. There are so many great summery products in my crafty stash that need some love, so I’m looking forward to working with this week’s theme. Today we’re getting started with a super simple card using the new Splash & Relax stamps and dies. And I have to give credit for the layout to fellow demo and Luv 2 Stamp team member Patti Dolan.

We get started on today’s card with a base of Gray Granite cardstock. And then our focal panel is a quarter panel of Gray Granite that is torn to make a lazy river in the middle. Our lazy river is a sheet of the blue shimmer vellum that’s machine embossed with the Soft Waves embossing folder and mounted over another panel of vellum to give it a bit more structural integrity and depth of color. The panel is then adhered to the card front with dimensionals.

Next we work on our fun elements using the new Splash & Relax stamps and dies. The innertubes are all stamped first in a variety of happy colors — blue-greens, yellows, and pinky-oranges — and then diecut with the coordinating die and adhered over the lazy river with dimensionals. I needed a few more fun summer elements and decided to make some flip flips and sunglasses. The flip flops are a combination of Barely Blush and Melon Mambo papers with some small rhinestones as the decorative element. And the sunglasses combine Blackberry Bliss and textured silver metallic paper for the perfect mirrored shades.

The sentiment is from the Splash & Relax stamp set and is stamped in a combination of Lost Lagoon and Pretty Peacock onto a scrap of Pool Party cardstock and then cut into a banner shape with paper snips. We finish things off with a combination of white and blue shimmering dots.

When I chose the Gray Granite, I was going for the look of a pool deck, which I think it accomplishes, but it doesn’t give me that ahhhhh feeling I was going for. In hindsight, I might pick a different neutral next time — maybe Crumb Cake or something like it — to give a more beachy feel. And here’s a hot tip for you! It’s always better to decide where you want your sentiment before you adhere the piece you’ll be stamping on onto your card base. Otherwise, you may not get a clean image and then you’ll have to make a quick pivot to create a separate sentiment panel that fits in the tiny space you allotted. Ask me how I know this. Ooops!

Hope you’ll drop in tomorrow to see what’s next in our summer card series!

Product List
Online Exclusives

Birthday Blues

Welcome back on this Saturday. How’s your weekend going so far? We’ve had lots of things to cross off the around-the-house to-do list so it’s been a busy one around here. But now it’s time to put the feet up and relax.

This week we’re getting a sneak peek at the new Violet Dreams suite that will release in just a few weeks. And today I wanted to show how you can easily use this suite to create beautiful masculine designs. So I’m turning to one of my favorite sentiment sets right now — the Words & Wishes dies.

We get started with a base of white cardstock. I choose the sheet of Secret Sea dotted paper from the Violet Dreams paper pack to serve as the backdrop. A panel is cut from this sheet with the Branching Out dies to allow for the lighter Cloud Cover striped pattern to tuck in behind and shine through our new window. The sentiment is a combination of shimmer vellum and velveteen specialty papers cut with the Words & Wishes happy birthday dies. The sentiment is mounted over some gold sheer ribbon with dimensionals. And we finish things off with some gold metallic gems around the sentiment to draw the eye across our design.

While I might turn to this suite more often for more delicate and feminine designs, I always like to explore how each product can lend itself to neutral and masculine designs, too. Next week is all about summer. I hope you’ll come along for all the summer fun!

Products used in today’s design:
White CS
Violet Dreams (releasing in July), shimmer vellum, velveteen DSP
Words & Wishes, Branching Out dies
Striped gold sheer ribbon
Metallic gems
Dimensionals
Adhesives

Online Exclusives

Birthday Violets

Welcome back, everyone! And TGIF. It’s certainly been quite a day around here as heavy rain on both commutes nearly necessitated a boat. Seriously though, I made it fine, but we got crazy amounts of rain today. I hope you’re dry & cozy wherever you are.

This week we’re getting a sneak peek at the new Violet Dreams suite that will release in just a few weeks. This suite has some gorgeous paper, coordinating specialty paper, a stamp set with coordinating dies, satin ribbon, and gemstone floral embellishments. And for this card, we’re getting a look at almost all of it.

So we get started with a base of Highland Heather cardstock. The background cross-stripe pattern in the background is from the Violet Dreams paper pack and then we use the Shimmering Stripes specialty paper to create a sparkly striped pattern in the center with a little bit of the Highland Heather as a mat. Our focal panel is a combination of images from the Framed Violets stamp set to create our oval frame and violet images and then cut them out with their coordinating dies. Some Granny Apple Green and Pretty in Pink Stampin’ Blends give us the shading on our violet image with a few velveteen pieces for some added texture. We add a bow of Fresh Freesia Satin to finish our violet bouquet. The sentiment from the Rolling Waves stamp set is stamped in Gorgeous Grape on white cardstock and then cut into the banner with the Stylish Shapes dies and affixed under the violet. We finish things off with some pearlized circles and fine purple shimmer gems, along with our little butterfly friend from the Gilded Wings accents pack.

We’ll be finishing up our sneak peek tomorrow. I hope you’ll drop by to see what else this beautiful suite can do!

Products used in today’s design:
Highland Heather, white CS
Violet Dreams, Shimmering Stripes (both releasing in July), velveteen DSP
Framed Violets stamps & dies (releasing in July)
Rolling Waves stamps
Stylish Shapes dies
Fresh Freesia satin ribbon (releasing in July)
Gilded Wings accents (releasing in July)
Stampin’ Blends
Pearlized faceted circles, fine shimmer gems
Dimensionals
Adhesives