
Howdy, friends, and happy Tuesday! Yesterday just completely got away from me, and by the time I got this card finished, it was well past time for me to be snoozing.
This week, our designs are going to be all about summer. There are so many great summery products in my crafty stash that need some love, so I’m looking forward to working with this week’s theme. Today we’re getting started with a super simple card using the new Splash & Relax stamps and dies. And I have to give credit for the layout to fellow demo and Luv 2 Stamp team member Patti Dolan.
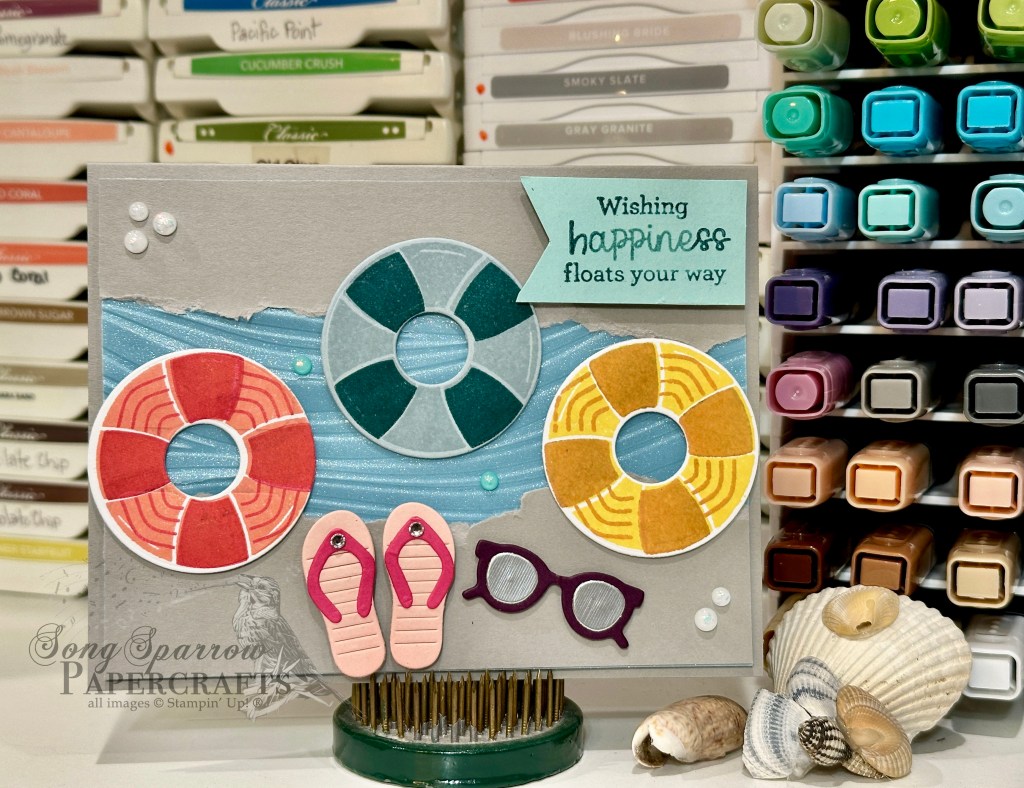
We get started on today’s card with a base of Gray Granite cardstock. And then our focal panel is a quarter panel of Gray Granite that is torn to make a lazy river in the middle. Our lazy river is a sheet of the blue shimmer vellum that’s machine embossed with the Soft Waves embossing folder and mounted over another panel of vellum to give it a bit more structural integrity and depth of color. The panel is then adhered to the card front with dimensionals.
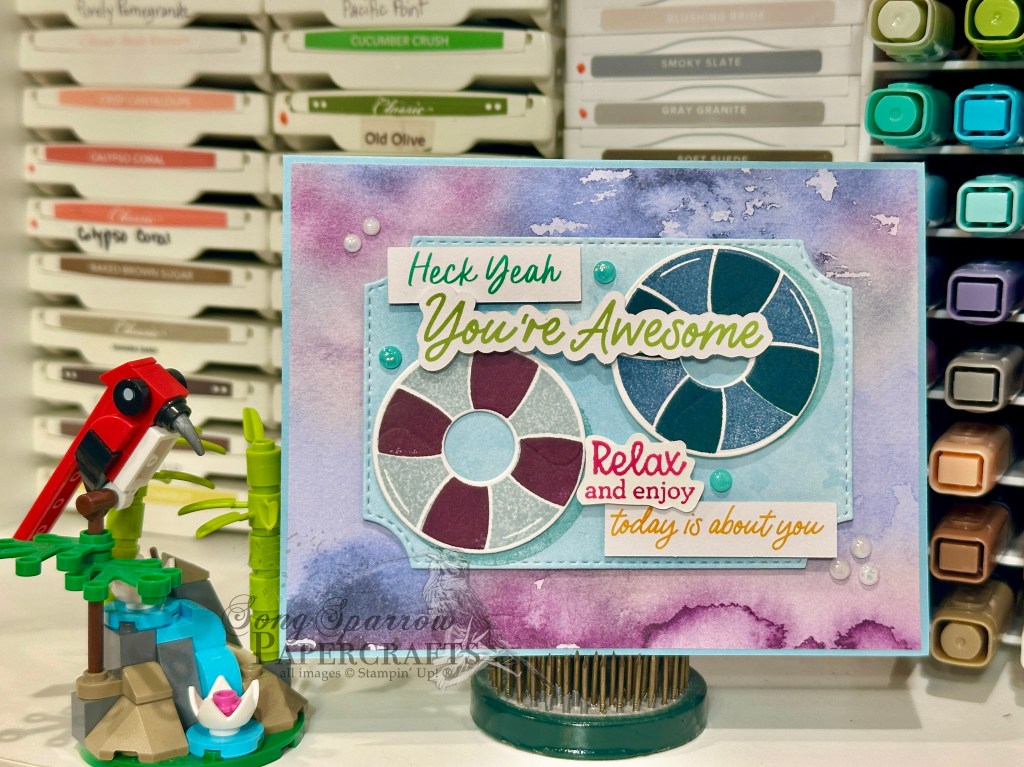
Next we work on our fun elements using the new Splash & Relax stamps and dies. The innertubes are all stamped first in a variety of happy colors — blue-greens, yellows, and pinky-oranges — and then diecut with the coordinating die and adhered over the lazy river with dimensionals. I needed a few more fun summer elements and decided to make some flip flips and sunglasses. The flip flops are a combination of Barely Blush and Melon Mambo papers with some small rhinestones as the decorative element. And the sunglasses combine Blackberry Bliss and textured silver metallic paper for the perfect mirrored shades.
The sentiment is from the Splash & Relax stamp set and is stamped in a combination of Lost Lagoon and Pretty Peacock onto a scrap of Pool Party cardstock and then cut into a banner shape with paper snips. We finish things off with a combination of white and blue shimmering dots.
When I chose the Gray Granite, I was going for the look of a pool deck, which I think it accomplishes, but it doesn’t give me that ahhhhh feeling I was going for. In hindsight, I might pick a different neutral next time — maybe Crumb Cake or something like it — to give a more beachy feel. And here’s a hot tip for you! It’s always better to decide where you want your sentiment before you adhere the piece you’ll be stamping on onto your card base. Otherwise, you may not get a clean image and then you’ll have to make a quick pivot to create a separate sentiment panel that fits in the tiny space you allotted. Ask me how I know this. Ooops!
Hope you’ll drop in tomorrow to see what’s next in our summer card series!
Product List![Gray Granite 8-1/2" X 11" Cardstock [ 146983 ]](https://assets1.tamsnetwork.com/images/EC042017NF/146983s.jpg "Gray Granite 8-1/2\" X 11\" Cardstock [ 146983 ]")
![Cloud Cover 8 1/2" X 11" Cardstock [ 165621 ]](https://assets1.tamsnetwork.com/images/EC042017NF/165621s.jpg "Cloud Cover 8 1/2\" X 11\" Cardstock [ 165621 ]")
![Pool Party 8-1/2" X 11" Cardstock [ 122924 ]](https://assets1.tamsnetwork.com/images/EC042017NF/122924s.jpg "Pool Party 8-1/2\" X 11\" Cardstock [ 122924 ]")
![Blackberry Bliss 8-1/2" X 11" Cardstock [ 133675 ]](https://assets1.tamsnetwork.com/images/EC042017NF/133675s.jpg "Blackberry Bliss 8-1/2\" X 11\" Cardstock [ 133675 ]")
![Barely Blush 8 1/2" X 11" Cardstock [ 167689 ]](https://assets1.tamsnetwork.com/images/EC042017NF/167689s.jpg "Barely Blush 8 1/2\" X 11\" Cardstock [ 167689 ]")
![Melon Mambo 8-1/2" X 11" Cardstock [ 115320 ]](https://assets1.tamsnetwork.com/images/EC042017NF/115320s.jpg "Melon Mambo 8-1/2\" X 11\" Cardstock [ 115320 ]")
![Textured Metallic 12" X 12" (30.5 X 30.5 Cm) Specialty Paper [ 163772 ]](https://assets1.tamsnetwork.com/images/EC042017NF/163772s.jpg "Textured Metallic 12\" X 12\" (30.5 X 30.5 Cm) Specialty Paper [ 163772 ]")
![Sunset Shimmer Vellum 12" X 12" (30.5 X 30.5 Cm) Specialty Paper [ 167784 ]](https://assets1.tamsnetwork.com/images/EC042017NF/167784s.jpg "Sunset Shimmer Vellum 12\" X 12\" (30.5 X 30.5 Cm) Specialty Paper [ 167784 ]")
![Soft Waves 3 D Embossing Folder [ 164695 ]](https://assets1.tamsnetwork.com/images/EC042017NF/164695s.jpg "Soft Waves 3 D Embossing Folder [ 164695 ]")
![Splash & Relax Bundle [ 167903 ]](https://assets1.tamsnetwork.com/images/EC042017NF/167903s.jpg "Splash & Relax Bundle [ 167903 ]")
![Pretty Peacock Classic Stampin’ Pad [ 150083 ]](https://assets1.tamsnetwork.com/images/EC042017NF/150083s.jpg "Pretty Peacock Classic Stampin’ Pad [ 150083 ]")
![Pool Party Classic Stampin' Pad [ 147107 ]](https://assets1.tamsnetwork.com/images/EC042017NF/147107s.jpg "Pool Party Classic Stampin' Pad [ 147107 ]")
![Daffodil Delight Classic Stampin' Pad [ 147094 ]](https://assets1.tamsnetwork.com/images/EC042017NF/147094s.jpg "Daffodil Delight Classic Stampin' Pad [ 147094 ]")
![Timid Tiger Classic Stampin' Pad [ 165278 ]](https://assets1.tamsnetwork.com/images/EC042017NF/165278s.jpg "Timid Tiger Classic Stampin' Pad [ 165278 ]")
![Flirty Flamingo Classic Stampin' Pad [ 147052 ]](https://assets1.tamsnetwork.com/images/EC042017NF/147052s.jpg "Flirty Flamingo Classic Stampin' Pad [ 147052 ]")
![Melon Mambo Classic Stampin' Pad [ 147051 ]](https://assets1.tamsnetwork.com/images/EC042017NF/147051s.jpg "Melon Mambo Classic Stampin' Pad [ 147051 ]")
![Rhinestone Basic Jewels [ 144220 ]](https://assets1.tamsnetwork.com/images/EC042017NF/144220s.jpg "Rhinestone Basic Jewels [ 144220 ]")
![Shimmering Dots [ 167949 ]](https://assets1.tamsnetwork.com/images/EC042017NF/167949s.jpg "Shimmering Dots [ 167949 ]")
![Mini Stampin' Dimensionals [ 144108 ]](https://assets1.tamsnetwork.com/images/EC042017NF/144108s.jpg "Mini Stampin' Dimensionals [ 144108 ]")
![Basic White 8 1/2" X 11" Cardstock [ 166780 ]](https://assets1.tamsnetwork.com/images/EC042017NF/166780s.jpg "Basic White 8 1/2\" X 11\" Cardstock [ 166780 ]")
![Pastels Shimmer 12" X 12" (30.5 X 30.5 Cm) Specialty Paper [ 167198 ]](https://assets1.tamsnetwork.com/images/EC042017NF/167198s.jpg "Pastels Shimmer 12\" X 12\" (30.5 X 30.5 Cm) Specialty Paper [ 167198 ]")
![Stylish Shapes Dies [ 159183 ]](https://assets1.tamsnetwork.com/images/EC042017NF/159183s.jpg "Stylish Shapes Dies [ 159183 ]")
![Sunset Coast Dies [ 167780 ]](https://assets1.tamsnetwork.com/images/EC042017NF/167780s.jpg "Sunset Coast Dies [ 167780 ]")
![Far Away Landscapes Photopolymer Stamp Set [ 167543 ]](https://assets1.tamsnetwork.com/images/EC042017NF/167543s.jpg "Far Away Landscapes Photopolymer Stamp Set [ 167543 ]")
![Secret Sea Classic Stampin' Pad [ 165285 ]](https://assets1.tamsnetwork.com/images/EC042017NF/165285s.jpg "Secret Sea Classic Stampin' Pad [ 165285 ]")
![Saying Something Mix & Match Ephemera Pack (English) [ 163761 ]](https://assets1.tamsnetwork.com/images/EC042017NF/163761s.jpg "Saying Something Mix & Match Ephemera Pack (English) [ 163761 ]")
![Strawberry Slush Classic Stampin' Pad [ 165286 ]](https://assets1.tamsnetwork.com/images/EC042017NF/165286s.jpg "Strawberry Slush Classic Stampin' Pad [ 165286 ]")
![Pool Party Stampin' Blends Combo Pack [ 154894 ]](https://assets1.tamsnetwork.com/images/EC042017NF/154894s.jpg "Pool Party Stampin' Blends Combo Pack [ 154894 ]")
![Shaded Spruce Stampin' Blends Combo Pack [ 154903 ]](https://assets1.tamsnetwork.com/images/EC042017NF/154903s.jpg "Shaded Spruce Stampin' Blends Combo Pack [ 154903 ]")
![Soft Sea Foam Stampin' Blends Combo Pack [ 154902 ]](https://assets1.tamsnetwork.com/images/EC042017NF/154902s.jpg "Soft Sea Foam Stampin' Blends Combo Pack [ 154902 ]")
![Old Olive Stampin' Blends Combo Pack [ 154892 ]](https://assets1.tamsnetwork.com/images/EC042017NF/154892s.jpg "Old Olive Stampin' Blends Combo Pack [ 154892 ]")
![Smoky Slate Stampin' Blends Combo Pack [ 154904 ]](https://assets1.tamsnetwork.com/images/EC042017NF/154904s.jpg "Smoky Slate Stampin' Blends Combo Pack [ 154904 ]")
![Fresh Freesia Stampin' Blends Combo Pack [ 155518 ]](https://assets1.tamsnetwork.com/images/EC042017NF/155518s.jpg "Fresh Freesia Stampin' Blends Combo Pack [ 155518 ]")
![Black & White & Gold Baker's Twine [ 166005 ]](https://assets1.tamsnetwork.com/images/EC042017NF/166005s.jpg "Black & White & Gold Baker's Twine [ 166005 ]")
![Dewdrops Embellishments [ 167748 ]](https://assets1.tamsnetwork.com/images/EC042017NF/167748s.jpg "Dewdrops Embellishments [ 167748 ]")
![Small Blending Brushes [ 160518 ]](https://assets1.tamsnetwork.com/images/EC042017NF/160518s.jpg "Small Blending Brushes [ 160518 ]")
![Fresh Freesia 8 1/2" X 11" Cardstock [ 155613 ]](https://assets1.tamsnetwork.com/images/EC042017NF/155613s.jpg "Fresh Freesia 8 1/2\" X 11\" Cardstock [ 155613 ]")
![Sunset Coast Bundle (English) [ 167781 ]](https://assets1.tamsnetwork.com/images/EC042017NF/167781s.jpg "Sunset Coast Bundle (English) [ 167781 ]")
![Blackberry Bliss Classic Stampin' Pad [ 147092 ]](https://assets1.tamsnetwork.com/images/EC042017NF/147092s.jpg "Blackberry Bliss Classic Stampin' Pad [ 147092 ]")
![Pearlized Faceted Circles [ 166978 ]](https://assets1.tamsnetwork.com/images/EC042017NF/166978s.jpg "Pearlized Faceted Circles [ 166978 ]")
![Mini Glue Dots [ 103683 ]](https://assets1.tamsnetwork.com/images/EC042017NF/103683s.jpg "Mini Glue Dots [ 103683 ]")
![Fine-Tip Glue Pen [ 138309 ]](https://assets1.tamsnetwork.com/images/EC042017NF/138309s.jpg "Fine-Tip Glue Pen [ 138309 ]")
![Balmy Blue 8-1/2" X 11" Cardstock [ 146982 ]](https://assets1.tamsnetwork.com/images/EC042017NF/146982s.jpg "Balmy Blue 8-1/2\" X 11\" Cardstock [ 146982 ]")
![Thoughtful Journey 6" X 6" (15.2 X 15.2 Cm) Designer Series Paper [ 163303 ]](https://assets1.tamsnetwork.com/images/EC042017NF/163303s.jpg "Thoughtful Journey 6\" X 6\" (15.2 X 15.2 Cm) Designer Series Paper [ 163303 ]")
![Beautiful Bokeh 6" X 6" (15.2 X 15.2 Cm) Designer Series Paper [ 164607 ]](https://assets1.tamsnetwork.com/images/EC042017NF/164607s.jpg "Beautiful Bokeh 6\" X 6\" (15.2 X 15.2 Cm) Designer Series Paper [ 164607 ]")
![Branching Out Dies [ 165775 ]](https://assets1.tamsnetwork.com/images/EC042017NF/165775s.jpg "Branching Out Dies [ 165775 ]")
![Cloud Cover Classic Stampin' Ink Refill [ 165279 ]](https://assets1.tamsnetwork.com/images/EC042017NF/165279s.jpg "Cloud Cover Classic Stampin' Ink Refill [ 165279 ]")
![Misty Moonlight Classic Stampin' Pad [ 153118 ]](https://assets1.tamsnetwork.com/images/EC042017NF/153118s.jpg "Misty Moonlight Classic Stampin' Pad [ 153118 ]")
![Pretty Peacock 8-1/2" X 11" Cardstock [ 150880 ]](https://assets1.tamsnetwork.com/images/EC042017NF/150880s.jpg "Pretty Peacock 8-1/2\" X 11\" Cardstock [ 150880 ]")
![Cajun Craze 8-1/2" X 11" Cardstock [ 119684 ]](https://assets1.tamsnetwork.com/images/EC042017NF/119684s.jpg "Cajun Craze 8-1/2\" X 11\" Cardstock [ 119684 ]")
![Everyday Essentials Mix & Match 12" X 12" (30.5 X 30.5 Cm) Designer Series Paper [ 167702 ]](https://assets1.tamsnetwork.com/images/EC042017NF/167702s.jpg "Everyday Essentials Mix & Match 12\" X 12\" (30.5 X 30.5 Cm) Designer Series Paper [ 167702 ]")
![Nature Walk 12" X 12" (30.5 X 30.5 Cm) Designer Series Paper [ 166912 ]](https://assets1.tamsnetwork.com/images/EC042017NF/166912s.jpg "Nature Walk 12\" X 12\" (30.5 X 30.5 Cm) Designer Series Paper [ 166912 ]")
![Label Me Grateful Dies [ 166111 ]](https://assets1.tamsnetwork.com/images/EC042017NF/166111s.jpg "Label Me Grateful Dies [ 166111 ]")
![Nested Essentials Dies [ 161597 ]](https://assets1.tamsnetwork.com/images/EC042017NF/161597s.jpg "Nested Essentials Dies [ 161597 ]")
![Bbq Master Bundle (English) [ 167466 ]](https://assets1.tamsnetwork.com/images/EC042017NF/167466s.jpg "Bbq Master Bundle (English) [ 167466 ]")
![Versamark Pad [ 102283 ]](https://assets1.tamsnetwork.com/images/EC042017NF/102283s.jpg "Versamark Pad [ 102283 ]")
![Real Red Classic Stampin' Pad [ 147084 ]](https://assets1.tamsnetwork.com/images/EC042017NF/147084s.jpg "Real Red Classic Stampin' Pad [ 147084 ]")
![Crushed Curry Classic Stampin' Pad [ 147087 ]](https://assets1.tamsnetwork.com/images/EC042017NF/147087s.jpg "Crushed Curry Classic Stampin' Pad [ 147087 ]")
![Basics Wow! Embossing Powder [ 165679 ]](https://assets1.tamsnetwork.com/images/EC042017NF/165679s.jpg "Basics Wow! Embossing Powder [ 165679 ]")
![Clear Wink Of Stella Glitter Brush [ 141897 ]](https://assets1.tamsnetwork.com/images/EC042017NF/141897s.jpg "Clear Wink Of Stella Glitter Brush [ 141897 ]")
![Pretty Peacock & Gold 3/8" (1 Cm) Metallic Ribbon [ 162588 ]](https://assets1.tamsnetwork.com/images/EC042017NF/162588s.jpg "Pretty Peacock & Gold 3/8\" (1 Cm) Metallic Ribbon [ 162588 ]")
![Array Of Dots [ 167559 ]](https://assets1.tamsnetwork.com/images/EC042017NF/167559s.jpg "Array Of Dots [ 167559 ]")
![Tear & Tape Adhesive [ 154031 ]](https://assets1.tamsnetwork.com/images/EC042017NF/154031s.jpg "Tear & Tape Adhesive [ 154031 ]")
![Crumb Cake 8-1/2" X 11" Cardstock [ 120953 ]](https://assets1.tamsnetwork.com/images/EC042017NF/120953s.jpg "Crumb Cake 8-1/2\" X 11\" Cardstock [ 120953 ]")
![Country Woods 12" X 12" (30.5 X 30.5 Cm) Designer Series Paper [ 163393 ]](https://assets1.tamsnetwork.com/images/EC042017NF/163393s.jpg "Country Woods 12\" X 12\" (30.5 X 30.5 Cm) Designer Series Paper [ 163393 ]")
![Trusty Tools Bundle (English) [ 162723 ]](https://assets1.tamsnetwork.com/images/EC042017NF/162723s.jpg "Trusty Tools Bundle (English) [ 162723 ]")
![Daffodil Delight Stampin' Blends Combo Pack [ 154883 ]](https://assets1.tamsnetwork.com/images/EC042017NF/154883s.jpg "Daffodil Delight Stampin' Blends Combo Pack [ 154883 ]")
![Beautiful Gallery 6" X 6" (15.2 X 15.2 Cm) Designer Series Paper [ 165196 ]](https://assets1.tamsnetwork.com/images/EC042017NF/165196s.jpg "Beautiful Gallery 6\" X 6\" (15.2 X 15.2 Cm) Designer Series Paper [ 165196 ]")
![Lunar Lustre 12" X 12" (30.5 X 30.5 Cm) Specialty Paper [ 167199 ]](https://assets1.tamsnetwork.com/images/EC042017NF/167199s.jpg "Lunar Lustre 12\" X 12\" (30.5 X 30.5 Cm) Specialty Paper [ 167199 ]")
![Scalloped Blooms Photopolymer Stamp Set (English) [ 167639 ]](https://assets1.tamsnetwork.com/images/EC042017NF/167639s.jpg "Scalloped Blooms Photopolymer Stamp Set (English) [ 167639 ]")
![Secret Sea 3/8" (1 Cm) Bordered Open Weave Ribbon [ 166932 ]](https://assets1.tamsnetwork.com/images/EC042017NF/166932s.jpg "Secret Sea 3/8\" (1 Cm) Bordered Open Weave Ribbon [ 166932 ]")
![2025–2027 In Color™ Flat Pearls [ 165192 ]](https://assets1.tamsnetwork.com/images/EC042017NF/165192s.jpg "2025–2027 In Color™ Flat Pearls [ 165192 ]")
![Moody Palette Glossy Dots [ 167180 ]](https://assets1.tamsnetwork.com/images/EC042017NF/167180s.jpg "Moody Palette Glossy Dots [ 167180 ]")
![Stampin' Dimensionals [ 104430 ]](https://assets1.tamsnetwork.com/images/EC042017NF/104430s.jpg "Stampin' Dimensionals [ 104430 ]")
![Velveteen Assortment 12" X 12" (30.5 X 30.5 Cm) Specialty Paper [ 167915 ]](https://assets1.tamsnetwork.com/images/EC042017NF/167915s.jpg "Velveteen Assortment 12\" X 12\" (30.5 X 30.5 Cm) Specialty Paper [ 167915 ]")
![Words & Wishes Dies (English) [ 167894 ]](https://assets1.tamsnetwork.com/images/EC042017NF/167894s.jpg "Words & Wishes Dies (English) [ 167894 ]")
![Gold Striped 3/8" (1 Cm) Mesh Ribbon [ 165599 ]](https://assets1.tamsnetwork.com/images/EC042017NF/165599s.jpg "Gold Striped 3/8\" (1 Cm) Mesh Ribbon [ 165599 ]")
![Drusy Adhesive Backed Embellishments [ 164223 ]](https://assets1.tamsnetwork.com/images/EC042017NF/164223s.jpg "Drusy Adhesive Backed Embellishments [ 164223 ]")

