Welcome back, crafty friends! It seems fitting that we’re working with the summer theme this week as it really starts to feel like summer here in North Texas. We’ve had a nice run of some unseasonably cooler days, but we’re headed for the frying pan as we head into the weekend. But today’s card is sure to cool us off as we head back to the beach for a day of fun in the sun with all of the accoutrements! Today’s fun fold combines the new Splash & Relax bundle with the Notes & Totes bundle to create this cute summer hello.
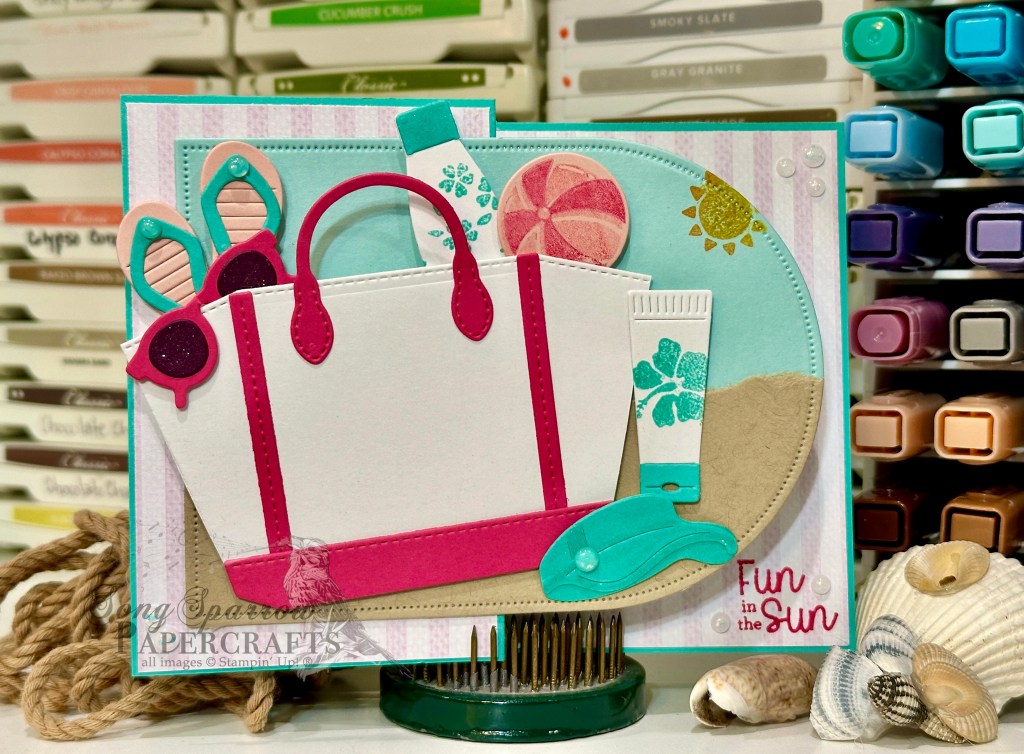
We get started with a base of Summer Splash cardstock and score it so we have a z-fold. A sheet of the striped Violet Dreams patterned paper (coming out in just a little over a week!) serves as our backdrop, along with the grid pattern from the Berry Botanical vellum pack (a Product of the Month that is still available with a qualifying olrder!). Our front focal panel has all the fun and we get started with a base of Pool Party cardstock that’s cut with one of the larger Everyday Arches dies. I cut a Crumb Cake arch at the same time and then tore it to create the sand. Our beach bag is a combination of white and Melon Mambo and the pieces are cut out with the Notes & Totes dies and adhered to our background panel with dimensionals.
All of our beachy essentials come next. The flip flops, beach ball, sunglasses and visor are all created with the Splash & Relax dies, while our water bottle and sunscreen are stamped and cut with the Notes & Totes set. We punch things up with a touch of Wink of Stella on the sunglasses lenses, the water bottle cap, the sunscreen bottle, and the visor. And then we add a few shimmering dots to finish off our flip flops and visor. Dimensionals help all of these fun beach essentials tuck in, around, and behind one another. We finish things off with our sun shining above which is stamped with the Notes & Totes stamps.
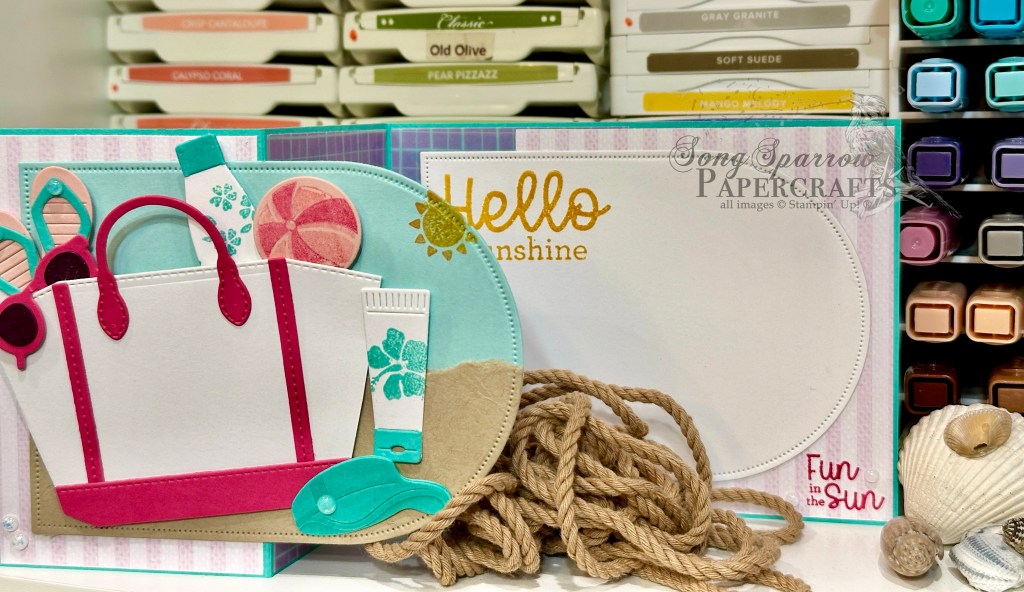
We complete the card by adding the finishing touches to our inside panel with the hello sunshine and fun in the sun sentiments. Some white shimmering dots give us sparkles in all the corners and help our eyes to easily move from the front panel to the message panel.
Today’s card is a part of the Luv 2 Stamp Group Instagram Hop, which goes live at 9 AM Pacific Time (PST). Click here to head over to my Instagram feed at 9 AM Pacific/11 AM Central and check out what the other demos in our L2S Group have created for you today!
Product List![Summer Splash 8 1/2" X 11 Cardstock [ 163797 ]](https://assets1.tamsnetwork.com/images/EC042017NF/163797s.jpg "Summer Splash 8 1/2\" X 11 Cardstock [ 163797 ]")
![Pool Party 8-1/2" X 11" Cardstock [ 122924 ]](https://assets1.tamsnetwork.com/images/EC042017NF/122924s.jpg "Pool Party 8-1/2\" X 11\" Cardstock [ 122924 ]")
![Crumb Cake 8-1/2" X 11" Cardstock [ 120953 ]](https://assets1.tamsnetwork.com/images/EC042017NF/120953s.jpg "Crumb Cake 8-1/2\" X 11\" Cardstock [ 120953 ]")
![Blackberry Bliss 8-1/2" X 11" Cardstock [ 133675 ]](https://assets1.tamsnetwork.com/images/EC042017NF/133675s.jpg "Blackberry Bliss 8-1/2\" X 11\" Cardstock [ 133675 ]")
![Melon Mambo 8-1/2" X 11" Cardstock [ 115320 ]](https://assets1.tamsnetwork.com/images/EC042017NF/115320s.jpg "Melon Mambo 8-1/2\" X 11\" Cardstock [ 115320 ]")
![Barely Blush 8 1/2" X 11" Cardstock [ 167689 ]](https://assets1.tamsnetwork.com/images/EC042017NF/167689s.jpg "Barely Blush 8 1/2\" X 11\" Cardstock [ 167689 ]")
![Basic White 8 1/2" X 11" Cardstock [ 166780 ]](https://assets1.tamsnetwork.com/images/EC042017NF/166780s.jpg "Basic White 8 1/2\" X 11\" Cardstock [ 166780 ]")
![Berry Botanical Vellum 12" X 12" (30.5 X 30.5 Cm) Specialty Designer Series Paper [ 167985 ]](https://assets1.tamsnetwork.com/images/EC042017NF/167985s.jpg "Berry Botanical Vellum 12\" X 12\" (30.5 X 30.5 Cm) Specialty Designer Series Paper [ 167985 ]")
![Everyday Arches Dies [ 164629 ]](https://assets1.tamsnetwork.com/images/EC042017NF/164629s.jpg "Everyday Arches Dies [ 164629 ]")
![Notes & Totes Bundle (English) [ 165241 ]](https://assets1.tamsnetwork.com/images/EC042017NF/165241s.jpg "Notes & Totes Bundle (English) [ 165241 ]")
![Splash & Relax Bundle [ 167903 ]](https://assets1.tamsnetwork.com/images/EC042017NF/167903s.jpg "Splash & Relax Bundle [ 167903 ]")
![Summer Splash Classic Stampin Pad [ 163809 ]](https://assets1.tamsnetwork.com/images/EC042017NF/163809s.jpg "Summer Splash Classic Stampin Pad [ 163809 ]")
![Strawberry Slush Classic Stampin' Pad [ 165286 ]](https://assets1.tamsnetwork.com/images/EC042017NF/165286s.jpg "Strawberry Slush Classic Stampin' Pad [ 165286 ]")
![Melon Mambo Classic Stampin' Pad [ 147051 ]](https://assets1.tamsnetwork.com/images/EC042017NF/147051s.jpg "Melon Mambo Classic Stampin' Pad [ 147051 ]")
![Crushed Curry Classic Stampin' Pad [ 147087 ]](https://assets1.tamsnetwork.com/images/EC042017NF/147087s.jpg "Crushed Curry Classic Stampin' Pad [ 147087 ]")
![Timid Tiger Classic Stampin' Pad [ 165278 ]](https://assets1.tamsnetwork.com/images/EC042017NF/165278s.jpg "Timid Tiger Classic Stampin' Pad [ 165278 ]")
![Shimmering Dots [ 167949 ]](https://assets1.tamsnetwork.com/images/EC042017NF/167949s.jpg "Shimmering Dots [ 167949 ]")
![Clear Wink Of Stella Glitter Brush [ 141897 ]](https://assets1.tamsnetwork.com/images/EC042017NF/141897s.jpg "Clear Wink Of Stella Glitter Brush [ 141897 ]")
![Stampin' Dimensionals [ 104430 ]](https://assets1.tamsnetwork.com/images/EC042017NF/104430s.jpg "Stampin' Dimensionals [ 104430 ]")
![Sunset Shimmer Vellum 12" X 12" (30.5 X 30.5 Cm) Specialty Paper [ 167784 ]](https://assets1.tamsnetwork.com/images/EC042017NF/167784s.jpg "Sunset Shimmer Vellum 12\" X 12\" (30.5 X 30.5 Cm) Specialty Paper [ 167784 ]")
![Sunset Coast Bundle (English) [ 167781 ]](https://assets1.tamsnetwork.com/images/EC042017NF/167781s.jpg "Sunset Coast Bundle (English) [ 167781 ]")
![Saying Something Mix & Match Ephemera Pack (English) [ 163761 ]](https://assets1.tamsnetwork.com/images/EC042017NF/163761s.jpg "Saying Something Mix & Match Ephemera Pack (English) [ 163761 ]")
![Lost Lagoon Classic Stampin' Pad [ 161678 ]](https://assets1.tamsnetwork.com/images/EC042017NF/161678s.jpg "Lost Lagoon Classic Stampin' Pad [ 161678 ]")
![Secret Sea Classic Stampin' Pad [ 165285 ]](https://assets1.tamsnetwork.com/images/EC042017NF/165285s.jpg "Secret Sea Classic Stampin' Pad [ 165285 ]")
![Crumb Cake Classic Stampin' Pad [ 147116 ]](https://assets1.tamsnetwork.com/images/EC042017NF/147116s.jpg "Crumb Cake Classic Stampin' Pad [ 147116 ]")
![Gray Granite Classic Stampin' Pad [ 147118 ]](https://assets1.tamsnetwork.com/images/EC042017NF/147118s.jpg "Gray Granite Classic Stampin' Pad [ 147118 ]")
![Early Espresso Classic Stampin' Pad [ 147114 ]](https://assets1.tamsnetwork.com/images/EC042017NF/147114s.jpg "Early Espresso Classic Stampin' Pad [ 147114 ]")
![Daffodil Delight Classic Stampin' Pad [ 147094 ]](https://assets1.tamsnetwork.com/images/EC042017NF/147094s.jpg "Daffodil Delight Classic Stampin' Pad [ 147094 ]")
![Black & White & Gold Baker's Twine [ 166005 ]](https://assets1.tamsnetwork.com/images/EC042017NF/166005s.jpg "Black & White & Gold Baker's Twine [ 166005 ]")
![Small Blending Brushes [ 160518 ]](https://assets1.tamsnetwork.com/images/EC042017NF/160518s.jpg "Small Blending Brushes [ 160518 ]")
![Gray Granite 8-1/2" X 11" Cardstock [ 146983 ]](https://assets1.tamsnetwork.com/images/EC042017NF/146983s.jpg "Gray Granite 8-1/2\" X 11\" Cardstock [ 146983 ]")
![Cloud Cover 8 1/2" X 11" Cardstock [ 165621 ]](https://assets1.tamsnetwork.com/images/EC042017NF/165621s.jpg "Cloud Cover 8 1/2\" X 11\" Cardstock [ 165621 ]")
![Textured Metallic 12" X 12" (30.5 X 30.5 Cm) Specialty Paper [ 163772 ]](https://assets1.tamsnetwork.com/images/EC042017NF/163772s.jpg "Textured Metallic 12\" X 12\" (30.5 X 30.5 Cm) Specialty Paper [ 163772 ]")
![Soft Waves 3 D Embossing Folder [ 164695 ]](https://assets1.tamsnetwork.com/images/EC042017NF/164695s.jpg "Soft Waves 3 D Embossing Folder [ 164695 ]")
![Pretty Peacock Classic Stampin’ Pad [ 150083 ]](https://assets1.tamsnetwork.com/images/EC042017NF/150083s.jpg "Pretty Peacock Classic Stampin’ Pad [ 150083 ]")
![Pool Party Classic Stampin' Pad [ 147107 ]](https://assets1.tamsnetwork.com/images/EC042017NF/147107s.jpg "Pool Party Classic Stampin' Pad [ 147107 ]")
![Flirty Flamingo Classic Stampin' Pad [ 147052 ]](https://assets1.tamsnetwork.com/images/EC042017NF/147052s.jpg "Flirty Flamingo Classic Stampin' Pad [ 147052 ]")
![Rhinestone Basic Jewels [ 144220 ]](https://assets1.tamsnetwork.com/images/EC042017NF/144220s.jpg "Rhinestone Basic Jewels [ 144220 ]")
![Mini Stampin' Dimensionals [ 144108 ]](https://assets1.tamsnetwork.com/images/EC042017NF/144108s.jpg "Mini Stampin' Dimensionals [ 144108 ]")
![Pastels Shimmer 12" X 12" (30.5 X 30.5 Cm) Specialty Paper [ 167198 ]](https://assets1.tamsnetwork.com/images/EC042017NF/167198s.jpg "Pastels Shimmer 12\" X 12\" (30.5 X 30.5 Cm) Specialty Paper [ 167198 ]")
![Stylish Shapes Dies [ 159183 ]](https://assets1.tamsnetwork.com/images/EC042017NF/159183s.jpg "Stylish Shapes Dies [ 159183 ]")
![Sunset Coast Dies [ 167780 ]](https://assets1.tamsnetwork.com/images/EC042017NF/167780s.jpg "Sunset Coast Dies [ 167780 ]")
![Far Away Landscapes Photopolymer Stamp Set [ 167543 ]](https://assets1.tamsnetwork.com/images/EC042017NF/167543s.jpg "Far Away Landscapes Photopolymer Stamp Set [ 167543 ]")
![Pool Party Stampin' Blends Combo Pack [ 154894 ]](https://assets1.tamsnetwork.com/images/EC042017NF/154894s.jpg "Pool Party Stampin' Blends Combo Pack [ 154894 ]")
![Shaded Spruce Stampin' Blends Combo Pack [ 154903 ]](https://assets1.tamsnetwork.com/images/EC042017NF/154903s.jpg "Shaded Spruce Stampin' Blends Combo Pack [ 154903 ]")
![Soft Sea Foam Stampin' Blends Combo Pack [ 154902 ]](https://assets1.tamsnetwork.com/images/EC042017NF/154902s.jpg "Soft Sea Foam Stampin' Blends Combo Pack [ 154902 ]")
![Old Olive Stampin' Blends Combo Pack [ 154892 ]](https://assets1.tamsnetwork.com/images/EC042017NF/154892s.jpg "Old Olive Stampin' Blends Combo Pack [ 154892 ]")
![Smoky Slate Stampin' Blends Combo Pack [ 154904 ]](https://assets1.tamsnetwork.com/images/EC042017NF/154904s.jpg "Smoky Slate Stampin' Blends Combo Pack [ 154904 ]")
![Fresh Freesia Stampin' Blends Combo Pack [ 155518 ]](https://assets1.tamsnetwork.com/images/EC042017NF/155518s.jpg "Fresh Freesia Stampin' Blends Combo Pack [ 155518 ]")
![Dewdrops Embellishments [ 167748 ]](https://assets1.tamsnetwork.com/images/EC042017NF/167748s.jpg "Dewdrops Embellishments [ 167748 ]")
![Fresh Freesia 8 1/2" X 11" Cardstock [ 155613 ]](https://assets1.tamsnetwork.com/images/EC042017NF/155613s.jpg "Fresh Freesia 8 1/2\" X 11\" Cardstock [ 155613 ]")
![Blackberry Bliss Classic Stampin' Pad [ 147092 ]](https://assets1.tamsnetwork.com/images/EC042017NF/147092s.jpg "Blackberry Bliss Classic Stampin' Pad [ 147092 ]")
![Pearlized Faceted Circles [ 166978 ]](https://assets1.tamsnetwork.com/images/EC042017NF/166978s.jpg "Pearlized Faceted Circles [ 166978 ]")
![Mini Glue Dots [ 103683 ]](https://assets1.tamsnetwork.com/images/EC042017NF/103683s.jpg "Mini Glue Dots [ 103683 ]")
![Fine-Tip Glue Pen [ 138309 ]](https://assets1.tamsnetwork.com/images/EC042017NF/138309s.jpg "Fine-Tip Glue Pen [ 138309 ]")
![Balmy Blue 8-1/2" X 11" Cardstock [ 146982 ]](https://assets1.tamsnetwork.com/images/EC042017NF/146982s.jpg "Balmy Blue 8-1/2\" X 11\" Cardstock [ 146982 ]")
![Thoughtful Journey 6" X 6" (15.2 X 15.2 Cm) Designer Series Paper [ 163303 ]](https://assets1.tamsnetwork.com/images/EC042017NF/163303s.jpg "Thoughtful Journey 6\" X 6\" (15.2 X 15.2 Cm) Designer Series Paper [ 163303 ]")
![Beautiful Bokeh 6" X 6" (15.2 X 15.2 Cm) Designer Series Paper [ 164607 ]](https://assets1.tamsnetwork.com/images/EC042017NF/164607s.jpg "Beautiful Bokeh 6\" X 6\" (15.2 X 15.2 Cm) Designer Series Paper [ 164607 ]")
![Branching Out Dies [ 165775 ]](https://assets1.tamsnetwork.com/images/EC042017NF/165775s.jpg "Branching Out Dies [ 165775 ]")
![Cloud Cover Classic Stampin' Ink Refill [ 165279 ]](https://assets1.tamsnetwork.com/images/EC042017NF/165279s.jpg "Cloud Cover Classic Stampin' Ink Refill [ 165279 ]")
![Misty Moonlight Classic Stampin' Pad [ 153118 ]](https://assets1.tamsnetwork.com/images/EC042017NF/153118s.jpg "Misty Moonlight Classic Stampin' Pad [ 153118 ]")
![Pretty Peacock 8-1/2" X 11" Cardstock [ 150880 ]](https://assets1.tamsnetwork.com/images/EC042017NF/150880s.jpg "Pretty Peacock 8-1/2\" X 11\" Cardstock [ 150880 ]")
![Cajun Craze 8-1/2" X 11" Cardstock [ 119684 ]](https://assets1.tamsnetwork.com/images/EC042017NF/119684s.jpg "Cajun Craze 8-1/2\" X 11\" Cardstock [ 119684 ]")
![Everyday Essentials Mix & Match 12" X 12" (30.5 X 30.5 Cm) Designer Series Paper [ 167702 ]](https://assets1.tamsnetwork.com/images/EC042017NF/167702s.jpg "Everyday Essentials Mix & Match 12\" X 12\" (30.5 X 30.5 Cm) Designer Series Paper [ 167702 ]")
![Nature Walk 12" X 12" (30.5 X 30.5 Cm) Designer Series Paper [ 166912 ]](https://assets1.tamsnetwork.com/images/EC042017NF/166912s.jpg "Nature Walk 12\" X 12\" (30.5 X 30.5 Cm) Designer Series Paper [ 166912 ]")
![Label Me Grateful Dies [ 166111 ]](https://assets1.tamsnetwork.com/images/EC042017NF/166111s.jpg "Label Me Grateful Dies [ 166111 ]")
![Nested Essentials Dies [ 161597 ]](https://assets1.tamsnetwork.com/images/EC042017NF/161597s.jpg "Nested Essentials Dies [ 161597 ]")
![Bbq Master Bundle (English) [ 167466 ]](https://assets1.tamsnetwork.com/images/EC042017NF/167466s.jpg "Bbq Master Bundle (English) [ 167466 ]")
![Versamark Pad [ 102283 ]](https://assets1.tamsnetwork.com/images/EC042017NF/102283s.jpg "Versamark Pad [ 102283 ]")
![Real Red Classic Stampin' Pad [ 147084 ]](https://assets1.tamsnetwork.com/images/EC042017NF/147084s.jpg "Real Red Classic Stampin' Pad [ 147084 ]")
![Basics Wow! Embossing Powder [ 165679 ]](https://assets1.tamsnetwork.com/images/EC042017NF/165679s.jpg "Basics Wow! Embossing Powder [ 165679 ]")
![Pretty Peacock & Gold 3/8" (1 Cm) Metallic Ribbon [ 162588 ]](https://assets1.tamsnetwork.com/images/EC042017NF/162588s.jpg "Pretty Peacock & Gold 3/8\" (1 Cm) Metallic Ribbon [ 162588 ]")
![Array Of Dots [ 167559 ]](https://assets1.tamsnetwork.com/images/EC042017NF/167559s.jpg "Array Of Dots [ 167559 ]")
![Tear & Tape Adhesive [ 154031 ]](https://assets1.tamsnetwork.com/images/EC042017NF/154031s.jpg "Tear & Tape Adhesive [ 154031 ]")
