Holidays · Winter

Bright & Beautiful Season

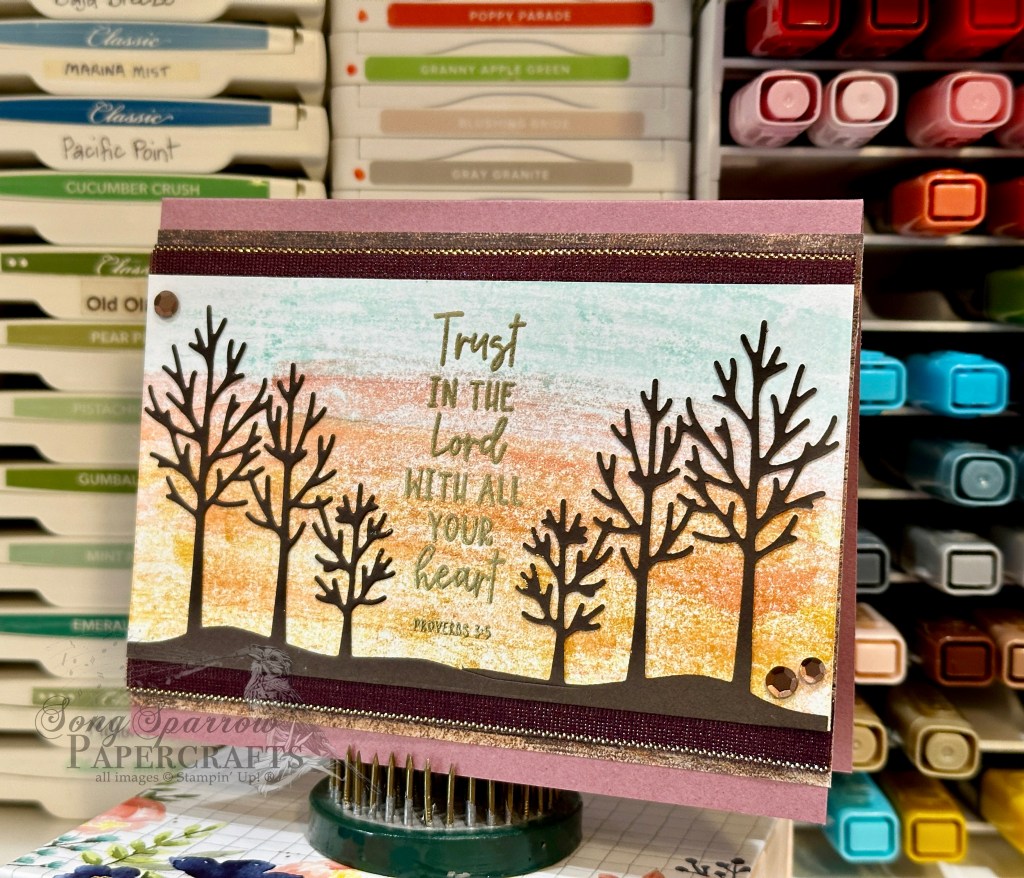
We’re taking a trek in the woods this week, and as much as I love all things autumn, I thought it would be nice to show how a few simple tweaks can yield beautiful winter designs. Today’s card is another clean and simple design, and we’re highlighting the Stampin’ Up! In the Grove dies and the Snowflake Sky embossing folder.

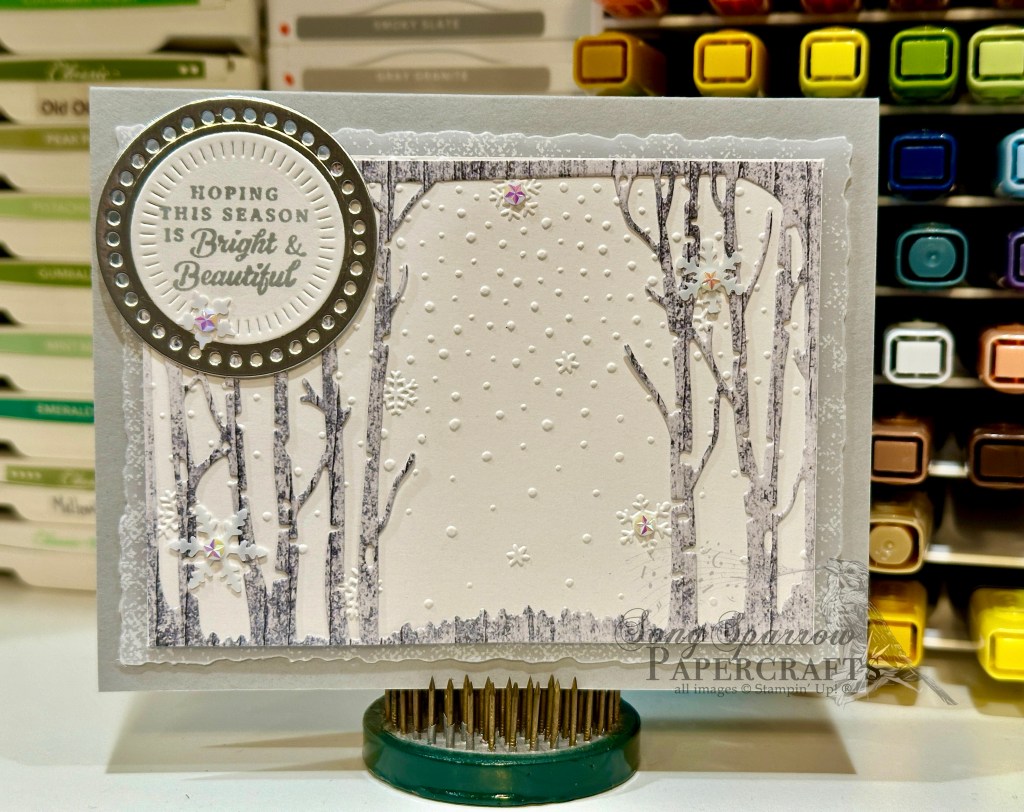
We get started with a card base of Smoky Slate cardstock. A piece of Graceful Greenery vellum serves as a soft base for our focal panel and is diecut using the Deckled Rectangles dies. Our focal panel combines a white background embossed with the Snowflake Sky embossing folder and the trees diecut from the grey woodgrain in the Country Woods patterned paper pack using the In the Grove die. The sentiment from the Peaceful Season stamp set is stamped in Smoky Slate on white cardstock and then diecut using the Radiating Stitches circle die and then matted with a silver foil circle diecut with the Everyday Details dies. A scattering of snowflakes and iridescent faceted gems give the snowy background the perfect amount of twinkle.

Tomorrow we’re going to be pairing our woodsy theme with a sketch from a SU! catalog. I hope you’ll pop in and check it out.

Product List
Clean and Simple

He Will Direct Your Paths

This week we’re venturing into the woods with our card designs. One of my favorite things to do is build scenes, and I love it when a scene comes together with just a few simple elements. For today’s card, we’re combining a stamp set, two die sets, and a patterned paper pack. And what a stunner this one turned out to be!

Our card design starts with a base of Pretty Peacock cardstock. A piece of Thoughtful Journey designer series paper sets the stage for our sunrise lake scene. The line of trees in the foreground is cut from Blackberry Bliss cardstock using the Frosted Forest dies. The deer is cut from Early Espresso using the Grove dies. The large sentiment from the You Are Beautiful stamp set is stamped in Blackberry Bliss and hangs beautifully in the sunlit sky.

This design literally comes together in minutes. I love how the Thoughtful Journey paper makes it so easy. Do you have products in your stash that can make easy scenes? Sometimes you just have to take a second look to see things a little differently.

Product List
Autumn · Fall

A Brighter Tomorrow

Happy Veterans’ Day to all of those who have served in the Armed Forces! We are ever so thankful for the sacrifices you and your family have made to make our way of life possible. Your service is always respected and appreciated!

I can’t believe we’re already starting another week. Is it just me or does it feel like August to the end of the year is always on fast forward?! Another new week means another new theme for our card designs. And this week, we’re going to be in the woods, which is one of my favorite places to be! I look forward to showing you some unique ways to use this theme in your designs.

Today, we’re getting started in the treetops. My favorite stretch of road in our neighborhood is just starting to show hints that the foliage is about to put on its fall foray. And I can’t wait! Before it’s all done, this stretch of road will look like it’s on fire. So today’s design is another nod to the changing foliage of fall.

We get started with a base of Copper Clay cardstock. Our focal panel consists of a background of Very Vanilla and a mat of Oxidized Copper. We build our forest of trees using the Frosted Forest dies. The base color is Mossy Meadow and then the changing foliage is a combination of Blackberry Bliss, Daffodil Delight, and Pumpkin Pie. The trees are adhered on varying levels of dimensionals to give some dimension to the scene and realism to the depth of forest. A few birds stamped using the Frosted Forest stamps add another layer of realism to our forest scene. The sentiment from Unbounded Love is stamped on the vanilla backdrop. The strip of Pretty Peacock & Gold metallic ribbon add some sparkle and help draw the eye to the top and the sentiment. A few Blooming Pearls help finish things off.

We’re going to be in the forest all week. So I hope you’ll tag along for the trip!

Products used in today’s card:
Copper Clay, Very Vanilla, Crumb Cake, Early Espresso, Pecan Pie, Blackberry Bliss, Daffodil Delight, Pumpkin Pie, Mossy Meadow cardstock
Oxidized Copper DSP
Frosted Forest bundle
Unbounded Love stamps
Pretty Peacock & Gold metallic ribbon
Blooming Pearls
Dimensionals
Adhesives

Product List
Fall · Thankful

Amazing Leaves

Fall is my favorite season of the year. Thus far, Texas isn’t really cooperating. It’s unseasonably warm for November and the leaves have only just started to hint at changing color. I’m ready for sweater weather and a big pile of leaves in the yard!

This week, we’re working within the theme of thankfulness. Aside from this time of year lending itself to this type of reflection, it just really feels like we all need a little reminder to slow down and appreciate all of the little things. Even when we don’t have it all, there are so many small ways we are living in the overflow of God’s grace and goodness.

For today’s card design, I took inspiration from the usual color palette of fall foliage that we see in our area. I really love the combination of foliage color and texture in today’s design.

We get started with a base of Early Espresso cardstock. Our leaf patterned focal panel is matted with lots of shimmer between the Oxidized Copper specialty paper and the Old Olive glimmer paper. For the focal panel, I inked the Leaf Collection background stamp with a combination of Blackberry Bliss, Copper Clay, Cherry Cobbler, and Mossy Meadow ink and stamped on Very Vanilla cardstock. I then embossed with the Changing Leaves embossing folder. I used gold ink to bring out the embossing and add a sparkly sheen to the leaves. The sentiment from the Changing Leaves stamp set is heat embossed in gold on a piece of Early Espresso that was embossed with the Leaf Fall embossing folder and then diecut with the Nested Essentials dies. Another rub of some gold ink helps bring out the pattern in the sentiment panel and match the sheen of our focal panel. A twist of the Natural Tones linen thread and some gold Blooming Pearls add the final touches.

Next week we’re going to take a trek through the trees and see what we can find. Hope you will tag along.

Thankful

Good Heart

I always find it interesting to analyze the overall sentiment people share on social media after elections. From gloating to despair, the feelings that people share very much run the full spectrum. In some election cycles, as a voter, I feel like a “winner” while in others I feel at a loss. And isn’t that the cycle of life. But the most important thing that I always like to carry with me is that, no matter what, my voice matters. And even more importantly, my actions on a day-to-day basis matter. Do my actions convey my deeply-held beliefs? That’s our point to ponder today.

This week, we’re working within a theme of thankfulness. And I really loved this sentiment from the Frosted Forest stamp set — no beauty shines brighter than that of a good heart. Let’s carry that thought with us today!

We get started on today’s card with a base of Cajun Craze cardstock. Our focal background is a sheet of the lovely Thoughtful Journey designer series paper that has been matted with a piece of Peach Pie glimmer paper. Our sentiment from Frosted Forest is stamped in Early Espresso on white cardstock and then diecut with the Autumn Leaves stamps. I had a collection of leaves diecut from some lovely shimmery paper (all retired) that really bring out all of the subtle colors in this piece of patterned paper, so I scattered them behind the sentiment and made a little pile on the ground. For a little extra pop of sparkle and to really draw the eye to our sentiment, I added some drusy embellishments.

I hope you’ll pop in tomorrow as we use a sketch to design a card, keeping with our thankfulness theme.

Products used in today’s card:
Cajun Craze, Basic White cardstock
Thoughtful Journey, In Color shimmer DSP
Frosted Forest stamps
Autumn Leaves dies
Drusy embellishments
Dimensionals
Adhesives

Thankful

Give Thanks in Everything

Our design theme for this week is thankfulness. And on this post-election day, I can certainly give thanks for the ability to vote. How fortunate we are as Americans to be able to voice our opinions by choosing our leaders on all levels. What a tremendous privilege this is!

Back to the crafty task at hand. This week, my son actually helped me choose a theme. And I think it works perfectly for inspiring designs of all kinds. Today’s card borrows a fall color palette to deliver our message of thanks.

We get started with a base of Early Espresso cardstock. The backdrop for our focal panel is a piece of Cajun Craze diecut with the largest rectangle from the Radiating Stitches dies. I just love the pop the detail in this die lends to this card design. Our focal panel is a sheet of Early Espresso cardstock that has been embossed using the Leaf Fall embossing folder and then cut to fit within the center of the Cajun Craze panel. To add more depth and dimension to the embossing, I rubbed gold ink over the raised portions with my finger and then wiped the excess across the full panel so it has a slight gold sheen all the way across. To really bring this forward, the embossed panel is matted with textured gold specialty paper. The sentiment from the Courage & Faith stamp set is stamped in Copper Clay on Crumb Cake cardstock and then diecut with the Autumn Leaves die using the extension method. A faux bow of Cherry Cobbler & Gold satin ribbon is adhered behind the sentiment panel which is popped up over our focal panel using dimensionals. I added a few Earth Tone shimmer gems on either side of the sentiment to draw the eye and add a little sparkle.

Tune in tomorrow to see where our thankfulness theme takes us.

Products used in today’s card:
Early Espresso, Cajun Craze, Crumb Cake cardstock
Textured gold SP
Leaf Fall embossing folder
Courage & Faith stamps
Autumn Leaves, Radiating Stitches dies
Cherry Cobbler & Gold satin ribbon
Natural tones shimmer gems
Dimensionals
Adhesives

Thankful

Meditation on Thanks

Happy Stampin’ Up Online Exclusives release day, everyone! Have you checked out the new goodies in the store yet? In addition to the new Online Exclusives, two new kits also launched today. So much exciting stuff!

This week, our projects are revolving around the theme of thankfulness. And today, we’re getting started with a home decor item and, for grinsies, I thought I would share a little backstory on how this particular project came about.

Each evening before dinner, we have the kiddo recite a blessing. We’ve gone through a number of them over the years. Most recently, we have been meditating on a scripture and that scripture has become our prayer over meals. I made a little decorative table placard that had our prayer printed. A happy little side effect of this practice has been that we’ve all now memorized that scripture. So we’re going to periodically change the scripture we use to pray over our meals. Today’s project is our new daily prayer.

The frame for today’s project came from a Luv 2 Stamp group get-together project, but I have found similar 6×6 frames on Amazon. I used a sheet of the lovely Splendid Autumn designer series paper as the backdrop for our daily prayer. I typed up our prayer on the computer and printed on a sheet of white cardstock and then cut it down to size. The prayer is matted in Moody Mauve shimmer paper and textured gold specialty paper. The scripture is mounted to the mounts with dimensionals and then the full panel is adhered to the background panel with dimensionals. I added a few Drusy embellishments near the prayer to draw the eye and add another element of sparkle.

For me, this particular project was about keeping things pretty simple because the prayer was the most important part of the project. I think it turned out nicely. And I’m looking forward to creating a rotation of prayers that we will use.

Tune in tomorrow for another take on our thankfulness theme.

Products used in today’s card:
6×6 frame (find them on Amazon)
Splendid Autumn DSP
Moody Mauve shimmer paper
Textured gold specialty paper
Drusy embellishments
Dimensionals
Adhesives

Frosted Forest

Trust in the Lord

We’re closing out the month of August and our week of In the Woods card designs. I’m still reeling over the fact that today is the last day of August! But I suppose I shouldn’t be surprised since the temps here in North Texas certainly reflect the usual magma-level heat we’re accustomed to in late August.

Today, we’re trekking through the woods at dusk. We’re pairing up the Frosted Forest dies with a fun new Stampin’ Blends background technique. This card was inspired by a recent Stampin’ Up! Artisan (@thecraftyoinkpen) spotlight on Frosted Forest. And I decided I wanted to create my own dusky background using Stampin’ Blends to finish up my projects for a current Luv 2 Stamp Group team challenge. So let’s see how this all comes together.

We get started with a base of Moody Mauve cardstock. Our focal panel is a piece of white cardstock that has been “painted” with Stampin’ Blends using an acetate rub technique. I used a combination of Daffodil Delight, Calypso Coral, and Pool Party Stampin’ Blends to create the dusky background. I’ll be sharing more on this Stampin’ Blend acetate rub technique in the next episode of Terrific Tuesdays, so be sure you tune in this coming week to learn all about it! I created a continuous panel of trees from Early Espresso cardstock using the die from the Frosted Forest die set and the extension method and then adhered it to the blended panel using a fine tip glue pen. The sentiment from Courage & Faith is heat embossed in gold between the two groves of trees. The focal panel is matted with Blackberry Bliss & Gold textured ribbon and the darker woodgrain panel from the Country Woods designer paper pack and adhered to the card front with dimensionals. For a little extra twinkle, I added some brown sequins in opposing corners.

Isn’t this just a beautiful backdrop for the trees? I just love this new background technique and can’t wait to tell you all about it on Tuesday! Speaking of which, next week is All About Autumn. I hope you’ll stop in each day to see how we’re putting some of the new items from the Holiday Mini Catalog to a unique use for our design theme!

Products used in today’s card:
Moody Mauve, Early Espresso, Basic White cardstock
Country Woods DSP
Courage & Faith stamps
Frosted Forest dies
Gold embossing powder
Blackberry Bliss & Gold textured ribbon (coming soon!)
Neutrals sequins
Dimensionals
Adhesives

Product List
Coming Soon · Fun Folds

Happy Birthday Deer

Do you ever see a card design and think, “man, that’s brilliant!” as you’re scrolling Pinterest or some other platform for inspiration? There are some cards that are just show stoppers! Today’s tri-fold card design was inspired by a stunning card posted by fellow demonstrator Stamp With Amy K, and as soon as I saw it, I knew that I had to give it a try for this week’s In the Woods card series.

I knew that I wanted to spotlight a gorgeous sunrise scene paper from the upcoming Splendid Autumn paper pack. We get started with this super simple tri-fold fun fold design with a base of Blackberry Bliss cardstock. I laid the open tree grove die from the Grove die set over the sheet of paper to determine what portion I wanted to peek through to the card front and then diecut the front panel of Blackberry Bliss cardstock. I diecut two deer silhouettes in black cardstock with the Grove dies and then adhered them in the grove of trees with tear-n-tape. To keep the deer in place, a sheet of acetate is then adhered to the back of the card front. The focal sentiment from Adventurous Sky is stamped on Flirty Flamingo and diecut using the Happy Little Things banner die. It’s adhered over a ribbon of Blackberry Bliss & Gold, gold trim, and Peach Pie and then mounted to a textured gold hexagonal mat.

The sheet of Splendid Autumn is then cut to fit inside the card and the far right of the patterned paper panel is scored to create the fold-out portion. The inside card base is covered with white cardstock, which also serves to cover the anchor for the patterned paper sheet.

I stamped the sentiment from Something Fancy in black ink on white cardstock and then diecut with the Greetings of the Season die, adding some gold trim to finish things off before adhering to the fold-out panel. We finish off the whole design with careful placement of shiny sequins and sparkle gems to add twinkles on several of the panels to help draw the eye across and through the full tri-fold.

Although this card looks complicated, it comes together quickly and is even more stunning in person! Tomorrow, we’re going to be walking through a new-to-me design technique. I hope you’ll pop by and check it out!

Products used in today’s card:
Blackberry Bliss, Flirty Flamingo, Basic Black, Basic White cardstock
Splendid Autumn (coming soon!), textured gold DSP
Acetate window sheets
Something Fancy, Adventurous Sky stamps
Grove, Autumn Leaves, Happy Little Things dies
Heartfelt Hexagon punch
Peach Pie bordered ribbon, Blackberry Bliss & gold textured ribbon (coming soon!), gold trim
In Color shimmer gems, shiny sequins
Adhesives

Product List
Inspiration

Where There is Heartache

I love finding new ways to use product in my stash. And I realized that I often look at the “holiday” products as just that – products for the holidays and not for the everyday. So I wanted to challenge myself to expand designs with those holiday products.

Today, we’re using the Season of Green & Gold patterned paper to create a stunning sympathy card. I feel like sympathy cards should offer love, hope, and encouragement. And while it’s certainly a somber occasion, a design of carefully selected colors and elements can convey hope without words.

We get started on our card with a base of Lost Lagoon cardstock. Our focal panel backdrop consists of a panel of Lost Lagoon embossed on an angle with the Cute Crochet embossing folder and then matted with the gold mercury vellum. The Lost Lagoon panel has gold trim tied around it with a small bow. The sentiment from Everyday Greetings is stamped in Versamark on Soft Sea Foam and then heat embossed in gold. This is then diecut with the Spotlight on Nature dies. I love that the Season of Green & Gold designer paper coordinates with the Golden Greenery dies and have used the two together to cut out several of the stalks of greenery for the sentiment panel. I also cut a sheet of textured gold with the greenery dies. All of these greenery pieces are layered behind the sentiment panel. The drusy embellishments add extra sparkle.

Next week, we’re going to be in the woods. I hope you’ll come along!

Products used in today’s card:
Lost Lagoon, Soft Sea Foam cardstock
Season of Green & Gold, mercury vellum, textured gold DSP
Cute Crochet embossing folder
Everyday Greetings stamps
Spotlight on Nature, Golden Greenery dies
Gold embossing powder
Gold trim
Drusy embellishments
Dimensionals
Adhesives