We’ve made it to Friday and that means that, for my kiddo, we’ve also made it to the end of another school year. It always feels like the second semester is on fast forward because we sure get from January to May super quickly!
This week, we’ve used the new School Days stamp set to create some cute clean and simple card designs. And we’re finishing things with a bag full of thanks.
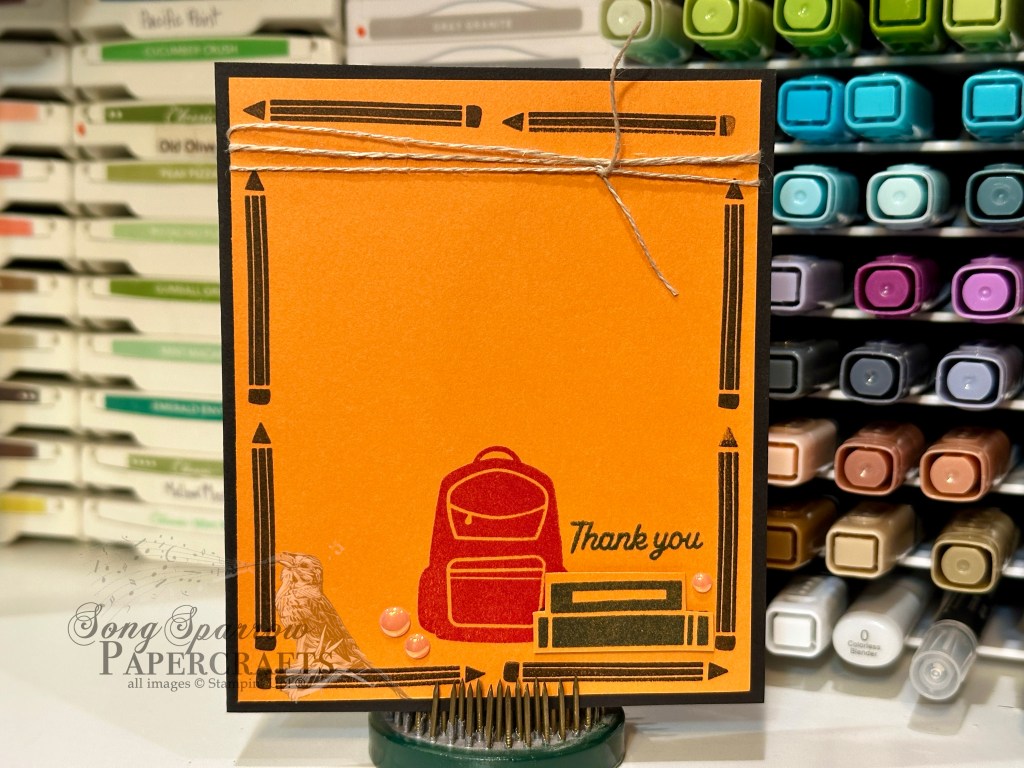
We get started with a base of Basic Black cardstock. The background panel is a sheet of Pumpkin Pie with a border a pencils stamped in black. The focal section starts with stamping the backpack image in Poppy Parade onto the background panel. I stamped the small stack of books onto a scrap of Pumpkin Pie using Misty Moonlight ink and then fussy cut with paper snips before adhering onto the background panel with dimensionals so that there is a slight overlap over the backpack. I stamped the sentiment in Misty Moonlight above the pile of books. A few Timid Tiger pearls add a shimmery pop. I tied some twine around the focal panel towards the top and then adhered it to the card base with dimensionals.
It’s been fun to design cards with our talented teachers in mind. Hopefully you’ve pocketed a few ideas for next year.
Next week we’re going to explore some goodies from the new catalog. I hope you’ll drop in to check it out!
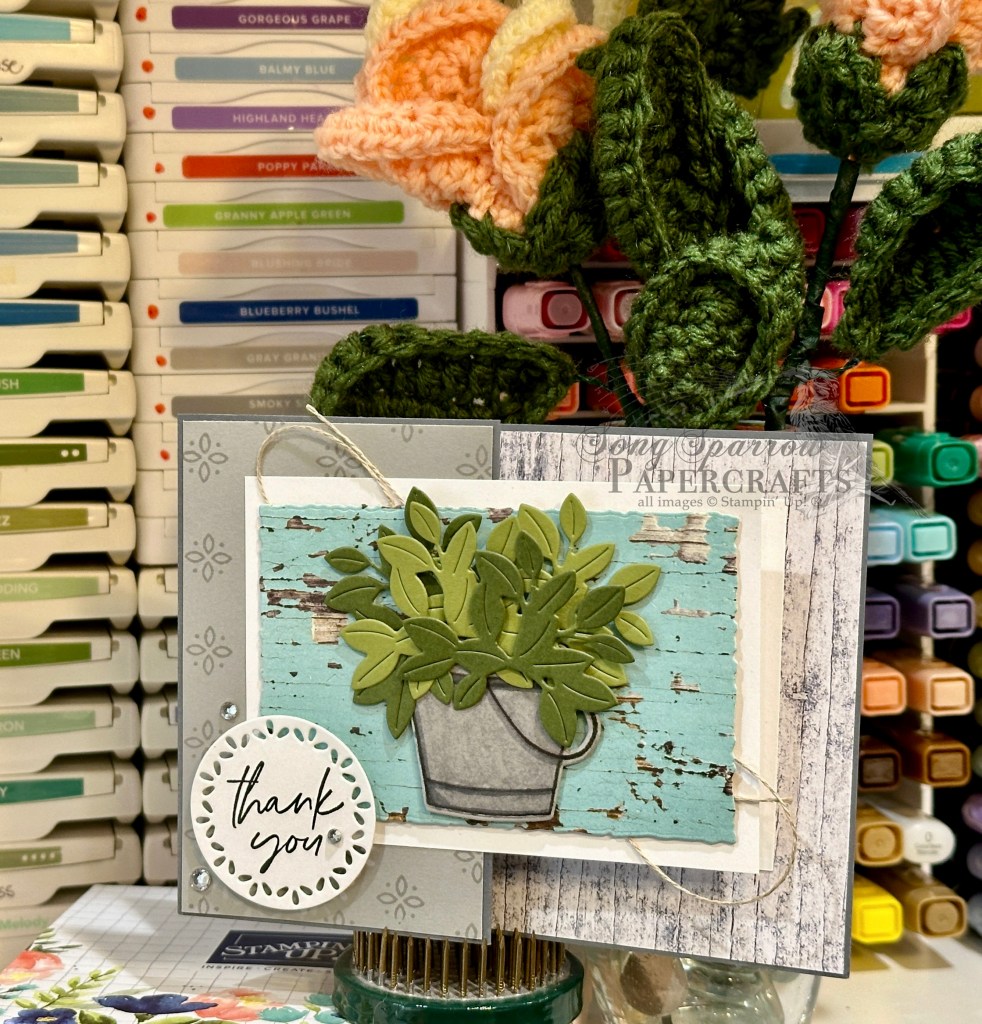
Products used in this card: Basic Black cardstock School Days, With You in Mind stamps Textured Notes dies Dimensionals Gold textured dots
Happy Monday, everyone! So glad to be back after an unexpected little hiatus. Between a crazy busy work schedule and prepping for and chaperoning my kiddo’s National Academic Pentathlon meet, I ended up having no time in the craft room last week. I’m pleased to report that the Texas teams represented the state well and my son’s school came home with 3rd place overall and a whole host of medalists in each of the 5 individual categories.
But never fear because all of the ideas for teacher appreciation gifts are still swirling around in the old noodle and need a place to go! So this week, the last week of school for us, we’re going to be exploring all of the ways we can use the Online Exclusive set called School Days to create some awesome designs to honor all of those teachers who have worked so hard all year. We’re starting our series with the old tried and true repeated pattern technique to create a sheet of patterned paper.
We start with a base of Mossy Meadow cardstock. To create our sheet of patterned paper, I used the apple image from School Days to create the quarter sheet of apple paper using Real Red, Old Olive, Poppy Parade, and Garden Green. After cutting the panel down, it’s mounted on Old Olive glimmer paper to leave a large shimmery border on the bottom. A strip of gold trim serves to divide the apple pattern from the green glimmer below. The sentiment from School Days is stamped in Real Red on white cardstock and then diecut with the smaller sentiment die from Beautiful Butterflies. The sentiment panel is adhered to the glimmer panel with dimensionals. A few iridescent discs finish things off with a little extra twinkle.
I hope you’ll continue to follow along this week as we honor our hard-working and dedicated teachers.
Products used in this card: Mossy Meadow, Basic White cardstock Old Olive glimmer DSP School Days stamps Beautiful Buuterflies dies Gold trim Dimensionals Iridescent discs
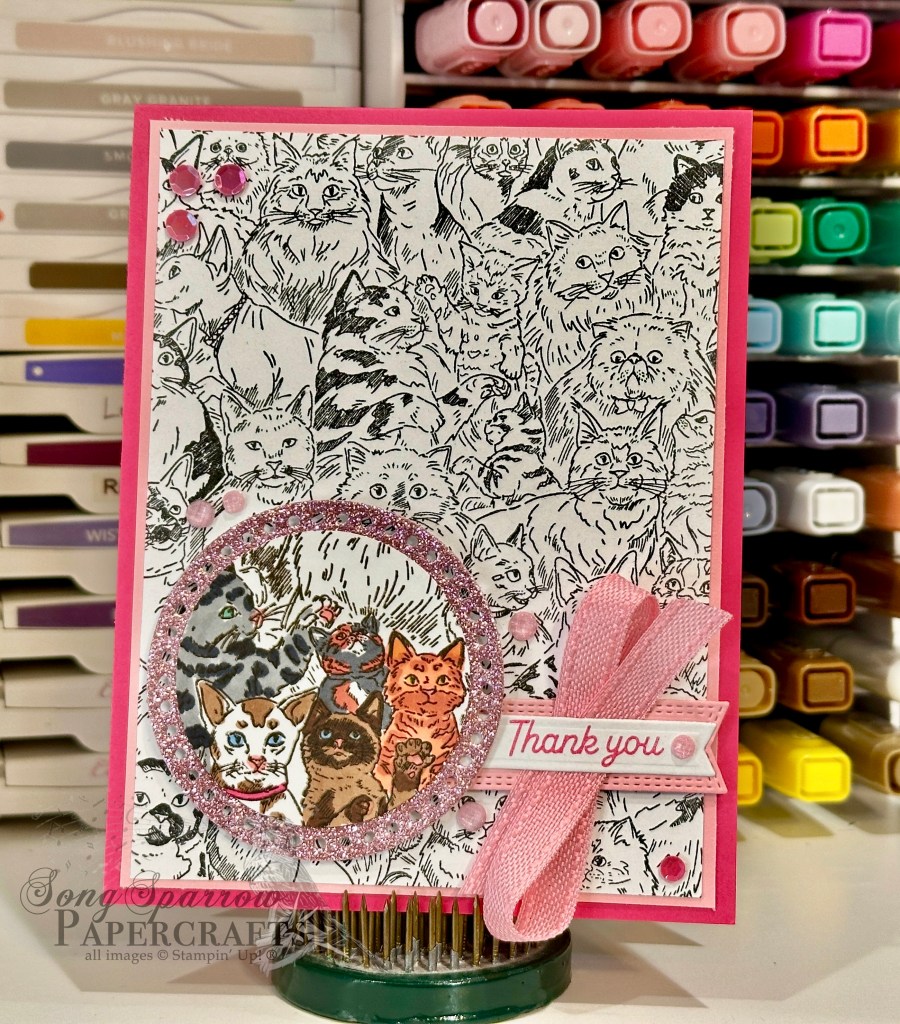
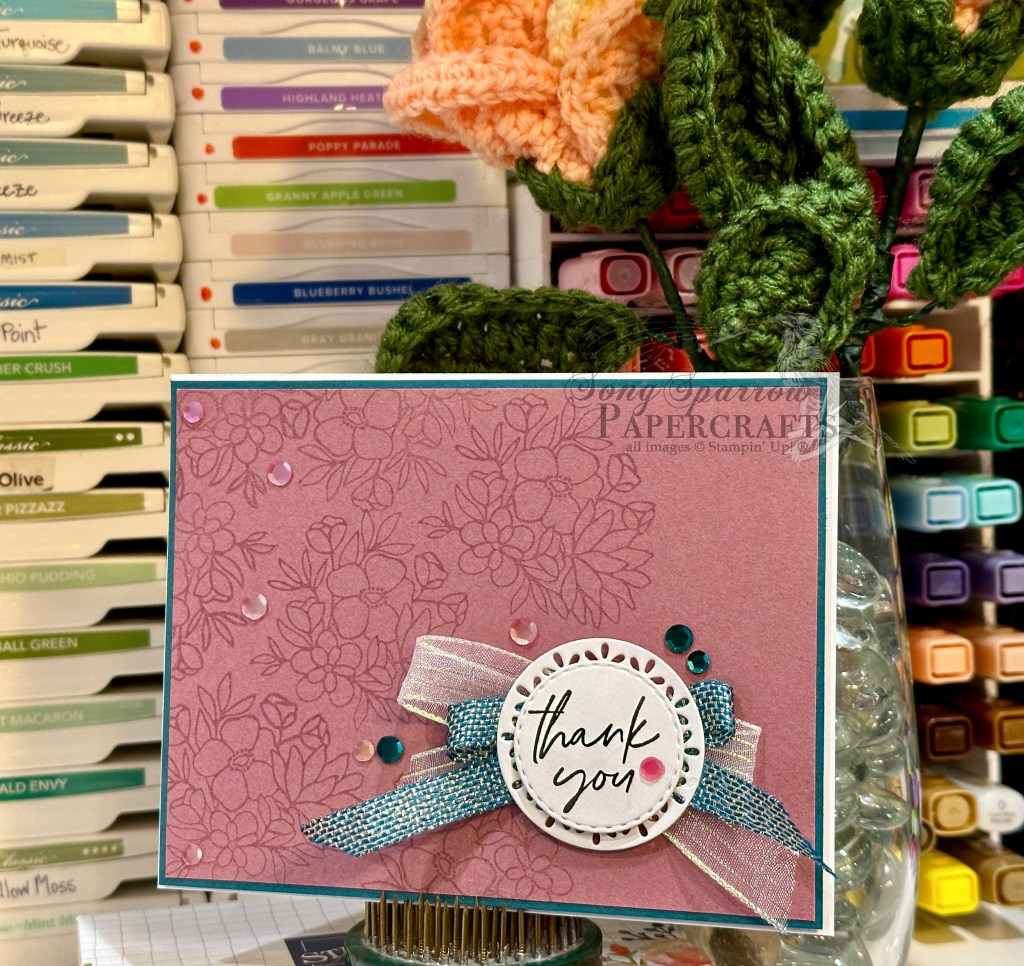
We are enjoying our spring break family time. So much so that I haven’t spent any time crafting. I thought I might have some down time here and there, but we’ve been on the go and having a ball! Today we’re back home from our woodsy adventures and I took just a few minutes to whip up a super cute thank you card for our house/pet sitter using the Meow Mates background stamp. One of the things I love about making cards is being able to tailor a design to a recipient, so naturally I had to incorporate our sitter’s favorite color — PINK — into this design!
We get started with a base of Melon Mambo cardstock. I stamped the Meow Mates background in black on white cardstock and adhered to a mat of Pretty in Pink and then adhered to the card base. I had a leftover Meow Mates image from another project and used it to punch a portion to pop up on the focal panel. I chose kitties that most represented ours — both in fur pattern and personality — and then used a whole slew of Stampin’ Blends to color in the images in the smaller circle panel. I used the (retired) Everyday Details dies to cut a sparkly mat of Pretty in Pink glimmer paper to mat the focal panel. The sentiment from the new Online Exclusive School Days stamp set is stamped in Melon Mambo on white cardstock and then diecut into a banner shape using the Adventurous Sky die. I used the Nested Essentials dies to cut a banner mat from Pretty in Pink cardstock. In between the layers, I put a twist of Pretty in Pink bordered ribbon. I finished things off with In Color shimmer gems and shiny sequins across the panel.
I don’t have a particular design theme for this week, unless you count RANDOM as a theme. *snicker* Break weeks always have me flying by the seat of my pants. So that’s what the ol’ crafty projects will reflect this week! But I hope you’ll pop in to see what comes next.
Welcome to another bright & shining Monday. I don’t know about you, but it was a busy weekend for us. The kiddo finished up his summer bowling league and took some lessons in preparation for the start of the fall league. So we spent a lot of time at the bowling alley. But given the inferno we’re experiencing here in North Texas, that worked out just fine!
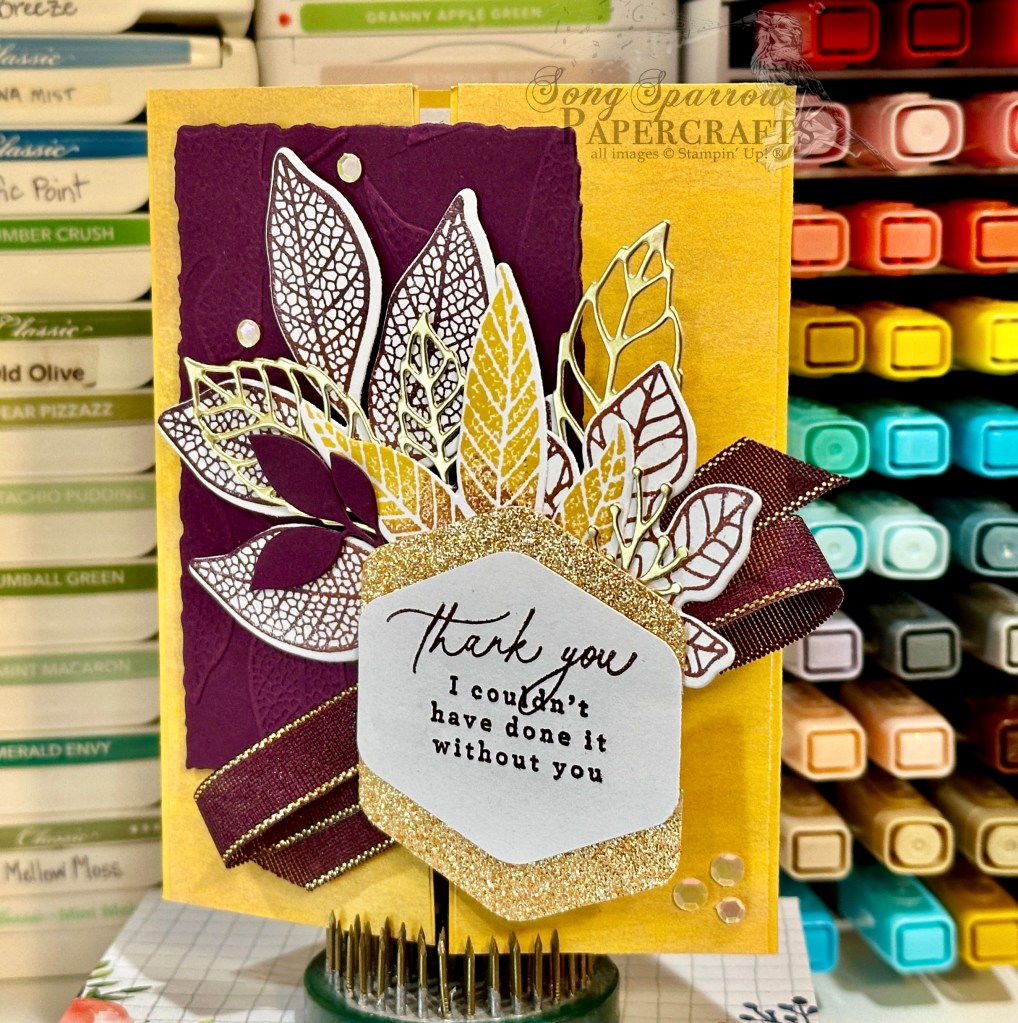
This week, we’re starting a new card series called In the Woods. Each we’ll be using products from Stampin’ Up! that fit our weekly theme. Today, I’m feeling all the fall vibes and thought it would be appropriate to get started with the Changing Leaves bundle paired up with the Splendid Autumn designer series paper that launches next week on September 6th.
To give an opportunity for our gorgeous leaves from the Changing Leaves bundle to take center stage, we’re working with the barn fold today. And we get started on today’s card with a base of Crushed Curry cardstock. We cover each of the front flaps of our barn fold with a strip of paper from the Splendid Autumn paper pack. The pattern is a very subtle brushed, grainy texture that gives some nice depth in our color palette. Next up, we emboss a quarter panel of Blackberry Bliss cardstock using the Changing Leaves hybrid embossing folder and then diecut it into a smaller panel with one of the larger Deckled Rectangles dies. On a quarter sheet of white cardstock, I traced the outside of the trio of leaves from the Changing Leaves die set in pencil to make it easier to stamp each of the leaf images and then diecut all at once. I used a combination of fall colors to ink each leaf from the stamp set, including Copper Clay, Blackberry Bliss, and Crushed Curry, and imitated the look of leaves in a color metamorphosis by going over sections of each leaf with other colors for a subtle two-toned look. I diecut a few additional leaves in gold foil and Blackberry Bliss and then layered everything together to create a leafy focal section behind the sentiment panel. Our hexagonal sentiment panel consists of a white center panel and mat of Peach Pie glimmer paper. The sentiments from Everyday Greetings and Changing Leaves are stamped in Blackberry Bliss. Our focal panel section is finished off with Blackberry Bliss & Gold textured ribbon from the upcoming Holiday Mini catalog, releasing next week on September 6th. A few shiny sequins finish things off with a little extra sparkle and help draw the eye across all the gorgeous design elements on the front of this card.
Tomorrow we’re working with another fun fold design and another gorgeous sheet from the Splendid Autumn paper pack to create a gorgeous peek-through scene. You won’t want to miss it!
Products used in today’s card: Crushed Curry, Blackberry Bliss, Basic White cardstock Splendid Autumn (coming soon!), gold foil, In Color glimmer DSP Changing Leaves stamps, dies & hybrid embossing folder Deckled Rectangles Everyday Greetings stamps Hexagon punch Blackberry Bliss & Gold textured ribbon (coming soon!) Shiny sequins Dimensionals Adhesives
This week we’re exploring all of the ways that we can use our holiday products to make everyday cards. For this week’s Sketchy Fridays, we’re taking a little detour from the Annual Catalog and, instead, are taking a page from my personal sketch book. And today, we’re pairing our sketch with the new Take a Bow patterned paper and Joyful Images ephemera both of which will be available on September 6th.
We get started with a base of Balmy Blue cardstock. Our center strip of patterned paper is from the Take a Bow paper pack and provides a colorful grounding base for our focal panel. Our focal panel backdrop consists of a piece of Garden Green cardstock embossed with the Cute Crochet embossing folder that is mounted on the mercury vellum sheet. The mug of hot chocolate is from the Joyful Images ephemera pack. A few adhesive peppermints add some visual texture and interest. The sentiment from Simply Zinnia is stamped in black on white cardstock and then diecut using the Autumn Leaves die. A faux bow of gold trim behind brings another pop of gold to the design, tying our full focal panel together as one. The mug and sentiment are adhered over a Graceful Greenery vellum panel diecut with the Nested Essentials dies. Iridescent faceted gems across the design help the eye pass across and to the sentiment.
We’re closing out our design series tomorrow with a stunning sympathy card. You don’t want to miss it!
Products used in today’s card: Balmy Blue, Garden Green, Basic White cardstock Take a Bow (coming soon!), Graceful Greenery vellum, mercury vellum DSP Simply Zinnia stamps Nested Essentials, Autumn Leaves dies Cute Crochet embossing folder Joyful Images ephemera (coming soon!) Real Red & White peppermints (coming soon!), iridescent faceted gems Gold trim Dimensionals Adhesives
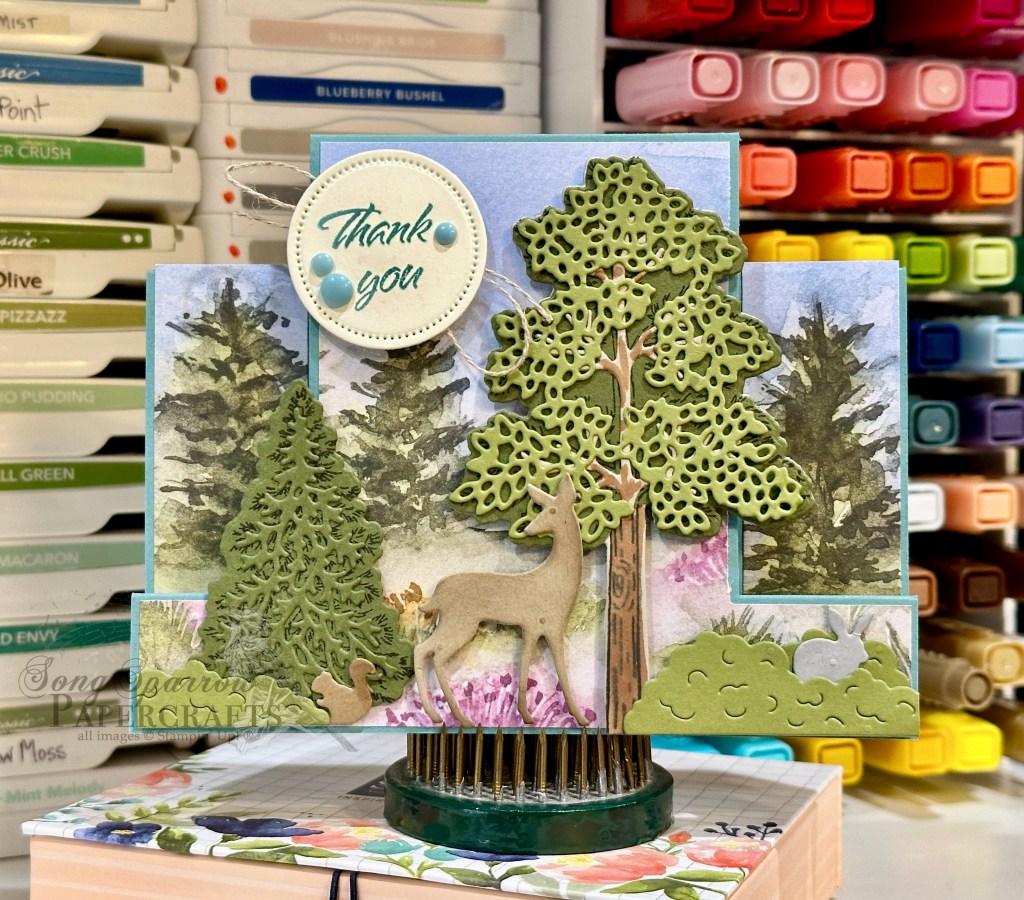
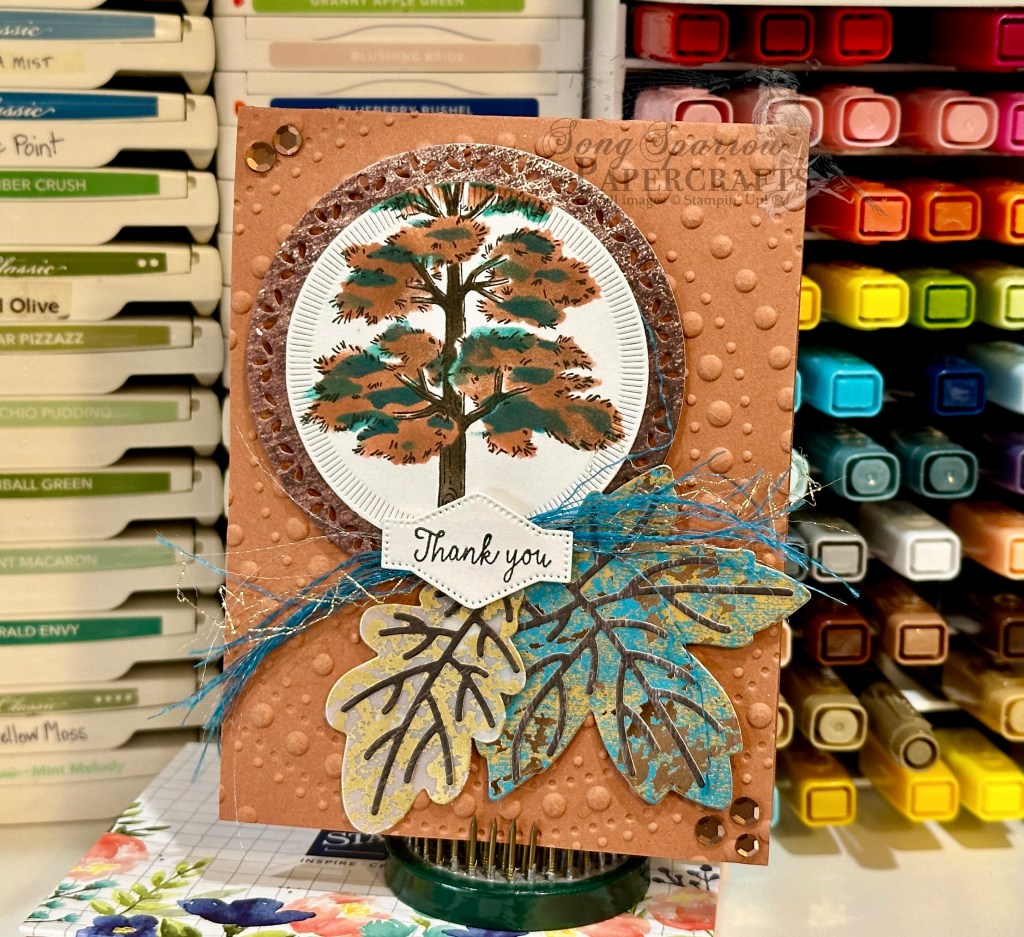
We are closing out our week of card designs where we’ve been using the new Online Exclusive by Stampin’ Up! called Frosted Forest. And we are doing so in style with one of my very favorite fancy fun folds called the Center Step fold. This is one of my favorite folds when I have a bundle made for scene building, and of course, Frosted Forest is absolutely perfect for that. For this design, we’re pairing it up with some patterned paper from the Thoughtful Journey designer series paper pack.
We get started on today’s fun fold design with a base of Lost Lagoon cardstock, which is cut to the standard size. The panel is then cut and scored to allow for the center standout section. (Click here for the full PDF directions.) I used the sheet of patterned paper with the evergreens from the Thoughtful Journey paper pack to serve as the backdrop for the front scene. The evergreen tree is stamped on Mossy Meadow using the Frosted Forest stamp and then diecut with the coordinating full tree die. The coordinating limbs are then diecut and added on top for additional detail. This is adhered to the left side of the center fold with dimensionals.
Next up is the tall tree, which is stamped on Crumb Cake cardstock and then diecut with the coordinating die. The top of the tree is then also stamped on Mossy Meadow, diecut, and adhered on top. I also diecut a branch portion of the tree from Crumb Cake to be layered on top of the green canopy. I went over the trunk and limbs with a Crumb Cake Stampin’ Blend. The coordinating leaves are diecut from Old Olive and then adhered on top of the branches. This is adhered to the right side of the center fold with dimensionals and made to stand a little higher than the evergreen for greater depth of field. I added some low-lying bushes using the die from the Sending Love set. The squirrel and bunny are diecut using the In the Grove dies, while the deer is from the Grove set. I added some shading detail to the deer and squirrel using my sponge dauber.
The sentiment panel is a simple circle diecut from Very Vanilla using the Everyday Details dies. The sentiment from Changing Leaves is stamped in Lost Lagoon. I added coordinating rainbow dots on either side to draw the eye and some linen thread behind for a more natural attention-grabbing detail.
The inside panel of the card is covered with another patterned sheet from the Thoughtful Journey paper pack. This sentiment from Changing Leaves is stamped on Very Vanilla and then diecut using the Autumn Leaves die. It’s adhered in the centered of the inside panel with dimensionals.
This card is a perfect example of how a great piece of patterned paper and a beautiful scene-building stamp bundle allow you to make beautiful cards without a lot of effort. The patterned paper does the heavy lifting here, while the Frosted Forest just adds the icing on the cake.
Next week, we’re going to dip our toes in the snow and dream of cooler weather! I hope you’ll join me.
Products used in today’s card: Lost Lagoon, Old Olive, Mossy Meadow, Crumb Cake, Pecan Pie, Smoky Slate, Very Vanilla cardstock Thoughtful Journey DSP Frosted Forest stamps & dies Changing Leaves stamps In the Grove, Grove, Everyday Details, Autumn Leaves dies Stampin’ Blends Rainbow adhesive dots Linen thread Dimensionals Adhesive
Happy Wednesday, crafty friends! It’s hard to believe we’re already halfway to the weekend. This week, we’re exploring designs using the new Stampin’ Up! Online Exclusive bundle called Frosted Forest. Like so many other sets, Frosted Forest can be paired with a whole host of products in the current catalog to give you a variety of looks. Today, we’re using Autumn Leaves for a fall-inspired design.
I have seen so many wonderful cards using the Dotted Circles embossing folder and some sort of circular diecut, and I really wanted to give it a try. This card really just fell together. And I certainly can’t say that about very many cards that I make!
We get started with a card base of Cajun Craze cardstock and emboss just the front-facing portion of the card base using the Dotted Circles embossing folder. The tall tree from Frosted Forest is stamped on a quarter panel of white cardstock in black ink and then shaded using the decorative masks and a combination of Early Espresso, Cajun Craze, Pretty Peacock, and Shaded Spruce inks to tie with our other leaf elements. Our image panel is two layers — a mat diecut from Country Woods and the image panel, both cut using the Spotlight on Nature dies. I chose the two larger leaf dies from the Autumn Leaves set to complete our focal element. The larger leaf is cut from the Pretty Peacock sheet of Oxidized Copper, while the smaller leaf is cut from the Gold Mercury vellum. The leaf veining is cut from the darkest woodgrain patterned sheet in the Country Woods designer paper pack. The full focal section is adhered to the card front with dimensionals. The sentiment from Frosted Forest is stamped in black on white cardstock and then diecut with the decorative banner die in the Unbounded Love die set. I frayed an entire section of Pretty Peacock & Gold metallic ribbon by “unzipping” the gold and then separating the strands of thread. After gathering them together, I tied a small knot in the center and adhered it to the back of the sentiment panel and then adhered the sentiment panel with dimensionals. To help the eye move across the design, copper sequins are placed in opposite corners.
I hope you’ll tune in tomorrow to see how you can use the Frosted Forest bundle to build beautiful scenes. You won’t want to miss it!
Products used in this card: Cajun Craze, Basic White cardstock Country Woods, Oxidized Copper DSP Gold Mercury vellum Frosted Forest stamps & decorative masks Spotlight on Nature, Unbounded Love, Autumn Leaves dies Dotted Circles embossing Pretty Peacock & Gold metallic ribbon Neutrals sequins Dimensionals Adhesives
This week, we’ve been using the Country Flowers bundle by Stampin’ Up! to make some lovely cards. Today, we’re rounding out the series with a clean and simple design. This is a layout that could be used over again and would work beautifully with a larger floral image, as well.
We get started with a card base of Basic White cardstock. Our focal panel is a pairing of Pretty Peacock and Moody Mauve cardstock. I stamped a repeating floral image in Versamark using the Country Flowers stamp set. The sentiment from Something Fancy is stamped in black on white cardstock and then diecut using the Unbounded Love set, which is then matted with a circle diecut using the Spotlight on Nature set. A pair of faux bows using Pretty Peacock & gold metallic ribbon and iridescent striped ribbon are adhered by the sentiment panel. To draw the eye across the design, I’ve used pink and peacock sequins from the Sequins Trio for some sparkle.
I hope you’ve been inspired by this weeks Country Flowers designs. Tune in next week as I give you a sneak peek at one of my favorite upcoming Online Exclusives bundle set to release on July 3rd!
Products used in today’s card: Basic White, Pretty Peacock, Moody Mauve cardstock Country Flowers, Something Fancy stamps Unbounded Love, Spotlight on Nature dies Pretty Peacock & gold metallic ribbon, iridescent striped trim Sequins trio Dimensionals Adhesives
This week, we are looking at all the ways we can use parts of the Stampin’ Up! suite of products called Country Woods. In particular, we’ve been focusing on the Country Flowers bundle, which includes stamps and coordinating dies, and the Country Woods designer series paper. Today, we continue with a brand new fun fold design.
Today’s fun fold is called the Front Panel Z-fold. What I love about this particular fun fold is that you can make it as simple or as complicated as you want. For this card design, I went somewhere in the middle. This design requires a little fussy stamping and some die cutting but all-in-all comes together pretty quickly once you get the hang of it. You can download the full PDF tutorial for today’s card, which includes a complete materials list and measurements, by clicking here. But for now, let’s take a closer look at how this card comes together.
Our card front consists of the smaller panels of the Z fold. Using the small detail stamp from the Country Flowers stamp set, we stamp a repeating pattern tone-on-tone on Smoky Slate cardstock. I chose a very symmetrical pattern and used a sheet of grid paper along with grid lines on my stamp block to accomplish this. This stamped panel is then cut into two smaller panels that are just a tick smaller than the card base. We cut a second quarter panel of white cardstock to make an identical sized mat that is adhered on the outermost fold to precisely overlay the inside message panel.
We start with a card base of Basic Gray cardstock. Our card base is of standard size and scored to give us our Z panel. The full-sized panel is our inside message panel, while our Z fold serves to give us a look inside with the overlapping front focal panel. For the inside panel, we cut a sheet of the gray woodgrain panel just a little smaller. The inside message panel is a quarter sheet of white cardstock that has been cut to size and then adhered to the center of the woodgrain panel. Be sure you only adhere to the outermost small panel so that your card will open. Next, we diecut a piece of the Pool Party woodgrain pattern from the Country Woods paper pack using the Deckled Rectangles die set. Using a glue dot, a faux bow is adhered diagonally across the front white mat and then the Deckled Rectangle piece is adhered over it using dimensionals. Using the Country Flowers stamps, stamp a bucket in black ink on Smoky Slate. I used Stampin’ Blends to provide shading and shadowing to the bucket, then diecut the bucket using the coordinating die from the Country Flowers die set. The greenery is cut from Old Olive and Mossy Meadow cardstock using the die from Country Flowers. The bucket and greenery are adhered with layers of dimensionals to give realistic visual planes. The sentiment from Something Fancy is stamped in black on white cardstock and then diecut using the Spotlight on Nature die set. The sentiment is adhered over the corner of the image panel using dimensionals. To draw the eye to the sentiment, rhinestone basic jewels are placed in a triangle around the sentiment panel.
Want to watch how this card comes together? You can watch the full episode of this week’s Terrific Tuesdays where we walk through the making of this card:
Tune in tomorrow for another fun fold design that showcases the beautiful greenery in the Country Flowers bundle. You want want to miss it!
Products used in today’s card: Basic Gray, Smoky Slate, Old Olive, Mossy Meadow, Basic White cardstock Country Woods DSP Country Flowers stamps & dies Something Fancy stamps Deckled Rectangles, Spotlight on Nature dies Stampin’ Blends Linen thread Rhinestone basic jewels Dimensionals Adhesives
Happy weekend, all! We have officially completed our first week of summer break here, and we’ve enjoyed just bummin’ around, for the most part. Between the rain and the start of the Texas summer heat, it hasn’t been the best week to be outside. But we’ve made the best of things and found plenty of other things to occupy our time. The kiddo really loves to bowl, and we renewed our Kids Bowl Free subscription for this summer. This cool program allows you to pay a flat fee for the summer to bowl 2 games each weekday with your kiddo(s) at your local participating bowling alley. It’s an absolute steal and we’ve thoroughly enjoyed this program for going on 5 years now. Wanna learn more? Check it out here.
I’ve also made plenty of time to play around in the craft room this week, as well. And today, we’re finishing up our look at the projects we can create using the Stampin’ Up! Friends for Life stamps and dies. I kept things simple today with a take on a design posted over on the Stampin’ Through the Catalog page. This clean and simple design combines Friends for Life and Softly Said sets to make this lovely card. This design caught my eye for its simplicity. You can easily turn out a number of these and swap out sentiments to fit the occasion.
We get started with a card base of Basic White cardstock. While a standard sized card, the cardstock is cut down the long edge rather than the short edge, giving you a score at the top. The paint smudge die gives us our background and is a combination of Summer Splash, Calypso Coral, Petunia Pop, Peach Pie, and Pretty in Pink cardstock. Each smudge is oriented a different direction and is slightly offset for some visual interest. The sentiment backdrop is white cardstock that has been debossed with the leaf-print die, cut out with the open heart die, and then lightly smudged with Pretty in Pink ink to really bring out the debossed pattern. A twist of the white diagonal trim is adhered behind the heart, which is placed over the backdrop with dimensionals. The sentiment from Simply Said is stamped in black on white cardstock and then fussy cut with paper snips before being adhered with dimensionals. The design is finished with the white and pink sequins from the Sequins Trio set.
In case you missed this week’s Terrific Tuesdays video where I demonstrated how to deboss using your dies, you can catch the quick tutorial by clicking here.
I hope you got some ideas from this week’s cards featuring the Friends for Life bundle. Next week’s theme is Father’s Day and we’ll be using a whole host of different sets to make some great cards. I hope you’ll drop by and check them all out!
Products used in today’s card: Summer Splash, Calypso Coral, Petunia Pop, Peach Pie, Pretty in Pink, Basic White cardstock Simply Said stamps Friends for Life dies White diagonal trim Sequins trio Dimensionals Adhesives


 Specialty Paper")

")


 Circle Punch")
 Bordered Ribbon")


")
")


 Designer Series Paper")


")


 Designer Series Paper")
 Specialty Designer Series Paper")
 Specialty Designer Series Paper")


 Metallic Ribbon")


")
")


 Metallic Ribbon")
 Striped Trim")