Botanicals · Country Flowers · sketches

Buckets of Birthday Flowers

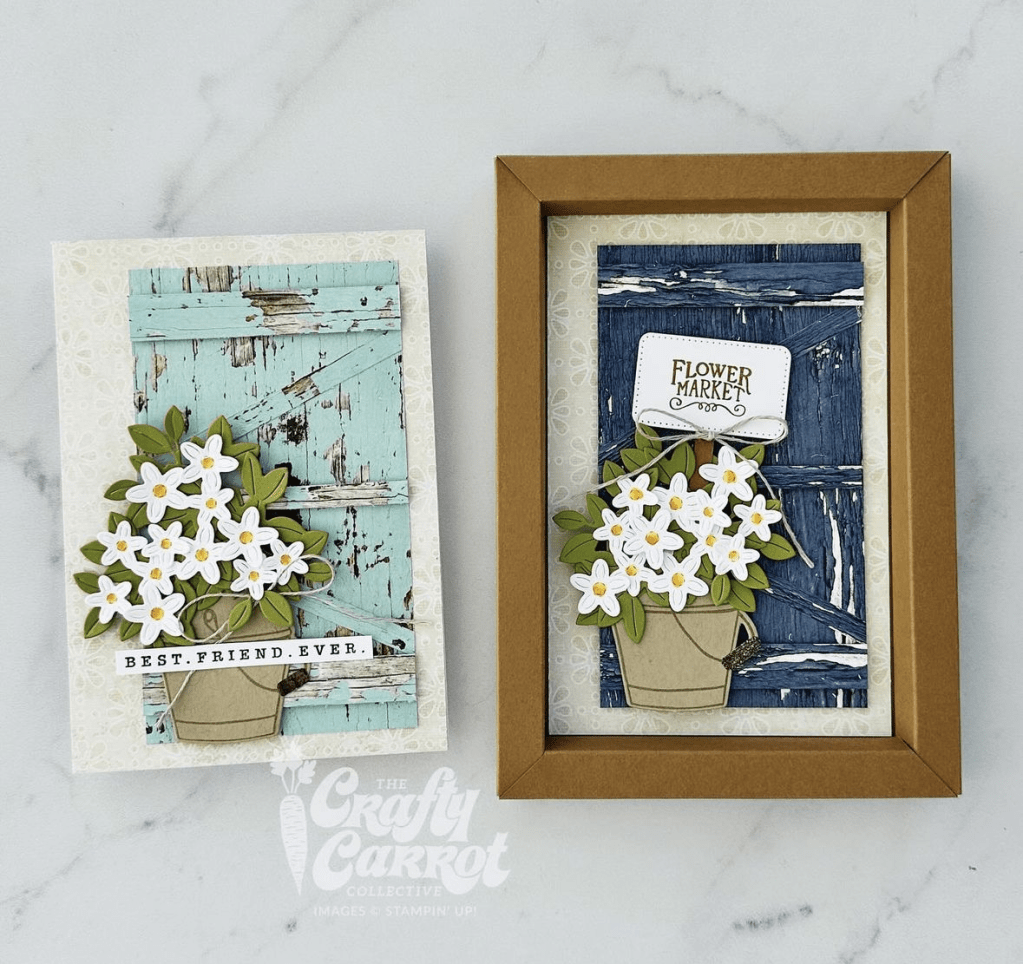
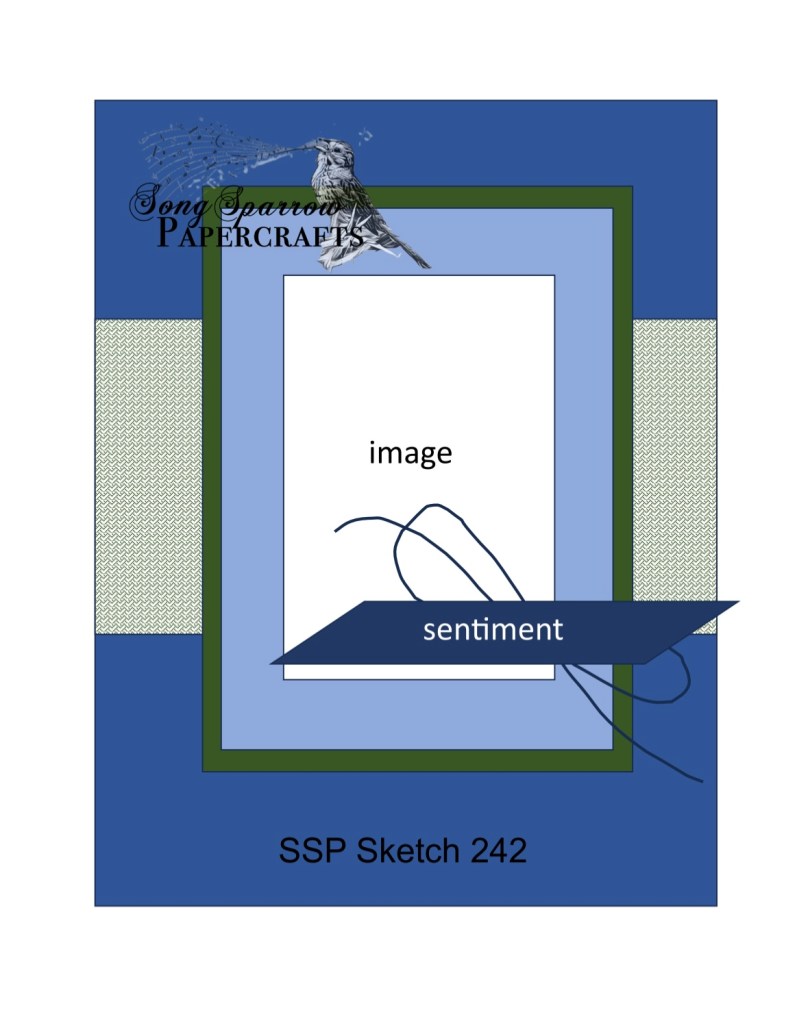
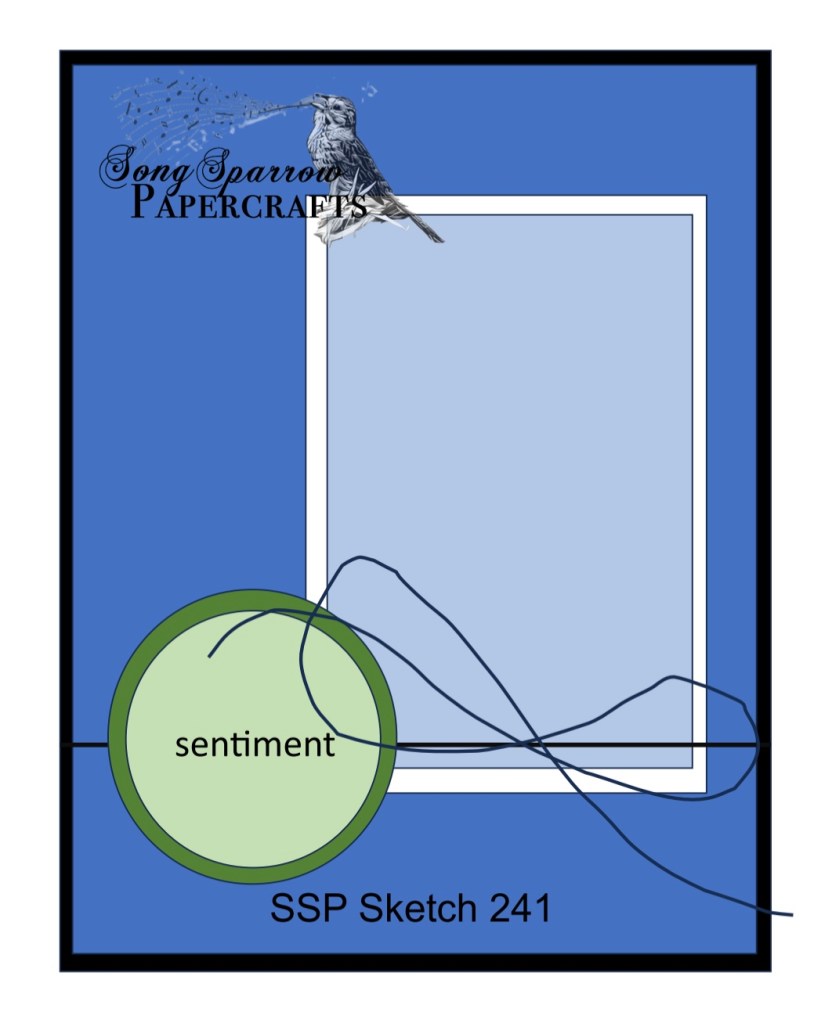
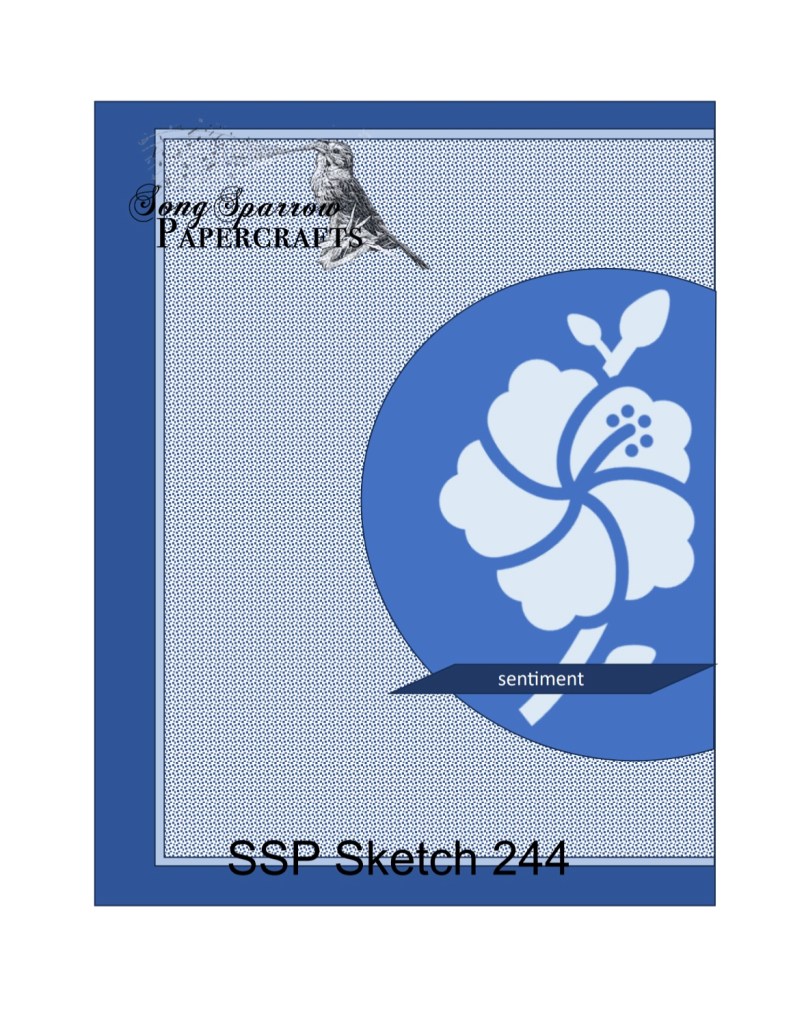
This week, we’re using portions of the Stampin’ Up! Country Woods suite to make all sorts of lovely card designs. We’re also using inspiration from fellow crafters as a jumpstart for our designs. Today, we’re taking a sketch from my sketchbook as inspiration for our layout.

When I see card layouts I really love, I try to make a quick sketch or save a photo of the inspiration card. There are many times that I love a card and immediately think of stamps and dies in my own stash that will work with that layout. Great layouts are like that — they can be used over and over and give you completely different looks based on the products you use.

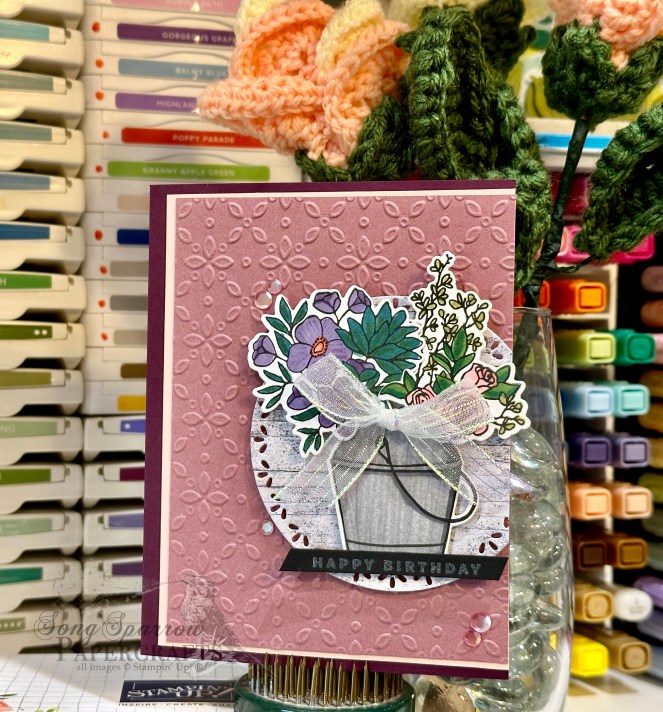
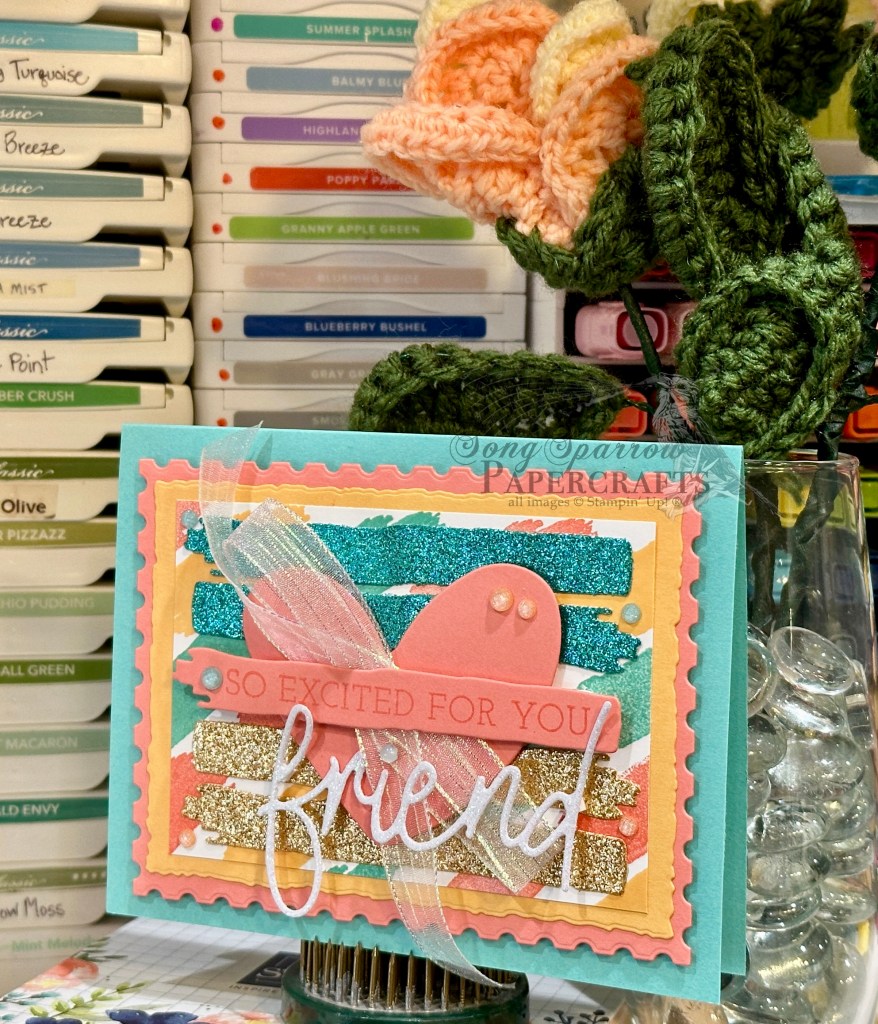
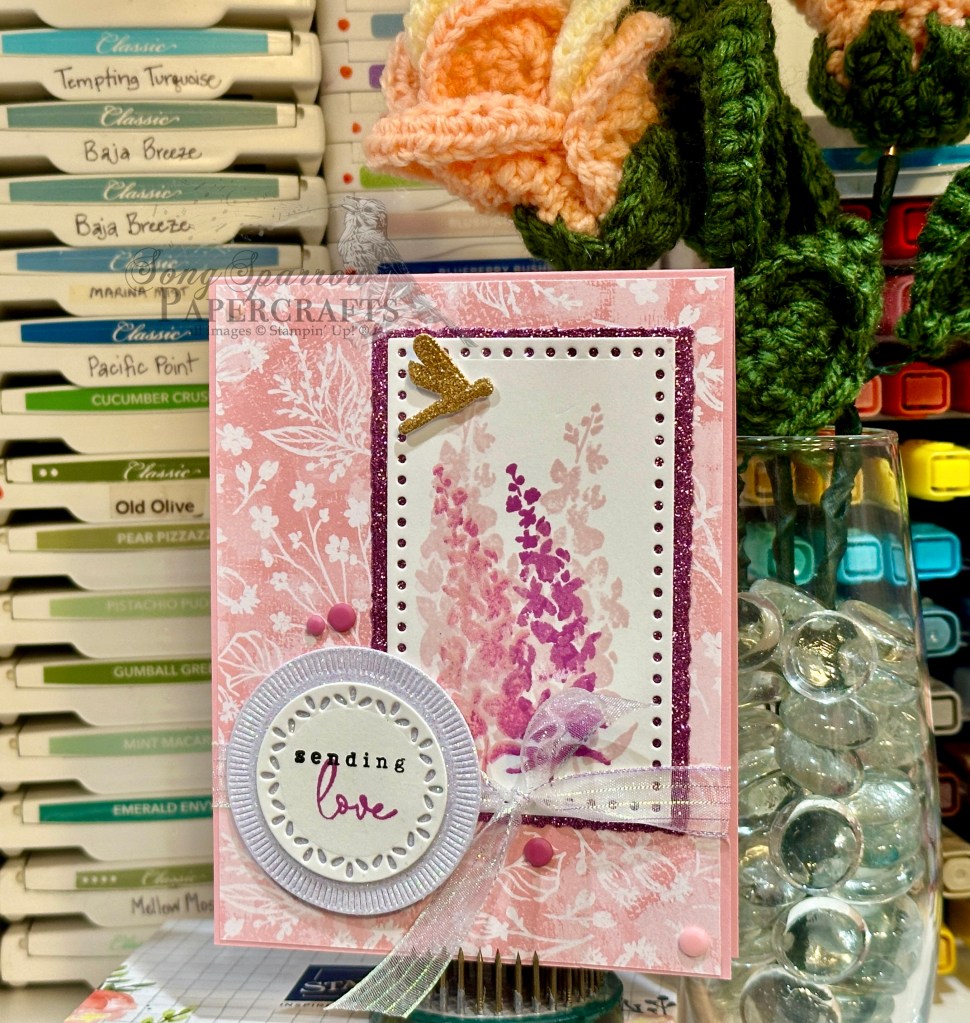
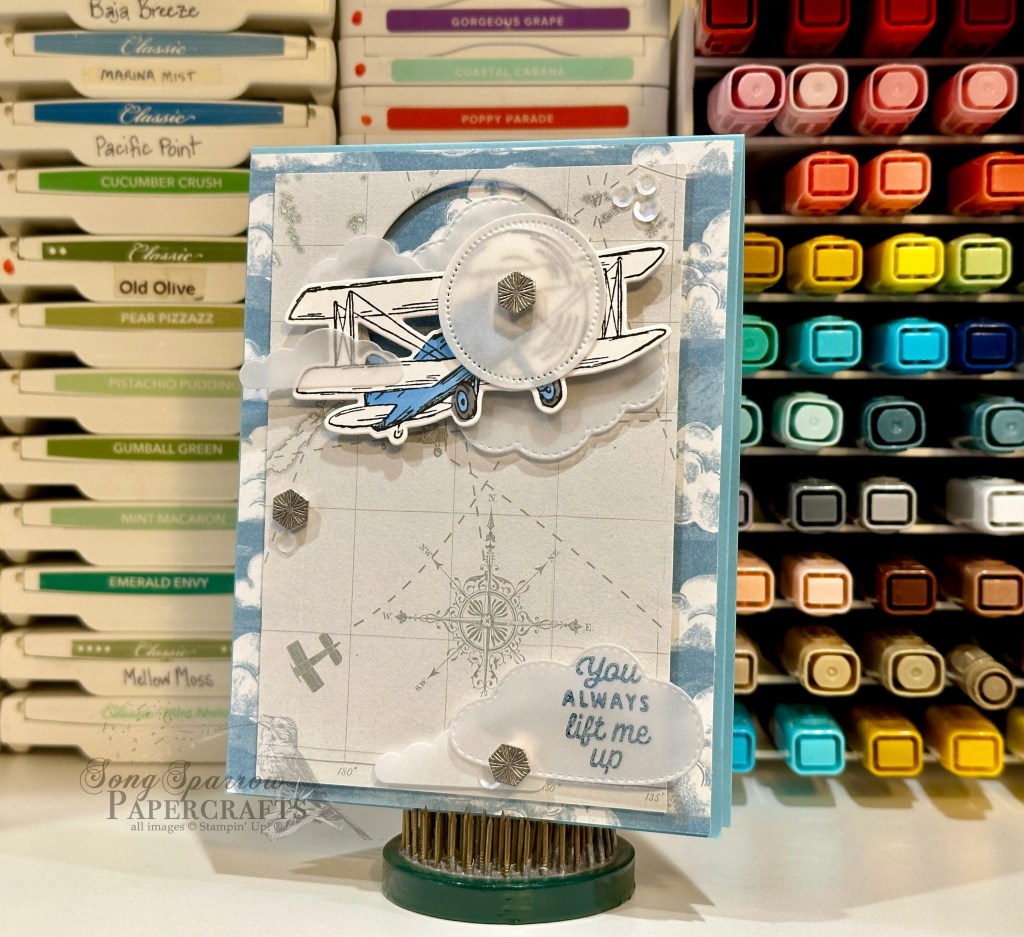
For today’s card, we get started with a card base of Blackberry Bliss cardstock. The background panel consists of two layers. The mat is Pretty in Pink and the foreground is a piece of Moody Mauve that has been machine embossed using the Eyelet embossing folder. The focal panel base is a piece of the lighter grey woodgrain pattern from the Country Woods designer paper pack that has been diecut using one of the larger Spotlight on Nature circles. The milk tin and floral bunches from Country Flowers have been stamped on white cardstock and then colored with Stampin’ Blends. The tin and flowers are adhered to the focal panel with dimensionals with the florals just a smidge higher than the tin they are resting in. A bow of striped iridescent ribbon sits just underneath the flowers at the top of the tin. The sentiment from Something Fancy is heat embossed in white on black cardstock and then cut into a thin strip with the paper trimmer. A few Berry Burst sequins from the sequins trio are placed to draw the eye across the design.

Pop in tomorrow to see what else we do with the Country Flowers.

Products used in today’s design:
Blackberry Bliss, Pretty in Pink, Moody Mauve, Basic Black, Basic White cardstock
Country Woods DSP
Country Flowers stamps & dies
Spotlight on Nature dies
Something Fancy stamps
Embossing powder
Striped iridescent ribbon
Sequins trio
Dimensionals
Adhesives

Botanicals · Country Flowers

Flower Market Love

This week, we’re taking a closer look at a portion of the Country Woods suite by Stampin’ Up! In particular, we’ll be focusing on the Country Flowers bundle, which includes photopolymer stamps and coordinating dies, and the Country Woods designer series paper. There is so much to love about this suite of products, but what really drew me was the feeling of a slow, summer afternoon swinging on the porch, which is how I felt when I first saw the images and papers. Perhaps it’s because I grew up in the country, and the milk tin and flowers and woodgrains all had that country feel to them. But whether you like a rustic, country feel or not, these products are — like everything Stampin’ Up! designs — so very versatile and lend themselves to all sorts of styles.

Today, I’m borrowing a design from fellow demo Susan Wong. I love how she used the woodgrain paper to “build” a door and then how she stacked the milk tin full of flowers in front. I don’t happen to have the Country Lace designer paper, but I made my own patterned sheet to mimic the sheet in the inspiration layout by stamping a repeating pattern using the small detail stamp, and I think it turned out to be an okay substitution.

So we get started with a card base of Smoky Slate cardstock. The background panel, as I mentioned, is a hand-stamped pattern using Smoky Slate ink and the small detail stamp from the Country Flowers stamp set. I decided to use the darker blue woodgrain sheet from the Country Woods paper pack to make the door. For the milk bucket, I decided to use one of the lighter woodgrain patterns from the DSP pack and stamped the image on top in Basic Gray ink, adding a handle with a Stampin’ Blend. I used some leftover scraps of Meandering Meadow designer paper to cut the leaves and flowers and then used rainbow dots for the flower centers. The flower market sign on the door is made using a small die from the Unbounded Love die set and the sentiment from Country Flowers. A small piece of linen thread and a metallic gem serve as the hanger. The sentiment from Country Flowers is stamped on white cardstock and then cut with paper snips. Two rhinestones help draw the eye to the sentiment.

It’s so fun bringing inspiration designs to life. And this week, we’re going to be doing just that. I hope you’ll tag along with me as we make a whole array of beautiful cards with Country Flowers.

Products used in today’s card:
Smoky Slate, Crumb Cake, Basic White cardstock
Country Woods, Meandering Meadow DSP
Country Flowers stamps & dies
Unbounded Love dies
Linen thread
Metallic gems, rainbow dots, rhinestone jewels
Dimensionals
Adhesives

Masculine Designs

Dad’s Trusty Tools

We continue our look at a good sampling of the Stampin’ Up! products that stand to make great Father’s Day cards. Today we’re revisiting a terrific set called Trusty Tools, which includes a photopolymer stamp set and a set of coordinating dies (sold separately). When I first bought this set, I only bought the stamps, but then I found myself fussy cutting way more than I really like to do when making projects. And I also realized that the set of dies includes things like a peg board and a tool box that really help give my stamps even greater value. And this set can go well beyond just Father’s Day designs.

This super fun design begins with a base of Daffodil Delight cardstock. The background panel mat is Basic Black. The background panel is a strip of Daffodil Delight stamped tone-on-tone with the nuts and bolts from the Trusty Tools stamp set and then a panel of white cardstock that has been diecut using the peg board die from the Trusty Tools die set. Each of these smaller panels is adhered directly to the black mat. The tools are diecut from a combination of black cardstock and silver foil specialty paper. I felt like this really gave the tools a more realistic look. The tools are adhered over the peg board using varying heights of dimensionals so that you really feel like you’re sitting at the tool chest. The sentiment panel is the bottom portion of the toolbox die and cut from Daffodil Delight. The word DAD is stamped in black in the center. The Happy Father’s Day sentiment is stamped on a banner diecut using the Happy Little Things dies. The design is finished off with some industrial trinkets to keep with the tool-look.

Tune in tomorrow to check out a brand new fun fold and fun outdoorsy theme!

Products used in today’s card:
Daffodil Delight, Basic Black, Basic White cardstock
Silver foil specialty paper
Trusty Tools stamps & dies
Happy Little Things dies
Industrial trinkets
Dimensionals
Adhesives

Friends for Life

Thank You, Friend

Happy weekend, all! We have officially completed our first week of summer break here, and we’ve enjoyed just bummin’ around, for the most part. Between the rain and the start of the Texas summer heat, it hasn’t been the best week to be outside. But we’ve made the best of things and found plenty of other things to occupy our time. The kiddo really loves to bowl, and we renewed our Kids Bowl Free subscription for this summer. This cool program allows you to pay a flat fee for the summer to bowl 2 games each weekday with your kiddo(s) at your local participating bowling alley. It’s an absolute steal and we’ve thoroughly enjoyed this program for going on 5 years now. Wanna learn more? Check it out here.

I’ve also made plenty of time to play around in the craft room this week, as well. And today, we’re finishing up our look at the projects we can create using the Stampin’ Up! Friends for Life stamps and dies. I kept things simple today with a take on a design posted over on the Stampin’ Through the Catalog page. This clean and simple design combines Friends for Life and Softly Said sets to make this lovely card. This design caught my eye for its simplicity. You can easily turn out a number of these and swap out sentiments to fit the occasion.

We get started with a card base of Basic White cardstock. While a standard sized card, the cardstock is cut down the long edge rather than the short edge, giving you a score at the top. The paint smudge die gives us our background and is a combination of Summer Splash, Calypso Coral, Petunia Pop, Peach Pie, and Pretty in Pink cardstock. Each smudge is oriented a different direction and is slightly offset for some visual interest. The sentiment backdrop is white cardstock that has been debossed with the leaf-print die, cut out with the open heart die, and then lightly smudged with Pretty in Pink ink to really bring out the debossed pattern. A twist of the white diagonal trim is adhered behind the heart, which is placed over the backdrop with dimensionals. The sentiment from Simply Said is stamped in black on white cardstock and then fussy cut with paper snips before being adhered with dimensionals. The design is finished with the white and pink sequins from the Sequins Trio set.

In case you missed this week’s Terrific Tuesdays video where I demonstrated how to deboss using your dies, you can catch the quick tutorial by clicking here.

I hope you got some ideas from this week’s cards featuring the Friends for Life bundle. Next week’s theme is Father’s Day and we’ll be using a whole host of different sets to make some great cards. I hope you’ll drop by and check them all out!

Products used in today’s card:
Summer Splash, Calypso Coral, Petunia Pop, Peach Pie, Pretty in Pink, Basic White cardstock
Simply Said stamps
Friends for Life dies
White diagonal trim
Sequins trio
Dimensionals
Adhesives

Friends for Life

Excited For You, Friend

This week we’re exploring all of the wonderful ways we can use the Stampin’ Up! Friends for Life stamps and dies. Do you ever use your stamps to make your own backgrounds? Today, we’re going to do just that.

I was feeling in the summer mood as I chose the color palette for this card, so I chose a trio that reminds me of rainbow sherbet—Peach Pie, Flirty Flamingo, and Coastal Cabana.

We get started with a standard card base of Coastal Cabana cardstock. Our background panel consists of three separate elements—two mats and a stamped background panel. The bottom mat is Flirty Flamingo diecut using the largest Perennial Postage die. The next mat is Peach Pie diecut using the second-largest Deckled Rectangles die. The stamped background panel is white cardstock, which has been stamped on the diagonal using the ink smudge stamp from Friends for Life in an alternating color pattern of Peach Pie, Coastal Cabana, and Flirty Flamingo. This panel is adhered to the card base with dimensionals.

Our focal section is layered with diecuts from Friends for Life. The base consists of Summer Splash and Peach Pie glimmer paper diecut using the smudge banner and adhered directly to the background panel. Next up is the heart diecut from Flirty Flamingo and then another smudge banner. Part of the sentiment is stamped tone-on-tone on the Flirty Flamingo banner. The heart and sentiment banner are adhered with dimensionals. A faux bow of striped iridescent ribbon is twisted behind the sentiment banner for some eye-catching shimmer. The word “friend” is cut from white glimmer paper and also adhered with dimensionals. I finished things off with In Color shimmer gems and a dot for the i using a white transparent dot.

Tune in tomorrow to see how we’re going to use our detail stamps and dies to add some pizzazz to a clean and simple design.

Products used in today’s card:
Coastal Cabana, Flirty Flamingo, Peach Pie, Basic White cardstock
Friends for Life stamps & dies
Perennial Postage, Deckled Rectangles dies
Striped iridescent ribbon
In Color shimmer gems, transparent dots
Dimensionals
Adhesives

Botanicals · SU! Promotions

Best of Luck

Our product focus this week is Stampin’ Up!’s Inspiring Snapdragons bundle, which includes a coordinating cling stamp and die set. We’ve explored using the stamps and dies together and independently in this week’s designs. Today’s card is pairing a sketch from my sketch book with Inspiring Snapdragons stamps and several of the new In Colors.

We get started with a card base of Summer Splash cardstock. The decorative element behind the focal panel consists of a mat of Petunia Pop In Color glimmer paper and Petunia Pop cardstock that has been machine embossed using the Cute Crochet embossing folder. The focal panel is matted with a trio of Summer Splash cardstock, Summer Splash In Color glimmer paper, and a sheet of Unbounded Beauty designer paper. The focal panel is white cardstock diecut using the Radiating Stitches dies on which I then stamped the smallest snapdragon in a combination of Shy Shamrock and Petunia Pop. The dragonflies are stamped in Smoky Slate on white cardstock and diecut using the coordinating Inspiring Snapdragons dies. I covered the wings in Wink of Stella for a little realistic shimmer. Each dragonfly is suspended in air with a dimensional. The sentiment panel is diecut from Petunia Pop cardstock using the Spotlight on Nature dies and then the sentiment from Unbounded Love is stamped tone-on-tone in the center. I tucked Summer Splash bordered ribbon and white diagonal trim behind the sentiment panel. For some extra pops of sparkly color, I added In Color shimmer gems across the card front.

Don’t forget, TODAY is the last day to take advantage of the fantastic Stampin’ Up! joining special, where for $99 (plus tax) you’ll get
⭐️$125 in products of your choice
⭐️5 new In Color Ink Pads for FREE ($40.50 value)
⭐️5 new In Color Markers for FREE ($17.50 value)
⭐️An Assorted Pack of In Color Cardstock for FREE ($11.50 Value)
⭐️An In Color Designer Series Paper Pack for FREE ($12.50 Value)
⭐️A FREE Paper Pumpkin Kit ($23 value)
⭐️FREE shipping on the Starter Kit

Ready to sign up? Click here.

Tomorrow we’re closing out our Inspiring Snapdragons series with a clean and simple design. I hope you’ll pop in and check it out!

Products used in today’s design:
Shy Shamrock, Petunia Pop, Basic White cardstock
Unbounded Beauty, In Color glimmer DSP
Inspiring Snapdragons, Unbounded Love stamps
Inspiring Snapdragons, Radiating Stitches, Spotlight on Nature dies
Cute Crochet embossing folder
Wink of Stella
Bordered ribbon, diagonal trim
In Color shimmer gems
Dimensionals
Adhesives

Botanicals · sketches

Snapdragon Love

This week, we’re going to be working with the Inspiring Snapdragons bundle by Stampin’ Up! This bundle includes cling stamps and coordinating dies. We’ll be looking at all of the ways that we can use these stamps and dies, both together and apart, to create beautiful cards.

And today’s card is based on a sketch from my sketch book. When I come across a great card, I typically take a screenshot and add it to my inspiration folder. Sometimes I am saving a card because I’m inspired by product usage, but a lot of times, I’m saving it as inspiration for layout when using products from my own stash. I often share with you guys when I found inspiration for a layout but don’t usually include a sketch. I have begun converting awesome layouts into digital sketches and thought I would begin sharing them with you as I use them. Love a sketch? Please feel free to save it to your own sketch collection.

Today’s card starts with Pretty in Pink cardstock. The patterned background layer is a sheet of the Unbounded Beauty designer series paper. For the image panel, I started with a sheet of white cardstock diecut using the Everyday Details dies. The image panel mat is diecut from Petunia Pop In Color Glimmer paper using the Deckled Rectangles dies. On the white panel, I stamped the two smaller snapdragon images using Bubble Bath, Pretty in Pink, and Petunia Pop ink. I then adhered the two panels together using my adhesive runner.

Next, I diecut the sentiment panel and mat. The sentiment panel mat is diecut from white glimmer paper and the sentiment panel itself is diecut from white cardstock using nesting circles from the Spotlight on Nature dies. The sentiment is from the Country Flowers set. I first stamped the word “sending” in black ink towards the top of the blank sentiment panel. Then I stamped “love” in Petunia Pop underneath, allowing part of the L to overlap the word “sending.” Adhere these two panels together with adhesive. TIP: To prevent stamping any portion of the word “sending” while stamping the remaining portion of your sentiment, I covered it with a piece of tape — any tape will do. I have tried cleaning my stamp in between stamping portions, but I still manage to get a ghost image of the previously inked portion. And I’ve found the taping method to be the most effective way to prevent that.

To finish things off, adhere the image panel on the top-right portion of the card. Tie sheer ribbon around the bottom third of the card, covering the bottom of the image panel. I chose to tie the sheer ribbon in a knot, but a bow could also work. Next, adhere the sentiment panel over the ribbon and bottom-left portion of the image panel using dimensionals. I added a gold glimmer dragonfly and In Color resin dots to finish things off.

Tomorrow, we’re going to take our sketch for another spin with a little variation. I hope you’ll pop in and let me know what you think!

Products used in today’ card:
Pretty in Pink, Basic White cardstock
Unbounded Beauty, In Color Glimmer DSP
Inspiring Snapdragons, Country Flowers stamps
Iridescent striped trim
In Color resin dots
Dimensionals
Adhesives

Country Flowers · Shop the catalog

Previewing Country Flowers

My box of goodies from the new Stampin’ Up! Annual Catalog came a bit ago, but I haven’t had time to play with much of it just yet. But as soon as I took a look at few of the items I got from the new Country Woods Suite, I knew I wanted to start with those.

I really love the Country Woods designer series paper and chose to have it serve as the backdrop of this card design. We get started with a base of Basic White cardstock. The main background panel is a sheet of the lighter woodgrain pattern from the Country Woods paper pack. I diecut the sheet of Pool Party woodgrain from the same designer paper pack using the largest die in the Spotlight on Nature dies set. I stamped the stool from the Country Flowers stamp set onto the darker woodgrain pattern sheet and then diecut using the coordinating die. I stamped all of the greenery, along with the bucket and teapot, onto white cardstock using the Country Flowers stamps and then colored them with my Stampin’ Blends. I layered everything up with dimensionals to build a lot of different layers on the card front so that it gives it a more realistic look. I finished things off with some of the pearlized sequins from the Sequins Trio set and a double twist of the Iridescent Striped Trim. I chose not to have a sentiment on the front so that I could easily choose an inside sentiment on the fly once I’m ready to send it out.

This whole suite of products is fabulous. There are so many different ways that you can take it — masculine, feminine, shabby chic, country, and the list goes on. I’ve seen so many wonderful ideas that I’ve put in my inspiration folder!

I hope to bring you some more designs later this week, assuming we get to go home from the hospital.

Products used on this card:
Basic White cardstock
Country Woods DSP
Country Flowers stamps & dies
Stampin’ Blends
Iridescent striped trim, linen thread
Sequins trio
Dimensionals
Adhesives

Retiring · Zany Zoo

Something Great

We’re rounding out this week with our zoo pals at the theatre. Before my son was born, I spent quite a bit of time in theatres in my area performing opera, musical theatre, and sacred music. There’s nothing quite like the feeling of being onstage, and I’ve been pleased to be able to return to some singing over the last year.

Today’s card actually combines two card designs that I saved in my inspiration folder quite some time ago. And I decided to combine them by using the barn fold fun fold to build the drama of waiting for the curtains to open and then starting the show.

We start with a base of Basic White cardstock. The standard sized base is scored so that there are two equal sized flaps serving as the card front, which creates the barn fold. A piece of Lemon Lolly cardstock and a strip of Basic Black serve as the background. Using the Zany Zoo dies, I diecut curtain panels from Pool Party cardstock. The curtain tie backs are cut from Distressed Gold specialty paper using the tie back die. The chairs are cut from Real Red using the base of the llama die. The silhouettes of the audience members are diecut from Basic Black using the llama and ballerina dies. The canned lights are diecut from black using the vase die and strips of vellum serve as light beams pointing to the sentiment in the center. The sentiment from Zany Zoo is stamped on white cardstock and then diecut using the Hot Air Balloon dies. The sentiment panel is adhered to the left panel of the card front using dimensionals.

The interior scene has another set of Pool Party curtain panels. The sentiment from Something Fancy is stamped in black on the center panel. The stage floor panels are diecut from Crumb Cake cardstock using the Filled With Fun wagon panels that I cut apart using paper snips. The base of the stage is a strip of black cardstock. The spotlight coming down center stage is a strip of gold vellum. The adorable ballerina is diecut from the Zoo Crew designer paper using the coordinating dies. I’ve placed her on a double layer of dimensionals to ensure she stands above the scene and really catches the eye. Things are finished off with some glitter sequins to reinforce the *magic* of the scene.

I’ve had a lot of fun taking our zoo friends on adventures this week, and I hope you’ve enjoyed tagging along! I’ll be taking a few days off next week to be with my hubby in the hospital. But I’ll be back with some more crafting goodness soon!

Products used in today’s card:
Pool Party, Crumb Cake, Real Red, Lemon Lolly, Basic Black, Basic White, vellum cardstock
Zoo Crew, Distressed Gold DSP
Something Fancy, Zany Zoo stamps
Zany Zoo, Hot Air Balloon, Filled With Fun dies
Glitter sequins
Dimensionals
Adhesives

Coming Soon

Lifting Me Higher

Our journey through the skies comes to an end today as we round out our aviation-themed trek through the Stampin’ Up! lineup. And today’s card is a full sneak peek at the brand NEW suite of products called Take to the Sky. The full suite includes stamps, coordinating dies, designer series paper, and silver trinkets. This suite will have you soaring when it releases in May!

Our card today begins with a base of Balmy Blue cardstock. The backdrop for our focal panel is a sheet of the cloud pattern designer paper. On top is another sheet with a radar view pattern. I cut a hole towards the top of the radar sheet using the Everyday Details dies, which allows the cloud pattern to peek through. And I reinforced this peek-through look by diecutting clouds from vellum using the Bright Skies and Hot Air Balloon dies. I stamped the largest plane from the Adventurous Skies stamp set onto white cardstock, colored the body of the plane with Stampin’ Blends, and then diecut with the coordinating die. I drew further attention to the spinning propeller by diecutting the smallest circle from Everyday Details from vellum. I added an Industrial Trinket to give a realistic look to the center of the spinning propeller. The sentiment from Adventurous Sky is stamped directly on vellum and then diecut using the Bright Skies dies. I scattered a few additional trinkets and some translucent sequins to tie things together and help the eye move across the card.

There are so, so many more designs I would like to try with this super fun suite of products that I plan to highlight this suite for a full week once it releases with the brand new Annual Catalog in May. In the meantime, next week we’ll be romping through the grassy plains and fields of flowers. I hope you’ll come along!

Products used in today’s card:
Balmy Blue, Basic White, vellum cardstock
Take to the Sky DSP (coming soon!)
Adventurous Sky bundle (coming soon!)
Industrial trinkets (coming soon!)
Stampin’ Blends
Sequins trio
Dimensionals
Adhesives