Retiring · Zany Zoo

Something Great

We’re rounding out this week with our zoo pals at the theatre. Before my son was born, I spent quite a bit of time in theatres in my area performing opera, musical theatre, and sacred music. There’s nothing quite like the feeling of being onstage, and I’ve been pleased to be able to return to some singing over the last year.

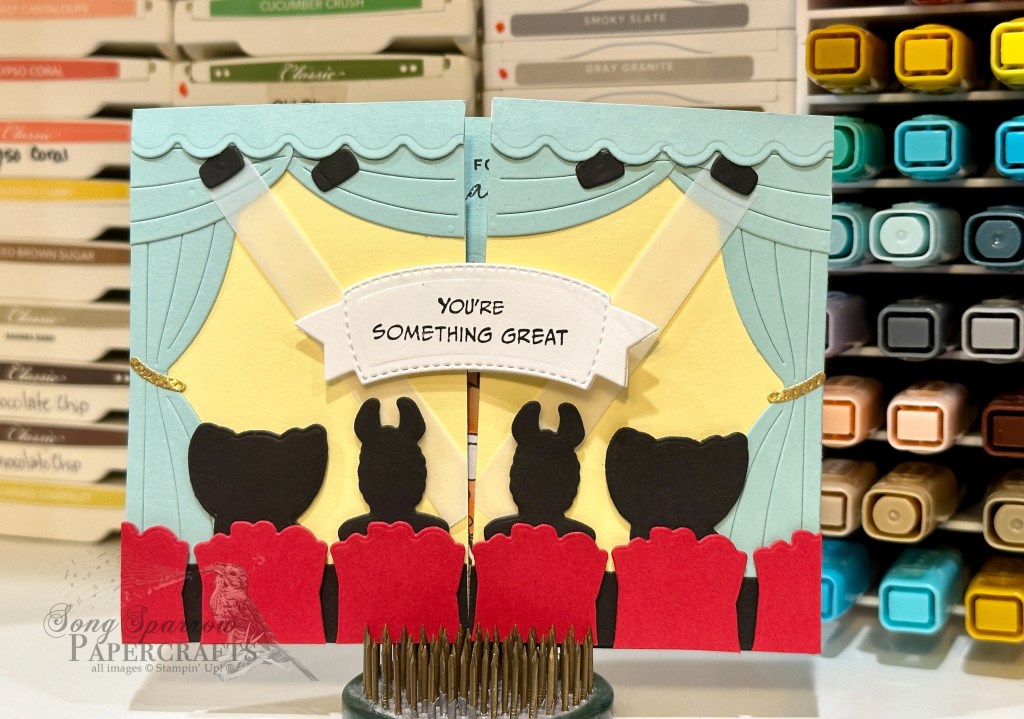
Today’s card actually combines two card designs that I saved in my inspiration folder quite some time ago. And I decided to combine them by using the barn fold fun fold to build the drama of waiting for the curtains to open and then starting the show.

We start with a base of Basic White cardstock. The standard sized base is scored so that there are two equal sized flaps serving as the card front, which creates the barn fold. A piece of Lemon Lolly cardstock and a strip of Basic Black serve as the background. Using the Zany Zoo dies, I diecut curtain panels from Pool Party cardstock. The curtain tie backs are cut from Distressed Gold specialty paper using the tie back die. The chairs are cut from Real Red using the base of the llama die. The silhouettes of the audience members are diecut from Basic Black using the llama and ballerina dies. The canned lights are diecut from black using the vase die and strips of vellum serve as light beams pointing to the sentiment in the center. The sentiment from Zany Zoo is stamped on white cardstock and then diecut using the Hot Air Balloon dies. The sentiment panel is adhered to the left panel of the card front using dimensionals.

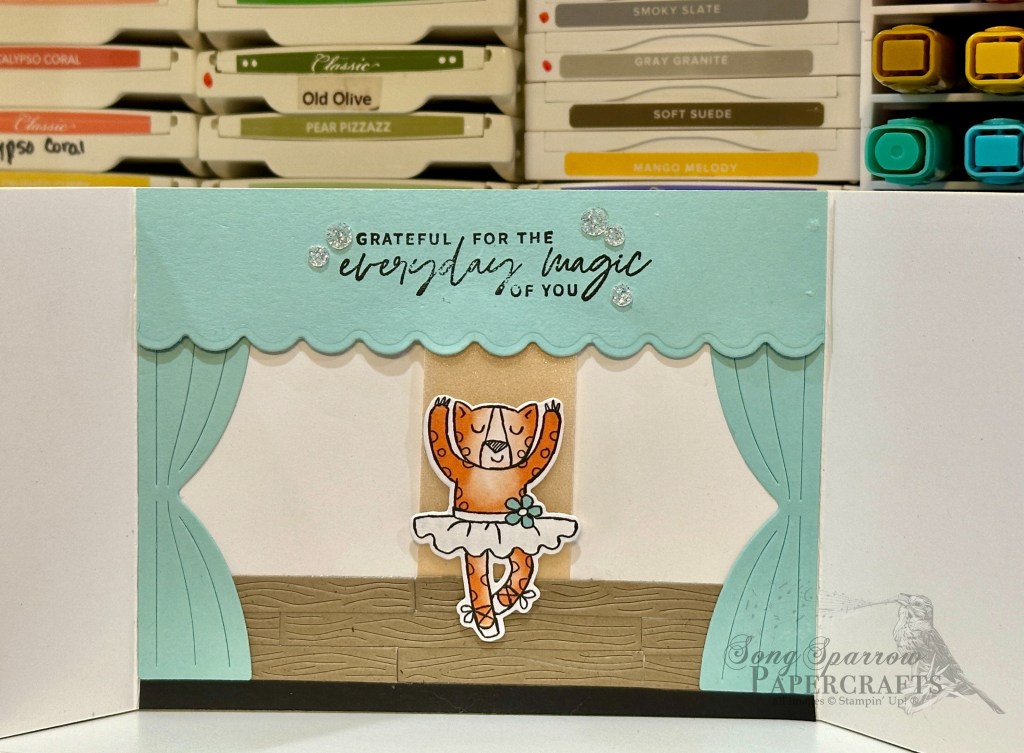
The interior scene has another set of Pool Party curtain panels. The sentiment from Something Fancy is stamped in black on the center panel. The stage floor panels are diecut from Crumb Cake cardstock using the Filled With Fun wagon panels that I cut apart using paper snips. The base of the stage is a strip of black cardstock. The spotlight coming down center stage is a strip of gold vellum. The adorable ballerina is diecut from the Zoo Crew designer paper using the coordinating dies. I’ve placed her on a double layer of dimensionals to ensure she stands above the scene and really catches the eye. Things are finished off with some glitter sequins to reinforce the *magic* of the scene.

I’ve had a lot of fun taking our zoo friends on adventures this week, and I hope you’ve enjoyed tagging along! I’ll be taking a few days off next week to be with my hubby in the hospital. But I’ll be back with some more crafting goodness soon!

Products used in today’s card:
Pool Party, Crumb Cake, Real Red, Lemon Lolly, Basic Black, Basic White, vellum cardstock
Zoo Crew, Distressed Gold DSP
Something Fancy, Zany Zoo stamps
Zany Zoo, Hot Air Balloon, Filled With Fun dies
Glitter sequins
Dimensionals
Adhesives

Coming Soon

Lifting Me Higher

Our journey through the skies comes to an end today as we round out our aviation-themed trek through the Stampin’ Up! lineup. And today’s card is a full sneak peek at the brand NEW suite of products called Take to the Sky. The full suite includes stamps, coordinating dies, designer series paper, and silver trinkets. This suite will have you soaring when it releases in May!

Our card today begins with a base of Balmy Blue cardstock. The backdrop for our focal panel is a sheet of the cloud pattern designer paper. On top is another sheet with a radar view pattern. I cut a hole towards the top of the radar sheet using the Everyday Details dies, which allows the cloud pattern to peek through. And I reinforced this peek-through look by diecutting clouds from vellum using the Bright Skies and Hot Air Balloon dies. I stamped the largest plane from the Adventurous Skies stamp set onto white cardstock, colored the body of the plane with Stampin’ Blends, and then diecut with the coordinating die. I drew further attention to the spinning propeller by diecutting the smallest circle from Everyday Details from vellum. I added an Industrial Trinket to give a realistic look to the center of the spinning propeller. The sentiment from Adventurous Sky is stamped directly on vellum and then diecut using the Bright Skies dies. I scattered a few additional trinkets and some translucent sequins to tie things together and help the eye move across the card.

There are so, so many more designs I would like to try with this super fun suite of products that I plan to highlight this suite for a full week once it releases with the brand new Annual Catalog in May. In the meantime, next week we’ll be romping through the grassy plains and fields of flowers. I hope you’ll come along!

Products used in today’s card:
Balmy Blue, Basic White, vellum cardstock
Take to the Sky DSP (coming soon!)
Adventurous Sky bundle (coming soon!)
Industrial trinkets (coming soon!)
Stampin’ Blends
Sequins trio
Dimensionals
Adhesives

Coming Soon

Speedy Recovery

We’re continuing our aviation adventures this week by taking a closer look at the brand NEW Adventurous Sky bundle, which is set to release in May with the launch of the new 2024-25 Stampin’ Up! Annual Catalog. This week’s chosen theme of flight is inspired by husband, who is a commercial pilot and aviation enthusiast.

And the theme of today’s card, in particular, is also inspired by my hubby, who has been having some serious health issues. When we’re making get well cards, we don’t often think of incorporating someone’s hobbies or interests when designing cards, but when you want something to feel very personalized for a recipient, I believe that’s the best way to do it!

Our card today is set on a base of Balmy Blue cardstock using the fold-back fun fold, which allows a portion of the inside panel to peek through when the card is fully closed. Before I adhered the fold-back portion of the card front, I used the Adventurous Sky cloud stamps to stamp a background on the entire inside-left panel. I also adhered the raindrop-embossed piece of vellum to the edge of the fold-back panel and then adhered it to the card front. On the exposed portion of the inside message panel, I chose the topography patterned sheet from the Take to the Sky designer series paper pack — the coordinating DSP to Adventurous Sky that will release in May.

The plane is cut from the Silver and Berry Burst sheets of Holographic specialty paper using the Adventurous Sky dies. But you might be thinking that it doesn’t look red. This particular sheet of paper looks blue when it’s cut into smaller pieces and from certain angles in larger pieces, and so by diecutting and then putting the plane on the diagonal, you see blue in this design. Neat, huh?! To give the illusion of a spinning prop, I cut a circle from vellum using the smallest die in the Everyday Details set. The center of the prop is made with the soon-to-be-released Industrial Trinkets piece.

The sentiments from Happy Little Things are stamped on white cardstock that is diecut from white cardstock using the Deckled Rectangles dies. A twist of silver & white sheer ribbon and the white sequins tie with the metallic elements of the plane and finish the visual triangle across the card design.

I hope you’ll fly by tomorrow to get a better look at the full Take to the Sky suite — paper, stamps, dies, and embellishments!

Products used in today’s design:
Balmy Blue, Basic White, vellum cardstock
Holographic Trio, Take to the Sky (coming soon!) DSP
Happy Little Things stamps
Deckled Rectangles, Adventurous Sky (coming soon!) dies
Raindrops embossing folder
Sequins trio, Industrial Trinkets (coming soon!)
Silver & white sheer ribbon
Dimensionals
Adhesives

Coming Soon

Flying Hi

This week, we’re taking to the skies with some Stampin’ Up! flying-themed products. Thus far, we’ve made some cute cards using the Hot Air Balloon bundle. And today, I’m sharing a sneak peek of a brand NEW bundle that will be available in the upcoming 2024-25 Annual Catalog that releases in May.

Say hello to Adventurous Sky! Did you know that my husband is a commercial pilot? And he’s the inspiration for this week’s theme and the reason that I just had to have this new aviation-themed bundle!

Like all of the Stampin’ Up! product line, the NEW Adventurous Sky stamps and dies pair perfectly with other existing product lines. For today’s card designed, I’ve paired it with the Bright Skies and Hot Air Balloon bundles to make this fun card.

Our card starts with a base of white cardstock. The focal panel is built on a background of Pool Party cardstock that has been diecut using the largest Deckled Rectangles die. I cut a variety of clouds using the Bright Skies and Hot Air Balloon dies and layered them across the background for lots of billowy dimension. The hot air balloon combines a Berry Burst balloon with a white glimmer banner and Bubble Bath frills — the whole balloon made with the Hot Air Balloon bundle. The staggerwing aircraft is the medium-sized airplane stamp in the Adventurous Sky stamp set. It’s stamped in black and then colored with Stampin’ Blends before being diecut with the coordinating die. The sentiment is also from the Adventurous Sky stamp set. The scene is finished off with a combination of white sequins from the Sequins Trio and the Pool Party dots from the Rainbow Dots set.

Fly back in tomorrow to see more of the Adventurous Sky set at work!

Products used in today’s design:
Pool Party, Berry Burst, Basic White cardstock
White glimmer, Bubble Bath soft shimmer SP
Hot Air Balloon, Adventurous Sky (coming soon!) bundles
Bright Skies dies
Sequins trio, rainbow dots
Dimensionals
Adhesives

January Mini Catalog

Wishes Up and Away

This week, we’re flying high with Stampin’ Up! sets that feature vehicles of flight. Thus far, we’ve been soaring with the Hot Air Balloon bundle. And today’s design is (almost) directly inspired by fellow SU! demo Anne Granger. Just a few tweaks here & there with products I had on hand and *voila* a fantastic birthday card ready to hoist your well wishes.

This card design begins with a base of Lost Lagoon cardstock. The background panel consists of a mat of Pretty Peacock soft shimmer paper and the lovely rainbow pattern designer paper from the Sale-a-Bration pack called Sunny Days. The focal panel is also matted with the shimmer paper and the balloon is stamped directly on the white cardstock panel in coordinating colors of Lost Lagoon and Pretty Peacock. I dressed up the sentiment by diecutting it separately using the Autumn Leaves dies. This design is finished off with Pretty Peacock sequins from the Sequins Trio set and the Pretty Peacock & Gold metallic ribbon.

Tune in tomorrow to get a SNEAK PEEK at a brand new flight-related suite of products. I know you’re gonna love it as much as I do!

Products used in today’s card:
Lost Lagoon, Basic White cardstock
Pretty Peacock fine shimmer SP
Sequins trio
Pretty Peacock & Gold metallic ribbon
Dimensionals
Adhesives

All ads on this site are posted by WordPress.  Song Sparrow Papercrafts is not responsible for ad content.

January Mini Catalog

Hang in There

For as long as I can remember, I’ve been fascinated by hot air balloons. My aunt and uncle had a balloon when I was a little girl. And I remember going to a few balloon festivals and watching the balloon teams prepare the balloons for flight — all the sights and smells and sounds. I still love to watch hot air balloons from afar so that I can see the balloons all at once with their rainbow of colors.

Stampin’ Up! has launched its own balloon festival with the suite called Lighter Than Air. The full suite includes stamps, dies, paper, and embellishments. I started with just the designer series paper, which makes wonderful cards for all sorts of occasions. But I’ve since added the stamp bundle after seeing so many wonderful inspiration designs. The Hot Air Balloon bundle will be carrying over when the new catalog launches!

For today’s card design, we start with a background of Melon Mambo cardstock to coordinate with the selected background paper from the Lighter Than Air paper pack. The focal panel background is a combination of white glimmer paper, which has been diecut using one of the larger Perennial Postage dies, and a sheet of the cloud paper from Lighter Than Air. Two balloons have been diecut from the designer paper, while the third is stamped on white cardstock using the Hot Air Balloon stamps. The white detailing on the balloon has been diecut from white glimmer paper using the coordinating Hot Air Balloon dies. Each of the baskets has been stamped in Crumb Cake ink on coordinating cardstock and then diecut using the Hot Air Balloon dies. The clouds and sentiment panels were each diecut from vellum. The sentiment from the Hot Air Balloon set is stamped on the banner which was cut using the Happy Little Things dies. The scene is layered with dimensionals to give a more realistic look, and a bit of sparkle is added using the shiny sequins and silver trim.

We’re taking to the skies this week with more fun air-inspired designs. I hope you’ll take flight with me!

Products used in today’s card:
Melon Mambo, Basic White, Crumb Cake, vellum cardstock
Lighter Than Air, glimmer DSP
Hot Air Balloon bundle
Perennial Postage, Happy Little Things dies
Shiny sequins
Silver trim
Dimensionals
Adhesives

All ads on this site are posted by WordPress.  Song Sparrow Papercrafts is not responsible for ad content.

Botanicals

Jungle of Thanks

As a plant lover, I’m always thrilled to see what new botanical-inspired designs make it into new Stampin’ Up! releases. I cannot recall a single release where there hasn’t been at least one stamp set, punch, set of dies, or designer series paper that hasn’t had a stunning flower or plant image. And today, I’m giving you a SNEAK PEEK at a stamp from the NEW catalog that releases in May.

Today’s card design features the NEW Leaf Collection background stamp. We get started with a base of Shaded Spruce cardstock. Using the largest Perennial Postage die, I cut the white glimmer mat that sits behind the Leaf Collection panel. I stamped tone-on-tone with a super saturated layer of ink. The toucan is from the Sale-a-Bration Jungle Pals stamp set, along with the lovely hibiscus flowers which were diecut using the coordinating Jungle Pals dies. The flower centers are Berry Burst iridescent discs. The shimmery leaves are diecut from Old Olive glimmer paper using the Thoughtful Expressions dies. The sentiment panel is diecut from white cardstock using the Thoughtful Expressions dies and then I stamped the sentiment from the Perennial Postage stamp set. I added a strip of the Granny Apple Green ribbon duo trim behind the sentiment panel and a few iridescent discs on opposing corners of the sentiment panel. I really liked the contrast of the yellow-green elements against the darker green background.

The NEW Leaf Collection background stamp is large enough to cover a quarter-panel of cardstock. This background image is very versatile and can be used well beyond merely making a one-step background. When I designed today’s card, I did not have a block large enough to hold the entire stamp. I have since ordered the F Block, which easily accommodates the full image of this lovely background stamp (and any of the others offered by SU!), to make capturing the full stamped image much easier on future projects.

I have a bonus card to share later today, so I hope you’ll pop back by!

Products used on this card:
Shaded Spruce, Basic White cardstock
Glimmer paper, shimmer paper DSP
Jungle Pals bundle (retired SAB)
Perennial Postage, Leaf Collection (Coming Soon!) stamps
Thoughtful Expressions, Perennial Postage dies
Stampin’ Blends (Basic Gray, Pumpkin Pie, Calypso Coral)
Iridescent discs
Ribbon duo
Dimensionals
Adhesives

All ads on this site are posted by WordPress.  Song Sparrow Papercrafts is not responsible for ad content.

Botanicals · Clean and Simple

Simple Thoughts of You

One of the things that I really love about crafting is the variety of projects that you can create. From the simplest to the most advanced designs, each one is beautiful in its own way and never fails to deliver a smile to its recipient. This week, we’ve been exploring designs using a number of different botanical products from Stampin’ Up!

Today’s card design is borrowed from a fellow demonstrator over at Stampaholic. She made a series of cards that spanned from easiest to advanced using the Planted Paradise stamps and this same soft color palette. I love the combination of earth tones with the botanical images. For my card, I swapped out a few elements and added a few too. And that’s the beauty of finding inspiration for your designs — they don’t have to be exact, but they certainly can be.

The base of this card is Early Espresso cardstock. The Calypso Coral strip of designer paper in the middle is from the Sale-a-Bration paper pack called Softly Stippled. I added a strip of the natural wavy trim to the center. The image panel is diecut from white cardstock using the Everyday Details dies. The clay pot is stamped upside down to more resemble a vase and then each of the twigs is stamped to come out the top. The sentiment from the Botanical Layers stamp set is stamped on Crumb Cake and then diecut using the Thoughtful Expressions dies. A small bow of linen thread is added to the top of the vase to dress it up and add a layer of the natural brown that ties together with the wavy trim and sentiment panel to complete a visual triangle. I added fine shimmer gems to finish things off.

This card design can easily be simplified or dressed up. And that’s what makes the layout on for the inspiration folder. It comes together beautifully and quickly and is lovely whether it is simple or more ornate.

Next week, we’re going to go flying. I hope you’ll come along as we take to the skies!

Products used in this card:
Early Espresso, Crumb Cake, Basic White cardstock
Softly Stippled DSP (retired SAB)
Planted Paradise, Botanical Layers stamps
Everyday Details, Thoughtful Expressions dies
Natural wavy trim, linen thread
Fine shimmer gems (retired)
Dimensionals
Adhesives

All ads on this site are posted by WordPress.  Song Sparrow Papercrafts is not responsible for ad content.

Botanicals · Clean and Simple

Garden Prayers

Ever since I can remember, I’ve had an interest in plants and insects. I’d like to think that I got that from my grandparents, who both loved to garden and my grandfather was a beekeeper. As the seasons change, I love going to the local nursery and buying new seasonal annuals. I love the challenge of finding plants that will do well despite the scorching summer heat. And I definitely have my favorites. Right now, I’m enjoying the new spring plantings and the lovely pops of color they bring to the barely-green landscapes. So naturally, I love crafting products that incorporate flowers and plants.

This week, we’re looking at some of the current products that Stampin’ Up! offers that feature plants of all sorts. Today’s card pairs stamps and an embossing folder.

We start with a base of Moody Mauve for this design. For this soft color palette, I embossed white cardstock with the Elegant Eucalyptus embossing folder and then matted the entire panel with Pool Party. I stamped the focal image separately using the Planted Paradise and Botanical Layers stamp sets. I cut them out with paper snips and then mounted to the embossed base with dimensionals. The sentiment from the So Sincere set is stamped on white cardstock and diecut using the Thoughtful Expressions dies. I added some Pool Party fine sparkle gems to finish things off.

Tomorrow I’ll be showing you a sneak peek of a brand new background stamp. Hope you’ll come check it out!

Products used in today’s design:
Moody Mauve, Pool Party, Basic White cardstock
Botanical Layers, Planted Paradise, So Sincere stamps
Thoughtful Expressions dies
Fine sparkle gems (retired)
Dimensionals
Adhesives

All ads on this site are posted by WordPress.  Song Sparrow Papercrafts is not responsible for ad content.

Botanicals · Clean and Simple

Pots of Joy

This week, we’re exploring card designs that use botanical images. I love stamp sets that include flowers and greenery but then sometimes find myself stuck for ideas on how to use them. We’re so fortunate to have so many different inspiration forums, and in cases where I’m fresh out of ideas, that’s precisely where I turn.

Today’s card design was inspired by a Stampin’ Up! Artisan design. The inspiration card used the lovely argyle detail die from Everyday Details — a die that I have had a really hard time finding a use for — and the lovely Planted Paradise stamp set.

This card design is a built on a base of white cardstock. The focal image panel sits atop a Blueberry Bushel panel where each long edge has been diecut using the argyle die from Everyday Details. A strip of white cardstock serves as the focal image base in the center. The pots and greenery are stamped on separate sheet of white cardstock and then cut with paper snips before being mounted with dimensionals. The sentiment panel consists of the Heartfelt Hellos sentiment that is punched with the coordinating Heartfelt Hexagon punch. I also added an additional layer of dimensionals to the sentiment panel to ensure that it stood above the supporting images. I added Blooming Pearls on the pots and near the sentiment for added detail and to draw the eye across the focal panel.

Yesterday, I mentioned the TIP for stamping crisp images when your photopolymer stamps tend to pool ink and stamp blotchy images. When you’re going for a more vintagey feel, I would definitely allow the ink to pool on the stamps. But if you’re going for a clean look, you’ll definitely want to use that layer of Versamark first before applying your selected colored ink. Today, I elected to use both types of stamped images on my card design so that you could see the difference. Can you spot which stamped elements look more vintage than crisp?

Products used in today’s design:
Blueberry Bushel, Basic White cardstock
Planted Paradise, Heartfelt Hellos stamps
Heartfelt Hexagon bundle
Blooming pearls
Dimensionals
Adhesives

All ads on this site are posted by WordPress.  Song Sparrow Papercrafts is not responsible for ad content.