Fun Folds · Sale-a-Bration

Toadstool Birthday

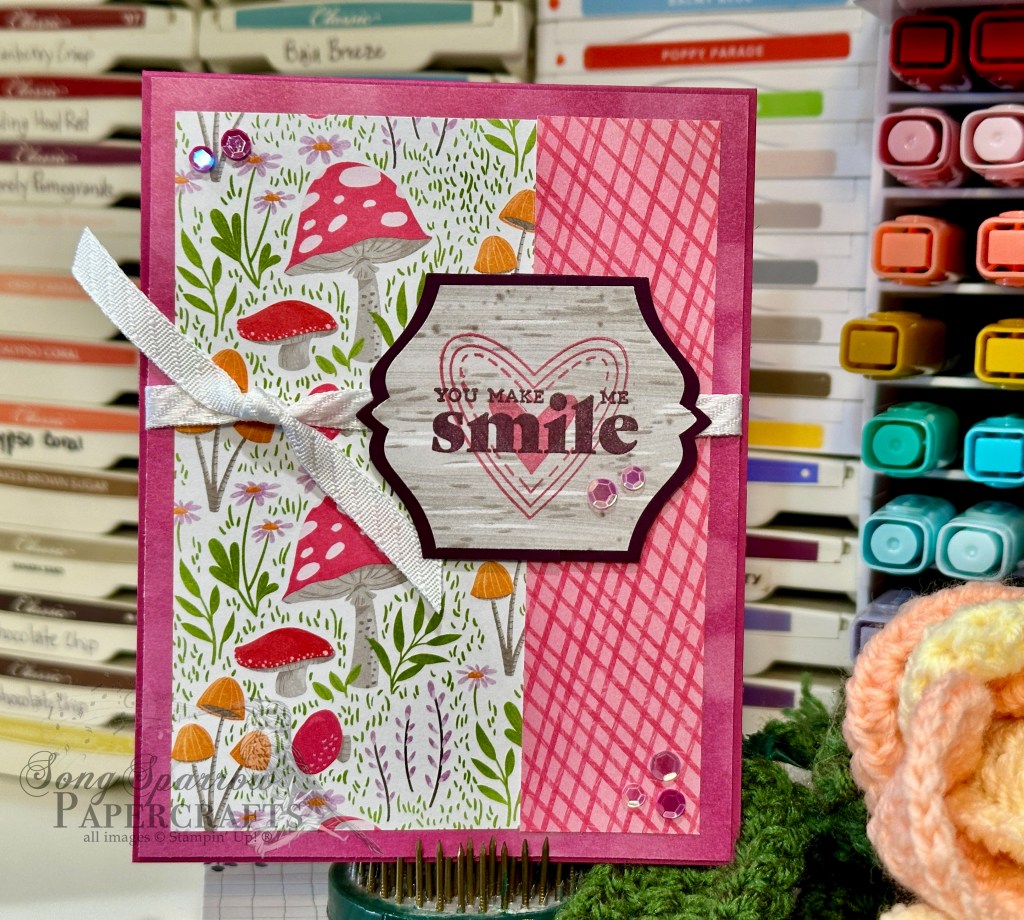
We’re continuing our patterns & sentiments design series as we tiptoe through the toadstools today. It’s been a long while since I’ve made an angled gatefold card, and I saw the cutest card using the Sale-a-Bration Toadstool Gardens designer series paper. So I’m taking a stab at this fun fold using our patterns & sentiments design theme.

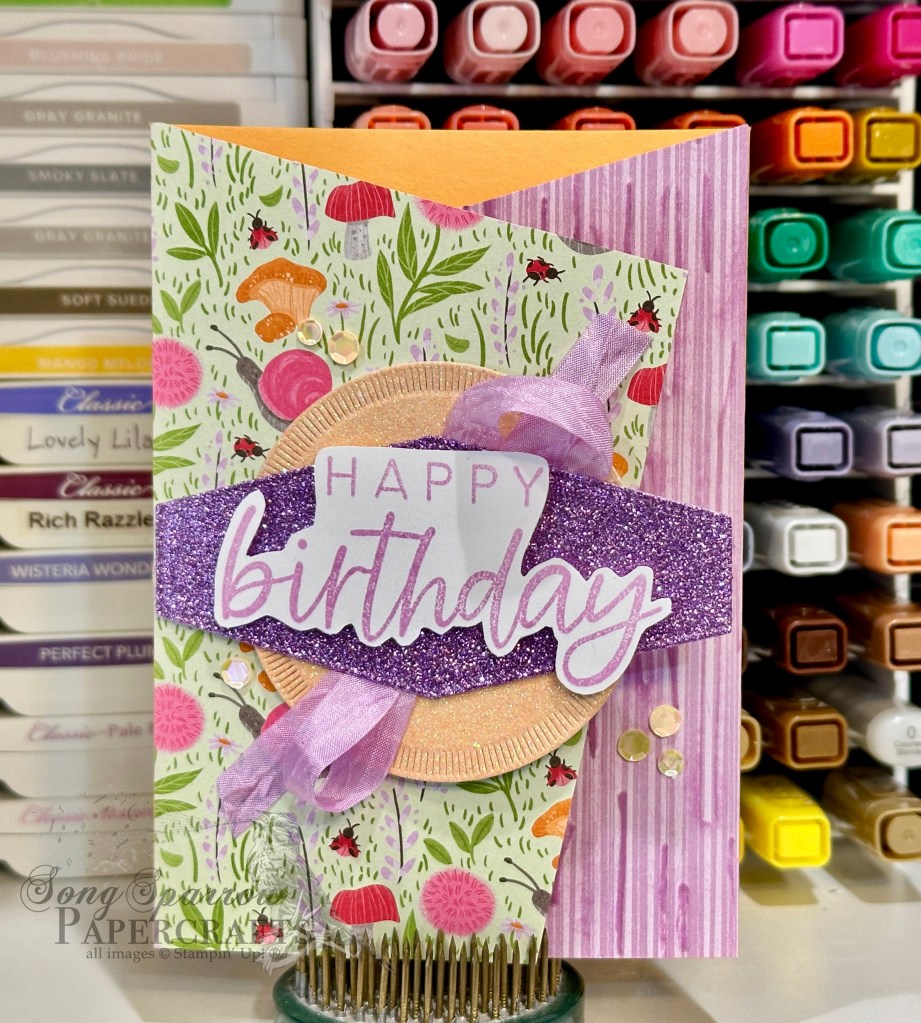
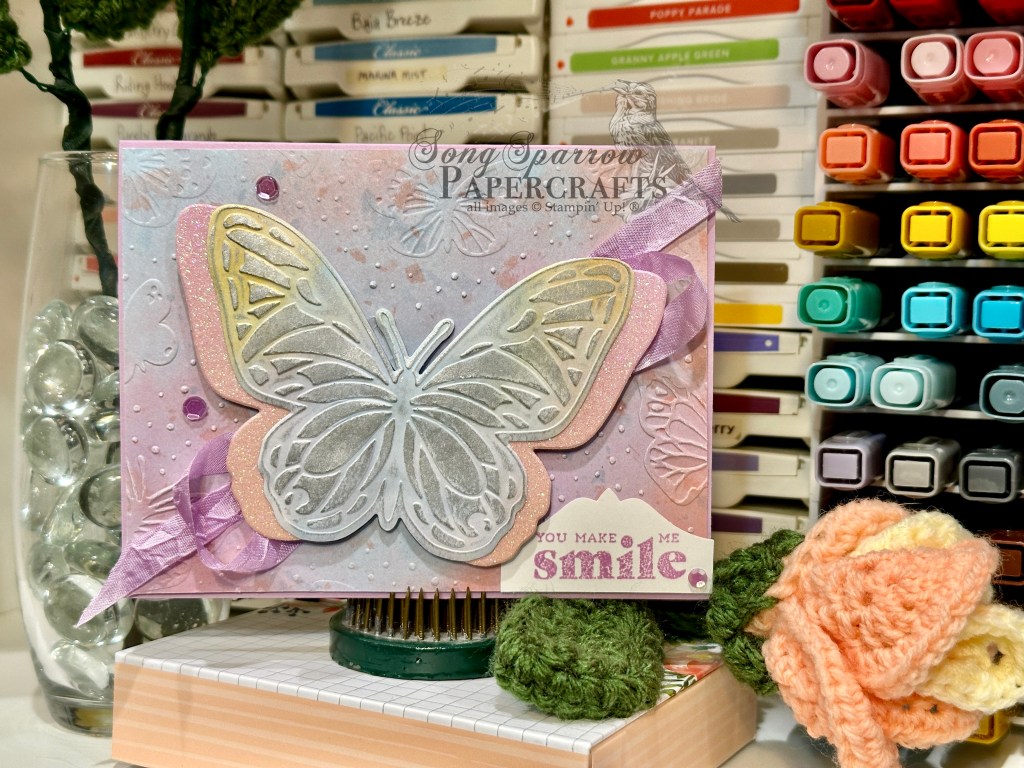
Our card starts with Peach Pie cardstock. Each of the angled flaps are covered with a pattern from the Toadstool Gardens paper pack. I added some additional patterned texture o the purple stripe panel by running it through the machine embossed using the Birch Wood embossing folder. To bring out the woodgrain pattern, I then went over the top with a Fresh Freesia ink pad. The sentiment panel has two base layers. I cut the circle from Petal Pink glimmer paper using the Spotlight on Nature dies while the long hexagon is cut from Fresh Freesia glimmer paper using the Nested Essential dies. The sentiment from With You in Mind is stamped in Fresh Freesia on white cardstock and then cut out using paper snips. Before assembling the sentiment base layers, I adhered some Fresh Freesia seam binding ribbon in between and then adhered the panel to the left panel with dimensionals. The sentiment is adhered with a few extra layers of dimensionals to ensure that it stands out on the center panel. A few shiny sequins finish things off with a little sparkle. You can find the full PDF tutorial here.

Tomorrow we’ll be pairing up a sketch with our pattern & sentiment design theme. I hope you’ll pop by and check it out!

Product List
Holidays · Sale-a-Bration

Love You More Than…

This week we’re diving into our crafty stash to create cards for our favorite Valentines. Maybe it’s your kiddo or your spouse or a niece or nephew. I think one of the most fun things is creating a card with a certain person in mind. And today’s design is inspired by a family joke about my love of everything potato but most especially fries and chips! The new Sale-a-Bration stamp set called Friendly Seagulls is absolutely perfect for pulling off today’s Valentine for one of my fellas.

We get started on today’s card with a base of Crumb Cake cardstock. The background is a combination of Petal Pink and Pretty Peacock glimmer paper that is embossed using the Soft Waves embossing folder. I cut along the embossed wave pattern to create two separate sea panels and adhered them over the sunset backdrop with layers of dimensionals. I used the Otterly Amazing dies to cut 3 separate poles from Crumb Cake and Gray Granite cardstock to peek up out of the water. Our flock of seagulls from the Friendly Seagulls stamp set is stamped on white cardstock, colored with Stampin’ Blends, and then fussy cut with paper snips before being adhered to our scene with dimensionals. I even included the little box of fries to carry out our theme beyond just the bird with a few fries in its beak. The sentiments are each stamped on white cardstock and then diecut with several different dies, including the banner from Countryside Corners, the rough board from Friends for Life, and the oval from Changing Leaves. Each one is adhered over a pole with dimensionals. I finished things off with some hearts scattered around the sentiment.

I just love these seagulls. There are so many possibilities to create adorable scenes. And the sentiments included in the stamp set make it a breeze to create cute Valentines! I hope you’ll pop in tomorrow to see what other critters might come to our warm & fuzzy party.

Products used in today’s card:
Crumb Cake, Gray Granite, Basic White cardstock
Three color glimmer paper
Friendly Seagulls stamps
Soft Waves embossing folder
Countryside Corners, Friends for Life, Changing Leaves, Otterly Amazing dies
Stampin Blends
Heart sequins
Dimensionals
Adhesives

Product List
Holidays · Sale-a-Bration

Heart to Heart

It’s hard to believe that we’re already into February. And that means it’s time to start thinking about all of those special someones. Whether it’s kids, spouses, significant others, or close friends, I’m going to show you how your crafty stash has you covered.

Today, we’re getting started with the Sale-a-Bration bundle called Heart Shaped and pairing up these stamps & dies with the beautiful Marbled Elegance patterned paper. If you’ve followed me for any length of time, you know that I can’t resist having a little sparkle on my designs and today we’re going all out. After all, isn’t that what we do for the ones we love?!

We get started on today’s design with a base of white cardstock. Our background panel is built on a base of gold foil and then a single sheet of the Marbled Elegance paper but using both sides – the foiled side and the print side. I used a piece of the Wild Wheat rustic striped ribbon to bridge the two patterns and tie our golden elements together. Our focal elements are two hearts cut with the Heart Shaped dies using both gold foil paper and the Real Red festive glimmer paper. I wanted the hearts to have a lot of visual weight and so I opted to keep the decorative outlines with their center negatives, but I swapped the centers to outline the gold in red and red in gold. They’re both adhered to the background panel with varying heights of dimensionals and then surrounded with gold heart sequins. The sentiment from the Heart Shaped stamp set is stamped in Cherry Cobbler on white cardstock and then diecut with the label die from the coordinating Heart Shaped die set. I flanked the sentiment on either side with a small gold heart sequin. The sentiment panel is mounted over a twist of gold thread on a decorative banner cut from gold mercury vellum using the Mixed Labels die. The full panel is then adhered to the background panel with dimensionals toward the bottom center of the design.

We’re going to be touring through a whole host of products this week as we make card some love-themed card designs. So I hope you’ll pop in and see how you can create some cute designs for the special people in your life!

Products used in today’s card:
Basic White cardstock
Marbled Elegance, Gold foil, Festive glimmer, Mercury vellum DSP
Heart Shaped stamps & dies
Mixed Labels dies
Wild Wheat rustic ribbon, gold thread
Heart sequins
Dimensionals
Adhesives

Product List
January Mini Catalog

Fairy Hugs

When I was growing up in the country, I used to love to hunt for mushrooms and toadstools. I loved the *poof* of dust that would come from the toadstools. And I always found the different mushroom shapes fascinating and would think about what kind of Smurf might live in it based on the size and shape. I always loved a rainy spring because it meant that there would soon be oodles of fungi to find, and I was always excited when we had “fairy rings” — those are the mushrooms that grow in a circle. Anyone else call them that? My grandpa used to say that the circles of mushrooms were where the fairies played. To this day, I still smile every time I see a circle of mushrooms in a yard here in the ‘burbs.

And that’s the inspiration behind today’s card design using the Toadstool Gardens patterned paper. This week, we’re using the new Hugs for Love stamps & punch bundle to create our designs. And I thought the “you make me smile” sentiment was just perfect for today’s card with our cute mushrooms.

We get started on our card today with a base of Berry Burst cardstock. A sheet of the pink Beautiful Bokeh paper serves as the base for our focal panel with two patterns of the Toadstool Gardens designer paper. The sentiment from Hugs for Love is stamped in Blackberry Bliss on the woodgrain pattern from the Toadstool Gardens paper with a lovely heart from the same stamp set stamped in Flirty Flamingo. The sentiment panel is then punched with the coordinating Hugs for Love punch. I also punched two partial panels from Blackberry Bliss to create a full mat for the sentiment panel. The sentiment panel is adhered to the focal panel with dimensionals. The white diagonal trim breaks up the patterns and adds the perfect eye-catching backdrop for our sentiment panel. A scattering of purple sequins gives us the sparkle that makes this design feel magical.

Tomorrow we’re going to use our Hugs for Love bundle to play with patterns. I hope you’ll stop by.

Products used in today’s card:
Berry Burst, Blackberry Bliss cardstock
Toadstool Garden, Beautiful Bokeh DSP
Hugs for Love bundle
White diagonal trim
Purple sequins
Dimensionals
Adhesives

Product List
Coming Soon · January Mini Catalog

You Make Me Smile

Happy New Year, everyone! We had a delightful evening, enjoying a steak dinner, some s’mores around the firepit, a family movie in our pjs, and some celebratory poppers & bubbles to ring in the new year. What about you? Did you do something fun to ring in the new year?

Today, we’re working with the Beautiful Butterflies bundle that will release on January 7th with the new Stampin’ Up! January Mini Catalog. This bundle includes stamps, dies, and a hybrid embossing folder. And today, the hybrid embossing folder takes center stage in our design, along with the new patterned paper called Beautiful Bokeh.

We start our design today with a backdrop of Fresh Freesia cardstock. I chose a coordinating sheet of Beautiful Bokeh as the focal panel and embossed it using the Beautiful Butterflies embossing folder and, at the same time, I cut the large butterfly from the center of the embossed panel using the coordinating die. To bring out the detail in the embossed butterfly that has been cut from the center, I went over it with my finger and silver ink. I added some pastel ombre wing tips for extra sparkle and color. Both the focal panel and butterfly are adhered to the card base using dimensionals of varying heights. A strip of Fresh Freesia seam binding ribbon behind the butterfly really brings out the purple hues in our backdrop. The sentiment from Hugs for Love is stamped on white cardstock and punched with the coordinating Hugs for Love punch and then adhered in the bottom-right corner of our focal panel. A few purple sequins add that extra touch of sparkle that draws the eye across the card.

I hope you’ll tune in tomorrow as we continue to explore all of the lovely designs we can make using the Beautiful Butterflies bundle.

Products used in today’s design:
Fresh Freesia, Basic White cardstock
Beautiful Bokeh (coming soon), pastel ombre glimmer (coming soon) DSP
Beautiful Butterflies dies & embossing folder (coming soon)
Hugs for Love bundle (coming soon)
Fresh Freesia seam binding ribbon (coming soon)
Purple sequins (coming soon)
Dimensionals
Adhesives

Coming Soon · January Mini Catalog

So Thankful

Welcome to the last bright & shiny new week of 2024! It’s hard to believe that this year is almost gone, but on a personal level, I can’t say that I’m disappointed to see the year go. It’s been a tough year for our family, and we’ll be glad to see a new year with new possibilities and fewer hardships!

In just a little over a week, the new Stampin’ Up! January Mini and Sale-a-Bration catalogs will officially launch. You’ve gotten smaller glimpses into some of my favorite products from the upcoming catalogs, and now we’re going to spend some time looking at all of these wonderful sets a little more closely. And I’m going to be pairing together products, as well, so you can see just how well they can work together.

This week, we’re getting started with the Beautiful Butterflies stamps & dies bundle. Stampin’ Up! has given even more versatility with this set of dies as we get to see a new half-panel cutting feature at work. And today’s design is my first foray into putting this new die feature into action.

We get started with a base of Blackberry Bliss cardstock. I scored the standard-sized base as usual and then used the half-panel die to cut just one panel of the card base. This gives a solid base panel and then the decorative flap on top. I chose a sheet of the purple Bloom Impressions Sale-a-Bration paper to serve as the backdrop for the decorative top panel and inside sentiment panel. The inside white sentiment panel is also cut using the half-panel die and then adhered over the Bloom Impressions paper to create a slight shadowing effect with the front decorative panel. The decorative butterfly panel is dressed up with the purple ombre glimmer paper and purple shimmer gems around the edges of the wings. The sentiment from the Beautiful Butterflies stamp set is stamped in Blackberry Bliss ink on white cardstock and then diecut with the smaller sentiment die included in the Beautiful Butterflies dies. A strip of Blackberry Bliss & Gold ribbon serve to ground the sentiment panel. A scattering of the Sale-a-Bration purple sequins give some additional sparkle and draw the eye across our card design and to the sentiment.

Drop by tomorrow to see more of the Beautiful Butterflies bundle!

Products used in today’s design:
Blackberry Bliss, Basic White cardstock
Bloom Impressions (coming soon), Pastel ombre (coming soon) DSP
Beautiful Butterflies stamps & dies (coming soon)
Purple sequins (coming soon), Purple shimmer gems
Blackberry Bliss & Gold ribbon
Dimensionals
Adhesives

Coming Soon · January Mini Catalog · Sale-a-Bration

Time to Celebrate

This week, we’re getting some sneak peeks at some of my favorite products from the upcoming Stampin’ Up! January Mini and Sale-a-Bration catalogs that are set to release on January 7th. Today’s card comes together in a snap thanks to the newest paper packs — Wildflower Birthday and pastel ombré glimmer paper. The new Wildflower Birthday pack makes quick work of festive cards and is the perfect addition to any crafter’s stash for those last-minute cards.

This super clean-and-simple design starts with a base of Basic White cardstock. The focal panel is a panel cut from the sheet of tags in the Wildflower Birthday designer series paper pack. I used the pink/purple sheet of pastel ombré glimmer paper as the mat behind the focal panel and tied everything together with the new Fresh Freesia seam binding ribbon. The sentiment from Beautiful Butterflies is stamped in Melon Mambo directly on top of the focal panel. We finish things off with a little bling from the new two-tone sparkle gems pack.

Products used in today’s design:
Basic White cardstock
Pastel ombre (coming soon!), Wildflower Birthday (coming soon!) DSP
Beautiful Butterflies stamps (coming soon!)
Fresh Freesia seam binding ribbon (coming soon!)
Two-tone sparkle gems (coming soon!)
Dimensionals
Adhesives

Coming Soon · January Mini Catalog · Sale-a-Bration

Pretty Wonderful

As we’re racing to the finish of the fall semester, we find ourselves running to and fro from various school activities and holiday events and rehearsals. I think we might get one evening at home this week. I’m glad I took a little time over the weekend to work on some crafty projects!

This week, we’re taking some sneak peeks at products from the upcoming January Mini and Sale-a-Bration catalogs from Stampin’ Up! Today we’re pairing up a Sale-a-Bration patterned paper pack with new stamps & dies.

Our card design uses Sketch #18 from the Stampin’ Up! Annual Catalog, which makes putting this card together a breeze. Once again, we’re using the Luv 2 Stamp Group’s monthly color combo to make our color selections — Night of Navy, Pool Party, and Melon Mambo. We get started with a base of Night of Navy cardstock. Our background panel is a sheet of the new SAB Bloom Impressions paper separated into large shutters. The focal section consists of our sentiment and focal image. The sentiment from Mixed Labels is stamped in Pool Party on white cardstock and then cut with the coordinating sentiment die from the Mixed Labels die set, which is mounted over some crinkled Pool Party ribbon and a strip of the new Beautiful Bokeh paper cut into a banner. The butterfly is diecut using the new Beautiful Butterflies dies. I layered Pool Party pastel ombré glimmer paper and black cardstock to create the butterfly. The focal section is adhered with dimensionals to help it stand out against our field of flowers. A few of the new Sunny Day iridescent dots draw the eye to our sentiment.

I’m going to be showing you more of the Beautiful Butterflies a little later this week because, YOU GUYS, it is just fabulous! There are so many possibilities with this bundle, including some shape cards, that I can’t wait to share. But we’ll be getting a broader look at my new products favorites before we dive in to the details of each.

Products used in today’s design:
Night of Navy, Basic Black, Basic White cardstock
Bloom Impressions (coming soon!), Pastel ombre glimmer (coming soon!), Beautiful Bokeh (coming soon!) DSP
Beautiful Butterflies (coming soon!) dies
Mixed Labels bundles (coming soon!)
Pool Party crinkle ribbon
Sunny Day iridescent dots (coming soon!)
Dimensionals
Adhesives

Coming Soon · January Mini Catalog · Sale-a-Bration

Made My Day

It’s a bright and shiny new week already! It was a busy weekend for us between bowling league activities and lessons, holiday gatherings, and holiday preparations. Whew — I feel like I need a weekend from my weekend. What about you?!

As promised, this week we’re going to be getting some sneak peeks at some of my favorite items from the upcoming Stampin’ Up! January Mini and Sale-a-Bration catalogs. Today’s card is based on a super fun color combination that our Luv 2 Stamp Group is working a challenge with right now — Night of Navy, Pool Party, and Melon Mambo. As soon as I saw this combo, I knew exactly what new products I was going to pair to show you. So let’s get a closer look.

I decided to use a sketch from the Annual Catalog to simplify the design process, so this design is based on Sketch #16. We get started with a base of Melon Mambo cardstock. The focal panel consists of the lovely new Toadstool Gardens designer paper, which is a Sale-a-Bration freebie, and a double mat of Night of Navy and the new pastel ombré glimmer paper, which will launch in the January Mini. I wrapped this panel with some Pool Party crinkle ribbon and then placed the sentiment panel over it. The sentiment from the new Mixed Labels stamp set is stamped on white cardstock and then diecut with the coordinating sentiment die from the Mixed Labels die set. I used the size-up sentiment die to cut the mat from the same Pool Party pastel ombré glimmer paper. Dimensionals behind both the sentiment panel and main panel give this card some dimension. I added some shiny sequins for a touch of sparkle across the focal panel.

I’ll be sharing more product previews this week, so I hope you’ll pop in and see what caught my eye from the new January catalogs!

Products used in today’s design:
Melon Mambo, Night of Navy, Basic White cardstock
Pastel ombre glimmer (coming soon!), Toadstool Gardens (coming soon!) DSP
Mixed Labels bundle (coming soon!)
Pool Party crinkle ribbon
Shiny sequins
Dimensionals
Adhesives

Luv 2 Stamp Artisan Design Team · Terrific Tuesdays

Thankful for You

Although I have several packages of the Softly Stippled designer series paper, I’ve found myself at a loss for design ideas. As I sat down to map out the Terrific Tuesdays theme for this week, I thought there may be some of you who are similarly situated. So I chose a few paper packs that easily lend themselves to design ideas AND a few that I have found challenging. One thing I have discovered is that when I force myself to push forward designing with a “difficult” product or color, I often get on a roll once I just get started.

This design got rolling when I realized that there was a sheet of paper in the Softly Stippled paper pack that had a hint of Pretty Peacock in it. Pretty Peacock is one of my favorite colors in the current Stampin’ Up! line-up and I often have to make myself use the other colors. *grin* But for those tough ones, sometimes it’s good to start with things you love.

Here, we begin with a card base of Pretty Peacock cardstock. This is one of the ways to tease out the color in the sheet of selected designer series paper in the focal panel section. The sentiment panel is matted with soft shimmer paper in Pretty Peacock. The metallic ribbon and foiled gems draw the eye to the sentiment. Repeating the color here in the center with a touch of shimmer across all of the elements really draws the eye to the sentiment and also further highlights the color in the floral patterned piece. I’m just in love with how this turned out.

Looking for ways to use some of the Sale-a-Bration papers? Check out this week’s episode of Terrific Tuesdays to see ideas for 4 of the 7 paper packs!

Products used in today’s design:
Pretty Peacock, Basic White cardstock
Softly Stippled, Soft Shimmer DSP
So Sincere stamps
Pretty Peacock & Gold metallic ribbon
Foiled gems
Dimensionals
Adhesives

All ads on this site are posted by WordPress.  Song Sparrow Papercrafts is not responsible for ad content.