birthday · Gifting

Spruce Up a Gift Bag

As a paper crafter, I try not to miss an opportunity to add that special handmade touch to gifts. It’s incredibly simple to dress up those packages with a lovely little something. From beautiful ribbon to a unique gift tag, a gift can be jazzy in no time!

I recently whipped up these cute gift tags so I would be ready for the next birthday party. These designs may look fancy and a bit complicated, but each design came together quickly. Let’s see how these came together.

Candles. The tag base is Basic White cardstock diecut using the Merriest Trees dies. I used some older washi tape I had on hand to serve as the colorful grounding for the sentiment panel, which begins with a piece of vellum diecut using the circle from the All That die collection. The candles are stamped in multiple colors on white cardstock using the Big News stamps. I colored each one lightly with a coordinating watercolor pencil and then add a bit of sparkle to the flames of each one using Stickles. The “happy birthday” sentiment is stamped on white cardstock using the Papertrey Ink Birthday Basics stamps and then diecut using the Bunch of Banners dies. A few iridescent discs on either side of the sentiment keep the eye in the center of the tag.

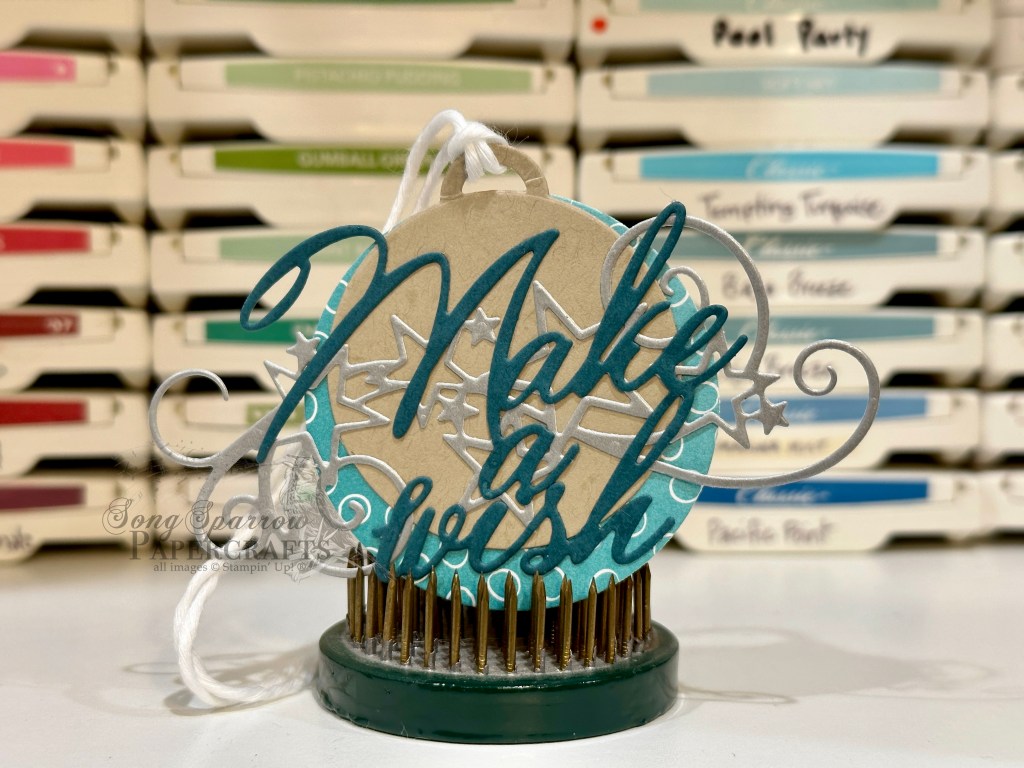
Wish. The tag base is comprised of two layers. The base layer is cut from Oh So Ombre designer paper and the Crumb Cake is diecut using the Merry Tags dies. Next comes the silver star banner which is diecut from metallic silver cardstock using the Star Blast dies. The sentiment is a single Papertrey Ink die and cut from a sheet of Pretty Peacock. Everything is held together with glue from the precision glue pen.

Products used: Birthday candles
Basic White, vellum cardstock
Washi tape
PTI Birthday Basics stamps (retired)
Big News stamps (retired)
Merriest Trees, All That, Bunch of Banners (retired) dies
Watercolor pencils
Stickles
Iridescent discs
Dimensionals
Adhesives
Ribbon

Products used: Make a Wish
Crumb Cake, Pretty Peacock cardstock
Metallic silver cardstock (retired)
Oh So Ombre DSP (retired)
Circles Collection, Merry Tags, Star Blast dies (retired)
PTI Make a Wish die
Adhesives
Precision glue pen
Ribbon

All ads on this site are posted by WordPress and are based on your personal browsing history. I do not control ad content.

Fun Folds

Clouds of Love

I don’t know about you, but I like to keep an assortment of cards on hand that I can tuck into my hubby’s suitcase. As a commercial pilot, my husband is gone fairly often. With modern technology, he never feels very far away, even when he’s halfway across the globe. But even so, it can get a little lonely on the road, so I like to sneak a note in his suitcase every now and then. Do you ever do things like this for your loved ones?

For today’s design, I started with a card base of Cherry Cobbler and paired it with another of the designs from the Country Floral Lane designer paper pack. I decided to do a center barn fold, which simply meant scoring the card base at 2 1/8″ from each edge rather than at 4 1/4″ in the center. The sentiment panel is diecut from Petal Pink cardstock using the PTI Mat Stack 6 die. The hearts are punched from Cherry Cobbler, and the sentiment is diecut from Bubble Bath using a PTI die. I used dimensionals under the sentiment and one heart for a little added interest. The adhesive-backed sequins give a little sparkle and reinforce the center focal point.

Products used:
Cherry Cobbler, Petal Pink, Bubble Bath cardstock
Country Floral Lane DSP (retired)
PTI dies (retired)
Heart punch (retired)
Adhesive-backed sequins
Dimensionals
Adhesives

All ads on this site are posted by WordPress and are based on your personal browsing history. I do not control ad content.

birthday

Who Wants Cake

Growing up, one of my favorite things about my birthday was the family party with the homemade birthday cake. My grandmother was an excellent baker and made the most beautiful and delicious cakes. The floral pattern in this paper reminds me of the one of the cakes she made for my birthday one year. And I chose the pink accents for this design because strawberry cake is my absolute favorite!

I chose Crumb Cake as the card base since it provides the perfect neutral background for the beautiful floral patterned paper. The decorative nesting dies provide the perfect feminine touch for the sentiment panel and my favorite pink — Flirty Flamingo — provides the perfect pop of bright pink. When you want the look of a large bow in the background but an actual bow doesn’t really work, you can layer the ribbon and affix it underneath the sentiment panel to give the look and feel of a tied bow. The pink sequins provide some much-needed sparkle and pizzazz that just says, “Happy Birthday!” What do you think?

Products used:
Blushing Bride (retired), Flirty Flamingo, Crumb Cake
Regency Park DSP (retired)
Heartfelt Hexagon stamps
Papertrey Ink dies
Adhesive-backed sequins
Ribbon duo
Dimensionals
Adhesives

All ads on this site are posted by WordPress and are based on your personal browsing history. I do not control ad content.

birthday · Custom Orders

Celebrate

Celebrate is today’s blog post today, and it’s definitely a day to celebrate as it’s my birthday! I’m not exactly sure what the family has on the agenda today, but it will definitely involved a homecooked dinner by the hubby.

Today’s design is another card from a recent custom order. Knowing the intended recipient of this birthday card really helped shape the design. I just love this foiled polka-dot cardstock. It’s one of the last sheets from a custom order I completed about a year or so ago. I’ve been hoarding it. LOL! The polka cardstock pairs beautifully with the sheet of Sweet Sorbet designer paper by adding a soft and playful feel. The lighter background of the patterned paper also provides the perfect relief for the sentiment to really take the floor. To add another layer of sparkle and pizzazz, I added a strip of sequin trim between the two paper panels. I’m thrilled with how this came out and think it spells FUN — just like its recipient!

Products used:
Bazzill Foil Candy Necklace cardstock (retired)
Sweet Sorbet DSP (retired)
Kaiserkraft glitter cardstock
Papertrey Ink dies
Sequin trim
Dimensionals
Adhesives

All ads on this site are posted by WordPress and are based on your personal browsing history. I do not control ad content.

Christmas

Festive Tannenbaum

I have a thing for foiled papers. Nothing says festive quite like the sparkle of foiled paper! When Stampin’ Up! recently released some new foiled holiday designs in the Online Exclusives, I just had to have them.

I’ve been playing one of my favorite Christmas albums in the craft room this week because it seems to keep my newest office assistant (aka Nolan the 6-week-old kitten) from going full tilt all the time. There’s a particularly lovely arrangement of O Tannenbaum on the album which inspired this card design.

The beauty of the Shining Christmas specialty paper pack is how beautifully each of the patterns stands on its own. The lovely sheet of trees just called for a prominent spot, and so it comprises most of the front of the card with a sheet of Cherry Cobbler serving as the base. And all of the remaining design elements are simple to allow the trees to shine (literally). The velvet ribbon adds a little texture, while the gold holly leaves carry the sparkle across the design. With just the right group of elements, a simple design can still have eye-catching appeal!

Products used:
Cherry Cobbler, white cardstock
Shining Christmas DSP
All That dies
Gold holly leaves (retired)
Glitter sequins
Adhesive-backed sequins
Papertrey Ink Think Big Favorites #8 (sentiment)(retired)
Velvet ribbon (retired)
Dimensionals
Adhesives

All ads on this site are posted by WordPress and are based on your personal browsing history. I do not control ad content.

Christmas · Clean and Simple

Joy to the World

I love making designs that are out of my comfort zone, particularly when I know a design is going to require a bit of “winging it” when I don’t have the materials to copy it exactly. When I saw the inspiration design for this card, originally posted by Linda Dalke on Instagram, I was immediately struck by it. It was so simple and not my usual style.

The base is a simple piece of white cardstock. I loved the natural look of the gold woodgrain pattern from the Joyful designer paper pack, which is a substitute for the more streaky gold pattern of the card base from the inspiration card. The beautiful starry night sky is diecut from a sheet of Shining Brightly DSP using the Nested Essentials dies. I wanted the star element to be more ethereal so I chose to diecut each layer from a sheet of gold shimmer vellum using the Stars at Night dies. As I was arranging the layers, I felt like the dimensionals behind the middle layer added more visual interest and depth to the panel, particularly when paired with the star trinkets. The sentiment is stamped directly on the card base below the star panel with the blue and gold glittered ribbon completing the visual triangle.

I just love how this turned out and the gold elements really shimmer in the light in person!

Products used:
Basic White cardstock
Shining Brightly, Joyful DSP
Gold shimmer vellum (retired)
Stars at Night, Nested Essentials dies
Papertrey Ink Christmas Blessings stamps (sentiment) (retired)
Night of Navy & Gold glittered ribbon
Star trinkets
Gold pearls
Dimensionals
Adhesives

All ads on this site are posted by WordPress and are based on your personal browsing history. I do not control ad content.

Halloween · Treat Boxes

Halloween Treats

Happy Friday, everyone! As I was looking through older posts, I realized that posts had been a little Christmas heavy in the last month or so, and I didn’t want you to think that that meant the upcoming fall holidays weren’t important. Quite the contrary! Fall is my favorite season!

Generally speaking, my customer base does tend to order more Christmas product than fall product, but I still enjoy making and giving products for both Halloween and Thanksgiving to friends and family. And I just happen to be prepping product for a craft fair, so I’ve put my creative hat on to develop some product that I would like to see as a customer.

Each year, I love to make treat boxes for my son’s teachers for holidays, and I’m always looking for new dies to make gift packaging. So today, I wanted to highlight these cute little treat boxes that I made for Halloween using an older Stampin’ Up! die set. Each of these boxes holds two small boxes of Nerdsâ„¢ candy, which is always a favorite with the kiddos. If I happen to know a recipient’s candy preference, then I’ll try to include the fave in the box. Otherwise, I pick a little treat that’s popular, like chocolate.

For this set of boxes, I tried to keep all of the designs cute and not scary since scary isn’t really my jam. I dug through my stash of paper scraps for the decorative elements on each box. These small boxes are perfect for using up scraps! I pulled out some fun Halloween stamps and got to work. Do you like to give little gifties for Halloween?

Products used: Papertrey Ink Tiny Treats: Halloween (retired); SU! Takeout Treats dies (retired); SU! Stampin’ Blends

All ads on this site are posted by WordPress and are based on your personal browsing history. I do not control ad content.

Christmas

Snowy Greetings

Have you had the chance to check out Stampin’ Up!’s Holiday Mini catalog yet? I’ve been giving you sneak peeks of many products from the catalog over the last month. I have to say that of all of the catalogs that have launched over my 15+ years of being a customer, I haven’t loved a catalog as much as I love this one! I think I dog-eared more than half of the catalog!

So today, we’re taking a look at the new designer series paper pack called Snowflake Magic. There are 3 different designs in this pack, and each one is a foiled design. What I love about these papers is that you can very quickly make a stunning card design with just the paper and a few embellishments!

For this card, Pretty Peacock serves as the card base. I had a hard time deciding on the base color but ultimately liked how Pretty Peacock makes the shimmery snowflakes stand out so beautifully. I kept the design very simple because I wanted the gorgeous paper to be center stage, so I heat embossed the sentiment in silver, added a strip of the silver & white sheer ribbon, and scattered silver pearls and glitter sequins across the design to move the eye across from top to bottom. For a little added drama, I popped up the whole panel on dimensionals. Simple yet stunning, don’t you think?

Products used:
Pretty Peacock cardstock
Snowflake Magic DSP
PTI Stylish Sentiments: Holiday (retired)
Silver & white sheer ribbon
Glitter sequins
Silver pearls
Silver embossing powder
Dimensionals
Adhesives

All ads on this site are posted by WordPress and are based on your personal browsing history. I do not control ad content.

Christmas

Noel

Last week, we took A Walk in the Forest with the bear as we looked at several sheets of the new designer series paper Stampin’ Up! is launching in just a few weeks. This week, I wanted to show you a few of the other designs included in the paper pack. These designs from A Walk in the Forest focus more on the winter foliage. So let’s get started on our walk down the winter nature trail, shall we?

For today’s card, I let the beautiful sheet of designer paper be the centerpiece and kept the design very simple. To pull the more subtle colors from the patterned paper, I used Shaded Spruce as the card base and matted the designer paper on Mossy Meadow. You’ll notice how the mat really helps pull those lighter colors forward. The sentiment is heat embossed in gold on white cardstock, and I used additional gold embellishments to highlight the lighter colors and aid the movement of the eye across the design. I added some Cherry Cobbler twine to help the berry elements come through and add a little pop of festive color.

Products used:
Shaded Spruce, Mossy Meadow, Basic White cardstock
A Walk in the Forest DSP
PTI Think Big Favorites #8 stamps (retired)
All That dies
Gold embossing powder
Twine (color retired)
Adhesive-backed sequins
Gold holly leaves (retired)
Dimensionals
Adhesives

All ads on this site are posted by WordPress and are based on your personal browsing history. I do not control ad content.

Christmas

‘Tis the Season

Today, the bear is finishing its trek as we wrap up a sneak peek at the newest card pack called A Walk in the Forest. This designer series paper, which will be available in the Stampin’ Up! Holiday Mini catalog in just a few weeks, is simply lovely, and I was truly captivated by the sheet of paper with the bear traversing the evergreen forest.

For today’s design, I wanted the trees to be more of the focal point than the bear. You will note that the bear is making its way in the background of this scene, while the stately evergreens are front and center. I heat embossed the sentiment on vellum because I wanted each of the evergreens to show through on this design. I added an additional tree in the forefront on dimensionals and the shimmery sequins move the eye up and across the design, which adds to the feeling that you’re taking a walk up the mountain trail. Can you picture yourself on this trail?

Products used:
Pretty Peacock cardstock
Vellum
A Walk in the Forest DSP
PTI Think Big Favorites #8 stamps (retired)
Nested Essentials, Merriest Trees dies
Glitter sequins
Glitter twine (retired)
Embossing powder
Dimensionals
Adhesive

All ads on this site are posted by WordPress and are based on your personal browsing history. I do not control ad content.