Hello Hollyhocks · Kits

Thinking of Hollyhocks

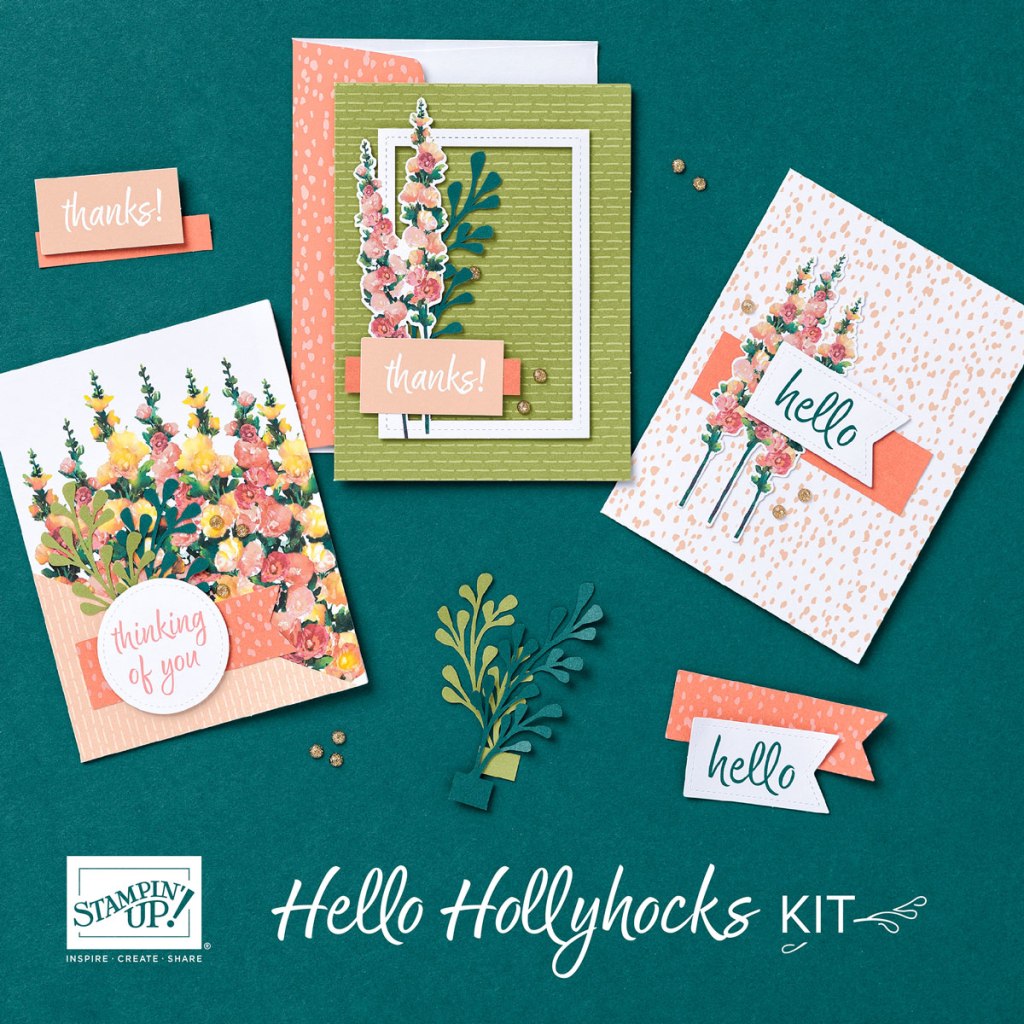
Happy Tuesday, everyone! This week, we’re getting a closer look at the beautiful new kit by Stampin’ Up! called Hello Hollyhocks. This kit comes with everything you need to create 9 stunning cards. And each day this week, I’m showing you how you can use the kit elements along with a few items from your own personal crafting stash to create gorgeous design alternatives.

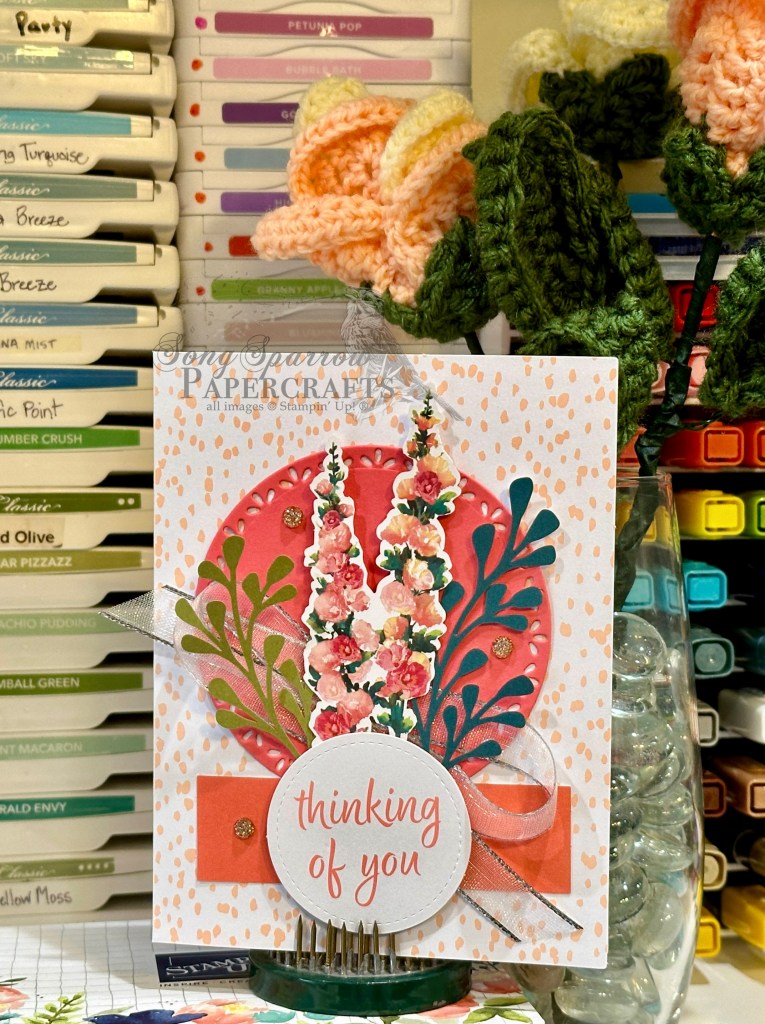
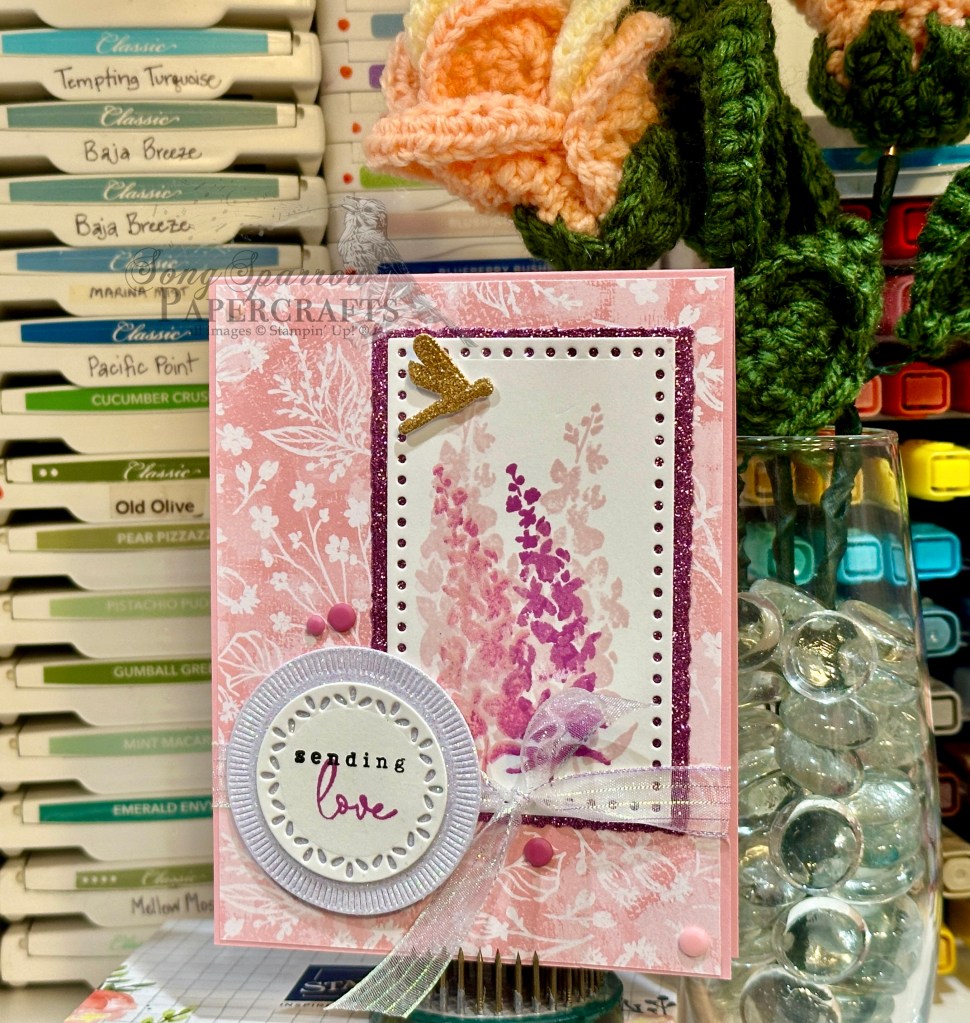
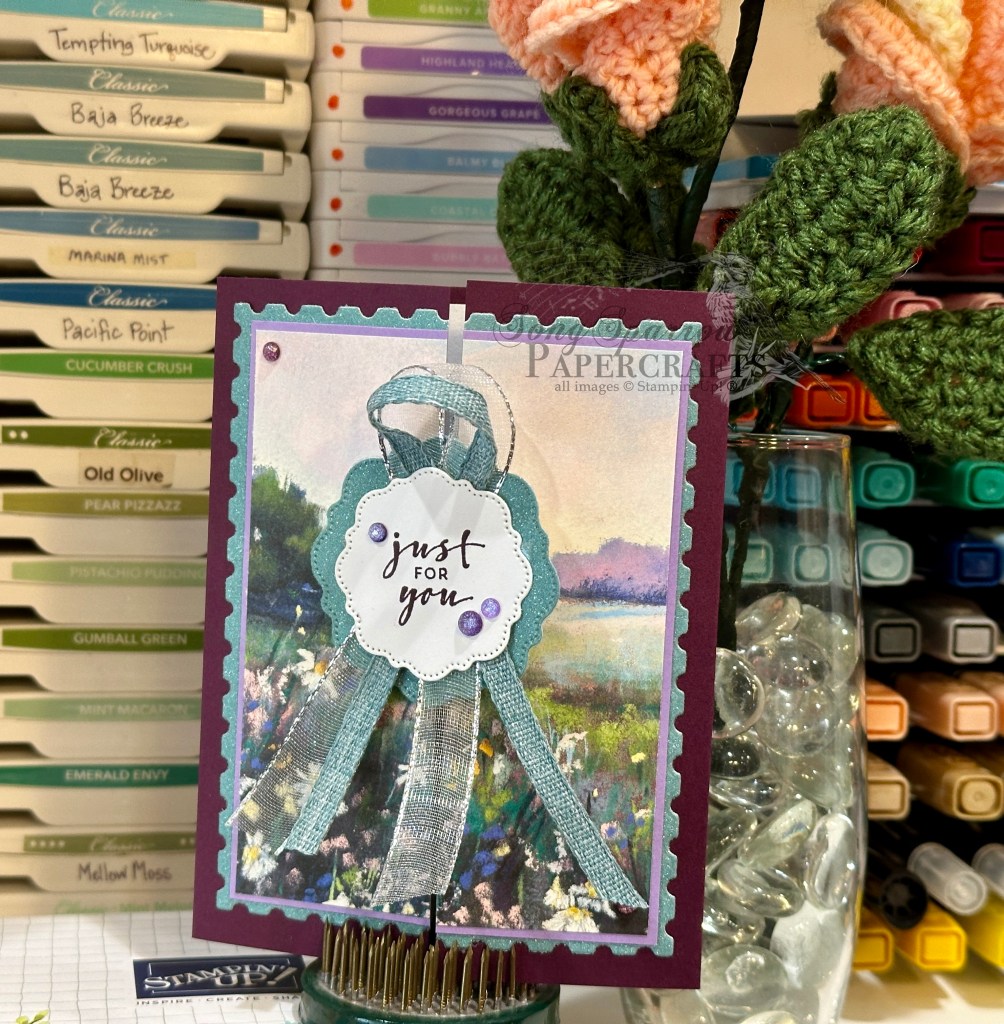
Today, we’re adding an additional diecut cardstock element to the Hello Hollyhocks kit to create this stunner. We start with the provided Petal Pink dotted card base. The backdrop for the image panel is a piece of Flirty Flamingo cardstock diecut using the Spotlight on Nature dies. The larger Calypso Coral rectangle included in the kit is adhered at the base of the circle and together these provide the base for our image and sentiment elements. The two-stem hollyhocks and peacock and olive stems are arranged and then adhered to the back of the sentiment. A faux bow made from the white & silver sheer ribbon is adhered to the Flirty Flamingo circle using tear and tape. And then the sentiment panel is adhered over it using two layers of dimensionals. The sparkle gems included in the kit finish off the design.

Would you like to see how to put together the 3 designs from the Hello Hollyhocks kit? Tune in to today’s episode of Terrific Tuesdays to see this all-inclusive kit come to life:

Tomorrow, we’ll be keeping things simple with our card alternative. I hope you’ll stop by and check it out.

Products used:
Hello Hollyhocks kit
Flirty Flamingo cardstock
Spotlight on Nature dies
Silver & white sheer ribbon
Dimensionals
Adhesives

Product List
Hello Hollyhocks · Kits

Hello Hollyhocks Kit Alternatives

Welcome to a brand new week. Can you believe it’s July already?! And in usual Texas fashion, we have jumped straight from the frying pan into the fire as far as our weather goes. Man, has it been HOT! But I’ve taken advantage of the hot days by spending some extra time in the craft room. *grin*

This week, we’re going to be taking a closer look at the Hello Hollyhocks kit by Stampin’ Up! This kit includes everything you need to create 9 beautiful cards — 3 each of 3 different designs. You literally open the box and go to town. In about 30 minutes, you’ll have 9 cards all done and ready to send. How cool is that?! During tomorrow’s episode of Terrific Tuesdays, I’ll walk you through unboxing the kit and making all 3 designs.

But the focus of the designs I’ll be sharing with you this week will be alternative card designs using the elements from the Hello Hollyhocks kit. With just a few extras from your crafting stash, you can create some lovely cards using this kit.

For today’s kit alternative card, I kept things very simple. The only element not included in the Hello Hollyhocks kit is the linen thread. From there, it’s just a mix and match of kit elements.

We get started with the Old Olive card base provided in the kit. The focal panel consists of the three-stem bunch of hollyhocks, the narrow Calypso Coral rectangle, and the Petal Pink THANKS sentiment panel. I adhered each of these elements together to create one panel. I made a twist of linen thread and added it behind the focal panel and then adhered everything into place with a double layer of dimensionals. A few of the kit’s included sparkle gems finish things off nicely.

This card came together in less than 5 minutes. Honestly, it took me the longest time to get the twist of linen thread to look right and then cooperate as I was trying to adhere it. This is so often the case with any ribbon element I add. Anyone else struggle with getting ribbons or threads to cooperate?

I hope you’ll pop back by tomorrow to see another card alternative for the Hello Hollyhocks kit!

Products used:
Hello Hollyhocks kit
Linen thread
Dimensionals

Product List
Friends for Life · Fun Folds · Gifting

Happy Birthday, Friend

Today we’re continuing to explore all the many ways we can use the Friends for Life bundle by Stampin’ Up! to create fabulous projects. I don’t know about you, but I like to have birthday cards of all kinds on hand for those moments when I need to grab a birthday card on the run. And today’s design is a two-for-one — a gift and a beautiful card!

This gift card design is a modified version of the Slide Up Gift Card Holder by fellow demo Jackie Bolhuis over at Klompen Stampers. I simplified the design to have a slide out gift card holder rather than the slide up version Jackie makes, but both are equally as wonderful for providing a lovely way to give a gift card. What I really loved about this design is it offers so much visual interest. From a beautiful card front that serves double duty as the gift card pocket to the ample space on the inside to dress things up, you have plenty of opportunity to express your creativity.

We get started with a base of Pretty in Pink cardstock. The cardstock is halved on the long edge for this design, but rather than scoring in the center, you’ll instead score at 3 3/4-inches and 9 1/4-inches. That gives you a center portion of standard size and then a flip-up flap and smaller bottom flap for the card front. The smaller flap should be adhered to the card base on either side to create the small pocket, which will be visible when the card front is closed. I chose a sheet of the Flowering Zinnias designer paper as the background panel and cut it so that a small border shows on each of the front panels. The fun background image is the large heart from the Friends for Life die set. I cut a Pretty in Pink heart and used the center portion as the background for the Pretty in Pink glimmer hearts. For the glimmer hearts, nestle the leaf heart die inside the large heart die when diecutting. I then used both the outside and inside hearts on top of the Pretty in Pink solid heart. The sentiment panel is diecut from Pretty in Pink using the smudge banner and then the sentiment is stamped tone-on-tone toward one end. The word friend from Friends for Life is stamped in Pretty in Pink on white cardstock and then diecut with the coordinating die. The sentiment is adhered to the card front with dimensionals .Two small hearts are diecut from white glimmer paper and used as eye-catching accents for the sentiment. The card front is finished of with a few In Color shimmer gems.

The inside of the card is finished to coordinate with the card front. The top flip panel has a piece of the Flowering Zinnias designer paper. Two shimmery banners diecut from glimmer paper and cut using the Filled with Fun dies bring festive fun to this top panel. The inside sentiment from Filled with Fun is stamped on white cardstock diecut using the Autumn Leaves dies. TIP: In order to get the banner long enough for the sentiment, you’ll want to use the extension method.

The gift card holder itself is a pocket within a pocket. It’s made two-sided so that the portion visible through the card front disappears into the background. A tug on the Pretty in Pink bordered ribbon reveals the gift holder and the gift card in the pocket on the reverse side. Each side has a piece of the Flowering Zinnias paper to coordinate with the rest of the card, along with a repeat of the happy birthday sentiment. I chose to keep the inside of my card very simple, but you can see where you could really dress it up.

I hope you’ll join me tomorrow for a more masculine inspired design.

Products used in today’s gift card:
Pretty in Pink, Basic White cardstock
Flowering Zinnias, In Color glimmer, White glimmer DSP
Friends for Life, Filled with Fun stamps
Friends for Life, Autumn Leaves, Filled with Fun dies
Pretty in Pink bordered ribbon
In Color shimmer gems, In Color resin dots
Dimensionals
Adhesives

Botanicals · SU! Promotions

Best of Luck

Our product focus this week is Stampin’ Up!’s Inspiring Snapdragons bundle, which includes a coordinating cling stamp and die set. We’ve explored using the stamps and dies together and independently in this week’s designs. Today’s card is pairing a sketch from my sketch book with Inspiring Snapdragons stamps and several of the new In Colors.

We get started with a card base of Summer Splash cardstock. The decorative element behind the focal panel consists of a mat of Petunia Pop In Color glimmer paper and Petunia Pop cardstock that has been machine embossed using the Cute Crochet embossing folder. The focal panel is matted with a trio of Summer Splash cardstock, Summer Splash In Color glimmer paper, and a sheet of Unbounded Beauty designer paper. The focal panel is white cardstock diecut using the Radiating Stitches dies on which I then stamped the smallest snapdragon in a combination of Shy Shamrock and Petunia Pop. The dragonflies are stamped in Smoky Slate on white cardstock and diecut using the coordinating Inspiring Snapdragons dies. I covered the wings in Wink of Stella for a little realistic shimmer. Each dragonfly is suspended in air with a dimensional. The sentiment panel is diecut from Petunia Pop cardstock using the Spotlight on Nature dies and then the sentiment from Unbounded Love is stamped tone-on-tone in the center. I tucked Summer Splash bordered ribbon and white diagonal trim behind the sentiment panel. For some extra pops of sparkly color, I added In Color shimmer gems across the card front.

Don’t forget, TODAY is the last day to take advantage of the fantastic Stampin’ Up! joining special, where for $99 (plus tax) you’ll get
⭐️$125 in products of your choice
⭐️5 new In Color Ink Pads for FREE ($40.50 value)
⭐️5 new In Color Markers for FREE ($17.50 value)
⭐️An Assorted Pack of In Color Cardstock for FREE ($11.50 Value)
⭐️An In Color Designer Series Paper Pack for FREE ($12.50 Value)
⭐️A FREE Paper Pumpkin Kit ($23 value)
⭐️FREE shipping on the Starter Kit

Ready to sign up? Click here.

Tomorrow we’re closing out our Inspiring Snapdragons series with a clean and simple design. I hope you’ll pop in and check it out!

Products used in today’s design:
Shy Shamrock, Petunia Pop, Basic White cardstock
Unbounded Beauty, In Color glimmer DSP
Inspiring Snapdragons, Unbounded Love stamps
Inspiring Snapdragons, Radiating Stitches, Spotlight on Nature dies
Cute Crochet embossing folder
Wink of Stella
Bordered ribbon, diagonal trim
In Color shimmer gems
Dimensionals
Adhesives

Botanicals · sketches

Snapdragon Love

This week, we’re going to be working with the Inspiring Snapdragons bundle by Stampin’ Up! This bundle includes cling stamps and coordinating dies. We’ll be looking at all of the ways that we can use these stamps and dies, both together and apart, to create beautiful cards.

And today’s card is based on a sketch from my sketch book. When I come across a great card, I typically take a screenshot and add it to my inspiration folder. Sometimes I am saving a card because I’m inspired by product usage, but a lot of times, I’m saving it as inspiration for layout when using products from my own stash. I often share with you guys when I found inspiration for a layout but don’t usually include a sketch. I have begun converting awesome layouts into digital sketches and thought I would begin sharing them with you as I use them. Love a sketch? Please feel free to save it to your own sketch collection.

Today’s card starts with Pretty in Pink cardstock. The patterned background layer is a sheet of the Unbounded Beauty designer series paper. For the image panel, I started with a sheet of white cardstock diecut using the Everyday Details dies. The image panel mat is diecut from Petunia Pop In Color Glimmer paper using the Deckled Rectangles dies. On the white panel, I stamped the two smaller snapdragon images using Bubble Bath, Pretty in Pink, and Petunia Pop ink. I then adhered the two panels together using my adhesive runner.

Next, I diecut the sentiment panel and mat. The sentiment panel mat is diecut from white glimmer paper and the sentiment panel itself is diecut from white cardstock using nesting circles from the Spotlight on Nature dies. The sentiment is from the Country Flowers set. I first stamped the word “sending” in black ink towards the top of the blank sentiment panel. Then I stamped “love” in Petunia Pop underneath, allowing part of the L to overlap the word “sending.” Adhere these two panels together with adhesive. TIP: To prevent stamping any portion of the word “sending” while stamping the remaining portion of your sentiment, I covered it with a piece of tape — any tape will do. I have tried cleaning my stamp in between stamping portions, but I still manage to get a ghost image of the previously inked portion. And I’ve found the taping method to be the most effective way to prevent that.

To finish things off, adhere the image panel on the top-right portion of the card. Tie sheer ribbon around the bottom third of the card, covering the bottom of the image panel. I chose to tie the sheer ribbon in a knot, but a bow could also work. Next, adhere the sentiment panel over the ribbon and bottom-left portion of the image panel using dimensionals. I added a gold glimmer dragonfly and In Color resin dots to finish things off.

Tomorrow, we’re going to take our sketch for another spin with a little variation. I hope you’ll pop in and let me know what you think!

Products used in today’ card:
Pretty in Pink, Basic White cardstock
Unbounded Beauty, In Color Glimmer DSP
Inspiring Snapdragons, Country Flowers stamps
Iridescent striped trim
In Color resin dots
Dimensionals
Adhesives

Clean and Simple · Fun Folds

Picked for You

This week, we’ll be frolicking in the meadows and stopping to smell a few flowers along the way. Stampin’ Up! has a whole host of papers and stamps that put us squarely in the middle of beautiful fields and fragrant flower patches. And we’re going to explore some of my favorites throughout this week.

We begin today with a new take on an old fun fold. I recently ran across the hidden barn fold design and knew I had to give it a try. Why is it called a hidden fold? When the card is completely closed, the two sections of the front panel meet, they make the center cut virtually disappear.

So our take on this card begins with a base of Blackberry Bliss cardstock. The focal panel consists of a bottom mat of Lost Lagoon soft shimmer paper that is diecut using the largest Perennial Postage die, followed by a layer of Highland Heather cut just a tick smaller, and finally with our section of Meandering Meadow designer paper on top. To accomplish the two perfect sections, I cut the shimmery layer in half after I diecut it. I adhered the DSP and Highland Heather mat together first before also cutting them in half with the trimmer. Then these three layers were adhered together before carefully adhering them in place on the card front so that they meet together perfectly at the center. The sentiment from Charming Sentiments is stamped on white cardstock and diecut using the smallest Thoughtful Expressions die. The sentiment mat is cut from Lost Lagoon shimmer paper. A twist of silver & white sheer ribbon and Lost Lagoon bordered ribbon are adhered in between the two sentiment layers. Using dimensionals, the sentiment is adhered to the left flap of the card front. I added a few purple fine shimmer gems for sparkle and to move the eye diagonally across the card front.

This particular design is super easy to put together. And by changing the color palette and DSP, each card has a completely different look. This is going to be a go-to design for me if I need to make a whole host of simple yet beautiful cards!

Tune in tomorrow as we explore the rolling Hills of Tuscany!

Products used in today’s card:
Blackberry Bliss, Highland Heather, Basic White cardstock
Meandering Meadow, Lost Lagoon soft shimmer DSP
Charming Sentiments stamps
Thoughtful Expressions, Perennial Postage dies
Silver & white sheer trim, Lost Lagoon bordered ribbon
Purple fine shimmer gems
Dimensionals
Adhesives

Coming Soon

Lifting Me Higher

Our journey through the skies comes to an end today as we round out our aviation-themed trek through the Stampin’ Up! lineup. And today’s card is a full sneak peek at the brand NEW suite of products called Take to the Sky. The full suite includes stamps, coordinating dies, designer series paper, and silver trinkets. This suite will have you soaring when it releases in May!

Our card today begins with a base of Balmy Blue cardstock. The backdrop for our focal panel is a sheet of the cloud pattern designer paper. On top is another sheet with a radar view pattern. I cut a hole towards the top of the radar sheet using the Everyday Details dies, which allows the cloud pattern to peek through. And I reinforced this peek-through look by diecutting clouds from vellum using the Bright Skies and Hot Air Balloon dies. I stamped the largest plane from the Adventurous Skies stamp set onto white cardstock, colored the body of the plane with Stampin’ Blends, and then diecut with the coordinating die. I drew further attention to the spinning propeller by diecutting the smallest circle from Everyday Details from vellum. I added an Industrial Trinket to give a realistic look to the center of the spinning propeller. The sentiment from Adventurous Sky is stamped directly on vellum and then diecut using the Bright Skies dies. I scattered a few additional trinkets and some translucent sequins to tie things together and help the eye move across the card.

There are so, so many more designs I would like to try with this super fun suite of products that I plan to highlight this suite for a full week once it releases with the brand new Annual Catalog in May. In the meantime, next week we’ll be romping through the grassy plains and fields of flowers. I hope you’ll come along!

Products used in today’s card:
Balmy Blue, Basic White, vellum cardstock
Take to the Sky DSP (coming soon!)
Adventurous Sky bundle (coming soon!)
Industrial trinkets (coming soon!)
Stampin’ Blends
Sequins trio
Dimensionals
Adhesives

Coming Soon

Speedy Recovery

We’re continuing our aviation adventures this week by taking a closer look at the brand NEW Adventurous Sky bundle, which is set to release in May with the launch of the new 2024-25 Stampin’ Up! Annual Catalog. This week’s chosen theme of flight is inspired by husband, who is a commercial pilot and aviation enthusiast.

And the theme of today’s card, in particular, is also inspired by my hubby, who has been having some serious health issues. When we’re making get well cards, we don’t often think of incorporating someone’s hobbies or interests when designing cards, but when you want something to feel very personalized for a recipient, I believe that’s the best way to do it!

Our card today is set on a base of Balmy Blue cardstock using the fold-back fun fold, which allows a portion of the inside panel to peek through when the card is fully closed. Before I adhered the fold-back portion of the card front, I used the Adventurous Sky cloud stamps to stamp a background on the entire inside-left panel. I also adhered the raindrop-embossed piece of vellum to the edge of the fold-back panel and then adhered it to the card front. On the exposed portion of the inside message panel, I chose the topography patterned sheet from the Take to the Sky designer series paper pack — the coordinating DSP to Adventurous Sky that will release in May.

The plane is cut from the Silver and Berry Burst sheets of Holographic specialty paper using the Adventurous Sky dies. But you might be thinking that it doesn’t look red. This particular sheet of paper looks blue when it’s cut into smaller pieces and from certain angles in larger pieces, and so by diecutting and then putting the plane on the diagonal, you see blue in this design. Neat, huh?! To give the illusion of a spinning prop, I cut a circle from vellum using the smallest die in the Everyday Details set. The center of the prop is made with the soon-to-be-released Industrial Trinkets piece.

The sentiments from Happy Little Things are stamped on white cardstock that is diecut from white cardstock using the Deckled Rectangles dies. A twist of silver & white sheer ribbon and the white sequins tie with the metallic elements of the plane and finish the visual triangle across the card design.

I hope you’ll fly by tomorrow to get a better look at the full Take to the Sky suite — paper, stamps, dies, and embellishments!

Products used in today’s design:
Balmy Blue, Basic White, vellum cardstock
Holographic Trio, Take to the Sky (coming soon!) DSP
Happy Little Things stamps
Deckled Rectangles, Adventurous Sky (coming soon!) dies
Raindrops embossing folder
Sequins trio, Industrial Trinkets (coming soon!)
Silver & white sheer ribbon
Dimensionals
Adhesives

Coming Soon

Flying Hi

This week, we’re taking to the skies with some Stampin’ Up! flying-themed products. Thus far, we’ve made some cute cards using the Hot Air Balloon bundle. And today, I’m sharing a sneak peek of a brand NEW bundle that will be available in the upcoming 2024-25 Annual Catalog that releases in May.

Say hello to Adventurous Sky! Did you know that my husband is a commercial pilot? And he’s the inspiration for this week’s theme and the reason that I just had to have this new aviation-themed bundle!

Like all of the Stampin’ Up! product line, the NEW Adventurous Sky stamps and dies pair perfectly with other existing product lines. For today’s card designed, I’ve paired it with the Bright Skies and Hot Air Balloon bundles to make this fun card.

Our card starts with a base of white cardstock. The focal panel is built on a background of Pool Party cardstock that has been diecut using the largest Deckled Rectangles die. I cut a variety of clouds using the Bright Skies and Hot Air Balloon dies and layered them across the background for lots of billowy dimension. The hot air balloon combines a Berry Burst balloon with a white glimmer banner and Bubble Bath frills — the whole balloon made with the Hot Air Balloon bundle. The staggerwing aircraft is the medium-sized airplane stamp in the Adventurous Sky stamp set. It’s stamped in black and then colored with Stampin’ Blends before being diecut with the coordinating die. The sentiment is also from the Adventurous Sky stamp set. The scene is finished off with a combination of white sequins from the Sequins Trio and the Pool Party dots from the Rainbow Dots set.

Fly back in tomorrow to see more of the Adventurous Sky set at work!

Products used in today’s design:
Pool Party, Berry Burst, Basic White cardstock
White glimmer, Bubble Bath soft shimmer SP
Hot Air Balloon, Adventurous Sky (coming soon!) bundles
Bright Skies dies
Sequins trio, rainbow dots
Dimensionals
Adhesives

January Mini Catalog

Wishes Up and Away

This week, we’re flying high with Stampin’ Up! sets that feature vehicles of flight. Thus far, we’ve been soaring with the Hot Air Balloon bundle. And today’s design is (almost) directly inspired by fellow SU! demo Anne Granger. Just a few tweaks here & there with products I had on hand and *voila* a fantastic birthday card ready to hoist your well wishes.

This card design begins with a base of Lost Lagoon cardstock. The background panel consists of a mat of Pretty Peacock soft shimmer paper and the lovely rainbow pattern designer paper from the Sale-a-Bration pack called Sunny Days. The focal panel is also matted with the shimmer paper and the balloon is stamped directly on the white cardstock panel in coordinating colors of Lost Lagoon and Pretty Peacock. I dressed up the sentiment by diecutting it separately using the Autumn Leaves dies. This design is finished off with Pretty Peacock sequins from the Sequins Trio set and the Pretty Peacock & Gold metallic ribbon.

Tune in tomorrow to get a SNEAK PEEK at a brand new flight-related suite of products. I know you’re gonna love it as much as I do!

Products used in today’s card:
Lost Lagoon, Basic White cardstock
Pretty Peacock fine shimmer SP
Sequins trio
Pretty Peacock & Gold metallic ribbon
Dimensionals
Adhesives

All ads on this site are posted by WordPress.  Song Sparrow Papercrafts is not responsible for ad content.