Random Acts of Kindness · Thinking of You Week

Thinking of You Week

Did you know that this week is Thinking of You Week? What is that, you may be wondering? This holiday was established by the National Greeting Card Association in 2014 to encourage people to send handwritten notes to friends and loved ones to create a wave of 😄happiness, ❤️love, and 🥰caring.

Let’s spread some cheer this week! I challenge you to send 7 cards💌 to 7 people👫🧍🏼‍♀️👨‍👩‍👧‍👦 this week to say hello and let them know you’re thinking of them! Will you do it? 🙋🏼‍♀️

All ads on this site are posted by WordPress and are based on your personal browsing history. I do not control ad content.

birthday · Gifting

Dressing a Package

For the last couple of days, we’ve been looking at cute gift packaging ideas for small gifties. And what package would be complete without a gift tag?

It doesn’t take much to whip up a cute tag to dress up a package. This tag is comprised of 3 basic components: a base, a decorative element, and the sentiment panel. For the base, I used some retired paper I had on hand and diecut it using the tag die from the Merriest Trees dies. Because I chose a decorative paper and not cardstock, I elected to cut a solid-colored piece to serve as the backing on the dot pattern to add a little more structure to the tag and give a place for a quick message to the gift recipient. The sparkly star is diecut using the So Many Stars dies. I really love that set of dies for its decorative stitching around the edges which adds a bit of pizzazz. The sentiment panel is punched from white cardstock using the 2 3/4″ circle punch and the Circle Sayings stamp set provides the elements for the adorable sentiment panel. A few strategically placed fine sparkle adhesive-backed gems and the iridescent trim give another touch of sparkle and complete the festive look.

Products used: White cardstock; Oh So Ombre DSP (retired); So Many Stars (retired), Merriest Trees dies; circle punch; Circle Sayings stamps; fine sparkle gems; iridescent trim

All ads on this site are posted by WordPress and are based on your personal browsing history. I do not control ad content.

Treat Boxes

Pillow Anyone?

Did you see yesterday’s post? I’m planning to spend the next several days looking at all of the creative ways that we can use paper to make creative packaging or packaging elements. And today you’re getting a sneak peek at some additional products that I’ve prepped for an upcoming craft fair.

For these cute pillow boxes using an older Stampin’ Up! die set, I dug through my stash of older patterned paper and pulled out these cute fall designs. TIP: I would definitely recommend that you use papers that are heavier cardstock rather than thinner papers to help the boxes hold their shape. These boxes are the perfect size for cash or gift cards, or you can also slide in tea bags or packaged chocolate squares. Or what about slipping this cute box in your kiddo’s lunch box with an encouraging note inside? There are so many gifting possibilities!

Do you like having unique packaging for smaller gifts, like gift cards?

Products used: SU! Square Pillow Box dies (retired); SU! natural wavy trim; SU! stitched ribbon (retired); SU! twine (retired)

All ads on this site are posted by WordPress and are based on your personal browsing history. I do not control ad content.

Halloween · Treat Boxes

Halloween Treats

Happy Friday, everyone! As I was looking through older posts, I realized that posts had been a little Christmas heavy in the last month or so, and I didn’t want you to think that that meant the upcoming fall holidays weren’t important. Quite the contrary! Fall is my favorite season!

Generally speaking, my customer base does tend to order more Christmas product than fall product, but I still enjoy making and giving products for both Halloween and Thanksgiving to friends and family. And I just happen to be prepping product for a craft fair, so I’ve put my creative hat on to develop some product that I would like to see as a customer.

Each year, I love to make treat boxes for my son’s teachers for holidays, and I’m always looking for new dies to make gift packaging. So today, I wanted to highlight these cute little treat boxes that I made for Halloween using an older Stampin’ Up! die set. Each of these boxes holds two small boxes of Nerds™ candy, which is always a favorite with the kiddos. If I happen to know a recipient’s candy preference, then I’ll try to include the fave in the box. Otherwise, I pick a little treat that’s popular, like chocolate.

For this set of boxes, I tried to keep all of the designs cute and not scary since scary isn’t really my jam. I dug through my stash of paper scraps for the decorative elements on each box. These small boxes are perfect for using up scraps! I pulled out some fun Halloween stamps and got to work. Do you like to give little gifties for Halloween?

Products used: Papertrey Ink Tiny Treats: Halloween (retired); SU! Takeout Treats dies (retired); SU! Stampin’ Blends

All ads on this site are posted by WordPress and are based on your personal browsing history. I do not control ad content.

Christmas

Peaceful Season

At quick glance, you maybe thought that I’m repeating the card design from yesterday. I am, in fact, using the same sheet of paper. But today’s card uses a different fun fold design and really showcases the versatility of this sheet of the Winter Meadow designer series paper.

This design uses the single Z fun fold. A sheet of Basic Gray serves as the card base and the same sheet of Winter Meadow is our focal image for the front when the card is closed. One thing you’ll notice when dividing this sheet of designer paper is how the placement of the deer in the evergreens moves across the paper when you cut the full 12×12 sheet into pieces, which works beautifully for different fun fold designs. For this card, I selected the piece where the deer was off to one side — the left in this case. The single Z fold creates two 2″ folding panels, and this perfectly aligned the deer for the left fold-over panel and I placed the remaining portion on the base on the right so that, when the card is closed, the two pieces meet to complete the scene, and I added a touch of Wink of Stella to the deer and white tree for some ethereal sparkle. For the remaining 2″ panel, I used the backside of the deer pattern, which reminds me of a snowy fog, and I used the snow pattern from the Stars at Night stamp set to give the feeling of falling snow. I completed the snowy theme by adding some white adhesive sequins throughout the design to draw the eye across the full design of the card and highlight the sparkle of freshly falling snow in each panel.

Products used:
Basic Gray cardstock
Winter Meadow DSP
Stars at Night, Peaceful Cabin (retired) stamps
Adhesive-backed sequins
Wink of Stella
Adhesives

All ads on this site are posted by WordPress and are based on your personal browsing history. I do not control ad content.

Christmas · Fun Folds

Magic of the Season

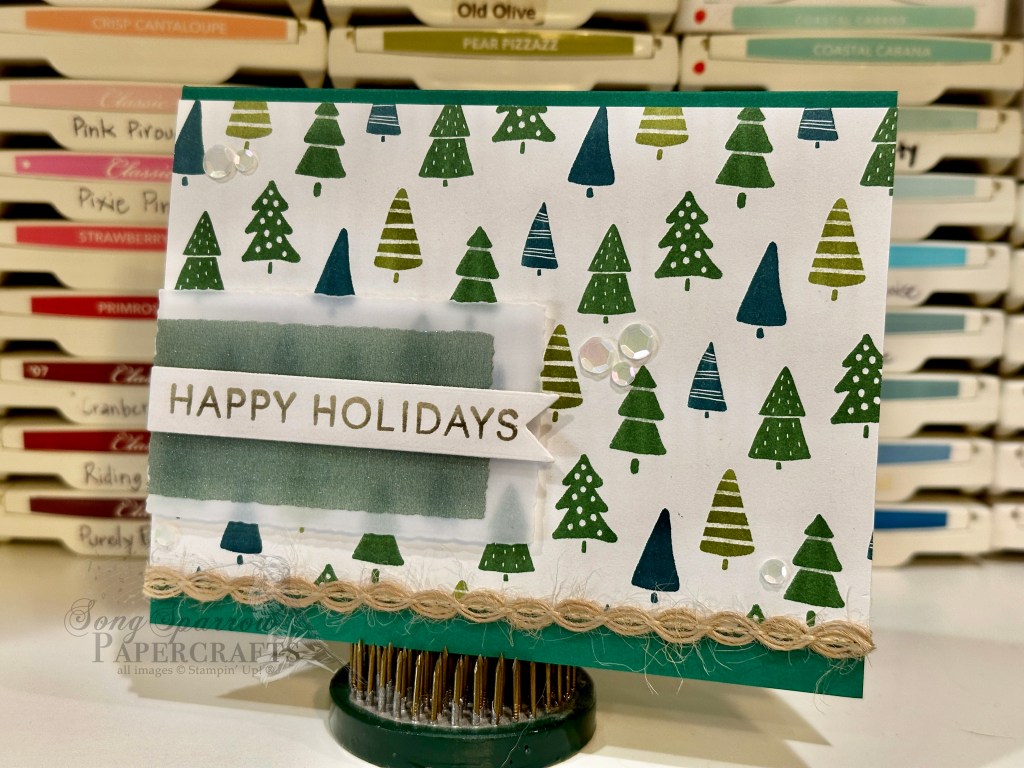
If you have followed me for the last month or so, you probably will recall that I have mentioned how much I love the Winter Meadow designer series paper that Stampin’ Up! just launched in its Holiday Mini catalog. And you may have heard me talk about how much I love this particular sheet of paper from that paper pack. I come from a family of avid hunters, so I’m always drawn to well-designed craft products that lend themselves well to documenting a hunt or simply the majesty of wildlife.

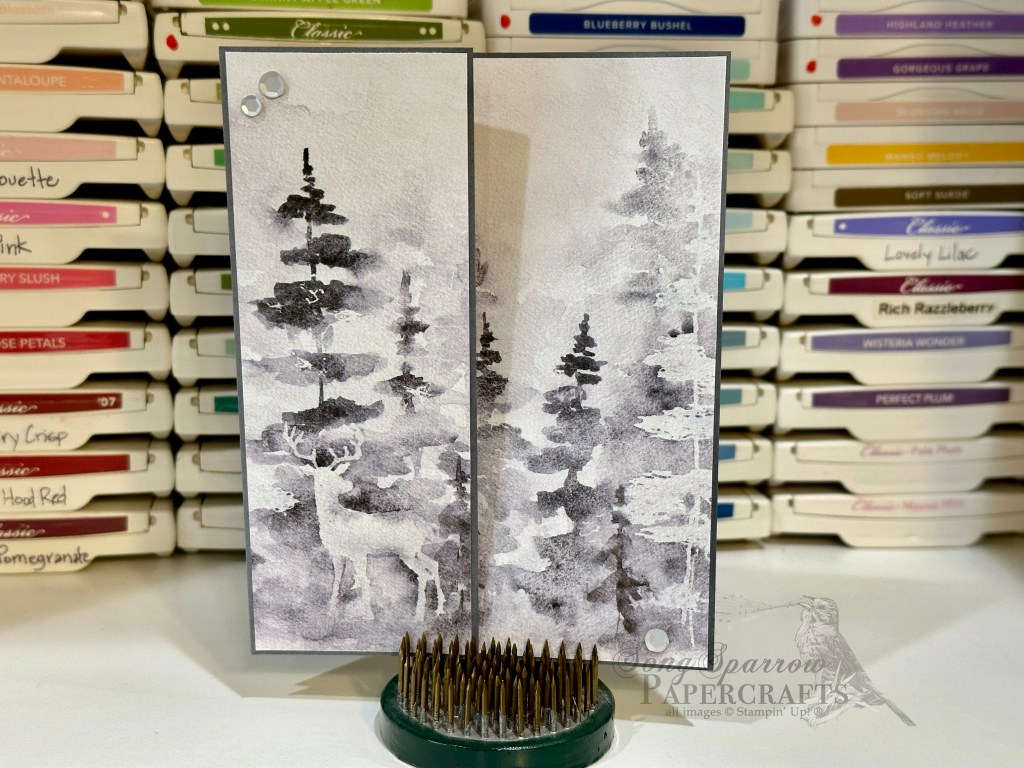
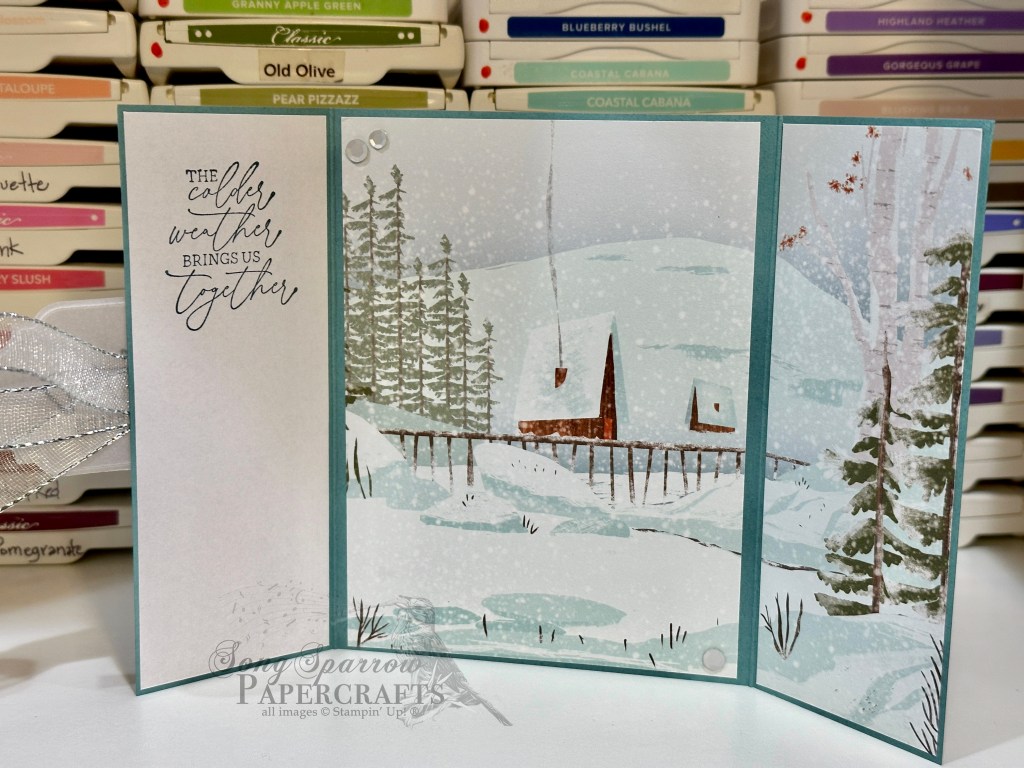
What I love, in particular, about this sheet of paper is the repeating pattern of the deer in the forest. It feels like you’re seeing the deer through the fog of fall morning. Pairing this design with different background colors allows for many different moods and lends itself well to different occasions. A while back, I used this paper to make a birthday card. Today, I’m focusing on the muted colors of a snowy winter to make this holiday card. And I tried my hand at a variation on the two-flip fun fold.

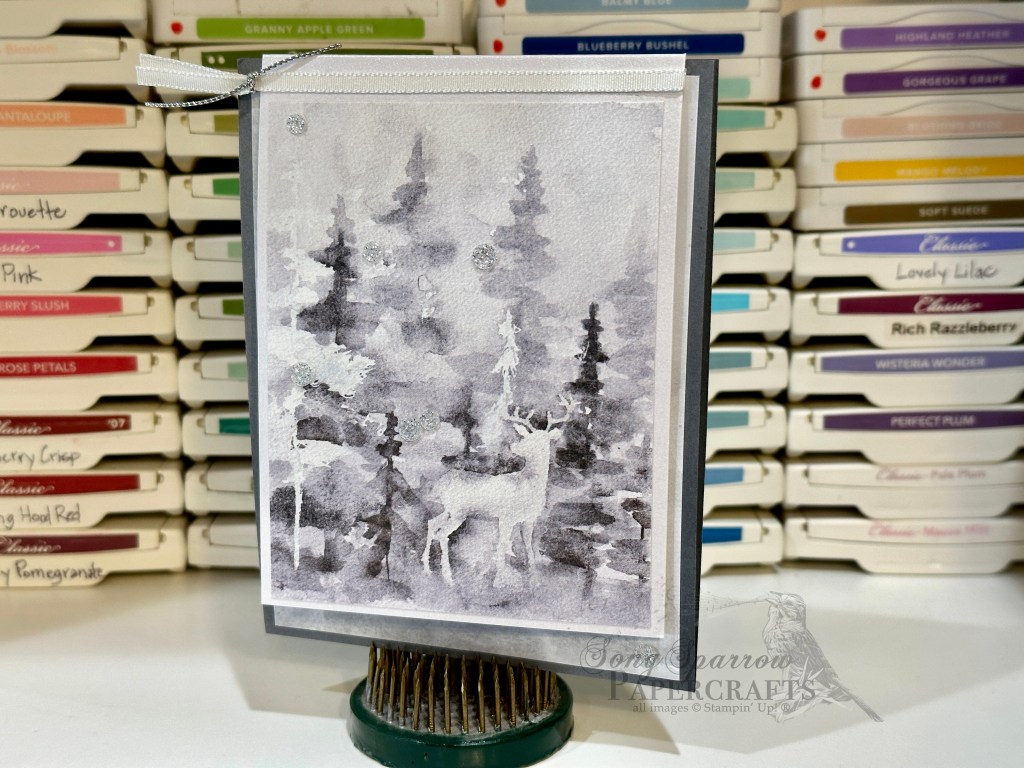
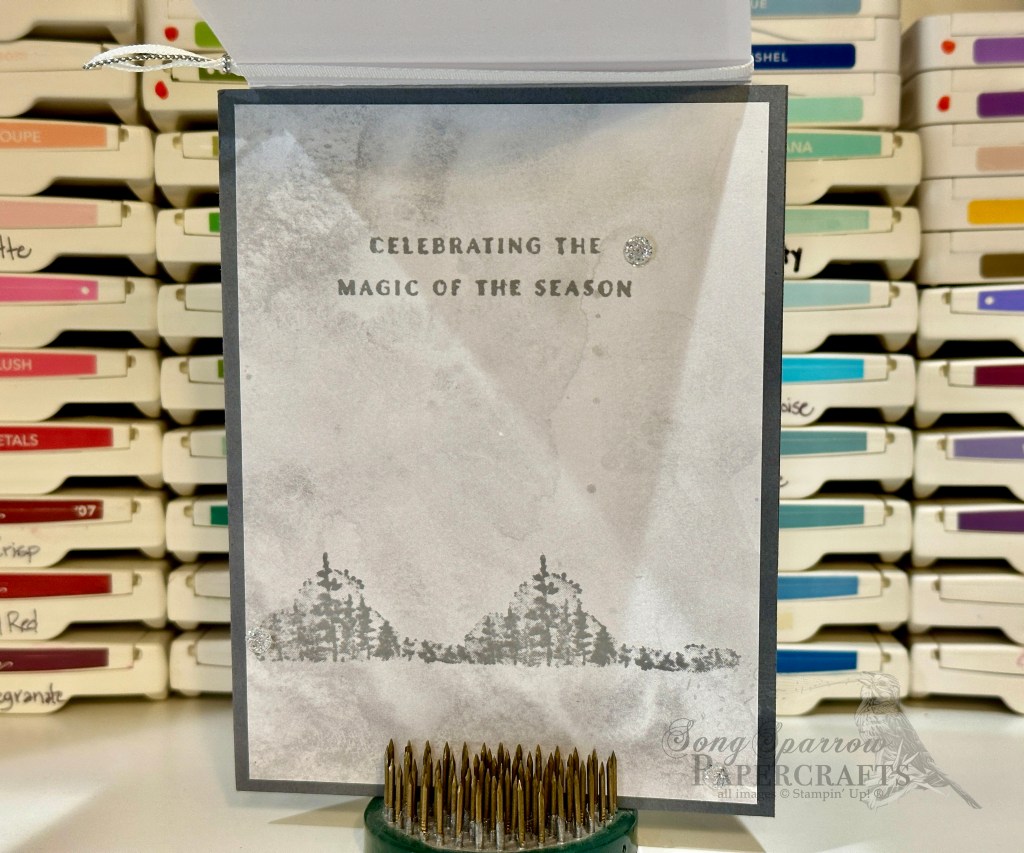
I used Basic Gray as the base for the card design as a whole. I also pulled a sheet of shimmer white cardstock to serve as the base for the front flip and inside panels. The gorgeous scene of the deer standing in the grove of evergreens serve as the focal image on the front of the card. Although it’s difficult to capture in photographs, the shimmer of the white cardstock and the touch of Wink of Stella on the deer really give the feel of a cold winter morning.

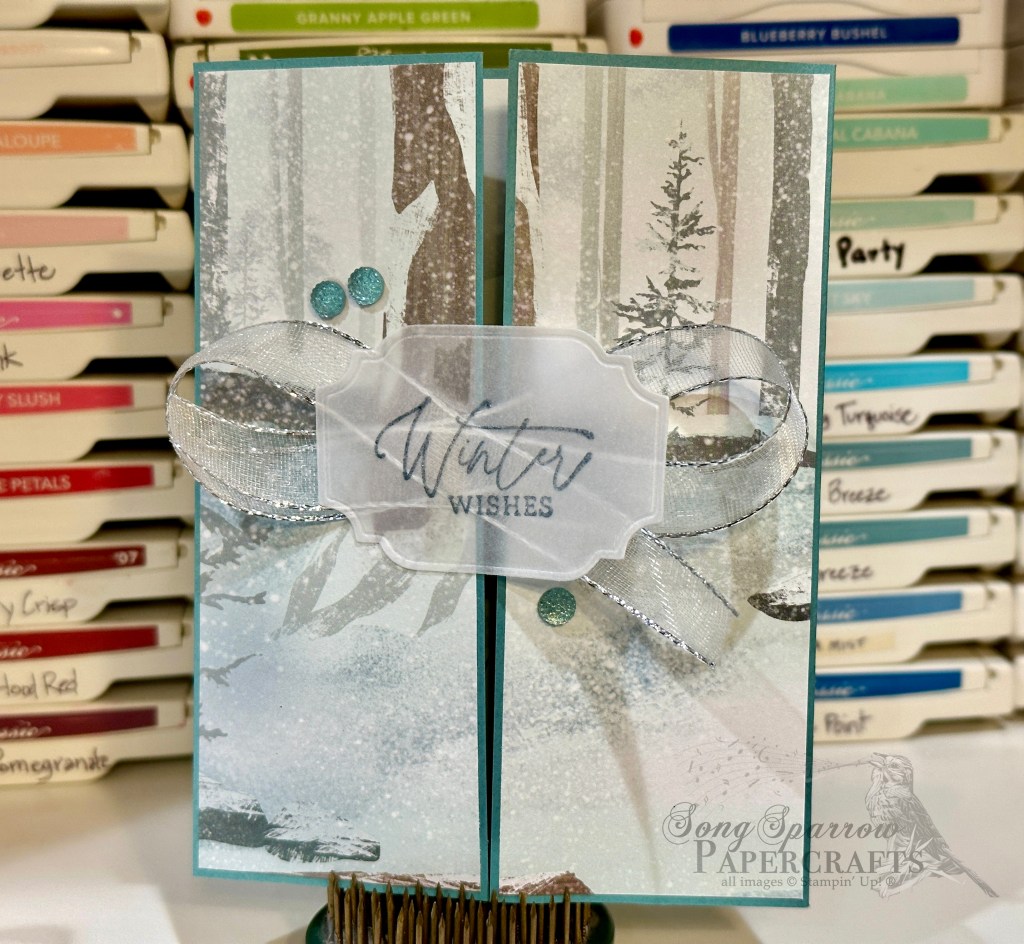
When you flip up the front panel, a new scene is revealed. This view of the forest from the open prairie is created atop another sheet of paper from the Winter Meadow paper pack. On its own, this design looks like a gray wash, but to me, it still spoke to the feeling of a snowy morning. I simply stamped the forest scene and sentiment in Basic Gray using the Magical Meadow stamp set. The Basic Gray card base serves as the base for this panel and gives some depth to the snowy grays. The sentiment stamp itself is one long strip, but I wanted two lines for better symmetry so I masked portions of the sentiment stamp to create it across two stacked lines. I added a little sparkle with the glitter sequin.

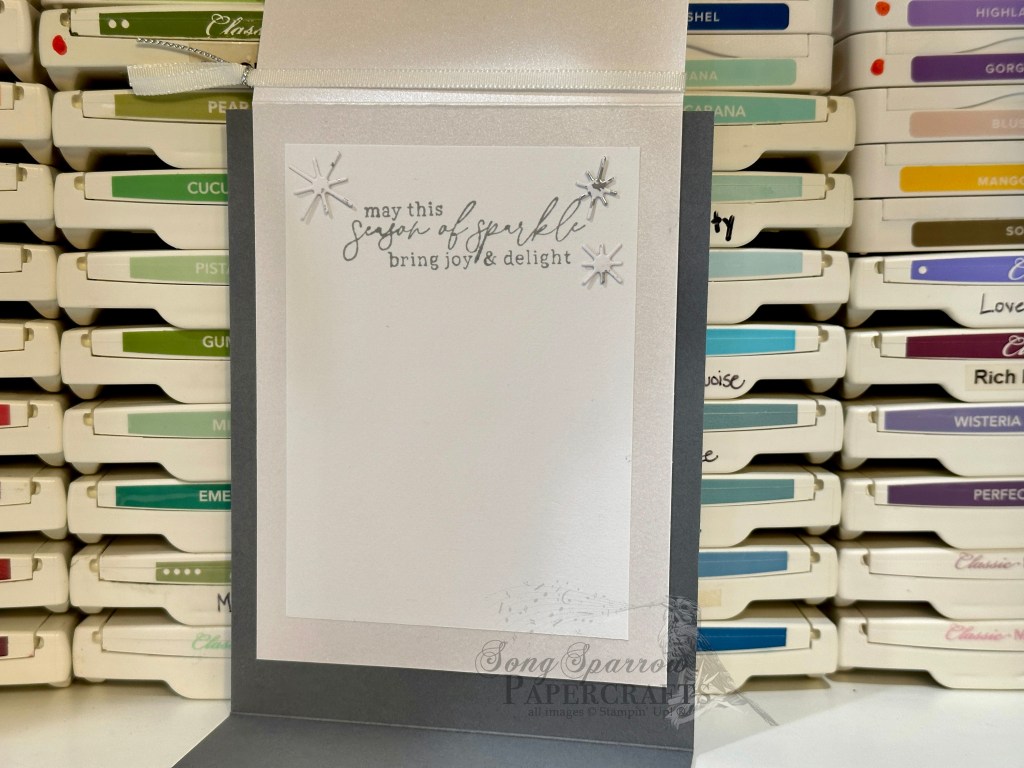
When you flip down the center panel, you reveal the inside of the card. Since this section is intended for a message to your card recipient, it’s very simple with just a sentiment panel over the shimmer white cardstock. I added a few stars diecut from a sheet of the Snowflake Magic designer paper for a little visual interest and to carry the snow theme through to the inside message panel.

Overall, everything about this design is simple and muted because I wanted the beauty of winter and the pizzazz of the fun fold to be the stars of the show. How do you think it turned out? Would you like to see a video on how this card is made?

Products used:
Basic Gray, shimmer white (retired) cardstock
Winter Meadow, Snowflake Magic DSP
Magical Meadow stamps
Stars at Night dies
Whisper White, silver ribbon
Glitter sequins
Wink of Stella
Adhesives

All ads on this site are posted by WordPress and are based on your personal browsing history. I do not control ad content.

Christmas

Spirit of the Season

We are finally beginning to get a break from the summer heat here in Texas, and things are beginning to feel a little more fall-like. And that always brings about more holiday spirit. I’m still working to prepare a holiday client order and for an upcoming craft show, which means lots of holiday-inspired designs.

Today’s card is relatively simple to put together but packs a lot of punch in the WOW department. The card base is a simple piece of white cardstock. A piece of Cherry Cobbler cardstock provides the pops of red in this design and gives the patterned paper a bit of grounding against the dry embossed white panel. The sequins, ribbon, and heat embossed sentiment bring the pops of gold that really makes this card sparkle. I love this designer paper. It’s a new pack from Stampin’ Up! called Joy of Christmas. Each of the designs in the paper pack has a watercolor look and each one is eye-catching and easy to work with. Making a stunning card with this designer paper is a walk in the park for sure!

I really love the simplicity of this design. Are you a fan of simple or more intricate designs?

Products used:
Cherry Cobbler, Basic White cardstock
Joy of Christmas DSP
Merry Melody embossing folder
Merriest Trees stamps
Gold embossing powder
Vanilla & gold ribbon (retired)
Adhesive-backed sequins
Dimensionals
Adhesives

All ads on this site are posted by WordPress and are based on your personal browsing history. I do not control ad content.

Christmas · Fun Folds

What Brings Us Together

Happy Monday, everyone! I really love the various wintery/holiday paper designs that Stampin’ Up! has introduced lately. Have you had a chance to check them out? I just recently got the One Horse Open Sleigh DSP pack and I am loving all of the fun folds you can do to really show off these beautiful paper designs.

A week or so ago, I shared a video of how I made a barn fold card using a different set of designs from the One Horse Open Sleigh paper pack. In that video, I showed how you could vary the placement of pieces to make it work for what you have on hand. I loved this variation so much that I felt it was worthy of having its own post to show you how you can make stunning cards with just a few supplies and just moving things around, like the placement of a sentiment panel, can make it feel like a completely new design even when it’s the same fun fold.

For this design, I started with a base of Lost Lagoon cardstock. I chose two different designs from the One Horse Open Sleigh designer paper pack — a lovely snowy woods scene and a gorgeous cabin across a frozen pond scene. Because I wanted the cabins to remain a whole panel and not be separated, I decided to use this particular sheet of paper on the inside of the card. And as I began working with this sheet of paper, it naturally lent itself to being cut into a 4″ and 2″ panels with the cabin portion in the inside center and the trees on the smaller right inside panel. So the snowy woods cover the outside of the card design and really set the mood for this beautiful theme of Winter Wishes. The sparkly touches of gems, ribbon, and sequins complete the feel of the twinkle of freshly falling snow.

Interested in making this card? You can check out the video tutorial here or download the PDF here.

Products used:
Lost Lagoon, vellum cardstock
One Horse Open Sleigh DSP
Magical Meadow stamps
All That dies
Versamark
Clear embossing powder
Faceted gems
Adhesive-backed sequins
Silver & white sheer ribbon
Adhesives

All ads on this site are posted by WordPress and are based on your personal browsing history. I do not control ad content.

Christmas

Happy Holidays

We’re looking at another card design using the designer series paper called A Walk in the Forest by Stampin’ Up!, which is a part of the company’s Making a Difference Initiative. For each pack of paper sold, Stampin’ Up! contributes $3 to Toy for Tots in the U.S. and to the Salvation Army in other worldwide markets. I just love that I can not only brighten someone’s day through a handmade card but also through the purchase of the products I used to assemble it.

Yesterday, we used this sheet of paper as a backdrop for the focal image. But today, I wanted this lovely sheet of paper to stand on its own, so we’re keeping this card very simple. A sheet of Shaded Spruce serves as the backdrop for the designer paper. I really love how the Shaded Spruce helps bring each shade of green in the forest of evergreens to the forefront to shine. I wanted the sentiment panel to allow the designer paper to remain front and center, so I kept it narrow and matted the sentiment banner with vellum. The natural wavy trim reminds me of tree bark and carries the forest theme through the design.

Does this design keep you in the forest? Or does it make you wander?

Products used:
Shaded Spruce, Basic White, vellum cardstock
Shimmer vellum (retired)
Tis the Season (retired), Deckled Rectangles dies
Adhesive-backed sequins
Natural wavy trim
Dimensionals
Adhesives

All ads on this site are posted by WordPress and are based on your personal browsing history. I do not control ad content.

Christmas

Love & Joy to You

Today, I wanted to highlight the designer series paper called A Walk in the Forest. You may remember the series of posts I did several weeks ago using this fun set of papers. But I wanted to circle back and draw attention to the Stampin’ Up! Making a Difference Initiative. For each U.S. sale of A Walk in the Forest, Stampin’ Up! donates $3 to Toys for Tots. I love that I can support others during the holidays – not only through a handmade card but through my purchase of this pack of paper. Smiles all around in my book!

Now, down to the business of design. It was fun to mix and match patterns for this card to give a down-home Christmas kinda feel to the overall design. Crumb Cake serves as the card base. Using both sides of a sheet of the Joyful designer series paper provides the musical plaid backdrop for the forest of trees. To help the sheet of trees from A Walk in the Forest really stand out, a sheet of Shaded Spruce serves as the mat. The three trees taking center stage are stamped in various shades of green and diecut using Merriest Trees. Everything really ties together nicely with the sentiment flags tucked into the grove of trees.

Does this give you the warm and cozy feelings of a country Christmas? What are your go-to, homey holiday patterns?

Products used:
Crumb Cake, Shaded Spruce, Basic White cardstock
A Walk in the Forest, Joyful DSP
Merriest Trees stamps & dies
Tis the Season dies (retired)
Glitter sequins
Dimensionals
Adhesives

All ads on this site are posted by WordPress and are based on your personal browsing history. I do not control ad content.