Happy Thursday, friends! We are almost through this week and on to the weekend. I’m super excited to bring you today’s card design because we’re getting sneak peeks at several new Stampin’ Up! goodies coming your way next week with the new Online Exclusives release. This week, our design theme is all about our favorite critters and there are some adorable critters coming your way! We’re pairing up the brand NEW Cutest Crew stamp & die bundle with the Easter Joy foil papers to bring together this adorably cheerful card. Let’s see how it all comes together!
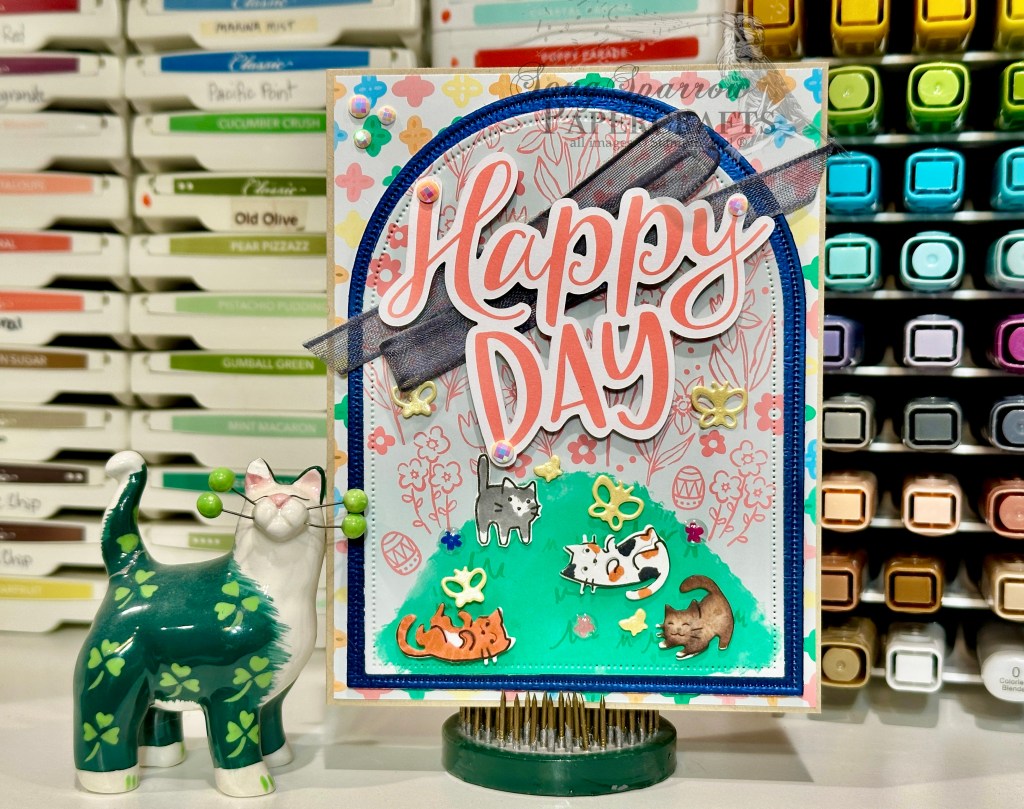
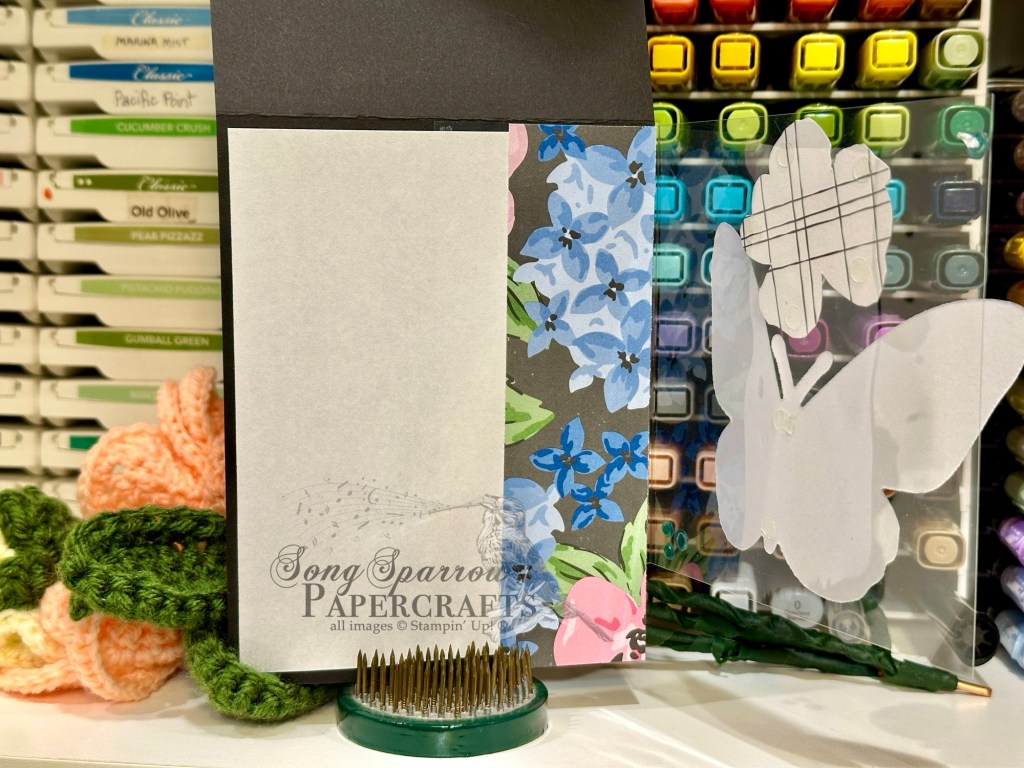
We get started with a nice neutral base of Crumb Cake cardstock. It works well to bring out the pastels in the patterned papers without competing with them. (And trust me, I tried all kinds of colors as the base layer and the neutral worked the best!). Our background layer is a fun multicolor cross pattern from the Easter Joy foiled paper pack. There’s just enough peeking out around the edges to add some interest and pizzazz without taking away from the focal panel scene.
And speaking of our focal panel. We get started with the focal panel mat which is a brand new patterned foil paper coming your way next week in the Garden Textures foil pack. This panel is cut with the largest arch in the Everyday Arches die set. I chose the Blueberry Bushel sheet to help our focal panel stand out against our patterned background, and it also works to help the pastels in our scene pop. Our focal panel on which we’re building our scene is one of the ready-made panels in the Easter Joy paper pack. I used the next-smallest die in the Everyday Arches set to cut it out.
And then we get started with our cute kitties who are enjoying a romp on the grassy hill chasing butterflies. These adorable felines are part of the new Cutest Crew stamp set & die bundle releasing next week. I stamped the kittens on white cardstock and then used a combination of Stampin’ Blends to color them before using the coordinating dies and paper snips to cut them out. They adhered to the scene with a combination of glue dots and dimensionals to give lots of depth of scene. The butterflies are cut from Lemon Lolly pastel shimmer paper and adhered with glue dots. The sentiment from the Unforgettable Times ephemera pack is adhered over Secret Sea bordered ribbon using dimensionals. A double layer helps the sentiment to really stand above everything else and catch the eye. We finish things off with some flowers from the new garden epoxy dots pack and some pops of twinkle with the pearlized faeted circles.
Isn’t this super fun? We’re going to get a peek at a few more critters tomorrow as we return to the lazy days of breezy summers. I hope you’ll drop in and see what cutie critters are up next!
Today’s card is a part of the Luv 2 Stamp Group Instagram Hop, which goes live at 9 AM Pacific Time (PST). Click here to head over to my Instagram feed at 9 AM Pacific/11 AM Central and check out what the other demos in our L2S Group have created for you today!
Product List![Crumb Cake 8-1/2" X 11" Cardstock [ 120953 ]](https://assets1.tamsnetwork.com/images/EC042017NF/120953s.jpg "Crumb Cake 8-1/2\" X 11\" Cardstock [ 120953 ]")
![Basic White 8 1/2" X 11" Cardstock [ 166780 ]](https://assets1.tamsnetwork.com/images/EC042017NF/166780s.jpg "Basic White 8 1/2\" X 11\" Cardstock [ 166780 ]")
![Easter Joy 12" X 12" (30.5 X 30.5 Cm) Specialty Designer Series Paper [ 166939 ]](https://assets1.tamsnetwork.com/images/EC042017NF/166939s.jpg "Easter Joy 12\" X 12\" (30.5 X 30.5 Cm) Specialty Designer Series Paper [ 166939 ]")
![Pastels Shimmer 12" X 12" (30.5 X 30.5 Cm) Specialty Paper [ 167198 ]](https://assets1.tamsnetwork.com/images/EC042017NF/167198s.jpg "Pastels Shimmer 12\" X 12\" (30.5 X 30.5 Cm) Specialty Paper [ 167198 ]")
![Unforgettable Times Mix & Match Specialty Ephemera Pack (English) [ 166987 ]](https://assets1.tamsnetwork.com/images/EC042017NF/166987s.jpg "Unforgettable Times Mix & Match Specialty Ephemera Pack (English) [ 166987 ]")
![Everyday Arches Dies [ 164629 ]](https://assets1.tamsnetwork.com/images/EC042017NF/164629s.jpg "Everyday Arches Dies [ 164629 ]")
![Jet Black Stāzon Ink Pad [ 101406 ]](https://assets1.tamsnetwork.com/images/EC042017NF/101406s.jpg "Jet Black Stāzon Ink Pad [ 101406 ]")
![Crumb Cake Stampin' Blends Combo Pack [ 154882 ]](https://assets1.tamsnetwork.com/images/EC042017NF/154882s.jpg "Crumb Cake Stampin' Blends Combo Pack [ 154882 ]")
![Basic Black Stampin' Blends Combo Pack [ 154843 ]](https://assets1.tamsnetwork.com/images/EC042017NF/154843s.jpg "Basic Black Stampin' Blends Combo Pack [ 154843 ]")
![Pumpkin Pie Stampin' Blends Combo Pack [ 154897 ]](https://assets1.tamsnetwork.com/images/EC042017NF/154897s.jpg "Pumpkin Pie Stampin' Blends Combo Pack [ 154897 ]")
![Calypso Coral Stampin' Blends Combo Pack [ 154881 ]](https://assets1.tamsnetwork.com/images/EC042017NF/154881s.jpg "Calypso Coral Stampin' Blends Combo Pack [ 154881 ]")
![Smoky Slate Stampin' Blends Combo Pack [ 154904 ]](https://assets1.tamsnetwork.com/images/EC042017NF/154904s.jpg "Smoky Slate Stampin' Blends Combo Pack [ 154904 ]")
![Pearlized Faceted Circles [ 166978 ]](https://assets1.tamsnetwork.com/images/EC042017NF/166978s.jpg "Pearlized Faceted Circles [ 166978 ]")
![Secret Sea 3/8" (1 Cm) Bordered Open Weave Ribbon [ 166932 ]](https://assets1.tamsnetwork.com/images/EC042017NF/166932s.jpg "Secret Sea 3/8\" (1 Cm) Bordered Open Weave Ribbon [ 166932 ]")
![Mini Glue Dots [ 103683 ]](https://assets1.tamsnetwork.com/images/EC042017NF/103683s.jpg "Mini Glue Dots [ 103683 ]")
![Mini Stampin' Dimensionals [ 144108 ]](https://assets1.tamsnetwork.com/images/EC042017NF/144108s.jpg "Mini Stampin' Dimensionals [ 144108 ]")

![Pool Party 8-1/2" X 11" Cardstock [ 122924 ]](https://assets1.tamsnetwork.com/images/EC042017NF/122924s.jpg "Pool Party 8-1/2\" X 11\" Cardstock [ 122924 ]")
![Basic Black 8-1/2" X 11" Cardstock [ 121045 ]](https://assets1.tamsnetwork.com/images/EC042017NF/121045s.jpg "Basic Black 8-1/2\" X 11\" Cardstock [ 121045 ]")
![Lovely & Beautiful 12" X 12" (30.5 X 30.5 Cm) Specialty Designer Series Paper [ 166957 ]](https://assets1.tamsnetwork.com/images/EC042017NF/166957s.jpg "Lovely & Beautiful 12\" X 12\" (30.5 X 30.5 Cm) Specialty Designer Series Paper [ 166957 ]")
![Vellum 12" X 12" (30.5 X 30.5 Cm) Specialty Paper [ 167099 ]](https://assets1.tamsnetwork.com/images/EC042017NF/167099s.jpg "Vellum 12\" X 12\" (30.5 X 30.5 Cm) Specialty Paper [ 167099 ]")
![Days Like This Memories & More Card Pack [ 166911 ]](https://assets1.tamsnetwork.com/images/EC042017NF/166911s.jpg "Days Like This Memories & More Card Pack [ 166911 ]")
![Lovely Arrangements Photopolymer Stamp Set (English) [ 167169 ]](https://assets1.tamsnetwork.com/images/EC042017NF/167169s.jpg "Lovely Arrangements Photopolymer Stamp Set (English) [ 167169 ]")
![Pretty Peacock Classic Stampin’ Pad [ 150083 ]](https://assets1.tamsnetwork.com/images/EC042017NF/150083s.jpg "Pretty Peacock Classic Stampin’ Pad [ 150083 ]")
![Versamark Pad [ 102283 ]](https://assets1.tamsnetwork.com/images/EC042017NF/102283s.jpg "Versamark Pad [ 102283 ]")
![Basics Wow! Embossing Powder [ 165679 ]](https://assets1.tamsnetwork.com/images/EC042017NF/165679s.jpg "Basics Wow! Embossing Powder [ 165679 ]")
![Clear Wink Of Stella Glitter Brush [ 141897 ]](https://assets1.tamsnetwork.com/images/EC042017NF/141897s.jpg "Clear Wink Of Stella Glitter Brush [ 141897 ]")
![Beautiful Butterflies Hybrid Embossing Folder [ 164614 ]](https://assets1.tamsnetwork.com/images/EC042017NF/164614s.jpg "Beautiful Butterflies Hybrid Embossing Folder [ 164614 ]")
![Stylish Shapes Dies [ 159183 ]](https://assets1.tamsnetwork.com/images/EC042017NF/159183s.jpg "Stylish Shapes Dies [ 159183 ]")
![Nested Essentials Dies [ 161597 ]](https://assets1.tamsnetwork.com/images/EC042017NF/161597s.jpg "Nested Essentials Dies [ 161597 ]")
![Black & White & Gold Baker's Twine [ 166005 ]](https://assets1.tamsnetwork.com/images/EC042017NF/166005s.jpg "Black & White & Gold Baker's Twine [ 166005 ]")
![Opal Rounds Assortment [ 163298 ]](https://assets1.tamsnetwork.com/images/EC042017NF/163298s.jpg "Opal Rounds Assortment [ 163298 ]")

![Crumb Cake 12" X 12" (30.5 X 30.5 Cm) Cardstock [ 166787 ]](https://assets1.tamsnetwork.com/images/EC042017NF/166787s.jpg "Crumb Cake 12\" X 12\" (30.5 X 30.5 Cm) Cardstock [ 166787 ]")
![Country Woods 12" X 12" (30.5 X 30.5 Cm) Designer Series Paper [ 163393 ]](https://assets1.tamsnetwork.com/images/EC042017NF/163393s.jpg "Country Woods 12\" X 12\" (30.5 X 30.5 Cm) Designer Series Paper [ 163393 ]")
![Thoughtful Journey 6" X 6" (15.2 X 15.2 Cm) Designer Series Paper [ 163303 ]](https://assets1.tamsnetwork.com/images/EC042017NF/163303s.jpg "Thoughtful Journey 6\" X 6\" (15.2 X 15.2 Cm) Designer Series Paper [ 163303 ]")
![Season Of Elegance 12" X 12" (30.5 X 30.5 Cm) Specialty Designer Series Paper [ 164144 ]](https://assets1.tamsnetwork.com/images/EC042017NF/164144s.jpg "Season Of Elegance 12\" X 12\" (30.5 X 30.5 Cm) Specialty Designer Series Paper [ 164144 ]")
![Window Sheets [ 142314 ]](https://assets1.tamsnetwork.com/images/EC042017NF/142314s.jpg "Window Sheets [ 142314 ]")
![With You In Mind Photopolymer Stamp Set (English) [ 164747 ]](https://assets1.tamsnetwork.com/images/EC042017NF/164747s.jpg "With You In Mind Photopolymer Stamp Set (English) [ 164747 ]")
![Autumn Trees Bundle [ 165900 ]](https://assets1.tamsnetwork.com/images/EC042017NF/165900s.jpg "Autumn Trees Bundle [ 165900 ]")
![Light & Wonder Dies [ 165762 ]](https://assets1.tamsnetwork.com/images/EC042017NF/165762s.jpg "Light & Wonder Dies [ 165762 ]")
![Scenic Adventure Dies [ 165467 ]](https://assets1.tamsnetwork.com/images/EC042017NF/165467s.jpg "Scenic Adventure Dies [ 165467 ]")
![Stampin' Dimensionals [ 104430 ]](https://assets1.tamsnetwork.com/images/EC042017NF/104430s.jpg "Stampin' Dimensionals [ 104430 ]")
![Foam Adhesive Strips [ 141825 ]](https://assets1.tamsnetwork.com/images/EC042017NF/141825s.jpg "Foam Adhesive Strips [ 141825 ]")
![Pretty Peacock 8-1/2" X 11" Cardstock [ 150880 ]](https://assets1.tamsnetwork.com/images/EC042017NF/150880s.jpg "Pretty Peacock 8-1/2\" X 11\" Cardstock [ 150880 ]")
![Elegant Pine Snowflakes 12" X 12" (30.5 X 30.5 Cm) Designer Series Paper [ 166066 ]](https://assets1.tamsnetwork.com/images/EC042017NF/166066s.jpg "Elegant Pine Snowflakes 12\" X 12\" (30.5 X 30.5 Cm) Designer Series Paper [ 166066 ]")
![Peaceful Garden 12" X 12" (30.5 X 30.5 Cm) Glimmer Paper [ 165929 ]](https://assets1.tamsnetwork.com/images/EC042017NF/165929s.jpg "Peaceful Garden 12\" X 12\" (30.5 X 30.5 Cm) Glimmer Paper [ 165929 ]")
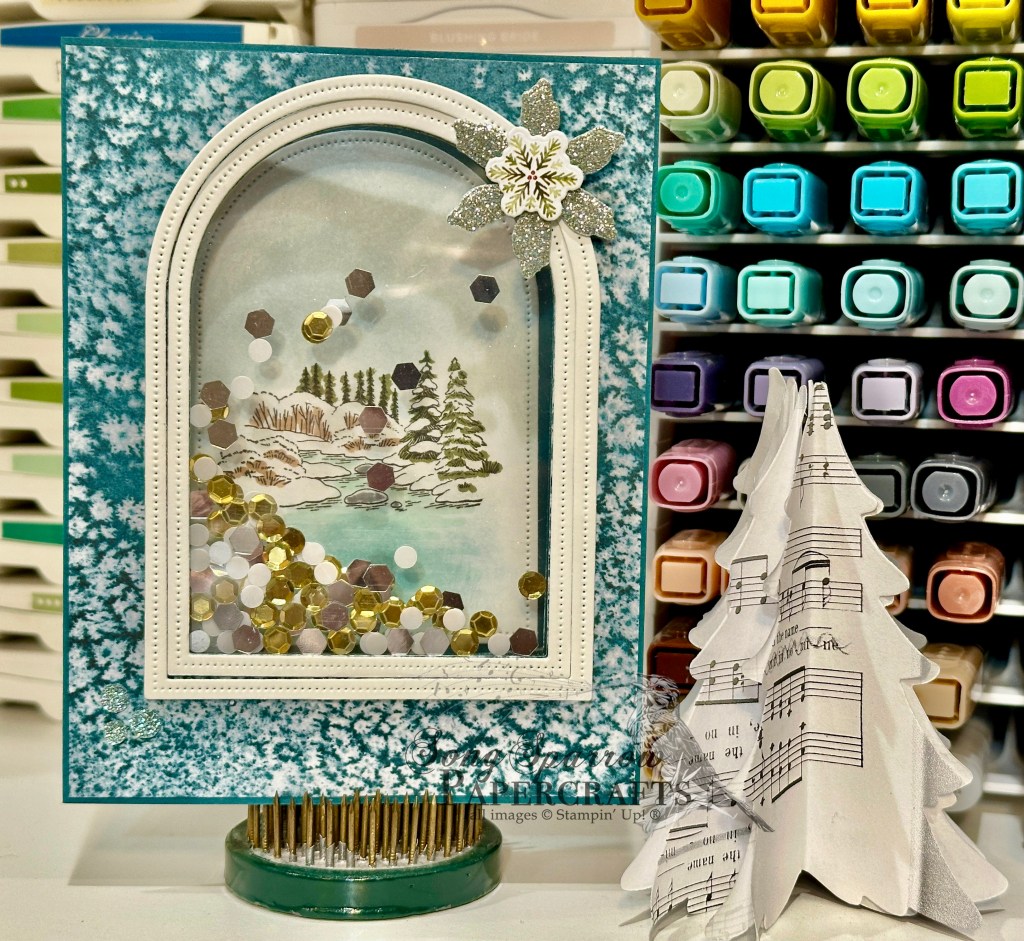
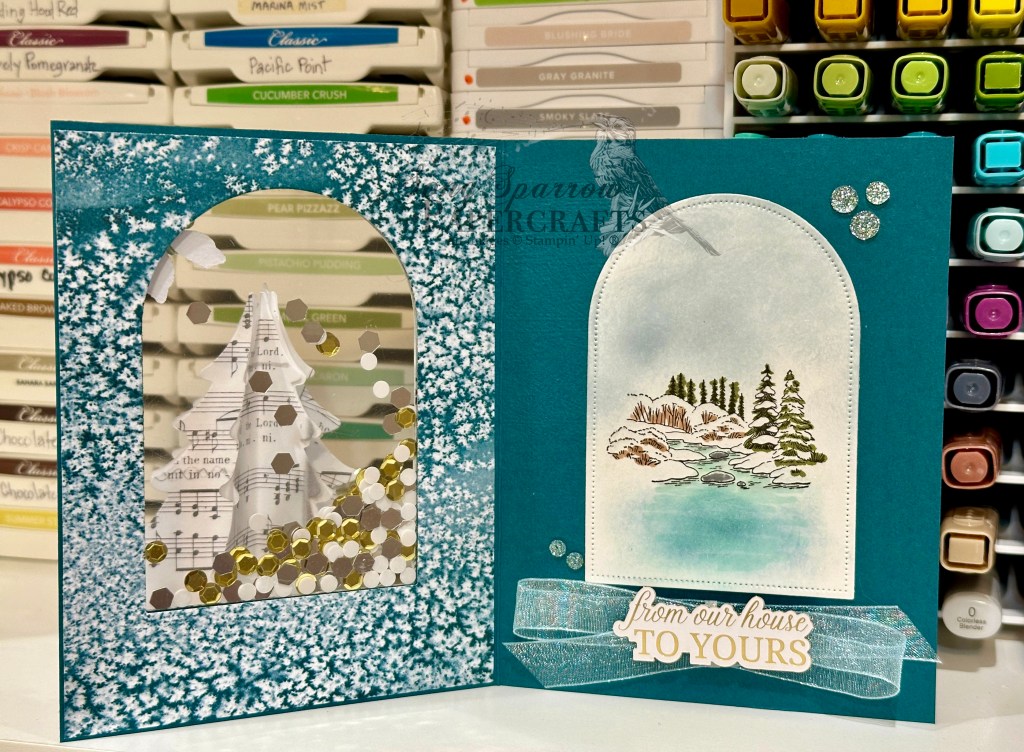
![Winter Scenes Cling Stamp Set (English) [ 166088 ]](https://assets1.tamsnetwork.com/images/EC042017NF/166088s.jpg "Winter Scenes Cling Stamp Set (English) [ 166088 ]")
![Old Olive Stampin' Blends Combo Pack [ 154892 ]](https://assets1.tamsnetwork.com/images/EC042017NF/154892s.jpg "Old Olive Stampin' Blends Combo Pack [ 154892 ]")
![Pool Party Stampin' Blends Combo Pack [ 154894 ]](https://assets1.tamsnetwork.com/images/EC042017NF/154894s.jpg "Pool Party Stampin' Blends Combo Pack [ 154894 ]")
![Small Blending Brushes [ 160518 ]](https://assets1.tamsnetwork.com/images/EC042017NF/160518s.jpg "Small Blending Brushes [ 160518 ]")
![Cloud Cover Classic Stampin' Ink Refill [ 165279 ]](https://assets1.tamsnetwork.com/images/EC042017NF/165279s.jpg "Cloud Cover Classic Stampin' Ink Refill [ 165279 ]")
![Misty Moonlight Classic Stampin' Pad [ 153118 ]](https://assets1.tamsnetwork.com/images/EC042017NF/153118s.jpg "Misty Moonlight Classic Stampin' Pad [ 153118 ]")
![Greetings For You Mix & Match Ephemera Pack (English) [ 166208 ]](https://assets1.tamsnetwork.com/images/EC042017NF/166208s.jpg "Greetings For You Mix & Match Ephemera Pack (English) [ 166208 ]")
![Balmy Blue 1/2" (1.3 Cm) Sheer Ribbon [ 165767 ]](https://assets1.tamsnetwork.com/images/EC042017NF/165767s.jpg "Balmy Blue 1/2\" (1.3 Cm) Sheer Ribbon [ 165767 ]")
![Traditional Sparkling Sequins [ 165875 ]](https://assets1.tamsnetwork.com/images/EC042017NF/165875s.jpg "Traditional Sparkling Sequins [ 165875 ]")
![Strawberry Slush 8 1/2" X 11" Cardstock [ 165625 ]](https://assets1.tamsnetwork.com/images/EC042017NF/165625s.jpg "Strawberry Slush 8 1/2\" X 11\" Cardstock [ 165625 ]")
![Wildflower Birthday 12" X 12" (30.5 X 30.5 Cm) Specialty Designer Series Paper [ 164591 ]](https://assets1.tamsnetwork.com/images/EC042017NF/164591s.jpg "Wildflower Birthday 12\" X 12\" (30.5 X 30.5 Cm) Specialty Designer Series Paper [ 164591 ]")
![Nature's Sweetness 12" X 12" (30.5 X 30.5 Cm) Specialty Designer Series Paper [ 162616 ]](https://assets1.tamsnetwork.com/images/EC042017NF/162616s.jpg "Nature's Sweetness 12\" X 12\" (30.5 X 30.5 Cm) Specialty Designer Series Paper [ 162616 ]")
![Sweet Jar Bundle (English) [ 165507 ]](https://assets1.tamsnetwork.com/images/EC042017NF/165507s.jpg "Sweet Jar Bundle (English) [ 165507 ]")
![Early Espresso Classic Stampin' Pad [ 147114 ]](https://assets1.tamsnetwork.com/images/EC042017NF/147114s.jpg "Early Espresso Classic Stampin' Pad [ 147114 ]")
![Crumb Cake Classic Stampin' Pad [ 147116 ]](https://assets1.tamsnetwork.com/images/EC042017NF/147116s.jpg "Crumb Cake Classic Stampin' Pad [ 147116 ]")
![Strawberry Slush Classic Stampin' Pad [ 165286 ]](https://assets1.tamsnetwork.com/images/EC042017NF/165286s.jpg "Strawberry Slush Classic Stampin' Pad [ 165286 ]")
![Strawberry Slush 3/8" (1 Cm) Faux Linen Ribbon [ 165274 ]](https://assets1.tamsnetwork.com/images/EC042017NF/165274s.jpg "Strawberry Slush 3/8\" (1 Cm) Faux Linen Ribbon [ 165274 ]")
![Strawberry Slush & Pretty In Pink Gems [ 165615 ]](https://assets1.tamsnetwork.com/images/EC042017NF/165615s.jpg "Strawberry Slush & Pretty In Pink Gems [ 165615 ]")
![Bright & Beautiful 6" X 6" (15.2 X 15.2 Cm) Designer Series Paper [ 161449 ]](https://assets1.tamsnetwork.com/images/EC042017NF/161449s.jpg "Bright & Beautiful 6\" X 6\" (15.2 X 15.2 Cm) Designer Series Paper [ 161449 ]")
![Pastel Ombre Glimmer 12" X 12" (30.5 X 30.5 Cm) Specialty Paper [ 164851 ]](https://assets1.tamsnetwork.com/images/EC042017NF/164851s.jpg "Pastel Ombre Glimmer 12\" X 12\" (30.5 X 30.5 Cm) Specialty Paper [ 164851 ]")
![Silver 12" X 12" (30.5 X 30.5 Cm) Foil Sheets [ 163387 ]](https://assets1.tamsnetwork.com/images/EC042017NF/163387s.jpg "Silver 12\" X 12\" (30.5 X 30.5 Cm) Foil Sheets [ 163387 ]")
![Berry Burst, Old Olive & White 12" X 12" (30.5 X 30.5 Cm) Glimmer Specialty Paper [ 163769 ]](https://assets1.tamsnetwork.com/images/EC042017NF/163769s.jpg "Berry Burst, Old Olive & White 12\" X 12\" (30.5 X 30.5 Cm) Glimmer Specialty Paper [ 163769 ]")
![Crushed Curry 8-1/2" X 11" Cardstock [ 131199 ]](https://assets1.tamsnetwork.com/images/EC042017NF/131199s.jpg "Crushed Curry 8-1/2\" X 11\" Cardstock [ 131199 ]")
![Timid Tiger 8 1/2" X 11" Cardstock [ 165626 ]](https://assets1.tamsnetwork.com/images/EC042017NF/165626s.jpg "Timid Tiger 8 1/2\" X 11\" Cardstock [ 165626 ]")
![Notes & Totes Dies [ 165240 ]](https://assets1.tamsnetwork.com/images/EC042017NF/165240s.jpg "Notes & Totes Dies [ 165240 ]")
![Pretty In Pink Classic Stampin Pad [ 163807 ]](https://assets1.tamsnetwork.com/images/EC042017NF/163807s.jpg "Pretty In Pink Classic Stampin Pad [ 163807 ]")
![Timid Tiger Classic Stampin' Pad [ 165278 ]](https://assets1.tamsnetwork.com/images/EC042017NF/165278s.jpg "Timid Tiger Classic Stampin' Pad [ 165278 ]")
![Crushed Curry Classic Stampin' Pad [ 147087 ]](https://assets1.tamsnetwork.com/images/EC042017NF/147087s.jpg "Crushed Curry Classic Stampin' Pad [ 147087 ]")
![2025–2027 In Color™ Flat Pearls [ 165192 ]](https://assets1.tamsnetwork.com/images/EC042017NF/165192s.jpg "2025–2027 In Color™ Flat Pearls [ 165192 ]")
![Two Tone Sparkle Gems [ 164633 ]](https://assets1.tamsnetwork.com/images/EC042017NF/164633s.jpg "Two Tone Sparkle Gems [ 164633 ]")
![Tear & Tape Adhesive [ 154031 ]](https://assets1.tamsnetwork.com/images/EC042017NF/154031s.jpg "Tear & Tape Adhesive [ 154031 ]")
![Lovely Garden 12" X 12" (30.5 X 30.5 Cm) Designer Series Paper [ 165524 ]](https://assets1.tamsnetwork.com/images/EC042017NF/165524s.jpg "Lovely Garden 12\" X 12\" (30.5 X 30.5 Cm) Designer Series Paper [ 165524 ]")
![Beautiful Butterflies Bundle (English) [ 164615 ]](https://assets1.tamsnetwork.com/images/EC042017NF/164615s.jpg "Beautiful Butterflies Bundle (English) [ 164615 ]")
![Layers Of Beauty Photopolymer Stamp Set (English) [ 163514 ]](https://assets1.tamsnetwork.com/images/EC042017NF/163514s.jpg "Layers Of Beauty Photopolymer Stamp Set (English) [ 163514 ]")
![Blooming Pearls [ 162238 ]](https://assets1.tamsnetwork.com/images/EC042017NF/162238s.jpg "Blooming Pearls [ 162238 ]")
![Adhesive Backed Sequins Trio [ 161206 ]](https://assets1.tamsnetwork.com/images/EC042017NF/161206s.jpg "Adhesive Backed Sequins Trio [ 161206 ]")
![Fresh Freesia 1/8" (3.2 Mm) Faux Velvet Ribbon [ 165540 ]](https://assets1.tamsnetwork.com/images/EC042017NF/165540s.jpg "Fresh Freesia 1/8\" (3.2 Mm) Faux Velvet Ribbon [ 165540 ]")


 Designer Series Paper")


 Specialty Designer Series Paper")
")


 Designer Series Paper")
 Specialty Paper")
 Designer Series Paper & Sticker Sheet (English)")
")


 Satin Ribbon")
