Christmas · Fun Folds · Holidays

Christmas Slider

Welcome to a new week, everybody! It was a relatively busy weekend for us with lots of bowling for the kiddo, but we spent it together and that sure made it fun! We capped off the weekend by bringing our feral momma kitty and her five precious week-old babies inside in preparation from exterior housework we’re having done this week that would have upended her cozy hiding spot. So we scooped up her little birthing hut (thank goodness she used it this time!) and brought her and the crew inside where they’ll all stay until babies are big enough to go to the local rescue group for adoption and mom is recovered enough to (finally) get fixed. I’ll have to share some precious baby photos once I can get momma to let me take some good ones.

This week we’re on to a new design theme — all that glitters is gold. With so many beautiful gold foiled and glittery products in the Stampin’ Up! lineup, it should be a week of shiny goodness! We get started with some goodies from the new suite called Traditions of Christmas and pair them up with a few oldies, like gold foil sheets, Regal Distressed Patterns paper, and a few die sets.

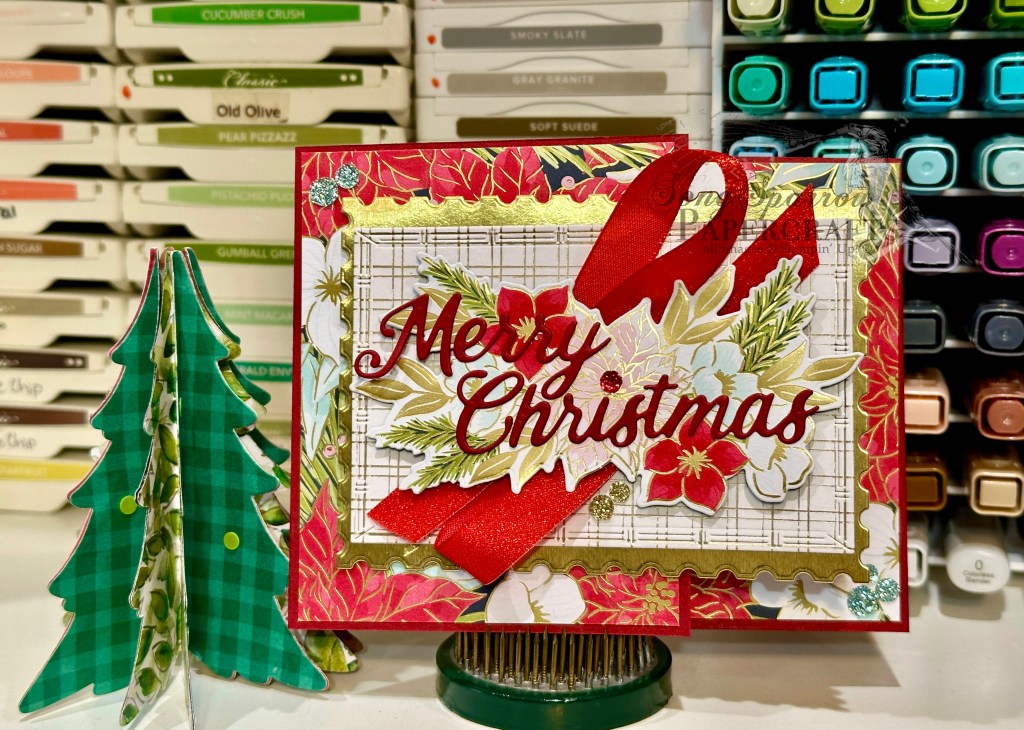
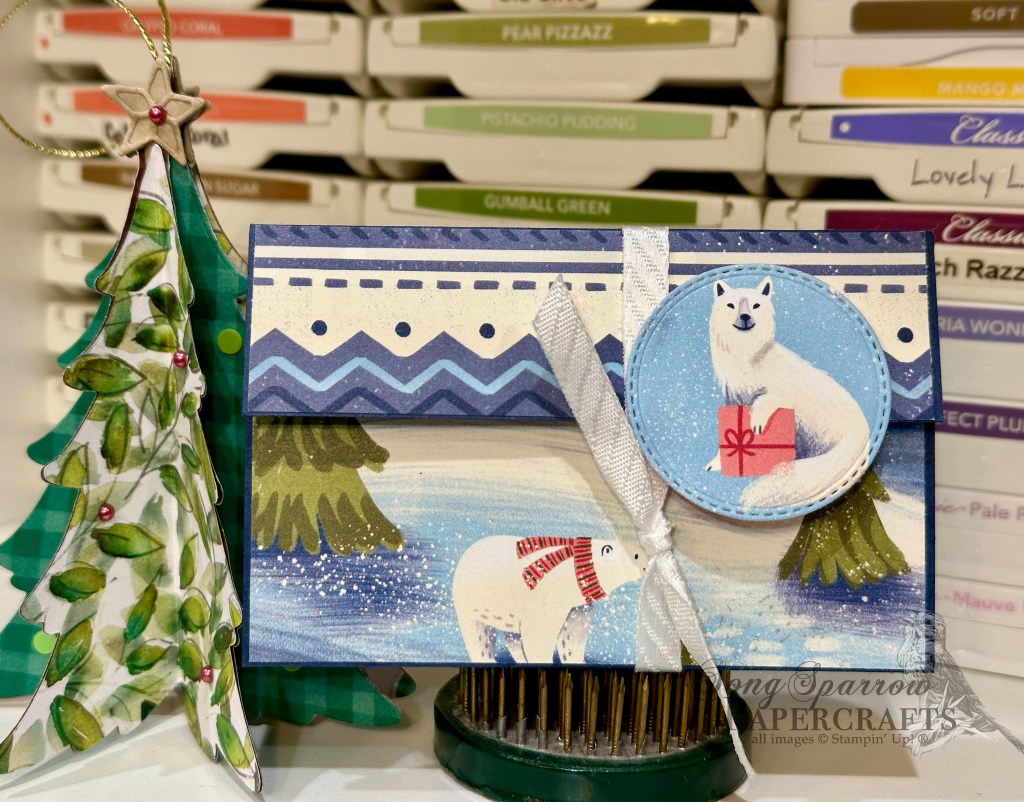
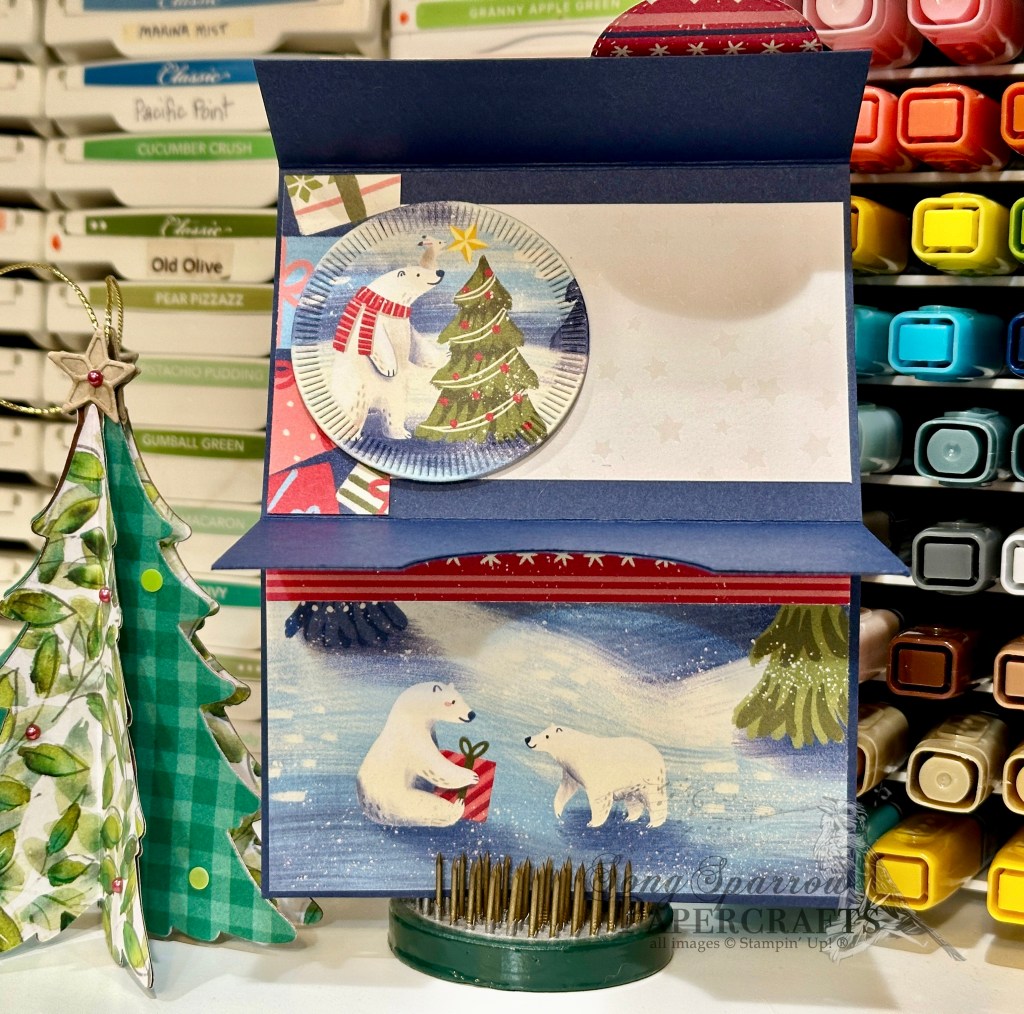
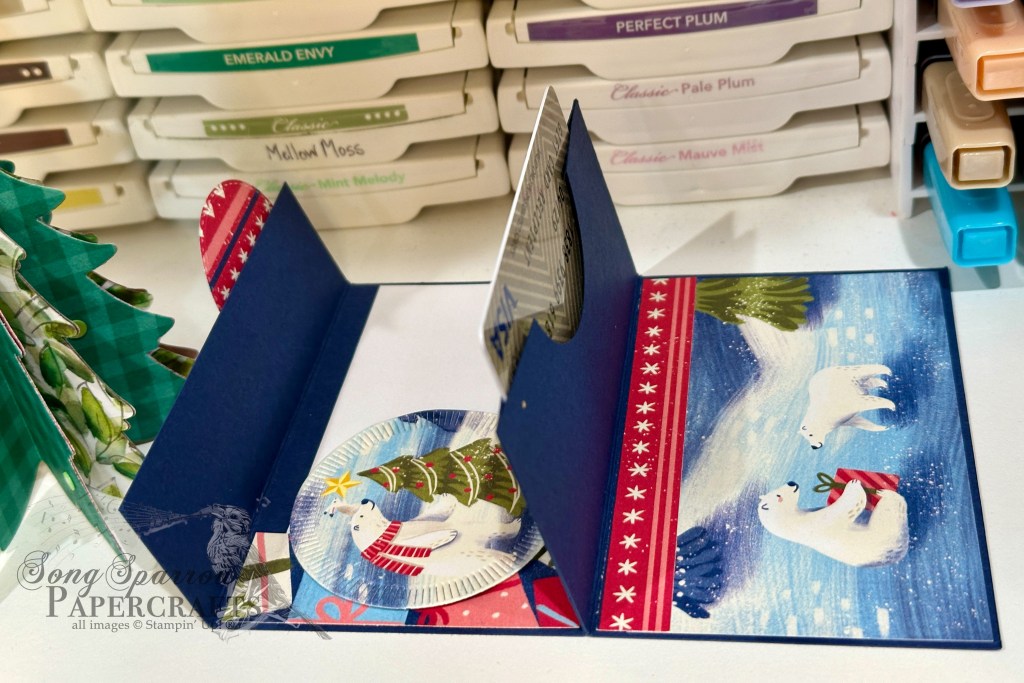
You might recognize this gift card layout and think that it looks familiar. And you would be exactly right! We’re flipping our new slider fun fold on its side to create today’s beautiful gift card design. I’m currently working on the tutorial and hope to have that up on the site later this week!

We get started with a base of Cherry Cobbler cardstock and score it to create the off-center barn fold look with the right panel serving as the pocket for our slider section. A sheet of the beautiful Traditions of Christmas paper serves as the backdrop for our card front. The overlapping focal panel backdrop is a combination of gold foil cut with the Perennial Postage dies and a sheet of the Regal Distressed Patterns paper cut with the Textured Notes dies. We use a combination of the Christmas Greenery dies and paper snips to cut the floral elements from another sheet of the Traditions of Christmas paper. The larger spray of florals is the focal image for the front panel, while the smaller fussy-cut elements serve as the cover for the slider pocket of the gift card panel. The front floral spray is adhered over a twist of the Real Red shiny ribbon using several layers of dimensionals. We finish everything off with a scattering of the Traditional Sparkling sequins across the front panel and add just a few on the gift card panel.

When adhering the florals on the sliding panel, ensure that they are flat for a fully unobstructed open/close of the inside slider gift card panel.

I hope you’ll drop in tomorrow to see what we have glittering next!

Product List
birthday · Gifting · Treat Boxes

Birthday Pinch Box

We’re already halfway through this week. I’m not quite sure how that happened! This week, we’re making 3D designs. And today’s design is a super simple fold-over pinch treat box. There are all sorts of variations of this box out there – mostly varying in size or shape. Regardless of which one you choose to make, the box comes together in a snap! And today’s birthday box uses the Wildflower Birthday paper pack and ephemera sheet.

The box itself is made from a full sheet of Pool Party cardstock. After scoring along both the long and short edges and making some strategic cuts, you fold in the flaps to create the bottom of the bag and the top flap. A quick little pinch of the sides at the top create the closure for the fold-over flap. I use small Velcro dots to act as my bag closure because I find it the simplest and most effective method, but I know some folks have used magnets and some have chosen to have a ribbon closure. But for me, I’ll stick with the easy button! *wink-wink*

I used two coordinating sheets of the Wildflower Birthday paper to decorate the bag. I intend to use this as a little birthday giftie, so I chose the sheet with cakes on it as the focal section (both front & back of the box) and then used the decorative scalloped sheet for the bag flap portion. I tied a bow using the gold striped sheer ribbon and decided I needed a little more oom-pah-pah for the bag flap, so I pulled a few gold twigs and a small leaf from the Wildflower Birthday ephemera sheet. Together, these elements provide the perfect eye-catching addition to the bag flap.

These gift boxes come together so quickly that it would be easy to trim and score a whole stack of cardstock in no time flat! If you’d like to give this cute gift box a try, you can download the tutorial here.

Product List
Mother’s Day

So Grateful

Have you seen all of the new products that hit the online store yesterday? There are so many wonderful new suites and bundles that it’s a little hard to choose a favorite! But one of the new bundles that ranks at the top is the Notes & Totes bundle that we’re using today to make a cute little giftie to go with mom’s handmade card.

This might look a little overwhelming, but the dies make it super easy to create this cute little gift bag! I’ve filled this one with a gift card, some stickies, and chocolates. And there’s still room for a little tube of hand cream or lip gloss if you wanted to throw one in.

To get started, we cut the sides of the bag out of Timeless Plaid with the largest Notes & Totes die. Fold along the score lines and then adhere together with tear-n-tape. To give the look of leather, I cut the straps and accent pieces for the bag out of Crumb Cake cardstock. Adhere the vertical straps first and then the piece on the bottom of the bag with tear-n-tape. I used glue dots to adhere the handles and accent pieces on each side of the bag. I tied a small bow of Pretty in Pink bordered ribbon around one strap and then filled the bag with goodies. I cut a small notecard with the included die and then stamped the sentiment from Notes & Totes in Melon Mambo and tucked it in the bag amongst the goodies. Voila! A cute little something to leave next to mom’s coffee!

I’ll be back on Friday with some more inspiration for Mother’s Day. I hope you’ll pop in!

Product List
Christmas · Gifting

Beary Cute Envelope

Howdy, crafty friends! I got a little side-tracked yesterday with a cookie project and ran out of time to play in my crafty stash. I was trying out a new cookie recipe to take to a cookie exchange. And once again, I forgot how much I hate messing with the candy coating. I can never get it to melt right and then end up making a big mess. I guess the good thing about this particular recipe is that the cookies are supposed to resemble snowballs, and snowballs are lumpy. Soooooo my lumpy candy coating is perfect! Hahaha!

I’m still furiously working away on gift tags and gift holders. And today, I’m bringing you a super easy gift card holder that I ran across on Pinterest that uses a standard card base. I decided to pull together some of my retired favorites for this one because the paper is perfect for my intended recipient!

We get started with a base of Night of Navy cardstock. It’s scored at 1 1/4 inches, 4 inches, 6 inches, and 8 inches and then folded to create the center gift card pocket. I used a 2-inch circle punch to make the pull-out section in the center of the gift card pocket. The pocket itself is held together with tear-and-tape. The Beary Christmas patterned paper pack was a part of last year’s holiday catalog, and I just loved it so much that I stocked up when it went on sale. I was able to use a collection of scraps from another project to cover the panels on the outside and inside of the gift envelope. I thought the sweater-patterned strips were perfect accents for the flap and adjoining panels. I found a cute star-patterned cardstock from the Irresistibly Yours paper pack (long ago retired) in my scrap stash that is the perfect panel for the gift message. Our smaller circle focal elements on the outside and inside of our gift envelope are diecut to highlight cute little critters. I used the Changing Leaves and Spotlight on Nature dies for these circles. I thought the decorative edges were perfect designs elements that add a lot of interest to the pop-out panels. The fox panel on the front is adhered to the flap with dimensionals, which gives a nice gap under which I slid the knotted diagonal striped ribbon to keep the envelope closed.

I just love how this turned out, and it came together quickly. The hardest part was choosing what adorable critters from the Beary Christmas paper that I wanted to highlight on each portion of the gift envelope.

Products used in this design:
Night of Navy Cardstock
Beary Christmas (retired), Irresistibly Yours (retired) DSP
2″ circle punch
Changing Leaves, Spotlight on Nature dies

Christmas · Gifting

Tree Pocket Gift Holder

We’re gearing up for Christmas here at Song Sparrow. Every day that Amazon shows up, my husband says something about the number of boxes that end up on the porch. *snicker* Hey, I can’t help it if the warehouses decide to box orders in a multitude of boxes.

But speaking of getting ready for Christmas, I’m still working on gifts and gift tags. And today’s design is a super cute gift-giving envelope that I plan to hang on the Christmas tree for a little holiday hide-n-seek. I ran across this super cute envelope in one of my Pinterest searches, and it’s super easy to put together.

We get started with a 6×6 sheet of Take a Bow patterned paper and score from corner to corner on both sides. Then you fold to create the envelope. For this one, the flap on the envelope is supposed to stay open, which makes it a snap to put together. I used two smaller strips of the Take a Bow paper to cover my score line in the center and also to serve as a nice break in the pattern underneath the focal panel. Our focal panel starts with a base of the (retired) Garden Walk patterned paper that is cut using the Peaceful Season decorative square die. Then I just layered the stocking and sentiment from the Joyful ephemera packs right on top using the dimensionals. The gift panel is a sheet of the (retired) More Dazzle specialty paper with a to/from panel cut from white cardstock using the (retired) Stitched Nested Labels dies. I cut some greenery fronds from Granny Apple Green cardstock using the Golden Greenery dies and adhered them to the back of the gift panel with dimensionals. A cute red bow tied from Cherry Cobbler & Gold metallic ribbon finish off the gift panel nicely. The whole kit & caboodle will hang from the tree with some green thread.

The hardest part of this whole design was picking what ephemera I wanted to use! Otherwise, it comes together in a snap. And don’t you think it will just be the cutest way to give cash or a gift card?

Product List
Friends for Life · Fun Folds · Gifting

Happy Birthday, Friend

Today we’re continuing to explore all the many ways we can use the Friends for Life bundle by Stampin’ Up! to create fabulous projects. I don’t know about you, but I like to have birthday cards of all kinds on hand for those moments when I need to grab a birthday card on the run. And today’s design is a two-for-one — a gift and a beautiful card!

This gift card design is a modified version of the Slide Up Gift Card Holder by fellow demo Jackie Bolhuis over at Klompen Stampers. I simplified the design to have a slide out gift card holder rather than the slide up version Jackie makes, but both are equally as wonderful for providing a lovely way to give a gift card. What I really loved about this design is it offers so much visual interest. From a beautiful card front that serves double duty as the gift card pocket to the ample space on the inside to dress things up, you have plenty of opportunity to express your creativity.

We get started with a base of Pretty in Pink cardstock. The cardstock is halved on the long edge for this design, but rather than scoring in the center, you’ll instead score at 3 3/4-inches and 9 1/4-inches. That gives you a center portion of standard size and then a flip-up flap and smaller bottom flap for the card front. The smaller flap should be adhered to the card base on either side to create the small pocket, which will be visible when the card front is closed. I chose a sheet of the Flowering Zinnias designer paper as the background panel and cut it so that a small border shows on each of the front panels. The fun background image is the large heart from the Friends for Life die set. I cut a Pretty in Pink heart and used the center portion as the background for the Pretty in Pink glimmer hearts. For the glimmer hearts, nestle the leaf heart die inside the large heart die when diecutting. I then used both the outside and inside hearts on top of the Pretty in Pink solid heart. The sentiment panel is diecut from Pretty in Pink using the smudge banner and then the sentiment is stamped tone-on-tone toward one end. The word friend from Friends for Life is stamped in Pretty in Pink on white cardstock and then diecut with the coordinating die. The sentiment is adhered to the card front with dimensionals .Two small hearts are diecut from white glimmer paper and used as eye-catching accents for the sentiment. The card front is finished of with a few In Color shimmer gems.

The inside of the card is finished to coordinate with the card front. The top flip panel has a piece of the Flowering Zinnias designer paper. Two shimmery banners diecut from glimmer paper and cut using the Filled with Fun dies bring festive fun to this top panel. The inside sentiment from Filled with Fun is stamped on white cardstock diecut using the Autumn Leaves dies. TIP: In order to get the banner long enough for the sentiment, you’ll want to use the extension method.

The gift card holder itself is a pocket within a pocket. It’s made two-sided so that the portion visible through the card front disappears into the background. A tug on the Pretty in Pink bordered ribbon reveals the gift holder and the gift card in the pocket on the reverse side. Each side has a piece of the Flowering Zinnias paper to coordinate with the rest of the card, along with a repeat of the happy birthday sentiment. I chose to keep the inside of my card very simple, but you can see where you could really dress it up.

I hope you’ll join me tomorrow for a more masculine inspired design.

Products used in today’s gift card:
Pretty in Pink, Basic White cardstock
Flowering Zinnias, In Color glimmer, White glimmer DSP
Friends for Life, Filled with Fun stamps
Friends for Life, Autumn Leaves, Filled with Fun dies
Pretty in Pink bordered ribbon
In Color shimmer gems, In Color resin dots
Dimensionals
Adhesives