Christmas · Gifting

Beary Cute Envelope

Howdy, crafty friends! I got a little side-tracked yesterday with a cookie project and ran out of time to play in my crafty stash. I was trying out a new cookie recipe to take to a cookie exchange. And once again, I forgot how much I hate messing with the candy coating. I can never get it to melt right and then end up making a big mess. I guess the good thing about this particular recipe is that the cookies are supposed to resemble snowballs, and snowballs are lumpy. Soooooo my lumpy candy coating is perfect! Hahaha!

I’m still furiously working away on gift tags and gift holders. And today, I’m bringing you a super easy gift card holder that I ran across on Pinterest that uses a standard card base. I decided to pull together some of my retired favorites for this one because the paper is perfect for my intended recipient!

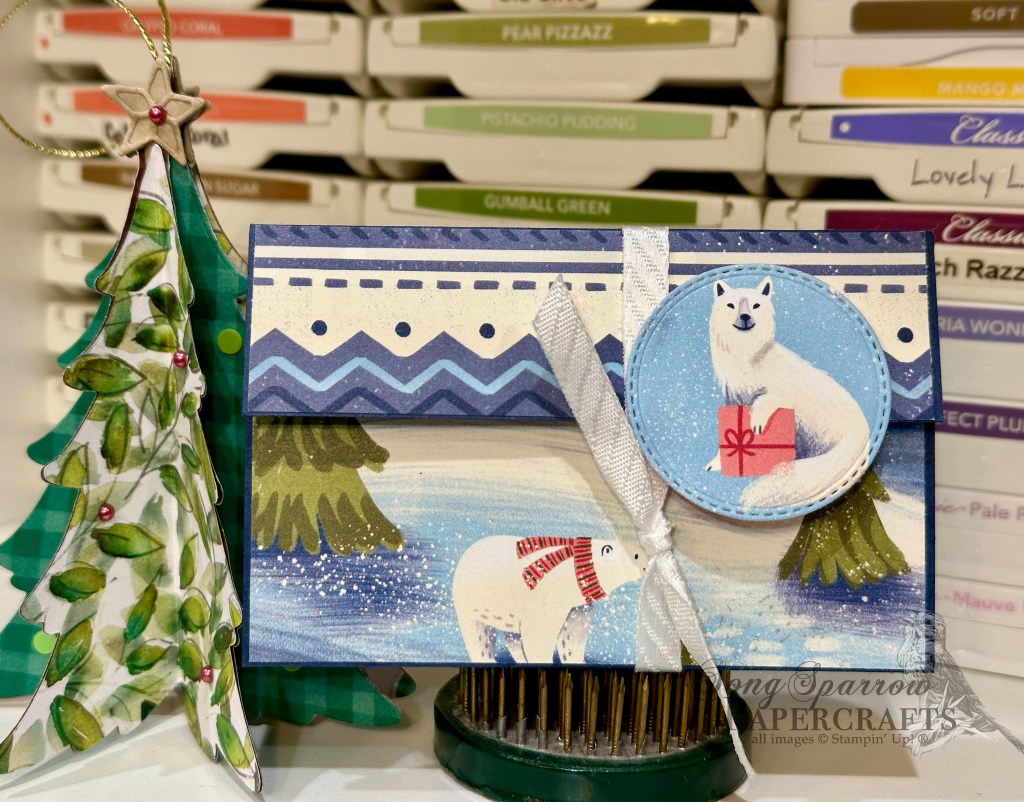
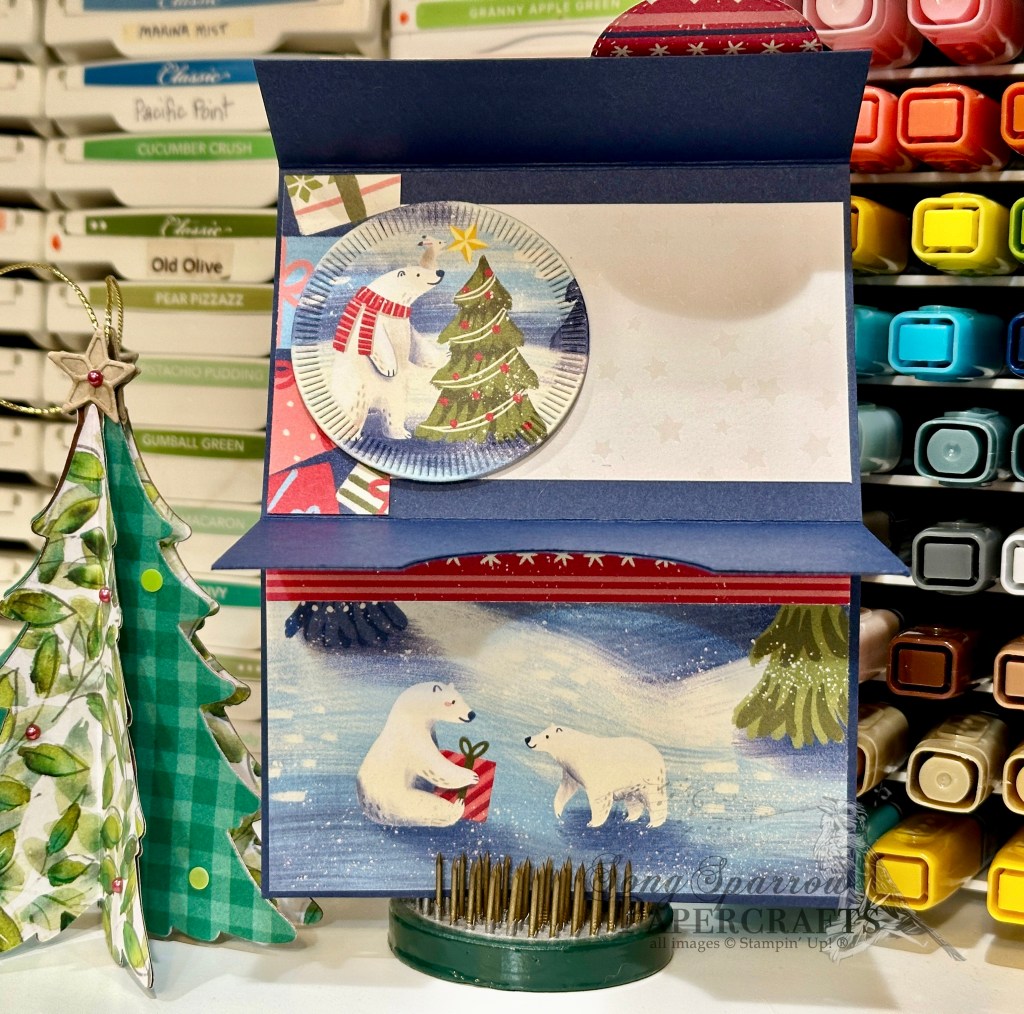
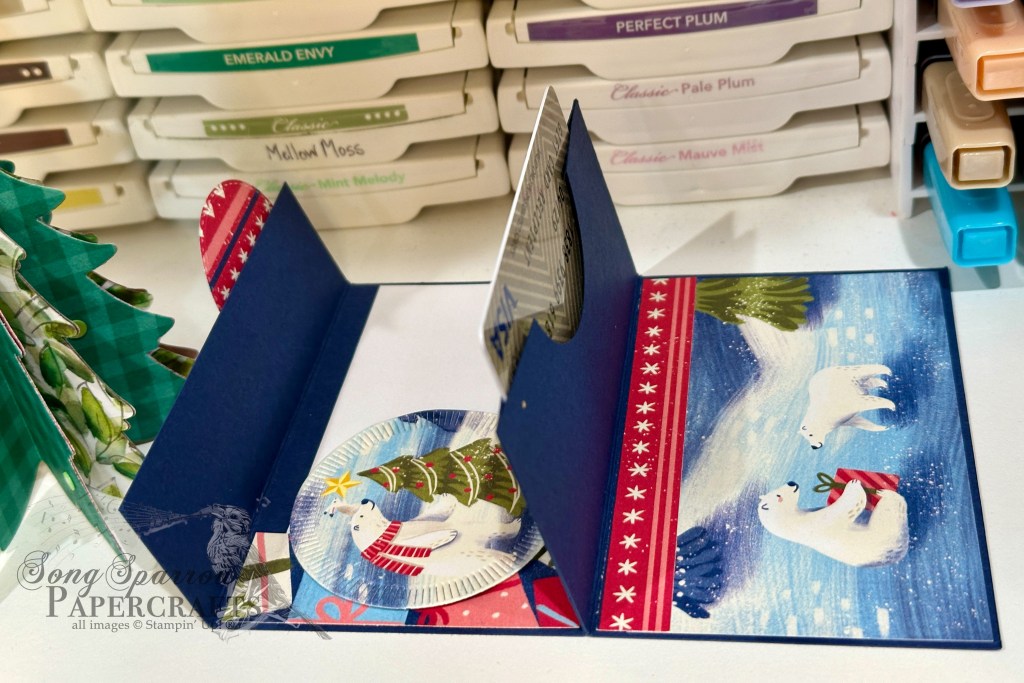
We get started with a base of Night of Navy cardstock. It’s scored at 1 1/4 inches, 4 inches, 6 inches, and 8 inches and then folded to create the center gift card pocket. I used a 2-inch circle punch to make the pull-out section in the center of the gift card pocket. The pocket itself is held together with tear-and-tape. The Beary Christmas patterned paper pack was a part of last year’s holiday catalog, and I just loved it so much that I stocked up when it went on sale. I was able to use a collection of scraps from another project to cover the panels on the outside and inside of the gift envelope. I thought the sweater-patterned strips were perfect accents for the flap and adjoining panels. I found a cute star-patterned cardstock from the Irresistibly Yours paper pack (long ago retired) in my scrap stash that is the perfect panel for the gift message. Our smaller circle focal elements on the outside and inside of our gift envelope are diecut to highlight cute little critters. I used the Changing Leaves and Spotlight on Nature dies for these circles. I thought the decorative edges were perfect designs elements that add a lot of interest to the pop-out panels. The fox panel on the front is adhered to the flap with dimensionals, which gives a nice gap under which I slid the knotted diagonal striped ribbon to keep the envelope closed.

I just love how this turned out, and it came together quickly. The hardest part was choosing what adorable critters from the Beary Christmas paper that I wanted to highlight on each portion of the gift envelope.

Products used in this design:
Night of Navy Cardstock
Beary Christmas (retired), Irresistibly Yours (retired) DSP
2″ circle punch
Changing Leaves, Spotlight on Nature dies

Christmas · Gifting

Tree Pocket Gift Holder

We’re gearing up for Christmas here at Song Sparrow. Every day that Amazon shows up, my husband says something about the number of boxes that end up on the porch. *snicker* Hey, I can’t help it if the warehouses decide to box orders in a multitude of boxes.

But speaking of getting ready for Christmas, I’m still working on gifts and gift tags. And today’s design is a super cute gift-giving envelope that I plan to hang on the Christmas tree for a little holiday hide-n-seek. I ran across this super cute envelope in one of my Pinterest searches, and it’s super easy to put together.

We get started with a 6×6 sheet of Take a Bow patterned paper and score from corner to corner on both sides. Then you fold to create the envelope. For this one, the flap on the envelope is supposed to stay open, which makes it a snap to put together. I used two smaller strips of the Take a Bow paper to cover my score line in the center and also to serve as a nice break in the pattern underneath the focal panel. Our focal panel starts with a base of the (retired) Garden Walk patterned paper that is cut using the Peaceful Season decorative square die. Then I just layered the stocking and sentiment from the Joyful ephemera packs right on top using the dimensionals. The gift panel is a sheet of the (retired) More Dazzle specialty paper with a to/from panel cut from white cardstock using the (retired) Stitched Nested Labels dies. I cut some greenery fronds from Granny Apple Green cardstock using the Golden Greenery dies and adhered them to the back of the gift panel with dimensionals. A cute red bow tied from Cherry Cobbler & Gold metallic ribbon finish off the gift panel nicely. The whole kit & caboodle will hang from the tree with some green thread.

The hardest part of this whole design was picking what ephemera I wanted to use! Otherwise, it comes together in a snap. And don’t you think it will just be the cutest way to give cash or a gift card?

Product List
Coming Soon · Fun Folds

Miss You

Happy Monday, crafty friends! Our weekend turned out to be waaaaaay busier than I anticipated. Between the kiddo’s bowling league and lessons and my own singing engagements, we kinda met each other coming and going this weekend. And that left no time to craft – womp, womp!

But here we are starting a bright, shiny new week and I have some bright & shiny new things to share with you from the upcoming Stampin’ Up! Online Exclusives release that will go live next week! This week, we’re going to pair some gorgeous new patterned paper with all sorts of things from the crafty stash — from other new Online Exclusives to current products. It’s going to be a fun week.

We’re getting started with a really cool fun fold called the Curtain Fold because it really shows off the new Marbled Elegance paper beautifully! Our card starts with a base of Melon Mambo cardstock. The backdrop for our gorgeous curtain fold is a combination of Melon Mambo foil paper (sadly retired) and the creamy Season of Elegance foiled paper that’s been embossed using the Painted Texture embossing folder. The sheet of Marbled Elegance is a combination of pinks, shades of white, and gold foil. Our sentiment from Sending Love is stamped in Melon Mambo on Very Vanilla and then diecut with the Everyday Details circle die. I used the leftover portion of a piece of white glimmer paper cut with Spotlight on Nature dies as the eye-catching border around our sentiment. A strip of iridescent striped trim anchors it against our sparkly background. A few iridescent rhinestones basic jewels and gold hearts finish things off with the perfect amount of twinkle.

The Marbled Elegance paper really is stunning, and I’m looking forward to showing you all the ways you can incorporate it into your everyday designs to give a little extra pop.

Products used in today’s card:
Melon Mambo, Basic White cardstock
Marbled Elegance (coming soon), Season of Elegance, White glimmer, Melon Mambo foil (retired) DSP
Painted Texture embossing folder
Sending Love stamps
Spotlight on Nature, Everyday Details dies
Iridescent striped trim
Iridescent rhinestones basic jewels, gold hearts (coming soon)
Dimensionals
Adhesives

Product List
Christmas · Fun Folds · Holidays

Season of Evergreens

We’ve made our way to another weekend and halfway through the month of September already! This week, we’ve been All About Christmas and have been exploring a whole selection of Stampin’ Up! holiday products. Today, we’re revisiting a set of products that carried over from last year’s holiday release. And it’s no wonder because the Merriest Trees set and the Winter Meadow paper pack both offer so many ways to create beautiful cards and not just holiday designs!

Today, we’re pairing up the Merriest Trees dies with one of my all-time favorite fun folds — the Center Step fun fold. I also gave a new coloring technique a try to make my own patterned paper for the trees. So let’s take a closer look at how this fun fold comes together.

We get started with a base of Pretty Peacock cardstock. A sheet of the Winter Meadow designer series paper serves as our backdrop for the center focal panel. Our pair of trees start with a custom coloring technique using Pretty Peacock and Old Olive ink. (Tune in on my YouTube channel on Tuesday for a full tutorial during the next episode of Terrific Tuesdays!) I also splatter some white craft ink to give the look of snowflakes falling in front of the branches. Using all of the various sizes of trees in the Merriest Trees die set, I cut out tree panels and then selected ones to layer to create each tree. Dimensionals on the bottom fringes of the branches help give a little dimension and the look of the stacked branches. Each tree is then decorated with garland and stars cut from textured gold specialty paper. The trees are adhered to the bottom of the center fold portion of the card base with dimensionals. Our sentiment consists of a mat of gold foil cut with the banner die from the Peaceful Season die set. The sentiment from Merriest Trees is heat embossed in gold on white cardstock and then diecut using the Peaceful Season dies. It’s adhered to the top of the center panel with dimensionals. I tucked a few bunnies by the trees for a little added interest and then scattered snowflakes in the background.

Next week we’re going to be exploring the new Christmas ephemera. I hope you’ll tag along!

Products used in today’s card:
Pretty Peacock, Basic White cardstock
Watercolor paper, Winter Meadow, gold foil, textured gold DSP
Merriest Trees stamps & dies
Peaceful Season, Grove dies
Gold embossing powder
Pretty Peacock, Old Olive reinker
Snowflakes, rhinestone jewels
Dimensionals
Adhesives

Product List
Fun Folds · sketches · Sketchy Fridays

Sketchy Fridays: Brighten Your Day

I don’t know about you, but I can’t believe that we’re wrapping up the month of August and marching right into September already! I mean, it’s Labor Day weekend. Whaaaaaa?! I feel like the older I get the faster the time seems to fly by.

And speaking of time flying by, it’s time again for another installment of Sketchy Fridays, where each week we’ll be using a card sketch to design our featured card. Right now, we’re working through a full series of designs using the card sketches found on page 22 of the current Stampin’ Up! Annual Catalog.

This week’s card is based on Sketch #20 and features the gorgeous Splendid Autumn designer paper from the new Stampin’ Up! Holiday Mini catalog that launches on September 4th.

This paper pack just turns out sheet after sheet of stunning designs, and I’m loving each and every one. I’m pairing up a fun fold shared by my upline Patty Bennett with Sketch #20 from the Annual Catalog. I’ve taken the liberty of changing the orientation of the sentiment piece. And that’s the best thing about using a sketch — it gives you a place to start and then you tweak things to work for you.

So our fun fold starts with a base of Blackberry Bliss cardstock. Rather than scoring in the center, we score and fold at 3-inches and 7.25-inches to give us our front fold with a standard-sized inside message panel. I decided to double mat the gorgeous sheet of Splendid Autumn patterned paper and used Flirty Flamingo to bring out the pinky-orange hues of the leaves. I cut and mounted the patterned paper so that the panels meet to form a complete picture when the card is closed. When open, there is a small border of Flirty Flamingo visible on the left panel and a slight overhang of the Splendid Autumn sheet on the right panel. The sentiment from Changing Leaves is stamped in black on white cardstock and then diecut using the Greetings of the Season die. I diecut a leaf from gold mercury vellum using the Autumn Leaves dies and adhered to the sentiment panel. The sentiment panel is mounted to the left panel of the card front using dimensionals. We finish off the card front with an assortment of regal foiled dots, which release next week. I felt like it was a shame to waste the remainder of the Splendid Autumn sheet, so it serves as the decorative strip next to the message panel on the inside of the card. I added a few additional gold mercury vellum leaves to tie things together.

I loved this fun fold because it offered the perfect opportunity to showcase a gorgeous sheet of paper. When I have paper that’s so pretty that I don’t want to cut it, I search for layouts like this one that let me put it on full display. Give it a try the next time you have a sheet of paper too pretty to cut up!

Tomorrow, we’re closing out our In the Woods card series with a fall sunset. I hope you’ll stop by and check it out!

Products used in today’s card:
Blackberry Bliss, Flirty Flamingo, Basic White cardstock
Splendid Autumn (coming soon!), gold mercury vellum DSP
Changing Leaves stamps
Autumn Leaves, Greetings of the Season dies
Regal foiled dots (coming soon!)
Dimensionals
Adhesives

Product List
Fun Folds · L2S Group Instahop

You Can Do This

This week, we’re making our way through the woods as we feature a whole array of woodsy products from the Stampin’ Up! lineup. Today, we’re dreaming of winter with this diamond fold card design featuring the Thoughtful Journey designer series paper and Frosted Forest bundle.

Stampin’ Up! has released some gorgeous watercolored patterned paper packs over the last year, and I think I have loved each and every one. I thought it would be fun to use the snowy scene paper from the Thoughtful Journey paper pack and create a pop-out using Frosted Forest since the evergreens closely resembled those in the paper. So let’s see how it all comes together.

We get started with a base of Blackberry Bliss cardstock. I love how this really pulls forward the purple hues in the patterned paper. Our diamond panel leaves a little of the Blackberry Bliss peeking around the edges and the mat for our panel is a piece of white glimmer cardstock to be reminiscent of twinkling snowdrifts. I used the Frosted Forest masks to create the evergreen using a combination of Blackberry Bliss, Fresh Freesia, Night of Navy, and Misty Moonlight inks and then diecut it using the coordinating Frosted Forest die. I went over the tree with Wink of Stella and added iridescent ribbon for added sparkle on the diamond panel. The sentiment from Saying Hey is stamped in black on white cardstock and then diecut using the Happy Little Things banner die. A few iridescent faceted gems finish things off nicely with an additional twinkly touch.

Isn’t this just a gorgeous scene?! Today’s card is a part of the Luv 2 Stamp Group Instagram Hop, which goes live today at 9 AM Pacific Time (PST).  Click here to head over to my Instagram feed at 11 AM Central and check out what the other demos in our L2S Group have created for you today! Tomorrow we’ll be walking in the woods with another fun fold design using the new Splendid Autumn designer series paper. I hope you’ll pop in and check it out!

Want to see how a Diamond Fold card layout comes together from start to finish? You can watch the full Terrific Tuesdays video where we make one together and snag a FREE printable tutorial to boot. Click here to download the PDF.

Products used in today’s card:
Blackberry Bliss, Basic White cardstock
Thoughtful Journey, white glimmer DSP
Frosted Forest masks and dies
Saying Hey stamps
Happy Little Things dies
Iridescent striped trim
Iridescent faceted gems
Dimensionals
Adhesives

Product List
Changing Leaves · Fun Folds

Not Without You

Welcome to another bright & shining Monday. I don’t know about you, but it was a busy weekend for us. The kiddo finished up his summer bowling league and took some lessons in preparation for the start of the fall league. So we spent a lot of time at the bowling alley. But given the inferno we’re experiencing here in North Texas, that worked out just fine!

This week, we’re starting a new card series called In the Woods. Each we’ll be using products from Stampin’ Up! that fit our weekly theme. Today, I’m feeling all the fall vibes and thought it would be appropriate to get started with the Changing Leaves bundle paired up with the Splendid Autumn designer series paper that launches next week on September 6th.

To give an opportunity for our gorgeous leaves from the Changing Leaves bundle to take center stage, we’re working with the barn fold today. And we get started on today’s card with a base of Crushed Curry cardstock. We cover each of the front flaps of our barn fold with a strip of paper from the Splendid Autumn paper pack. The pattern is a very subtle brushed, grainy texture that gives some nice depth in our color palette. Next up, we emboss a quarter panel of Blackberry Bliss cardstock using the Changing Leaves hybrid embossing folder and then diecut it into a smaller panel with one of the larger Deckled Rectangles dies. On a quarter sheet of white cardstock, I traced the outside of the trio of leaves from the Changing Leaves die set in pencil to make it easier to stamp each of the leaf images and then diecut all at once. I used a combination of fall colors to ink each leaf from the stamp set, including Copper Clay, Blackberry Bliss, and Crushed Curry, and imitated the look of leaves in a color metamorphosis by going over sections of each leaf with other colors for a subtle two-toned look. I diecut a few additional leaves in gold foil and Blackberry Bliss and then layered everything together to create a leafy focal section behind the sentiment panel. Our hexagonal sentiment panel consists of a white center panel and mat of Peach Pie glimmer paper. The sentiments from Everyday Greetings and Changing Leaves are stamped in Blackberry Bliss. Our focal panel section is finished off with Blackberry Bliss & Gold textured ribbon from the upcoming Holiday Mini catalog, releasing next week on September 6th. A few shiny sequins finish things off with a little extra sparkle and help draw the eye across all the gorgeous design elements on the front of this card.

Tomorrow we’re working with another fun fold design and another gorgeous sheet from the Splendid Autumn paper pack to create a gorgeous peek-through scene. You won’t want to miss it!

Products used in today’s card:
Crushed Curry, Blackberry Bliss, Basic White cardstock
Splendid Autumn (coming soon!), gold foil, In Color glimmer DSP
Changing Leaves stamps, dies & hybrid embossing folder
Deckled Rectangles
Everyday Greetings stamps
Hexagon punch
Blackberry Bliss & Gold textured ribbon (coming soon!)
Shiny sequins
Dimensionals
Adhesives

Product List
Fun Folds · Terrific Tuesdays

Diamond Birthday

Do you ever see a special fold and think WOW? That’s precisely what happened when a fellow demonstrator shared the Diamond Fold with our team. And I’m glad to finally have the time to sit down and learn this fold. It looks far more complicated than it is, and it is absolutely a perfect way to spotlight beautiful patterned paper!

This week, we’re looking at all the ways we can use traditional holiday products in everyday designs. Today, we’re pairing the Season of Gold & Green designer paper with part of the new Season of Elegance suite to make this gorgeous Diamond Fold card.

We get started on today’s fun fold design with a base of Shaded Spruce cardstock. We cut a standard-sized base but in landscape orientation with a fold in the center and then one to divide the second half. I chose two different patterns from the Season of Green & Gold designer series paper pack, a current Stampin’ Up! Online Exclusive. We’re bringing out the gold foiling by using the gold foil specialty paper as an accent color on our diamond panel. Our focal image is the largest tree from the new Peaceful Evergreens bundle. It’s stamped and diecut from Mossy Meadow with a gold bow diecut and added to the top. The new Peaceful Evergreens die set that will release on September 6th with the Holiday Mini catalog includes a set of dies to make paper bows and it really makes it easy to have perfect bows for your cards! Our sentiment from Adventurous Sky is stamped in black on Very Vanilla cardstock and then diecut using the Peaceful Season dies. This panel is mounted on a gold foil banner diecut with the largest banner from that same die set. I added some drusy embellishments for lots of extra sparkle and to help draw the eye across the card front.

Tomorrow we’ll be using a sketch to create a super fun thank-you design. I hope you’ll stop by and check it out.

Want to know how to make today’s card step-by-step? You can catch this week’s of episode of Terrific Tuesdays to see this card come together from start to finish. I’ve also provided a FREE PDF tutorial here. Please note that some of the products shown will not be available until September 6th.

Products used in today’s card:
Shaded Spruce, Mossy Meadow, Very Vanilla, Basic White cardstock
Season of Green & Gold, gold foil DSP
Adventurous Sky stamps
Peaceful Evergreens stamps & dies (coming soon!)
Peaceful Season dies (coming soon!)
Drusy embellishments (coming soon!)
Dimensionals
Adhesives

Coming Soon · Holiday Mini Catalog

Thinking of You Always

Welcome to a bright, new shiny week, crafty friends! It’s started off a busy one here for sure, hence the lateness of my post. Today is the first day of school in our school district. Don’t you find it funny when you’ve spent weeks with your kid picking out new clothes for school and kid then decides to wear things he’s worn a hundred times?!

This week, I thought it would be fun to tour the box of preorder goodies I just received for the Stampin’ Up! Holiday Mini catalog. So each day, I’ll be bringing you a sneak peek of items that will be available in my online store on September 4th. Ready??

We’re getting started today with some gorgeous designer series paper called Regal Winter. This paper pack is full of gorgeous floral images in hues of Berry Burst, Blackberry Bliss, Cherry Cobbler, Night of Navy, Pretty Peacock, Shaded Spruce, and Wild Wheat. And it’s even prettier in person! I have soooo many ideas running in my head for this paper, and I decided to start simple with one of my favorite fun folds. So let’s see how this barn fold comes together.

We get started with a base of Blackberry Bliss cardstock. This is scored so that our short edges meet in the center of the standard-sized card front. Our focal panel is matted in textured gold paper and I chose a sheet of floral pattern in Blackberry Bliss from the Regal Winter pack. Our sentiment panel is matted in a base of gold mercury vellum that has been diecut using the Greetings of the Season dies. The sentiment from the new stamp set called Winterly Tree Tops is stamped in black on white cardstock and is then diecut using the Unbounded Love dies. I tucked some gold greenery stems behind the sentiment panel, which are diecut from gold foil paper with the Painted Lavender dies. A twist of the new Blackberry Bliss & Gold textured ribbon helps tie things together. I added a few of the new drusy embellishments around the sentiment for extra sparkle and pizzazz, and let me just say, they call these gems drusy for a reason! (drusy: dru·​sy  zē usually -er/-est covered with minute crystals containing cavities lined with crystals)

Tomorrow, things are going to feel a little more like Autumn. I hope you’ll pop in and check it out!

Products used in today’s card:
Blackberry Bliss, Basic White cardstock
Textured gold, gold foil, mercury vellum, Regal Winter (coming soon!) DSP
Winterly Tree Tops stamps (coming soon!)
Greetings of the Season, Unbounded Love, Painted Lavender dies
Blackberry Bliss & gold textured ribbon (coming soon)
Drusy embellishments (coming soon!)
Dimensionals
Adhesives

Product List
Botanicals · Terrific Tuesdays

Busy Florals

We are already halfway through this week. Every time I get to Wednesday, I feel like the week is just whizzing by! Maybe it’s because it feels like we still have so much to do before the regular routine of school days gets started. Or maybe it just comes with getting older.

This week, we’re tiptoeing through the garden as we make cards inspired by the beauty of nature. And today, I’m going to show you ways to use “difficult” patterned paper. Do you ever fall in love with a pack of patterned paper but then find yourself stumped when it comes to actually using it? That’s precisely what has happened to me with the Unbounded Beauty paper pack by Stampin’ Up! I fell in love with the patterns but then just haven’t been able to find designs where the patterns make sense. Until now.

In this week’s episode of Terrific Tuesdays, we are using two card layouts to showcase that paper that you are finding hard to use. We get started with a card that I like to call the tuxedo fold. We choose two complimentary paper patterns, bearing in mind the backside of one sheet will be visible and must also be considered in our paper choice. And one sheet will be folded to reveal a portion underneath so that it almost looks like the collar of a tux shirt on each end. Then our sentiment panel sits on top as a prominent feature on our card. Suddenly, our overwhelming pattern now fits perfectly in a design — no longer overwhelming but instead a beautiful backdrop.

Our second design literally cuts our busy patterns down to size. I like to call this design a patterned paper or designer paper (DSP) grid since we use strips of busy patterns to build a grid on our card front, leaving the center section for a small sentiment. The patterned paper strips can be of any size from 1- to 2-inches, depending on how large you wish to make your center sentiment. Not only does this design tame some wild patterns, it also allows you to use up scraps of even your favorite patterned papers.

To see the tuxedo fold and DSP grid designs at work, tune in to this week’s episode of Terrific Tuesdays where we made 2 cards from scratch using these two card layouts.

Tomorrow, we’re making things easy with the Nature’s Sweetness paper. Pop by and check it out.

Products used in card above — tuxedo fold:
Summer Splash, Pretty in Pink, Basic White cardstock
Unbounded Beauty DSP
Inspiring Snapdragons, Something Fancy stamps
Spotlight on Nature, Inspiring Snapdragons dies
Pretty in Pink ribbon
In Color shimmer gems, tinsel gems
Dimensionals
Adhesives

Products used in card above — DSP grid:
Basic White cardstock
Berry Burst, Unbounded Beauty DSP
Unbounded Love stamps
Everyday Details dies
Iridescent striped trim
Iridescent discs
Dimensionals
Adhesives

Product List
Product List