Fun Folds · January Mini Catalog

Grateful Forever

Welcome in, crafty friends, on this frigid Saturday! We had a brief warm-up yesterday with temps well above freezing and today we’re back down in the low 20s. We’re thankful for the brief period of time we had to thaw out from all of the ice and snow Winter Storm Fern left us. And we’re praying for all of those in the areas that are still in the midst of the freeze and are without power and basic utilities. Having been there during Winter Storm Uri back in 2021, we personally know all too well what that is like!

We’re continuing our design series using the new Days Like This Memories & More card pack from Stampin’ Up! I love having at least one set of Memories & More cards on hand for those times when I need to make a quick card for a specific occasion. Today we’re using the Beautiful Butterflies dies and Lovely & Beautiful paper to make a fun fold card. Our Memories & More cards are perfect for the finishing touches on the inside of our card. Let’s see how this one comes together.

We get started with a base of Lemon Lolly cardstock on a standard A2 card base. We’re using a sheet of the Lovely & Beautiful patterned paper as the backdrop for our card front. The front panel focal panel is a fold-over panel of Lemon Lolly shimmer paper cut using the Beautiful Butterflies dies. This fold-over panel is cut just large enough to give us our butterfly shape for the front with about a half-inch strip to adhere to the inside panel of our card. Our butterfly details are made from vellum and black cardstock cut with the Beautiful Butterflies dies. The vellum is colored with the black Stampin’ Blend and then a layer of Wink of Stella is added to both pieces for some nice subtle twinkle. The detail pieces are adhered to the butterfly panel with glue dots. The front-facing part of our sentiment is the word grateful from the Unforgettable Times ephemera pack and is adhered at the base of the fold-over butterfly panel with several layers of dimensionals. I added some clear opal rounds on either side of the butterfly panel to draw the eye in to our front focal section.

When you lift the butterfly panel, lots of extra detail is revealed, including the second portion of our sentiment. I used the hybrid embossing folder to cut a detail butterfly from the Lemon Lolly glimmer paper and adhered it to the back of the fold-over panel. I love this hidden detail and it makes the butterfly more realistic because there’s a front and back view to their wings, after all. I cut a smaller butterfly from the hybrid embossing folder panel and used gold foil to add the details to coordinate with the gold foil forever sentiment from the Unforgettable Times ephemera pack. A small bow tied from the black & gold baker’s twine ties the two sentiment panels together.

We open our card to reveal our sentiment panel — complete with additional butterfly detailing. Here we’re using our Memories & More cards to add the finishing touches to the inside of our card. A larger 4×6 card from the pack serves as the patterned panel for the left-hand side of the message panel. I had a scrap of one of the smaller 3×4 butterfly cards left in my stash, and I cut out one of the butterflies to add to the corner of the patterned sheet. We use half of the more subtle butterfly-patterned 3×4 card to decorate the message panel. A few Peach Pie pearls finish off the opposing corners of the inside panels.

I love how each of the panels of this card reveals a fun surprise. And while it looks like a super complicated design, it really comes together quickly thanks to beautiful paper and Memories & More cards. I have a super quick & easy bonus card to bring you this evening once I knock out today’s around-the-house to-do list. I hope you’ll drop back by to check it out.

Product List
Fun Folds · January Mini Catalog · Online Exclusives

All Good Things

Howdy, friends, and welcome back on this bright & shiny Tuesday. We’re still frozen in under a pretty thick layer of ice here in North Texas, and it’s Day 2 of no school. That may sound a little strange to anyone who lives in a colder climate, but we don’t get very many days of ice or snow in winter so we’re not prepared to handle it. And we have a blanket of solid ice without any associated traction, so roads are a mess at best. But the goodness is that we’re finally expected to get above freezing this afternoon and should experience some thawing. Will it be enough to get us all back to work & school tomorrow? Well, that remains to be seen. But for now, I’m enjoying a beautiful sunrise out my craft room window.

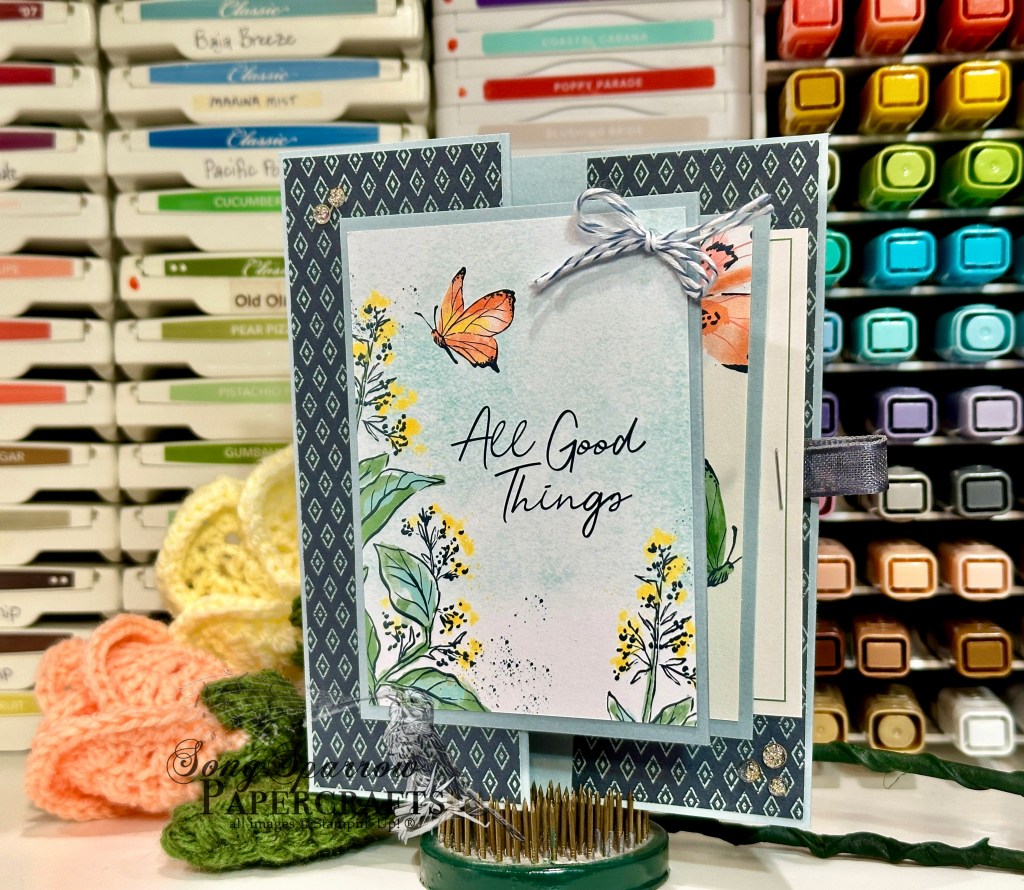
This week, we’re using the new Days Like This Memories & More cards to create our projects. This pack contains a combination of 3×4 and 4×6 decorative cards that could be used for scrapbook pages or for cards and other projects. And today we’re using the smaller cards to create a double Z fun fold card.

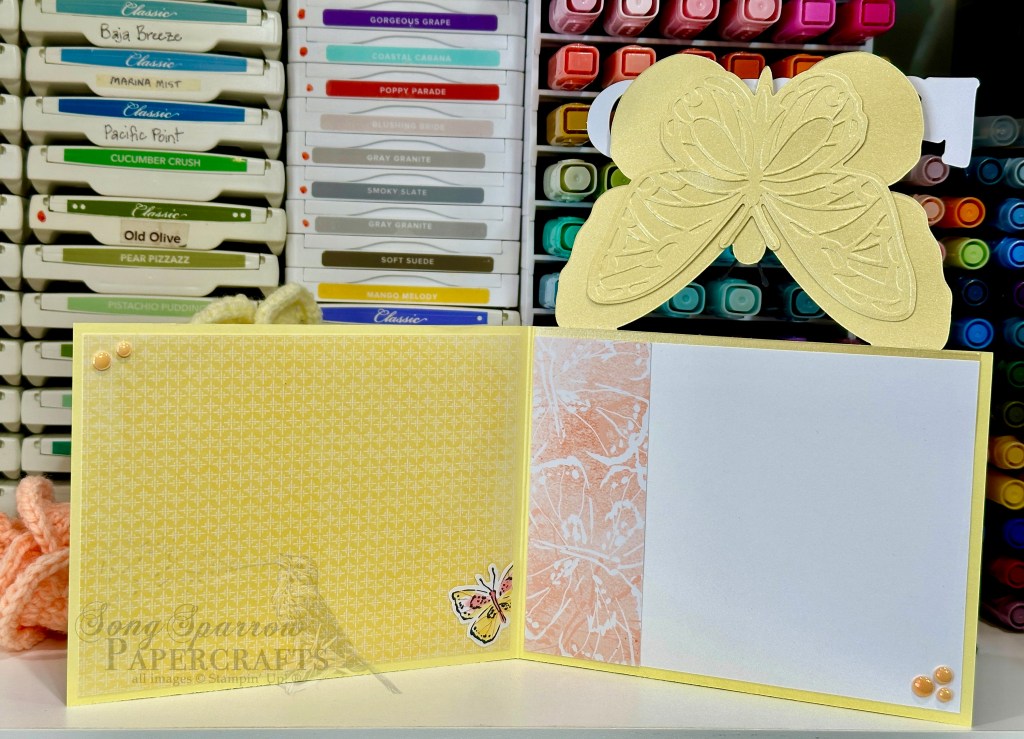
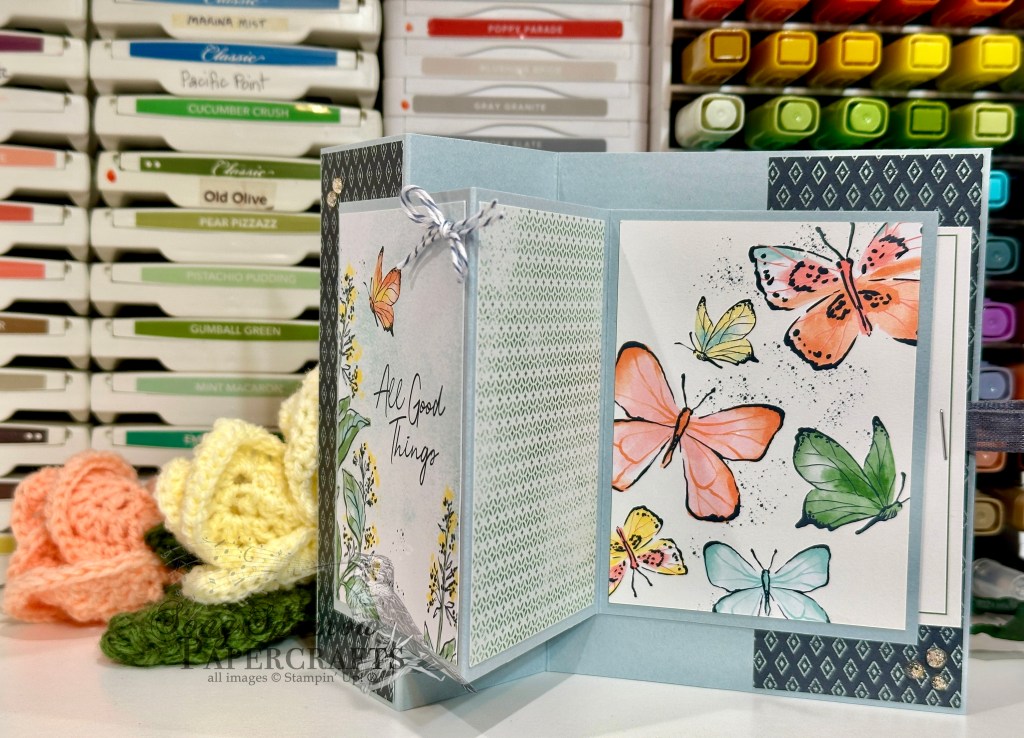
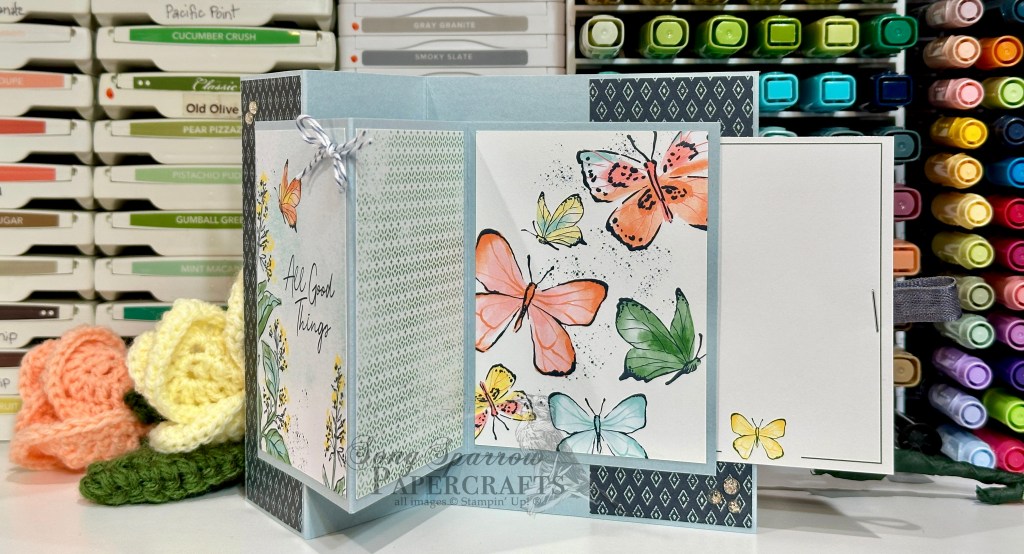
I’m using a standard A2 card base (4.25 x 5.5-inch card front) for today’s card because I prefer to keep things sized so they’re easy to mail, but you might decide to size up to have the scale of the smaller Z-panel be more in line with the overall card size. We’re getting started with a base of Cloud Cover cardstock. We’re going to score as usual in the center to create a standard card base and then score again in the center of the front panel to create our base Z-fold. I used a scrap of Lovely Blossoms patterned paper to create the two 2-inch panels for the smaller front Z-flap and inside peek-through panel.

Then we start working on our focal Z-panel, which is a little smaller. I sized the Cloud Cover base so that none of the small cards from the Days Like This card pack had to be cut down. I wanted to preserve all of the pretty details of each of the patterns selected — the front sentiment panel, middle pattern, and inside butterflies. Caveat: this does impact how much you’re able to open the card — it will not lie flat when open. (Side note: I need to work on some kind of sliding mechanism for the next one I make like this.) To preserve all of the pretty card details means that our message panel — a blank card with tiny butterfly detail on the bottom — is a hidden, pull-out element. I used a piece of the Secret Sea bordered ribbon and stabled it in place to serve as the pull-out tab for the message panel. Some Wink of Stella on the smaller butterflies in each of the panels adds some twinkly interest, along with the Cloud Cover baker’s twine from the 2025 Advent Calendar and a few iridescent foil gems.

Today’s design is definitely a craft on the fly design, and there are a few things that I would change if I had taken more time. But sometimes the fun part of the creative process is just following an idea all the way through and seeing how it turns out. Do you ever just let yourself run with idea?

I hope you’ll tune in tomorrow for another look at the Days Like This Memories & More cards.

Product List
Botanicals · January Mini Catalog

You Can Do Anything

Happy Saturday, crafty friends! It’s a cold and icy day here in North Texas, just as the weathermen predicted. The kiddo has had fun sliding down the steep driveway, and I’ve puttered around sweeping off the porch and setting up makeshift shelters for the cat food bowls and temporary potty box so our (very spoiled) outside cats don’t have to leave the back porch. Hubby made us all a big breakfast and we’ve been enjoying loafing around since, which leaves me time to play in the craft room!

I got a brand new box of goodies earlier this week that I’ve been dying to take out and make some projects. Today, I decided to make another project with the new Lovely & Beautiful patterned paper pack and Fabulous Sentiments Product of the Month stamp set. I flipped through my trusty fun fold template book put together by fellow demo Jackie Bolhuis over at Klompen Stampers to source the card layout.

So this design gets started with a quarter panel of Blackberry Bliss cardstock. I love the contrast that this small panel provides and the stability it lends to the overall card design. Our folding panel is a sheet of Fresh Freesia that is scored to give us a tick-smaller standard quarter panel in the center section. The top and bottom flaps of our folded section then open to reveal the inside message panel of our card. I chose a sheet of the smaller foiled floral pattern paper from the Lovely & Beautiful paper pack as the patterned sheet for the card front panels. The top fold is just slightly larger than the bottom so that it overlaps slightly, and so we build our overhanging focal panel on the top panel. Our focal section gets started with a scrap of Blackberry Bliss cut with the Nested Essentials die. The sentiment from the January Product of the Month Fabulous Sayings stamp set is stamped in Fresh Freesia on white cardstock and then cut with paper snips. The sentiment is adhered over a bow of white & gold ribbon with dimensionals onto the Blackberry Bliss panel. This panel is adhered to the bottom of the top flap with dimensionals. A flower and leaves from the Covered in Flowers accents serve as our floral accents, and they’re colored with small blending brushes using Fresh Freesia and Mossy Meadow before being covered with Wink of Stella. They’re tucked behind the sentiment and adhered with a combination of dimensionals and glue dots. I added a gold drusy embellishment as the flower center to coordinate with the foiled paper and added a group of In Color pearls on the sentiment panel for a pop of twinkly color contrast to draw the eye to the sentiment.

I’m planning to bring you some more designs this weekend. I hope you’ll drop back by and see what I have in store for you!

Product List
Fun Folds · January Mini Catalog

Because You’re Amazing

Welcome back and welcome to the midweek! With most of us going back to work and kiddos returning to school, this is either the first full week for some or simply feels like the longest short week ever for others. *wink*

But how about some new product inspiration to give a little bright spot in this week for you?! Did you know that a whole bunch of new stuff hit the online store yesterday? Yep — there are 3 new kits, a whole new batch of online exclusives, PLUS all of the products in the new January Mini catalog. Soooooo many goodies. And this week, we’re getting a good look at the brand new Lovely Blossoms suite that includes paper, ribbon, embellishments, stamps, dies, and an embossing folder.

Today’s featured fun fold card puts another one of the ready-made card panels on display. The new Lovely Blossoms paper pack includes a full sheet of these panels of varying sizes. Today’s panel is a little smaller, which lets some of the other cool goodies in this suite get a chance at the spotlight. Let’s take a closer look.

Our card front starts with a base of Cloud Cover cardstock. For this fun fold, we’re using a standard A2-sized base. The backdrop for our front focal panel is a combination of two patterned papers. The mat is from the Traditions of Christmas pack and our floral panel is from the new Lovely Blossoms pack. Our focal panel base is white cardstock that is embossed with the new Lovely Stripes embossing folder. This folder gives a nice, deep impression in the paper making the details really pop. I used my paper snips to cut closely around the focal image from the ready-made panel I cut from the Lovely Blossoms paper. The little detail of the overhanging leaves just added a nice soft touch to the card front. The because sentiment is from the Words of Beauty set and is stamped on vellum with Secret Sea ink and then set with clear embossing powder before being diecut with the coordinating outline die. It’s adhered to the focal panel with glue dots to keep the adhesive invisible. The focal panel is adhered to our embossed panel with dimensionals over a twist of the new Cloud Burst ribbon and we finish off our focal panel with a dash of subtle twinkle with the new Moody Palette glossy dots.

When we open our small front focal panel, we reveal the other portion of our sentiment I think you’re amazing from the Words of Beauty set. Our sentiment panel sits atop a beautiful backdrop of some of the smaller ready-made panels from the Lovely Blossoms paper. We add some interest to our backdrop using the Stylish Shapes dies and the set of postage stamp dies in the 2025 Advent Calendar.

The sentiment is stamped on vellum in Secret Sea and heat set with clear embossing powder before being cut with a smaller banner die from the Stylish Shapes die set. It’s adhered over a faux bow of Cloud Cover baker’s twine from the 2025 Advent Calendar. And we finish off our sentiment panel with a little pop of twinkle with some Secret Sea Moody Palette glossy dots. The card opens up to a blank white message panel which covers the anchor portion of our smaller front focal panel.

Tomorrow we’re going to let the stamps & dies from the Lovely Blossoms bundle take center stage. I hope you’ll drop in and see.

Product List
Botanicals · Fun Folds · January Mini Catalog

Thankful Blossoms

Welcome in, friends! I hope your week is off to a good start. This is the first full week I will have had since the flu and the holidays. And I’m still not sure what day it is! *snicker* All of the kiddos in our area are returning to school today so the roads are back to being busy.

This week, I’m playing with some of my new January Mini Catalog goodies with an up-close look at the new Lovely Blossoms bundle by Stampin’ Up! This terrific bundle includes it all — stamps, dies, embossing folder, paper, embellishments…the works! And one of my favorite things about the paper in this set is the sheet of ready-made card elements. With a pretty tight schedule these days, it’s nice to have ways to still make handmade smiles without hours in the craft room.

Today’s fun fold card starts with a base of Secret Sea cardstock. I’m using the barn fold here which places the flaps opening squarely in the center of the card front. But I used an overly large overlay panel to give the look of a traditional cohesive card front. Isn’t that such a fun twist on this barn fold?! I used one of the largest ready-made panels from the Lovely Blossoms sheet and cut it down just a smidge with the largest Textured Notes die. The panel is then matted with Secret Sea glimmer paper and the full panel is adhered just to the left flap of our barn fold. The sentiment from the Lovely Arrangements stamp set is stamped in Secret Sea on white cardstock and then diecut with the Words of Beauty middle-sized sentiment panel die. The sentiment is adhered over a twist of the new white with gold ribbon in the bottom corner of our front focal panel. And we add bits of sparkle with some of the brand new Secret Sea sparkle dot essentials.

Now comes the fun part — the inside of our card. The message panel has a flower image from the Lovely Arrangments set stamped in the bottom corner. Each of the flaps is covered with a coordinating lighter floral and vine patterned sheet from the Lovely Blossoms set. And then we cover the exposed part of our front card panel with a coordinating Secret Sea patterned sheet from the Lovely Blossoms paper pack.

I just love how this one comes together. You could even add an inside sentiment on the left inside panel. That would be a really nice variation actually. *making note to self* Tomorrow we’re going to be making another fun fold with this suite and getting a sneak peek at a few more new products. I hope you’ll drop in and see!

Products used:
Secret Sea, Basic White cardstock
Lovely Blossoms, Peaceful Garden glimmer DSP
Textured Notes, Words of Beauty dies
Lovely Arrangements stamps
Secret Sea ink
White with gold ribbon
Sparkle dot essentials
Dimensionals
Adhesives

Thankful

Thanks Abounds

Happy Monday, everyone! I hope you enjoyed your weekend. Although we were on the go most of the weekend doing the usual errands and chores, we got to enjoy some beautiful weather and time together. And sometimes that makes the most mundane of tasks a lot more enjoyable.

We’re on to a new design series this week, and it seems apropos to do some thankful reflection as Thanksgiving is quickly upon us. I don’t know about you, but outside of personal reflection on thankfulness this time of year, I also try to express words of thanks to others — be it friends, family, coworkers, or someone else who just deserves a word of thanks. So we’re getting started today with a lovely book binding fold that combines the Gathering Together paper with the Label Me Grateful dies and With You in Mind sentiment.

This lovely card comes together in a jiffy thanks to a layout that does all the work. We get started with a base of Early Espresso cardstock. Two different patterns from the Gathering Together paper pack serve as our card front and the inspiration for our sentiment panel. The sentiment panel base is a circle of vellum cut using the Spotlight on Nature dies. A variety of foliage is cut with the Label Me Grateful dies using an assortment of cardstock and specialty paper — Cajun Craze, Earthen Toned Metallic, and Country Woods. The sentiment from With You in Mind is heat embossed in copper on Very Vanilla cardstock and then hand cut with paper snips. The foliage and sentiments are layered on dimensionals over a twist of Mossy Meadow & gold trim. And we finish things off with a few green sparkling sequins.

What a perfect little card to tell someone they’re appreciated! I hope you’ll drop in tomorrow to see where our gratitude takes us for tomorrow’s crafty adventures!

Product List
Autumn · Autumn Trees · L2S Group Instahop

Autumn Window

So glad you’re back, friends! You probably noticed that my day shaped up as I expected and I didn’t have the opportunity to post yesterday. But never fear, the card design I had in mind is about halfway finished and coming your way tomorrow!

But today, we’re hopping along with the Luv 2 Stamp Group over on Instagram. And our card today continues our design series using the Autumn Trees bundle by Stampin’ Up! I thought it would be fun to do a variation of last month’s window card design by making it a double flap card to make room for a nice note section on the inside panel. Let’s take a look!

We get started with a base of Crumb Cake cardstock and cut a window using the largest Everyday Arches die. To make the shaker section, we cut a window frame from a sheet of Country Woods patterned paper using the largest and third largest dies to make the frame wide enough for our two-sided tape to adhere the window sheet. The front window frame is adhered directly to the card front. The second frame and window sheet is assembled and then we use adhesive foam strips to create the box in which the shaker elements will move about inside our window. Before adhering this window frame, we add our shaker bits to the back of the outside window sheet and then seal everything up with the inside window frame. I used the new shaker bits that I scored from my SU! 12 Days of Crafting Advent Calendar.

Now we move on to our inside fold-out panel where we build a fall scene using the Autumn Leaves bundle and a sheet of Thoughtful Journey patterned paper. The base is a quarter sheet that is cut a half-inch wider to allow for the small fold-over flap that is adhered to the inside card base under the message panel. We get started by building our background scene. The mountain is cut directly from our patterned paper using the Scenic Adventure dies. The top piece of the sky is cut down to size and then adhered at the top of our panel and then the mountain section is adhered over it with dimensionals. I added Wink of Stella to the portion resembling a lake, giving it time to dry while we work on the forefront of our scene.

From another sheet of Thoughtful Journey, we cut a small section of trees using the Light & Wonder die set and adhered at the water’s edge and just under the mountain ridge. Using a small scrap of black cardstock, we use the deer die from the Autumn Trees set to cut the doe and fawn. They’re adhered directly to the background. Next up, I stamped the tree image from Autumn Trees in Early Espresso on the slightly smaller quarter sheet of Crumb Cake and shaded the trunk with blending brushes and Crumb Cake ink. We cut leaves in several different colors. I especially love the look of the red and green leaves from the Season of Elegance paper. Each set of colored leaves is adhered on top of the other with dimensionals and slightly askew of one another to create lots of depth. The tree is then adhered at the base of our scenic panel along the edge using dimensionals. We finish things off with some grass in the foreground that is cut from the other sheet of Thoughtful Journey using the Scenic Adventure die. This panel is then adhered to our inside panel with tear-n-tape along the small fold-over flap. The inside message panel has a small buck in the bottom corner and the sentiment from With You in Mind at the top.

This card is even prettier in person. And I thought you might enjoy seeing it in action to get an idea. *grin*

Today’s card is a part of the Luv 2 Stamp Group Instagram Hop, which goes live at 9 AM Pacific Time (PST).  Click here to head over to my Instagram feed at 9 AM Pacific/11 AM Central and check out what the other demos in our L2S Group have created for you today! 

Product List
birthday · Fun Folds

Birthday Surprise

Welcome in, crafty friends, and welcome to the weekend! After a busy morning, we are enjoying some family downtime this afternoon before we hit some projects while the weather is nice. What do you have on the weekend agenda?

We’re rounding out our series this week where we’ve been restocking the birthday card stash, and there’s nothing better than a fun fold gift card holder to close things out for this series! I found the cutest (and easiest) pop-up gift card holder over at Klompen Stampers and just had to give it a try. I combined this cool fun fold with a picture-in-picture design using the Splendid Autumn paper and Layered Thoughts stamps. And I can’t wait to try this again with a scene building set!

We get started with a base of Cajun Craze cardstock, which serves as both the card base and the inside gift card panel. The front picture-in-picture panel starts with the background sheet from the Splendid Autumn paper pack that is matted with gold foil specialty paper. The window section is a second sheet of the same Splendid Autumn pattern that is cut using the Everyday Arches dies and matted with a larger-sized arch of Basic White. I used the negatives from the grass die from the Mixed Florals set cut from a sheet of the cream Season of Elegance paper and tucked the grass behind the panel inset to make it look like grass is waving outside the window. The sentiment is from the Layered Thoughts stamp set and the first portion of our birthday greeting is stamped on white cardstock, heat embossed in gold, and then cut with the largest banner from the Stylish Shapes die set. The sentiment panel is mounted over a bow of gold trim on dimensionals. The front panel is finished with a scattering of gold drusy embellishments.

The inside of our card is our pop-up gift card panel which is cut from Cajun Craze cardstock. It tucks behind the bottom panel of the card front to create the gift card movement when the card opens and closes. The second portion of our birthday greeting is on the bottom panel of the gift card section. It’s stamped on Cajun Craze cardstock, heat embossed in gold, and then cut with the largest Stylish Shapes banner die using the extension method. It’s a tight fit, but it works. This panel is adhered to the gift card panel with the dimensionals.

Here’s a quick look at this gift card in action.

My newest batch of Holiday Mini catalog and Online Exclusives have arrived, so I’m looking forward to bringing you a closer look at those as we explore the theme all that glitters is gold. I hope you’ll drop in and see what that’s all about!

Product List
Beautiful Pumpkins · Coming Soon · L2S Group Instahop · Online Exclusives

Small Things

This week, we’re getting a closer look at the new Online Exclusive suite called Gathering Together that will release next week. Aside from being a combination of beautiful products that stand just fine all by themselves, they also pair up beautifully with other products in the SU! lineup. And today we’re getting a second sneak peek as we pair up Gathering Together with the new OE bundle called Beautiful Pumpkins.

I think I mentioned yesterday that I’m really in love with the foiled paper in the Gathering Together patterned paper pack. Today I’m showing you one of the non-foiled, reverse-side patterns which serves as the backdrop for this design. But I couldn’t just abandon the sheen of the foiled paper altogether. I used a sheet of the vanilla Season of Elegance foiled paper to stamp and diecut all of my focal panel images. I just love the look! One tip: let the ink dry before diecutting or you’ll end up with ink in interesting places! *wink and ugh* To speed things up, I used my heat gun.

We get started with a base of Basic Black cardstock. This pulls out the small black pinstriping in the background panel quite nicely. I tied some Mossy Meadow & Gold ribbon around the bottom of the panel before adhering to the card front. Our focal panel is a sheet of the foiled Gathering Together paper and is cut using the Nested Essentials dies. Using the Beautiful Pumpkins stamps, I stamped the pumpkins and acorns on the vanilla sheet of Season of Elegance paper, and I made sure to include some of the foiling in each of the stamped images. I used the coordinating dies to cut them out. I cut the pumpkin stems from Crumb Cake cardstock and the pumpkin leaves from a sheet of the Old Olive Season of Elegance paper. They’re all adhered to the pinstriped backdrop using different layers of dimensionals to create lots of depth in the scene. The sentiment from the Beautiful Pumpkins set is stamped on a strip of white cardstock, and I snipped the ends to create a banner. It’s adhered under the focal panel with dimensionals. I added some gold drusy embellishments in opposing corners to draw the eye across the panel.

Today’s card is a part of the Luv 2 Stamp Group Instagram Hop, which goes live at 9 AM Pacific Time (PST).  Click here to head over to my Instagram feed at 9 AM Pacific/11 AM Central and check out what the other demos in our L2S Group have created for you today! 

Products used in today’s card:
Basic Black, Basic White, Crumb Cake cardstock
Gathering Together (coming next week) , Season of Elegance DSP
Beautiful Pumpkins stamps & dies (coming next week)
Nested Essentials dies
Mossy Meadow & gold ribbon
Drusy embellishments
Dimensionals
Adhesives

Coming Soon · Gathering Together · Online Exclusives

Gathering of Thanks

We’re already halfway through this wonderful week and quickly headed for our long weekend. Do you have any special plans for the Labor Day holiday weekend? I’m hoping that the first significant cold front makes its way in as promised because I have some yardwork I’d really like to get done.

And speaking of yards, once fall arrives, they’ll be adorned with beautiful fall foliage. And this week is all about the foliage as we get an in-depth sneak peek at the upcoming Online Exclusive release called Gathering Together. Today we’re using more of the beautiful paper and the stamp set included in this suite to create a clean and simple Z-fold card. You guys, I’m just in love with this foiled patterned paper. Not into anything sparkly on your patterned paper? The back of each sheet is sans foiling so you get the best of both worlds in this pack of beautiful patterns!

Today’s fun fold gets started with a base of Cajun Craze cardstock, which creates our Z-shaped base. I chose a sheet of the Gathering Together patterned paper with a more subtle background to serve as the background on each of the panels. A sheet of the foiled fall foliage with berries and mushrooms is the backdrop of our focal panel which is cut using the Textured Notes dies. To pull out the lovely shades of yellow amongst the foliage, I chose Crushed Curry as the mat for this panel. The sentiment from Gathering Moments is stamped on Very Vanilla and I also stamped a few acorns in the background for some visual interest and to make the sentiment panel and background panel feel more cohesive. The sentiment is diecut using the Traditional Labels banner die and then adhered over some gold linen thread using dimensionals. I finished things off with a touch of extra sparkle with some Cajun Craze & gold dots in opposing corners.

Of all the fun folds, I really love Z-folds because they pack an amazing punch with very little extra work! And this particular layout with the larger overlapping front panel is a terrific way to show off beautiful patterned paper.

Tune in tomorrow for another fabulous fall-themed sneak peek. We’re going to be pairing up the Gathering Together suite with another new release product. You don’t want to miss this one!

Products used in today’s card:
Cajun Craze, Crushed Curry, Very Vanilla cardstock
Gathering Together DSP (coming next week)
Gathering Moments stamps (coming next week)
Traditional Labels (coming next week), Textured Notes dies
Gold thread (retired)
Cajun Craze & gold dots (coming next week)
Dimensionals
Adhesives