Happy Monday, everyone! Can you believe we’re halfway through August already?! Me either! But that means, we’re just a few short weeks away from the launch of the Stampin’ Up! Holiday Mini catalog. And trust me when I say you’re gonna love it!
This week, we’re starting a new design series. We’re going to be looking at our holiday products from a different angle, taking them beyond the holidays into the everyday.
And today, we’re starting with the new Nests of Winter designer paper. We’re using the detailed bird patterned paper to create a celebratory card. While it’s a little wintery, the design doesn’t feel like a holiday card. This card would be perfect for a winter birthday, promotion, retirement, or graduation.
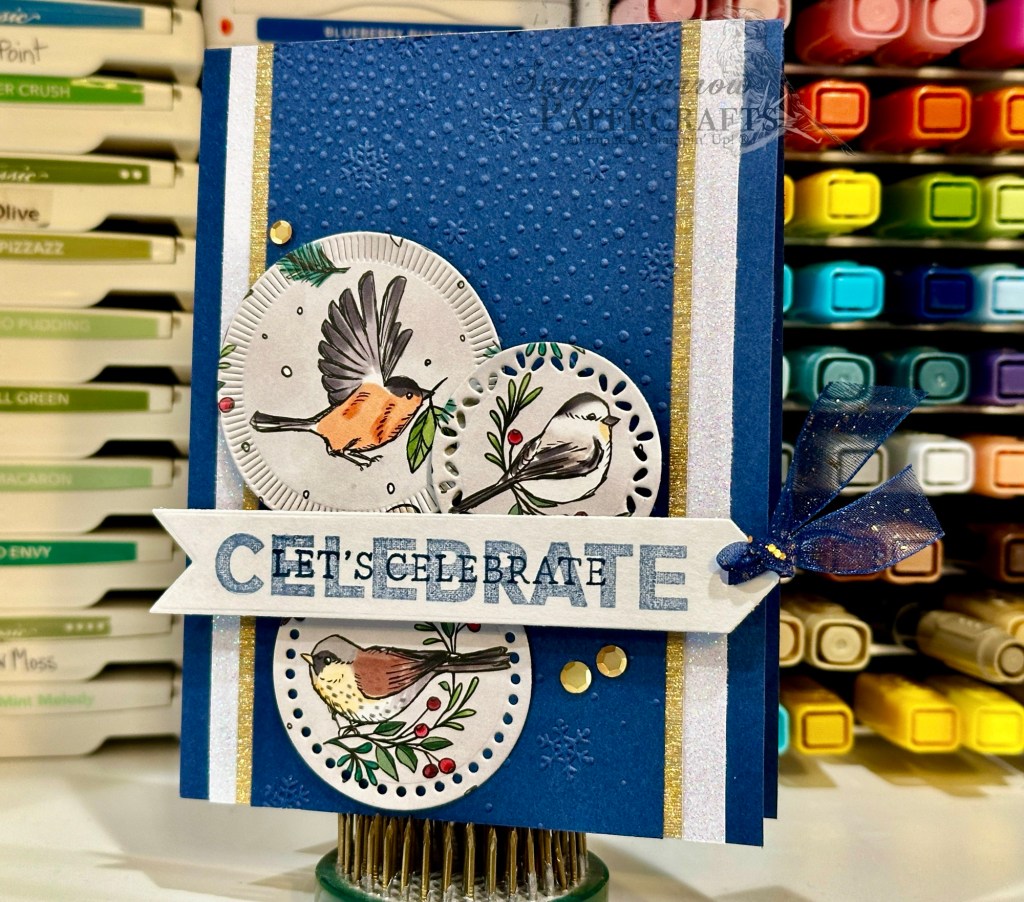
We get started with a base of Night of Navy cardstock. Our focal panel backdrop consists of a narrow panel of Night of Navy embossed with the Snowflake Sky embossing folder and two mats — white glimmer paper and textured gold specialty paper. The cluster of birds are diecut from the Nests of Winter designer paper using the Spotlight on Nature dies. The sentiments are stamped in navy on white cardstock using the Happy Little Things and Friends for Life stamp sets and then diecut using the Greetings of the Season banner die. I’ve tied Night of Navy & Gold sheer ribbon through the end. Our sentiment panel overlays the focal images. And the design is finished with a few gold sequins to draw the eye across the design.
Tune in tomorrow for another twist on the Nests of Winter.
Products used in today’s card:
Basic White, Night of Navy cardstock
White glimmer, textured gold, Nests of Winter (coming soon!) DSP
Happy Little Things, Friends for Life stamps
Spotlight on Nature, Greetings of the Season dies
Snowflake Sky embossing folder
Night of Navy & Gold sheer ribbon
Neutrals sequins
Dimensionals
Adhesives


 Luster Specialty Paper")
 Specialty Designer Series Paper")


")


 Trim Combo Pack")


")


 Striped Trim")


 Designer Series Paper")
 Specialty Designer Series Paper")
 Specialty Designer Series Paper")
")


 Metallic Ribbon")


")
")

")


 Specialty Designer Series Paper")
")


 Specialty Paper")
")


 Diagonal Trim Combo Pack")


")


 Designer Series Paper")
 Specialty Designer Series Paper")

