Halloween · Holiday Mini Catalog

Woodland Fright

We made it to the weekend — whew! Yesterday turned out to be a bit busier than anticipated. The kiddo participated in the first round of basketball tryouts, and let’s just say it got off to a bumpy start. Quite literally. He’s got quite the nasty bump & bruise on his knee that we spent the evening nursing. Hoping it looks better after a good night’s rest!

As promised though, we’re strolling through Sleepy Hollow today. And look who we rustled up — Casper and friends! The new Frightfully Fun suite is so fun and we’re dazzling it up with some shimmery touches for the perfect pops of fun!
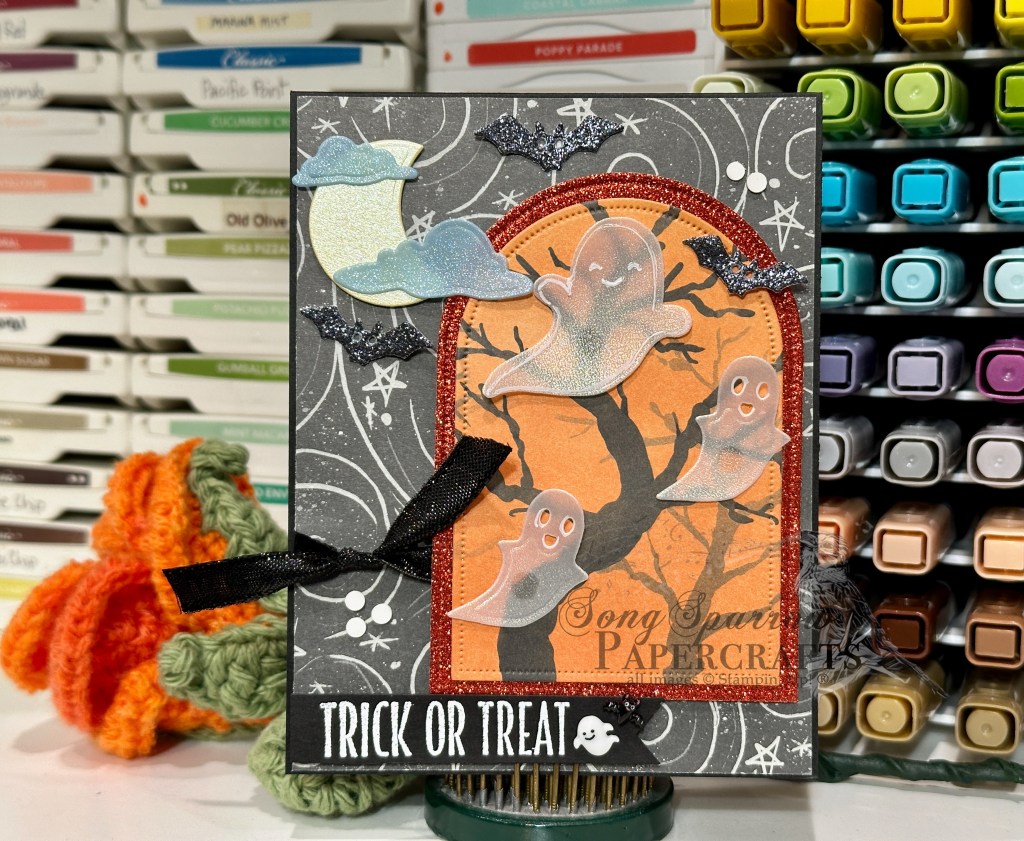
We get started with a base of black cardstock. A sheet of the swirling stars paper from the new Frightfully Fun paper pack gives us our spooky backdrop. And we wrap it with some black shiny ribbon before adhering to the card front. The Everyday Arches dies help us create our matted focal panel with a combo of orange Autumn Woodland glimmer paper and Frightfully Fun scary woods paper. Our cute little ghosties are diecut with the Oh My Fright dies and I added some detailing to each with a white chalk pen. Our dies also help us create the rest of our scene. The moon is a sheet of the pale yellow pastel shimmer paper with the clouds from a sheet of the blue Sunset shimmer vellum. Our bats are cut from Secret Sea glimmer paper and I added some detailing around the eyes with the chalk pen. Our sentiment from the Oh My Fright stamps is heat embossed in white on black paper and then cut into a banner shape before being adhered to the bottom corner of our card front. We finish things off with some dots and ghosts and bats from the Ghosts and Dots embellishments pack.

It’s a busy one today but I’m hoping to get some crafty playtime this afternoon to work on some 3D projects for an upcoming craft show.

Products used in today’s card:
Basic Black CS
Frightfully Fun, Autumn Woodland glimmer (coming in Sept), Peaceful Garden glimmer, pastels shimmer, Sunset shimmer vellum DSP
Everyday Archie’s dies
Oh My Fright bundle (coming in Sept)
Versamark
Black & clear EP
Ghosts & dots (coming in Sept)
Black shiny ribbon (coming in Sept)
Dimensionals
Adhesives
Holiday Mini Catalog · L2S Group Instahop

Tidings of Home

Howdy, friends! Welcome back. It’s hard to believe it’s already Thursday, although Monday & Tuesday definitely felt like Thursday & Friday. *chuckle*

I had some grand plans for a 3D project for today but ultimately figured out that I needed to devote more time to it in order to get it just right. So I hope to bring that to you over the weekend. Today, we’re getting another look at the Neutral Noel suite of products to include the awesome dies and embossing folder. And to add that touch of razzle dazzle in line with our design theme this week, we’re also using some of the new holiday hot foil products. So let’s dive in and see how this beauty comes together.

To start, I have to give props to the inspiration behind this card design. I’m CASEing a catalog CASE by Stamping Beauty NZ (follow her over on Insta!). Honestly, the catalog sample did not stand out to me like her card did. I love the neutral color palette and the overall feel of the card. But as I usually do when (theoretically) CASEing a card, it’s never truly a copy and stamp exactly situation. I always take liberties from the inspiration.

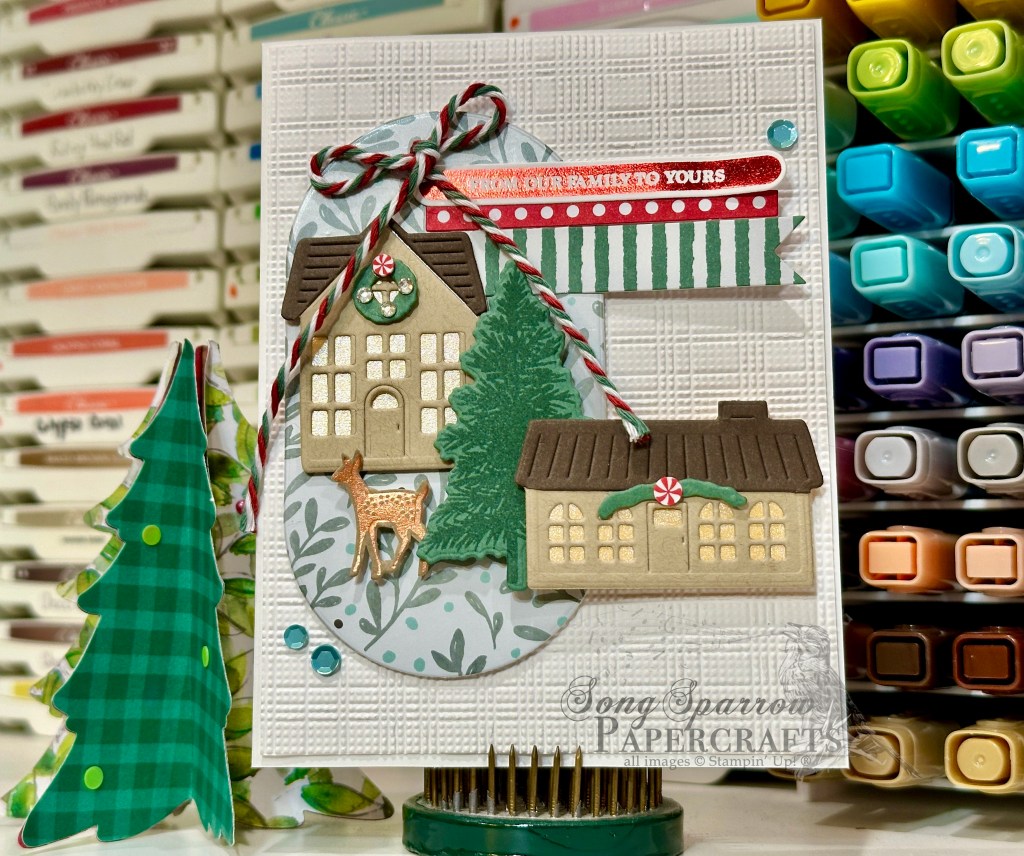
So we stick to the (mostly) neutral color palette here with a base of white cardstock. And our background panel of white is machine embossed with the new Soft Linen embossing folder. I punched things up a bit with the backdrop panel for the focal section by using a sheet of the All Wrapped Up foiled paper and cut it with the oval die from the Welcome Noel set. And the focal elements is where things get creative.

I paper pieced several houses diecut with the Welcome Noel dies from a combination of Crumb Cake, Early Espresso, and Golden Glow pearlized paper. I just love the soft glow in the windows provided by that pearlized paper! We dress up our houses with some holiday greenery cut from Peaceful Pine paper using the evergreen deco pieces in the Welcome Noel die set and add some peppermints and rhinestones. Next up, we prepare our large spruce tree by stamping tone-on-tone on Peaceful Pine cardstock and diecutting using the Welcome Noel bundle. Our little deer comes from the new Graceful Evergreen Deer hot foil bundle. The deer is foiled in copper and then diecut with the coordinating die. Using all of these elements, we build our scene on our focal panel with dimensionals to create depth of scene.

We finish off our card design with our holiday sentiment panel. It combines two ephemera banners from the Season of Celebration pack and the hot foil sentiment from the new Twinkling Tidings bundle foiled in red. Adhere them at the top of our scene with a bow of the new holiday baker’s twine, add a few sequins, and voila!

Today’s card is a part of the Luv 2 Stamp Group Instagram Hop, which goes live at 9 AM Pacific Time (PST).  Click here to head over to my Instagram feed at 9 AM Pacific/11 AM Central and check out what the other demos in our L2S Group have created for you today! 

Tomorrow things will be getting spooky as we continue our tour of the new products launching next week! I hope you’ll drop by!

Products used in today’s card:
Basic White, Early Espresso, Crumb Cake, Peaceful Pine CS
In Color pearlized SP, All Wrapped Up (coming in Sept) DSP
Season of Celebration ephemera (coming in Sept)
Noel Tidings, Graceful Evergreen Deer, Welcome Noel, Twinkling Tidings dies (coming in Sept)
Twinkling Tidings, Graceful Evergreen Deer hot foil bundle (coming in Sept)
Copper & red foil (coming in Sept)
Softly Woven EF (coming in Sept)
Rhinestone basic jewels, Real Red peppermints, sparkle sequins
Seasonal baker’s twine (coming in Sept)
Dimensionals
Adhesives
Coming Soon · Holiday Mini Catalog

A Beautiful Christmas

Howdy, folks! Welcome back. Have you melted into a puddle yet? Man, the heat this summer is something else. I know, I know. We Texans are used to summers being extra when it comes to heat. But this particular summer is EXTRA extra. Maybe it feels particularly bad because the last couple of summers have been mild by comparison. Not sure, but I’m placing my vote for an early fall! Anybody else?

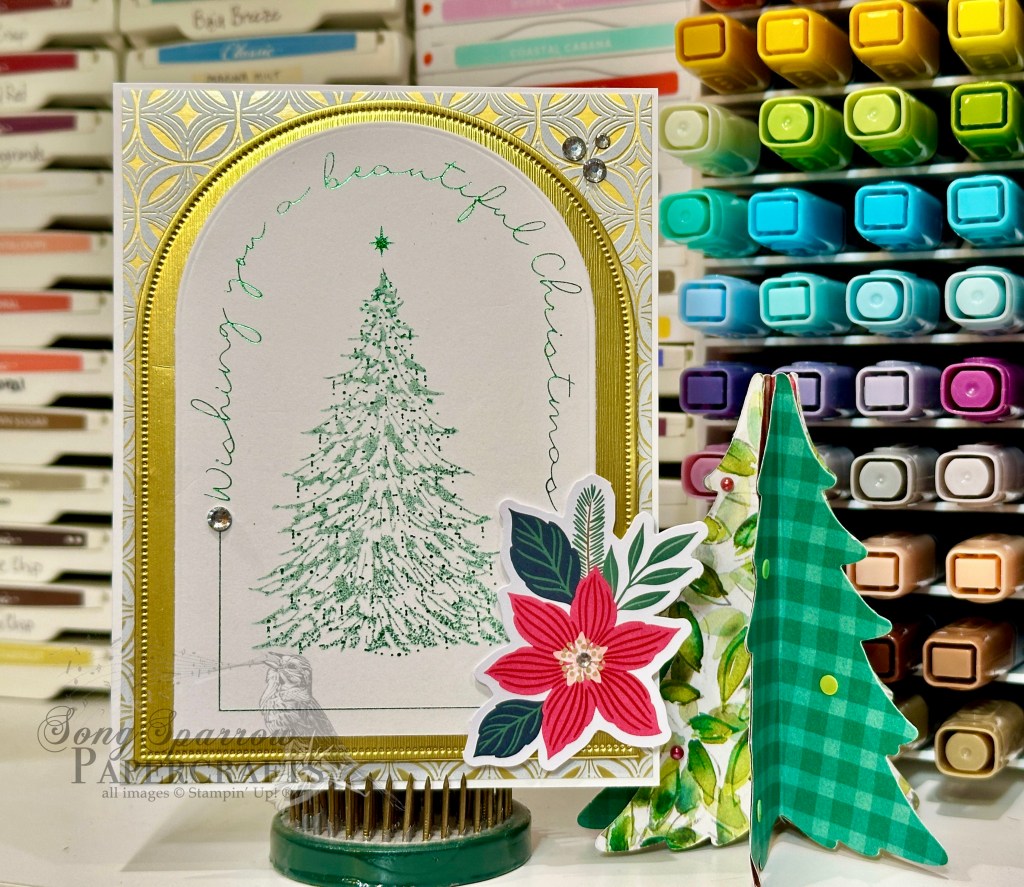
On the upside, I guess you could say that the heat is forcing us all to find productive things to do inside, which is magic words in the ears of any paper crafter! So as we’re dreaming of cooler weather, I’m pulling out the Christmas sparkles. There are SO many good things hitting the store next week. And today’s razzle dazzle card has a little bit of it all — Neutral Noel foiled paper, Season of Celebration ephemera, and the Twinkling Tidings hot foil bundle.

We keep things pretty simple so that our focal panel takes center stage here and get started with a base of white cardstock. The background panel is a sheet of the beautiful Neutral Noel foiled paper. Our focal panel starts with the Twinkling Tidings image hot foiled in green. We add the tree image by stamping over the tree with Peaceful Pine ink and then cut out our panel with the arched die from the coordinating Twinkling Tidings dies. A larger arch is cut from textured gold specialty paper using the Everyday Arches dies. A beautiful sprig of evergreen and poinsettia is added to the bottom corner of the panel with dimensionals. And then we finish things off with a few rhinestone jewels.

This one is sooo beautiful in person. It’s difficult to capture all of the glints of light you see from the foiled elements. Tomorrow I’ll be taking a little crafty break to get ready for the team blog hop on Thursday where I have grand plans for a bigger 3D project to share. We have a busy day slated for the office tomorrow also, so we shall see if my grand plans come to light. I hope you’ll drop by because I’ll have something to share either way.

Products used in today’s card:
Basic White CS
Textured Gold & Neutral Noel (coming in Sept) DSP
Season of Celebration ephemera (coming in Sept)
Everyday Arches dies
Twinkling Tidings hot foil bundle (coming in Sept)
Green foil (coming in Sept)
Peaceful Pine ink
Rhinestone basic jewels
Dimensionals
Adhesives

Coming Soon · Masculine Designs

Better Coworkers

Howdy, friends! Thanks for dropping by. I’ve been a little under the weather this week and haven’t felt like doing much the last couple of days.

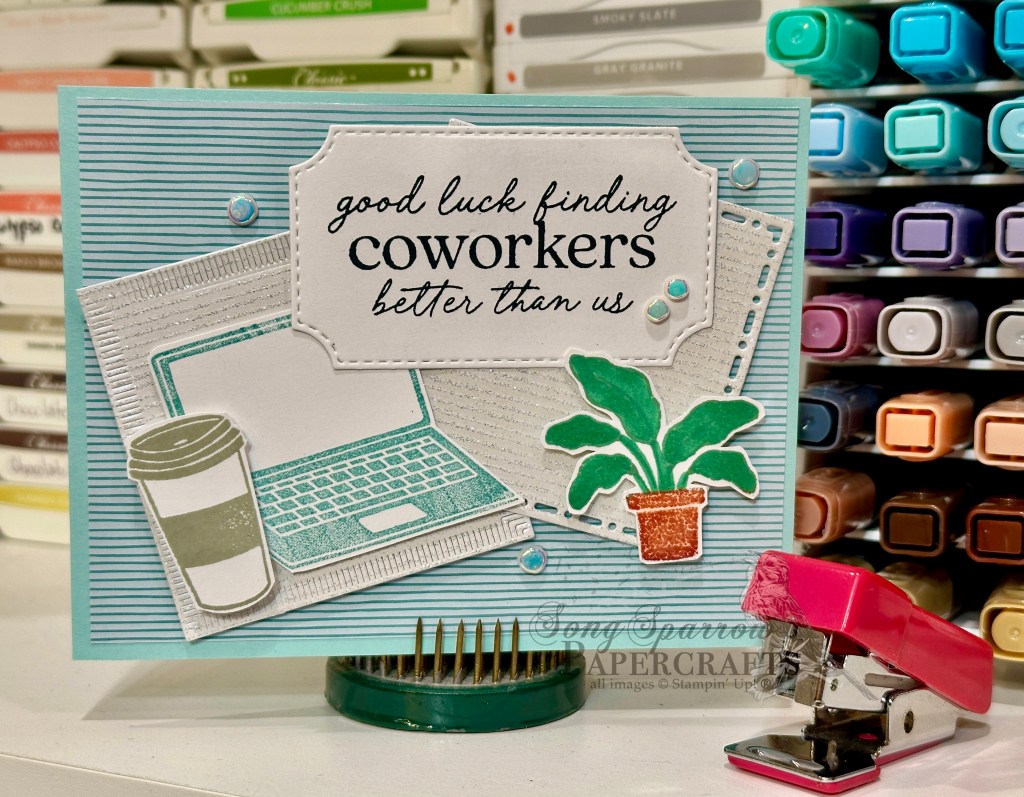
To be honest, I just wanted to drop into bed when I got home from work today, but it’s my co-worker’s last day tomorrow and I needed to whip up a special card for him to wish him luck on his next grand adventure. And in the spirit of this razzle dazzle week, we’re making a masculine card that has some pizzazz with a combination of the new Tile Garden dies, the retired Dream Team stamp set, and the Shimmering Stripes specialty paper.

To keep things on the masculine side, we’re starting with a base of Pool Party cardstock and then a sheet of the narrow striped paper from the Everyday Essentials paper. I used the new Tile Garden dies to cut two squares of the Shimmering Stripes paper to serve as the backdrop for our focal elements. They’re mounted askew on our card front for some visual interest and movement. We use the Dream Team stamp set to stamp our images — the coffee cup, computer, and desk plant — and then fussy cut them. Stampin’ Blends help give us some additional color on our plant. The sentiment from the set is stamped and then diecut with one of the smaller Branching Out banner dies. They’re all adhered with dimensionals in varying layers to give us some depth of scene. A few riverside irregular pearls finish things off with a glimmery sheen across our card front.

I really love how this turned out. The playful sentiment and arrangement of images is very fitting for the recipient of this card who is full of zest and character. And I think that’s one of my favorite things about being a paper crafter — having the ability to make something that is perfect in every way for the intended recipient!

I’m sooooo excited to play with the new hot foil goodies that arrived this week. I hope I’m feeling up to making a few previews tomorrow evening!

Products used in today’s card:
Pool Party, Basic White CS
Everyday Essentials, Shimmering Stripes DSP
Tile Garden (coming soon), Branching Out dies
Dream Team stamps (retired)
Pool Party, Gray Granite, Cajun Craze, Secret Sea, Peaceful Pine ink
Shaded Spruce Stampin’ Blends
Riverside irregular pearls (retired)
Dimensionals
Adhesives

Clean and Simple · Coming Soon

Fancy Heartfelt Thanks

Hey, friends, guess what day it is?! We’re halfway through this week already. Whew. Just like that. And we’re also halfway through a week of designs using new products fresh to the crafty stash!

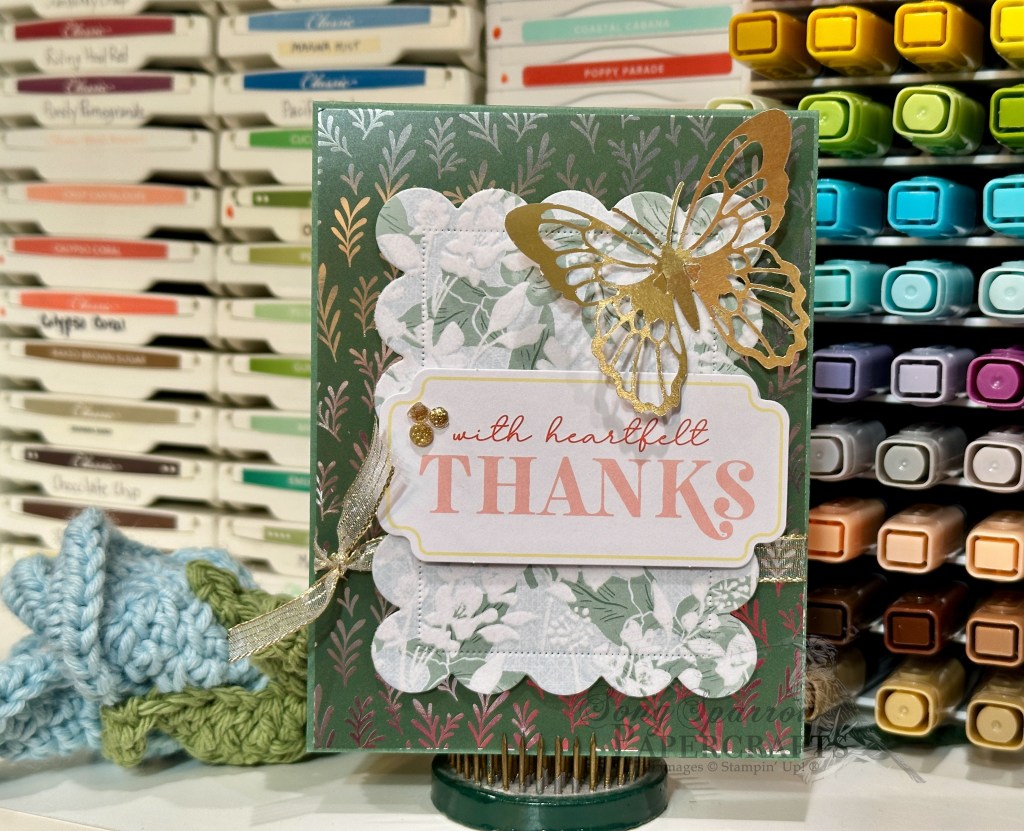
As promised, today we’re getting a sneak peek at a new set of dies that will release with the September holiday catalog — Scalloped Christmas Cheer dies. These scalloped rectangles are the perfect dress-me-up addition to your designs. And we’re pairing it up today with another peek into the new All Wrapped Up paper pack that will also release in the new holiday catalog. I tossed in a few of my current faves, like the Sincerely Noted ephemera, and a couple of my super loved retired goodies, like the butterflies.

We get started with a base of Peaceful Pine cardstock. The foiled backdrop from the All Wrapped Up paper pack coordinates perfectly. The focal panel backdrop is a scalloped rectangle cut from a sheet of the Velvet Meadow paper using the new Scalloped Christmas Cheer dies and adhered over some gold striped sheer ribbon using dimensionals. The sentiment is from the Sincerely Noted ephemera pack — a current go-to of mine for something quick and mess-free — and is mounted on the scalloped panel with dimensionals. We finish things off with a beautiful gold butterfly and a few gold glitter dots from the 2025 Advent calendar.

I’m still in the clean and simple frame of mind, and there are lots of things in the crafty stash that make it a snap to put together a clean and simple card. Tomorrow we’ll preview some Christmas product for grins. I hope you’ll stop by!

Products used in today’s card:
Peaceful Pine CS
Velvet Meadow, All Wrapped Up (coming in Sept) DSP
Scalloped Christmas Cheer dies (coming in Sept)
Sincerely Noted ephemera
Gilded wings butterflies
Gold striped sheer ribbon
Gold glitter pieces (retired)
Dimensionals
Adhesives

Online Exclusives

Birthday Violets

Welcome back, everyone! And TGIF. It’s certainly been quite a day around here as heavy rain on both commutes nearly necessitated a boat. Seriously though, I made it fine, but we got crazy amounts of rain today. I hope you’re dry & cozy wherever you are.

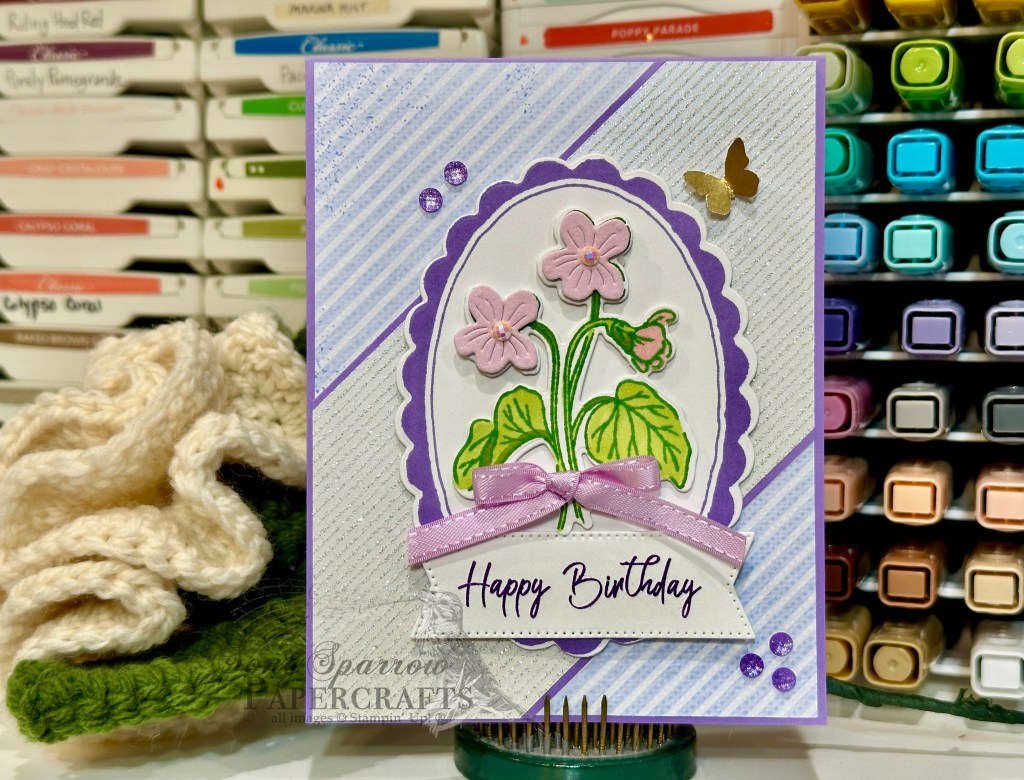
This week we’re getting a sneak peek at the new Violet Dreams suite that will release in just a few weeks. This suite has some gorgeous paper, coordinating specialty paper, a stamp set with coordinating dies, satin ribbon, and gemstone floral embellishments. And for this card, we’re getting a look at almost all of it.

So we get started with a base of Highland Heather cardstock. The background cross-stripe pattern in the background is from the Violet Dreams paper pack and then we use the Shimmering Stripes specialty paper to create a sparkly striped pattern in the center with a little bit of the Highland Heather as a mat. Our focal panel is a combination of images from the Framed Violets stamp set to create our oval frame and violet images and then cut them out with their coordinating dies. Some Granny Apple Green and Pretty in Pink Stampin’ Blends give us the shading on our violet image with a few velveteen pieces for some added texture. We add a bow of Fresh Freesia Satin to finish our violet bouquet. The sentiment from the Rolling Waves stamp set is stamped in Gorgeous Grape on white cardstock and then cut into the banner with the Stylish Shapes dies and affixed under the violet. We finish things off with some pearlized circles and fine purple shimmer gems, along with our little butterfly friend from the Gilded Wings accents pack.

We’ll be finishing up our sneak peek tomorrow. I hope you’ll drop by to see what else this beautiful suite can do!

Products used in today’s design:
Highland Heather, white CS
Violet Dreams, Shimmering Stripes (both releasing in July), velveteen DSP
Framed Violets stamps & dies (releasing in July)
Rolling Waves stamps
Stylish Shapes dies
Fresh Freesia satin ribbon (releasing in July)
Gilded Wings accents (releasing in July)
Stampin’ Blends
Pearlized faceted circles, fine shimmer gems
Dimensionals
Adhesives

Coming Soon

The Right Words

Welcome back, friends! I’m glad you decided to stop by. Do you ever have days that just get off on the wrong foot — with one snafu after another? It started out as one of those days for me, but thankfully, everything was a bit more uphill after lunch. I’ll definitely be glad to see this week in the rearview!

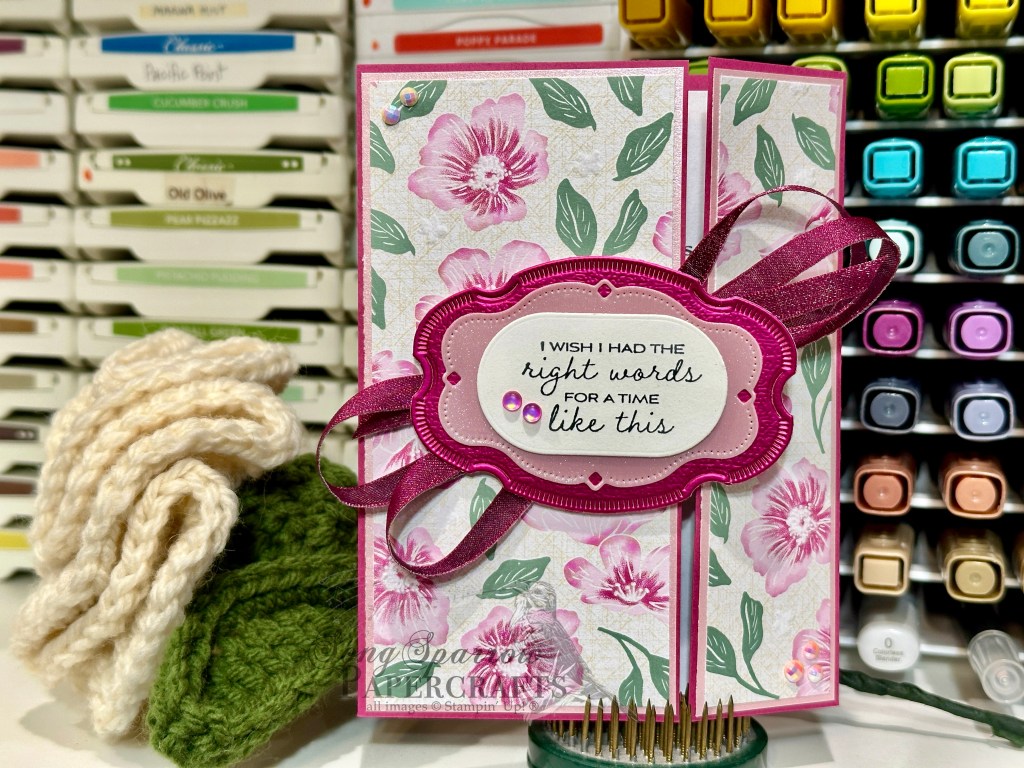
We’re slowly but surely going to work our way through a patterns & textures design series. And today I’m sharing a sneak peek of some new paper that literally has texture — velvet, to be precise. The new Velvet Meadow patterned (and textured) paper is taking center stage in this fun fold sympathy card, along with a few other new products.

We get started with a base of Berry Burst cardstock. It’s scored to give a standard size panel inside but with offset folding panels for the card front. I really love to use this fun fold with busy patterned papers. It allows the sheet to sit front and center while also breaking up the pattern for some eye relief. The sheet of new Velvet Meadow patterned paper is matted with Pretty in Pink soft shimmer paper, which really helps the softer details in the paper pop. The sentiment from The Right Words stamp set is stamped in Secret Sea on a panel of white cut with the More Messages die. (Hint: I usually cut a quarter sheet of cardstock with the More Messages die to create a stash of sentiment panels for easy grab-and-go sentiments.) its mounted with dimensionals on a sheet of new pink Sunset Shimmer vellum and Berry Burst Garden Textures paper that are both cut with the new Sweet Words & Labels dies. I made a big twist of Berry Burst shiny ribbon and adhered it to the back of the sentiment panels for before adhering it to the left panel of the card front with dimensionals. Pearlized faceted circles and frosted iridescent dots finish things off with pops of color.

Although not pictured (because I completely forgot to photograph it), the inside is decorated with leftover strips of the Velvet Meadow paper. And the message panel includes a coordinating sentiment from The Right Words stamp set.

Sympathy cards are always hard, but combining products in a way that feels like a paper hug is always worth the extra effort!

Products used:

Berry Burst, Basic White cardstock

Garden textures, pastel shimmer DSP

Velvet Meadow DSP, Sunset Shimmer vellum, Sweet Words & Labels dies (May releases)

The Right Words stamps

More Messages dies

Secret Sea ink

Pearlized faceted dots, frosted iridescent dots

Berry Burst shiny ribbon

Dimensionals

Coming Soon

On My Desk

Howdy, friends! Did you miss me? I’ve sure missed being in my studio! It’s been a crazy week around here with a super busy work schedule. So every free minute I’ve had has been spent with the family or catching much-needed Zzzzzz. But I wanted to drop in to let you know that I haven’t forgotten about our patterns & textures design series. And I’m planning to hop right back into it once the ol’ work schedule allows.

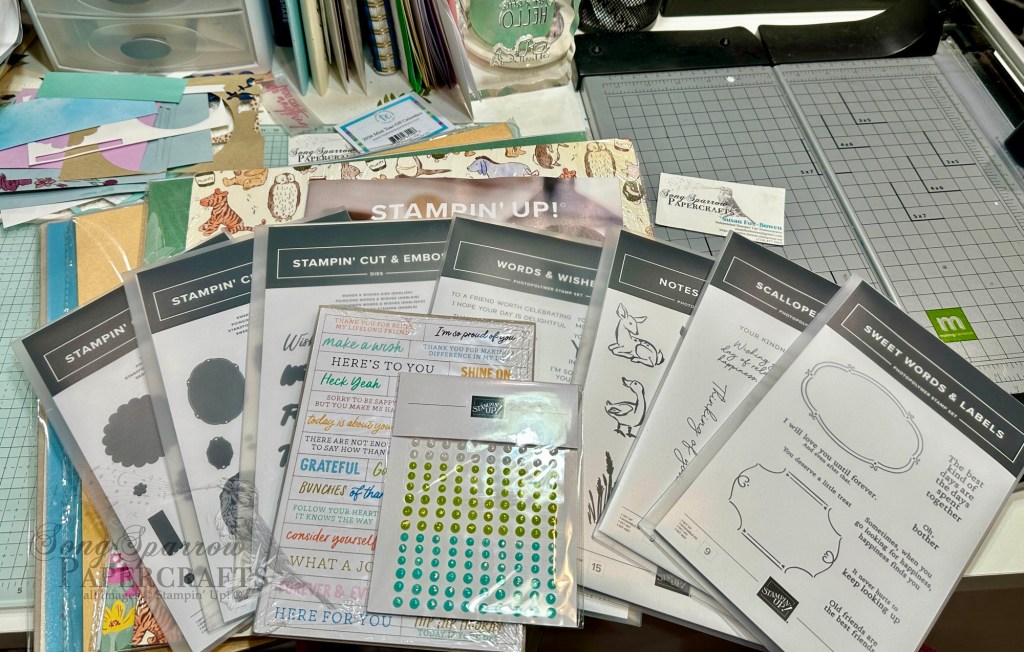
In the meantime, I wanted to share with you a little sneak peek at the brand new goodies that arrived — all from the new release that drops in just a little under 2 weeks.

I’ve broken my shopping list into a couple of orders and this is part one. And I can’t WAIT to have some time to start playing with all this good stuff. So hopefully you can hang with me as I craft in fits and spurts for the next couple of weeks! We’ll be exploring all this new loot and picking out part two!

Coming Soon · Online Exclusives · Sketchy Fridays

Sketchy Fridays: Little Howl-lo

Happy Friday! We finally made it. You know, it’s so funny. I was in a work meeting today and we were all talking about how the last two weeks have felt like a month and it’s just been CRAZY. Anybody else been in the boat? BUT we’re finally to the weekend and get a little breather.

And I thought this was the perfect opportunity to have a Sketchy Friday. What do you think? For those of you who are new here, Sketchy Fridays is a weekly series where we use a card sketch to design our featured card.

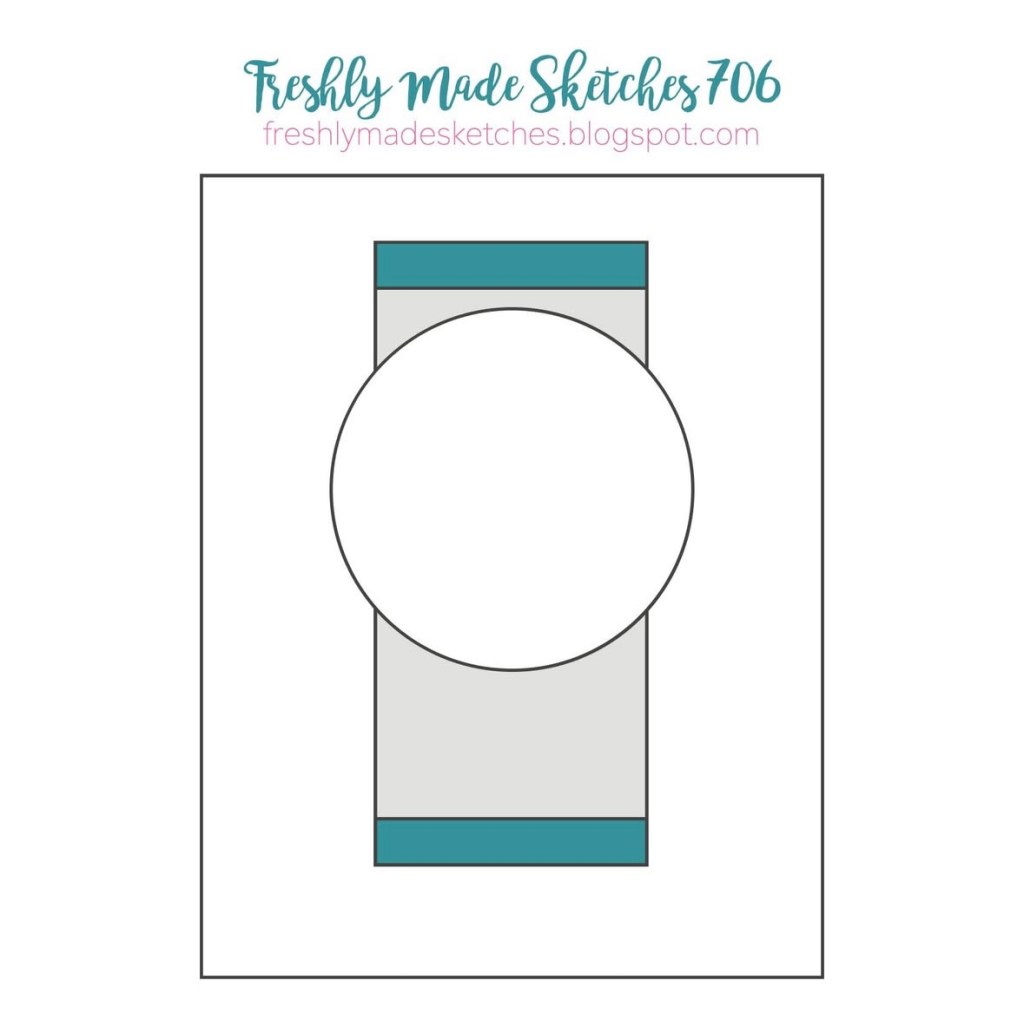
Funny enough, I was drawn to a sketch that I used the last time I hosted a Sketchy Fridays post. Clearly, it must be a good one! Soooo this week’s card is based on the Freshly Made Sketches #706 sketch. As I was trying to find a sketch to go with the idea in my head to best show off the adorable new bundle called Cutest Crew, this one caught my eye. So here we go.

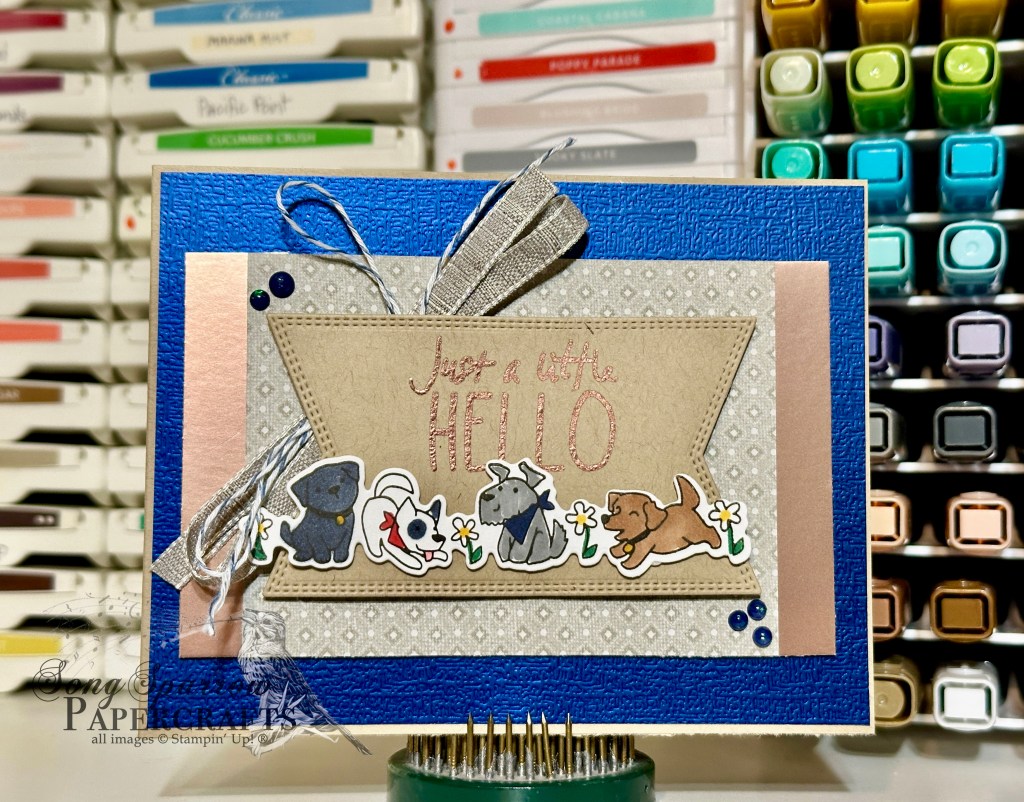
We get started with a neutral base of Crumb Cake cardstock. Our focal panel sits on a background of the brand new Garden Textures foil that will release next week. The base of the focal panel is a combination of a neutral geometric pattern from the Autumn Toile paper pack with a border of Earthen Toned metallic paper and adhered to the card front with dimensionals. The focal panel starts with a banner of Crumb Cake cardstock cut with the Nested Essentials dies. We heat emboss our sentiment from the new Cutest Crew stamp set in copper. Our cute band of doggos is from the new Cutest Crew stamp & die bundle releasing next week. We start by stamping the band of merry furballs onto white in black ink and then color them with an assortment of Stampin’ Blends, including Crumb Cake, Basic Gray, Basic Black, and a few others. The puppers are adhered to our focal panel with dimensionals. The full focal panel is adhered to the larger base with dimensionals over some Gray Granite variegated trim and Cloud Cover baker’s twine from the 2025 Advent Calendar. We finish thigs off with some opal rounds on opposite corners of our sentiment to draw our eyes across our adorable scene.

We’re rounding out our critter series tomorrow. Do you have any critter favorites that might be in my crafty stash? Drop me some suggestions and see if yours makes the cut!

Product List
Coming Soon · L2S Group Instahop · Online Exclusives

Purrrfect Day

Happy Thursday, friends! We are almost through this week and on to the weekend. I’m super excited to bring you today’s card design because we’re getting sneak peeks at several new Stampin’ Up! goodies coming your way next week with the new Online Exclusives release. This week, our design theme is all about our favorite critters and there are some adorable critters coming your way! We’re pairing up the brand NEW Cutest Crew stamp & die bundle with the Easter Joy foil papers to bring together this adorably cheerful card. Let’s see how it all comes together!

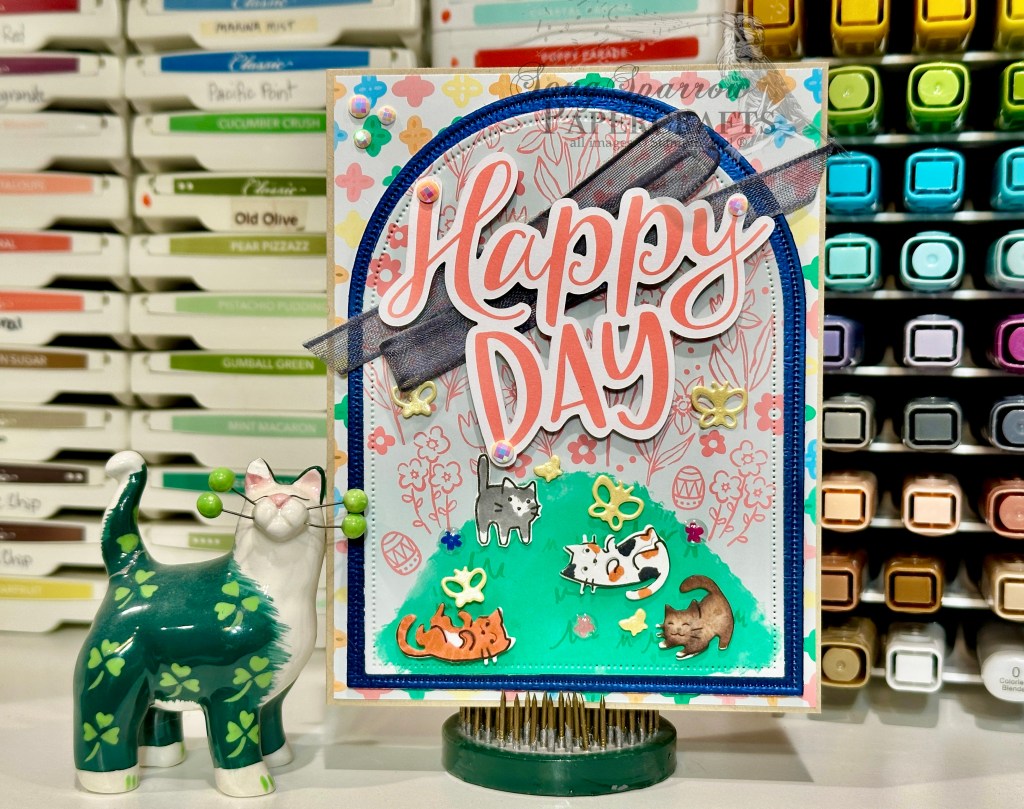
We get started with a nice neutral base of Crumb Cake cardstock. It works well to bring out the pastels in the patterned papers without competing with them. (And trust me, I tried all kinds of colors as the base layer and the neutral worked the best!). Our background layer is a fun multicolor cross pattern from the Easter Joy foiled paper pack. There’s just enough peeking out around the edges to add some interest and pizzazz without taking away from the focal panel scene.

And speaking of our focal panel. We get started with the focal panel mat which is a brand new patterned foil paper coming your way next week in the Garden Textures foil pack. This panel is cut with the largest arch in the Everyday Arches die set. I chose the Blueberry Bushel sheet to help our focal panel stand out against our patterned background, and it also works to help the pastels in our scene pop. Our focal panel on which we’re building our scene is one of the ready-made panels in the Easter Joy paper pack. I used the next-smallest die in the Everyday Arches set to cut it out.

And then we get started with our cute kitties who are enjoying a romp on the grassy hill chasing butterflies. These adorable felines are part of the new Cutest Crew stamp set & die bundle releasing next week. I stamped the kittens on white cardstock and then used a combination of Stampin’ Blends to color them before using the coordinating dies and paper snips to cut them out. They adhered to the scene with a combination of glue dots and dimensionals to give lots of depth of scene. The butterflies are cut from Lemon Lolly pastel shimmer paper and adhered with glue dots. The sentiment from the Unforgettable Times ephemera pack is adhered over Secret Sea bordered ribbon using dimensionals. A double layer helps the sentiment to really stand above everything else and catch the eye. We finish things off with some flowers from the new garden epoxy dots pack and some pops of twinkle with the pearlized faeted circles.

Isn’t this super fun? We’re going to get a peek at a few more critters tomorrow as we return to the lazy days of breezy summers. I hope you’ll drop in and see what cutie critters are up next!

Today’s card is a part of the Luv 2 Stamp Group Instagram Hop, which goes live at 9 AM Pacific Time (PST).  Click here to head over to my Instagram feed at 9 AM Pacific/11 AM Central and check out what the other demos in our L2S Group have created for you today! 

Product List