Coming Soon · Holiday Mini Catalog · Lights of Aurora

Inspiring Strength

Happy Monday, one and all. We’re getting started with a bright, shiny new week. What’s on your plate this week? Things are starting to ramp up for the kiddo with the second week of school getting underway, and it’s set to be a busy one at the office for me. But what I’m most looking forward to? Showing you a stunning new suite of products headed your way the first week of September!

This week, we’re going to be working with the Lights of Aurora suite, which includes paper, stamps, dies, ribbon, and embellishments. And it’s ever bit as beautiful as the natural wonder that inspired it! And if you’re a scene builder, then you’re most definitely going to love this coordinating suite. Today we’re getting started with a simple scene that really lets the lights shine.

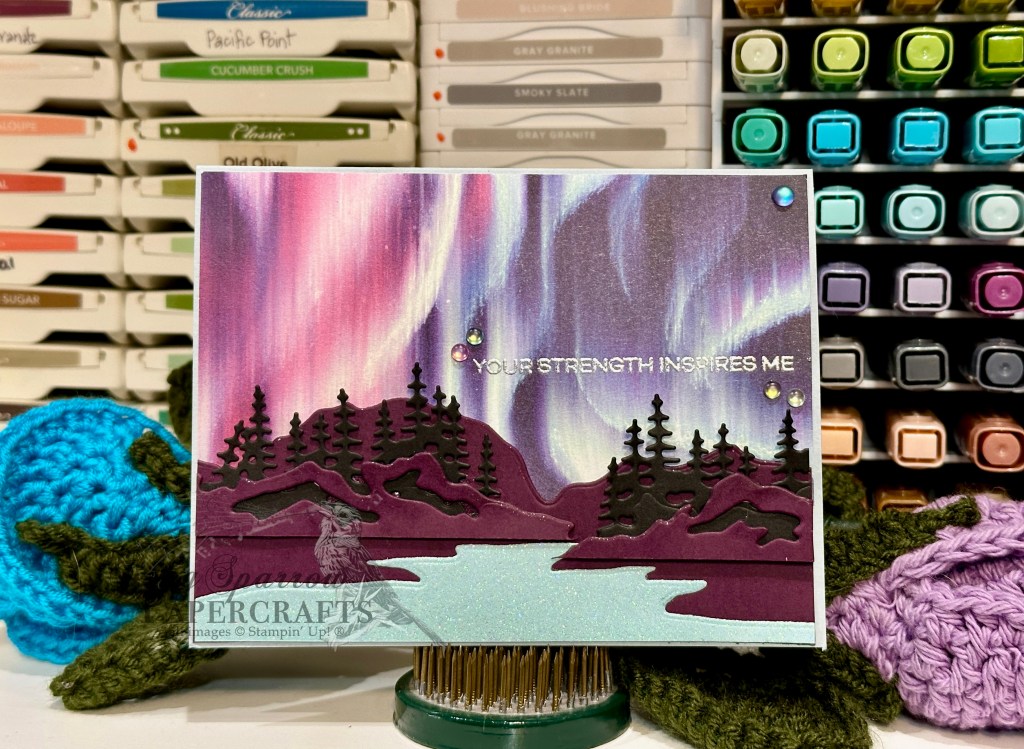
We start with a base of Cloud Cover cardstock. I chose a sheet of the full sky, wavy aurora from the Lights of Aurora 6×6 paper pack. I cut the sheet in half – and since it’s only the top portion of the aurora that shows for this scene, it allows you to make two cards and not just one! I then moved to cutting all of the pieces for the bottom portion of the scene, starting with the mountain range in the background. I cut the range using the die from the Light & Wonder die set from a sheet of Blackberry Bliss cardstock. This portion is the base on which the remainder of the scene is built so it will cover the bottom portion of the card base. I cut a shadowy treeline from Basic Black using the die from the Light & Wonder set. To add some depth & detail to the mountain range, I used the detail mountain range die and cut it from the remaining portion of my Blackberry Bliss cardstock. I broke it into pieces and adhered portions of the treeline behind each piece using dimensionals. To add a little mystical sparkle I cut some water from a sheet of the blue pastel ombre glimmer paper and adhered it at the bottom so that it gives the appearance of an inlet in the center. The sentiment from Light & Wonder is heat embossed in silver just above the mountains. I adhered the mountain details with treelines just above the water and below the larger mountains in the back. I finished things off by adding some sparkly details to the mountain peaks using Wink of Stella and added frosted iridescent dots around the sentiment to draw the eye.

I can’t wait to show you more of what this suite has to offer. I hope you’ll drop in tomorrow to catch another peek!

Products used in today’s card:
Cloud Cover, Blackberry Bliss, Basic Black cardstock
Lights of Aurora (coming in Sept), pastel ombre glimmer DSP
Light & Wonder stamps & dies (coming in Sept)
Silver embossing powder
Versamark
Wink of Stella
Frosted iridescent dots (coming in Sept)
Dimensionals
Adhesives

Coming Soon · Fun Folds · Holiday Mini Catalog · Peaceful Garden

Peaceful Thoughts

Welcome to the weekend! How is yours going so far? It’s been a busy one here just catching up on all of the things you don’t have time to deal with during the school week. But, of course, there’s always a little time for crafting too! *wink*

This week, we’ve been using the products in the SU! Peaceful Garden suite that will release in a few short weeks with all of the products in the new Holiday Mini catalog. Today we’re pairing up the paper with the With You in Mind stamp set and a cool fun fold I learned from fellow demo Patti Dolan called the Arrow Fun Fold.

We get started with a base of Cloud Cover cardstock. One sheet of patterned paper from the Peaceful Garden pack serves as the show-stopping focal elements in this card. The sentiment from With You in Mind is stamped in Secret Sea on white cardstock. I used paper snips to cut around the sentiment. It’s adhered to the arrow portion using dimensionals. I finished things off with some Misty Moonlight silver edged ribbon, Hues of Blue flowers, and charming shimmer gems.

Would you like to give this fun fold a try? It’s really pretty simple, and you can download the PDF tutorial here.

Next week, we’re going to a stroll through another suite of products that will be releasing in September. And I can’t wait to show it to you!

Products used in today’s card:
Cloud Cover, Basic White cardstock
Peaceful Garden DSP (coming in Sept)
With You in Mind stamps
Misty Moonlight silver edged trim (coming in Sept)
Hues of Blue flowers (coming in Sept), charming shimmer faceted dots
Dimensionals
Adhesives

Coming Soon · Holiday Mini Catalog · Peaceful Garden · Sketchy Fridays

Sketchy Fridays: Peace, Love, & Joy!

Happy Sketchy Fridays, everyone, and welcome to the weekend! Around here, we’ve survived our first week of school and now we’re sailing into the weekend ready for the R&R for sure. I’m super stoked because I just got my box of pre-order goodies for the new Holiday Mini catalog. Anyone know what I plan to be doing this weekend? *grin*

We’ve taken a little break from Sketchy Fridays for the last little bit, but I thought it would be fun to get back to it. Because who doesn’t love being able to push the easy button on getting a card started?! *wink* For those of you who are new here, Sketchy Fridays is a weekly series where we use a card sketch to design our featured card.

This week’s card is based on our Luv 2 Stamp Group’s monthly sketch challenge using the Atlantic Hearts Sketch #640. Today’s design features the new Peaceful Garden suite that will release in Holiday Mini catalog in September.

We get started with a base of Cloud Cover cardstock. The background panel is a nice neutral pattern from the Peaceful Garden paper pack. The focal panel backdrop is a floral pattern and cross-hatch sheet from the pack. The sentiment from Peace on Earth is stamped in Misty Moonlight on white cardstock and then cut to a simple banner. The sentiment panel is adhered over a bow of Misty Moonlight & silver edged ribbon with dimensionals. I finished things off with some Hues of Blue flowers. Super simple and super elegant!

We’ll be wrapping up our Peaceful Garden card series tomorrow with a fun fold. I hope you’ll drop in!

Products used in today’s card:
Cloud Cover, Basic White cardstock
Peaceful Garden DSP (coming in Sept)
Peace on Earth stamps (coming in Sept)
Misty Moonlight & silver edged ribbon (coming in Sept)
Hues of Blue flowers (coming in Sept)
Dimensionals
Adhesives

Coming Soon · Holiday Mini Catalog · Peaceful Garden

Monochromatic Peace

We’re winding down this week, and I don’t know about you but I’m ready for the weekend ahead. The first week of school is always a rough transition as we work to find the school year rhythm again. Poor fella had a rough day yesterday after leaving some important papers and his school computer at home. Learning personal responsibility is tough!

This week, we’ve been working with a brand new suite of products that is due to release in September in the SU! Holiday Mini catalog. Peaceful Garden lends itself to a whole host of different styles and seasons. Today I thought it would be fun to work in a monochromatic color palette and with just a few simple elements from the suite. So our featured color is one of the new In Colors called Secret Sea and we’re letting the lovely Peaceful Greenery embossing folder do all of the heavy lifting for our design.

We start with a base of Secret Sea cardstock. Our Secret Sea focal panel is machine embossed with the Peaceful Greenery embossing folder and then matted with Secret Sea glimmer paper. One thing I love about the Peaceful Greenery embossing folder and Peace on Earth dies is that the decorative panels are made to inlay in the center of the debossed portion of the embossing folder. So I used the largest die to cut out the debossed section. And then I used the smaller die to cut down the cutout piece and create a smaller panel for the sentiment. The sentiment from Peace on Earth is stamped in Versamark and heat embossed with clear embossing powder. I cut some of the smaller greenery elements from a scrap of Secret Sea glimmer paper and adhered them on opposing corners of the sentiment panel before adhering the sentiment panel to the center of the card front with dimensionals. A few shimmer dots finish things off perfectly.

Tomorrow we’ll be using a sketch to create our card. I hope you’ll drop in and see what’s in store!

Products used in today’s card:
Secret Sea cardstock
Peaceful Garden glimmer SP (coming in Sept)
Peace on Earth stamp & die bundle (coming in Sept)
Peaceful Greenery embossing folder (coming in Sept)
Clear embossing powder
Charming shimmer faceted dots
Dimensionals
Adhesives

Coming Soon · Holiday Mini Catalog · Peaceful Garden

Peaceful Greenery

Welcome to the midway point of the week. The first week of school is always a whirlwind as we get back into the groove of the schoolyear schedule, and this year is no exception. Hopefully we’ll start finding our groove a little better next week, but for now we’re just flying by the seats of our pants! *grin*

This week, all of our designs feature the Stampin’ Up! Peaceful Garden suite which is due to release in September in the new Holiday Mini catalog. Today, I wanted to give a look at the Peaceful Greenery embossing folder.

We get started with a base of Night of Navy cardstock. The backdrop for our focal panel is a sheet of vine pattern from the Peaceful Garden paper pack. This panel is machine embossed with the Peaceful Greenery embossing folder. To ensure that the embossed pattern stood out against the complimentary patterned background, I used my finger to “shade” the embossing with platinum ink from my metallic ink stash. The embossed image has a perfect shaped portion in the center where the stacked dies from the Peace on Earth set fit. The sentiment from Peace on Earth is stamped in Misty Moonlight on white and then cut with the smallest die. The panel is then matted with Secret Sea glimmer paper from the Peaceful Garden pack that has been cut with the larger die. The full panel is adhered to the card front with dimensionals. I cut two of the larger twigs from the die set from silver glimmer paper and held them together with some of the Misty Moonlight silver edged ribbon. Drusy embellishments draw the eye down and across the design so that the eye takes in all the details.

I hope you’ll drop by tomorrow to see what else this lovely embossing folder can do!

Products used in today’s card:
Night of Navy, Basic White cardstock
Peaceful Garden DSP, Peaceful Garden glimmer (coming in September!)
Peace on Earth stamp & die bundle (coming in September!)
Peaceful Greenery embossing folder (coming in September!)
Misty Moonlight silver edged ribbon (coming in September!)
Drusy embellishments
Dimensionals
Adhesives

Coming Soon · Holiday Mini Catalog · Peaceful Garden

Wishing You Love

Welcome back, friends! I hope your week has gotten off to a good start. We have successfully navigated the first day of school. The kiddo was pretty stoked that he had friends in every class. And we’re just glad that he had a great day and seems to be at least moderately excited about this school year.

On to some crafting, shall we? This week, we’re working with a brand new suite from the upcoming Holiday Mini catalog – Peaceful Garden. And the beautiful paper takes center stage in today’s card.

We get started with a base of Secret Sea cardstock. (Does anyone else love the moodiness of this new shade of blue?) A sheet of the floral stems from the Peaceful Garden paper pack serves as the backdrop for our card. A strip of the coordinating Secret Sea glimmer paper serves as the focal panel on which we have two small squares of the vine patterned from the Peaceful Garden pack. The hovering dove is cut from a sheet of silver glimmer paper using the Peace on Earth dies and secured to the panel with dimensionals. Extra dimensionals under the wings give the realistic look of wing movement. The sentiment from Peace on Earth is stamped on white cardstock in Secret Sea ink. One end of the panel is snipped to create the sentiment banner that is adhered underneath the larger focal panel. A few drusy embellishments on either side help draw the eye across our design so that you take in each element.

Tomorrow we’ll be exploring a few of the other elements included in the suite. I hope you’ll drop in and see some of the other awesome goodies in this amazing suite.

Products used in this card:
Secret Sea, Basic White cardstock
Peaceful Garden DSP & glimmer paper (coming Sept 3!)
Peace on Earth stamp & die bundle (coming Sept 3!)
Drusy embellishments
Dimensionals
Adhesives

Coming Soon · Holiday Mini Catalog · Peaceful Garden

Peaceful Prayers

Happy Monday, crafty friends! It was a busy weekend that went by way too fast for us as we spent the last weekend soaking up summer and preparing for the new school year that begins today.

I am SO excited about this week’s featured design products. We’re going to be using the *new* Peaceful Garden suite of products, which releases in the new Holiday Mini catalog on September 3rd. This suite includes beautiful patterned paper, coordinating glimmer paper, stamps, dies, an embossing folder, gorgeous ribbon, and fun embellishments. I just love the beautiful blue color palette of this suite! And today’s super simple design features the gorgeous patterned papers.

We get started with a base of Misty Moonlight cardstock. I chose two coordinating patterns from the Peaceful Garden paper pack – the beautiful doves and greenery sheets. I loved the repeating pattern of the doves and chose to cut one of the vertical strips of repeating pattern to serve as the centerpiece of this design. To give a little eye relief and add a little punch, I separated the dove strip from the greenery with a strip of blue glimmer paper from the coordinating pack. The sentiment from the Peace on Earth stamp set is stamped in Misty Moonlight on a strip white cardstock and then notched on each end to create the banner. I offset the sentiment to allow for the diecut dove on the left. The dove is cut from white cardstock using the Peace on Earth dies and adhered to the sentiment panel with dimensionals. I also cut and added a branch of greenery cut from silver glimmer paper. The sentiment panel is adhered at the bottom of the front panel with dimensionals. A few charming shimmer faceted dots on either side of the sentiment panel add a little extra color-coordinated sparkle.

This suite really does make it easy to create beautiful cards in a snap. I can’t wait to show you more!

Products used in today’s card:
Misty Moonlight, Basic White cardstock
Peaceful Garden DSP & glimmer paper (coming Sept 3!)
Peace on Earth stamp & die bundle (coming Sept 3!)
Charming shimmer faceted dots
Dimensionals
Adhesives

Fun Folds · Holiday Mini Catalog · Tutorials

Big Hugs

Howdy, everyone, and happy Saturday! We are officially to the weekend. We’re counting down the last week of summer break over here, so there are lots of things on the to-do list to be sure the kiddo is ready for his first week of 8th grade! What about you? What will your weekend plans have you doing?

Here in the craft room, we’re wrapping up our full week of fun fold designs. And today, I’m giving you a sneak peek of a full suite of products that will be available in the Holiday Mini catalog on September 3rd. We’re using the Peaceful Garden Suite to create a 4-Panel Accordion Fold. Demos were able to purchase this suite early as part of the special Creativity Now event in June, and I’ve saved using it until we got closer to the official release date for customers.

We get started by cutting down a 12×12 piece of Night of Navy cardstock and then score it to create the accordion base. I chose the leaf and vine patterned sheet from the Peaceful Garden paper pack as my focal paper and then matted these strips with the coordinating silver glimmer paper. The sentiment panel is created using the Peace on Earth stamp & die bundle included in the Peaceful Garden suite. I finished things off with a few Hues of Blue flowers and Misty Moonlight trim from the suite, along with a few drusy embellishments.

I dressed this fun fold up a bit by adding mats for each of the patterned paper panels. When you’re using heavier glimmer paper, like the sheets from Peaceful Garden, this will add some extra weight to your card. You could simplify this by omitting the extra mats or using lighter weight glimmer paper.

How would you like to give the 4-panel accordion fold a try? You can download the free PDF tutorial here.

It’s been a lot of fun learning some new fun folds this week. And there are quite a few that will be going into my more regular rotation. Do you have a favorite from this week’s fun fold series? Tell me in the comments!

Next week, we’re going to be exploring a super fun stamp bundle called Sweet Jar that has a new coordinating holiday stamp set called Jar of Joy. I hope you’ll pop in and see all of the fun things we can do with these cute stamps & punch!

Products used in today’s card:
Night of Navy, Cloud Cover, Basic White cardstock
Peaceful Garden, Peaceful Garden glimmer DSP (coming in September!)
Peace on Earth stamp & die bundle (coming in September!)
Misty Moonlight & silver edged ribbon (coming in September!)
Hues of blue flowers (coming in September!), Drusy embellishments
Dimensionals
Adhesives

Holiday Mini Catalog

Hello, Fall Wreath

This week, we’re using the Nests of Winter suite by Stampin’ Up! to create our designs. This suite of products includes coordinating stamps & dies, patterned paper, an embossing folder, twine, and shimmer gems. Today’s card showcases the versatility of this set as we make a lovely fall design.

I don’t know if you’re one to change your decor based on the seasons, but I really love to do that. Some seasons I go more “all out” than others, but I have some very basic elements around the house that change based on the season. One thing I’m sure to change is the wreath on my front door, which inspired today’s design. The greenery swag in the Winterly Tree Tops set is perfect for wreath-making!

We get started on our card with a base of Mossy Meadow cardstock. Our background panel is the woodgrain pattern from the Nests of Winter patterned paper pack. I just love the old barn door look here! Our wreath is made with the greenery swag image from the Winterly Tree Tops stamp set. The image is stamped in Crumb Cake on Wild Wheat cardstock. The berries are completed with a combination of In Color resin dots and Rainbow dots using a combination of pinks, oranges, and yellows to really reflect our fall color palette. I decided to mimic the look of fall wreath picks and used the smaller greenery elements in the Winterly Tree Tops die set to accomplish this. The picks are a combination of Early Espresso, Old Olive, Mossy Meadow, Calypso Coral, Daffodil Delight, Cajun Craze, and gold foil papers. They’re tied together with some of the lovely Very Vanilla satin ribbon. Our greeting placard is a combination of Very Vanilla and Early Espresso cardstock diecut using the Unbounded Love dies and the sentiment is stamped from Wonderful Thoughts is stamped in black. Everything is adhered with dimensionals to really give the look of a wreath hanging on the door. A few drusy embellishments add a little sparkle and really bring our eyes across the lovely wreath.

Tomorrow we’re going to be using a new sketch and once again using our Nests of Winter to create a lovely fall-inspired card design. Come check it out!

Products used in today’s card:
Mossy Meadow, Very Vanilla, Calypso Coral, Daffodil Delight, Cajun Craze, Old Olive, Early Espresso cardstock
Nests of Winter, gold foil DSP
Winterly Tree Tops stamps & dies
Unbounded Love dies
Rainbow dots, In Color resin dots
Very Vanilla satin ribbon
Drusy embellishments
Dimensionals
Adhesives

Product List
Holiday Mini Catalog

Hi, Friend

We’ve made it to the halfway point of the week already, friends. I don’t know about you, but I have more things to do than I have time to do them these days! I’m preparing for 2 craft shows this month and my craft room looks like it! *snicker*

This week, we’re using the Stampin’ Up! Nests of Winter suite of products to create our projects. Today, we’re pairing up the lovely patterned papers with a few other current products in the SU! lineup to create this lovely Hello card.

We start with a base of Lost Lagoon cardstock. I love how this base brings out the subtle hues in the greenery around the birds. The background panel consists of the snowy and woodgrain patterns from Nests of Winter. Our focal panel is all about the birds. I chose to fussy cut the chickadee and pair of cardinals from the sheet from Nests of Winter to serve as our focal images. Our birds are layered on top of a sparkly glimmer paper circle cut with the Spotlight on Nature dies and greenery cut from the Season of Green & Gold paper with the Golden Greenery dies. A twist of gold trim behind the panel complements the sparkle of the gold-foiled greenery. The sentiment from Wonderful Thoughts is stamped in black on white cardstock and then diecut with the Changing Leaves dies and tucked behind the greenery. A few blooming pearls across our design help the eye move across our focal panel to take in every detail.

Tomorrow we’re going to build a fall design with our feature suite. I hope you’ll pop in and see how it turns out!

Products used in today’s card:
Lost Lagoon, Basic White cardstock
Nests of Winter, white glimmer, Season of Green & Gold DSP
Wonderful Thoughts stamps
Golden Greenery, Spotlight on Nature, Changing Leaves dies
Gold trim
Blooming pearls
Dimensionals
Adhesives

Product List