Happy Monday, everyone! I don’t know about you, but I needed a weekend from my weekend. *grin* Craft shows, while always fun, are always exhausting. I got everything home, but I haven’t unpacked a single thing. It’s onward and upward to new products!
That’s right, in just a few short weeks, there will be a brand new bunch of Online Exclusives. And let me tell you, there are some C-U-T-E, CUTE things in this release, including the suite that I’m showcasing for you this week — the Otterly Adorable suite. This suite includes patterned paper, coordinating stamps & dies, some specialty cording, and iridescent pearls. We’re starting off with a super simple layout.
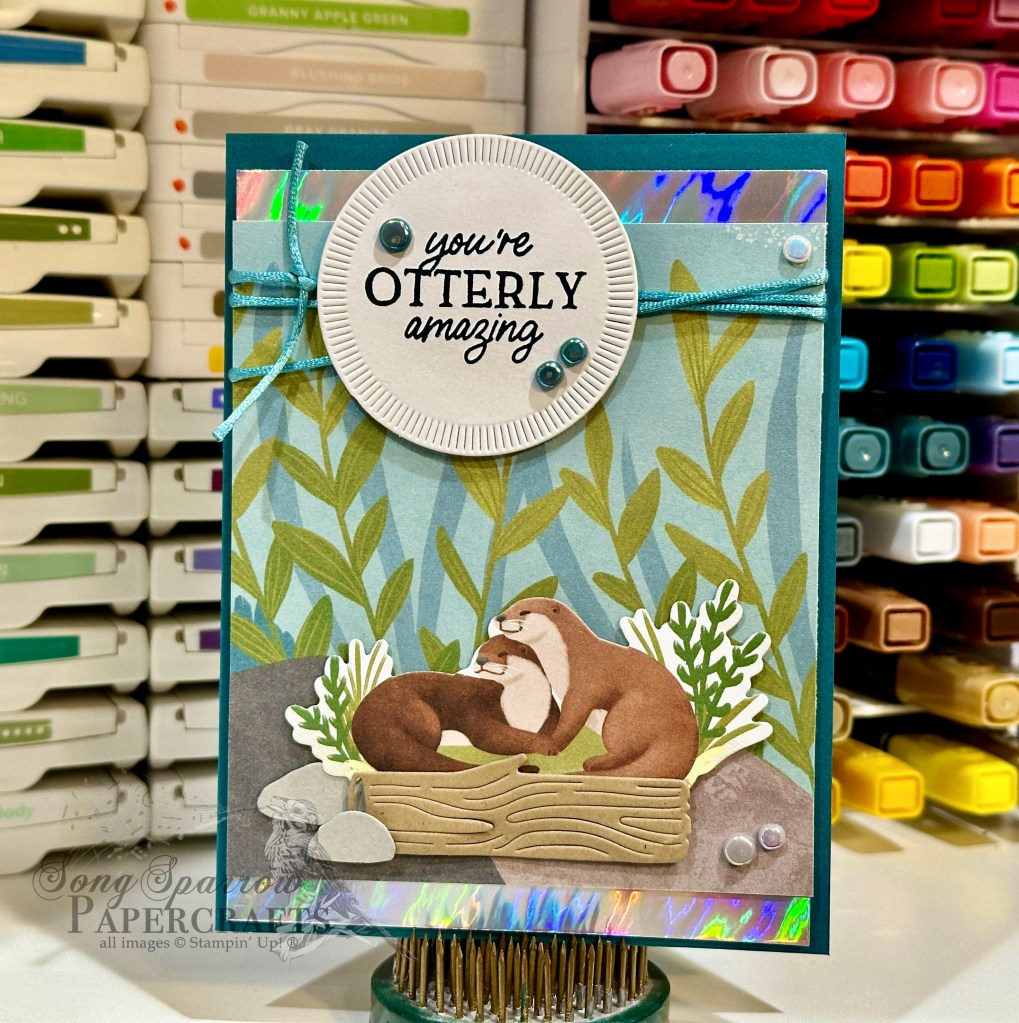
Our card base is a piece of Pretty Peacock cardstock. Our backdrop is a piece of the patterned scene papers from the Otterly Amazing designer series paper pack that’s releasing soon. I really loved the look of the (now retired) Holographic Trio silver foil and how it looks like a flowing river, and so while I don’t usually use too many products from my retired stash, this one just had to be a part of today’s card! Our cute otter pair is diecut from a sheet of the Otterly Adorable paper using the coordinating Otterly Amazing dies. To complete the scene, I cut our otter’s log den from Crumb Cake cardstock and the rocks from Smoky Slate. Dimensionals add depth and dimension to our scene. The sentiment from the Otterly Amazing stamp set is stamped in Pretty Peacock and diecut using the Spotlight on Nature dies and then mounted over the Lost Lagoon soft cording with dimensionals. A few Riverside Irregular Pearls finish things off with some iridescent sparkle.
This whole set is so cute and I can’t wait to show you all of the ideas I have floating in my head (pun intended!)!
Products used in this card:
Pretty Peacock, Crumb Cake, Smoky Slate, Basic White cardstock
Holographic Trio (retired), Otterly Adorable (coming soon) DSP
Otterly Amazing stamps & dies (coming soon)
Spotlight on Nature dies
Lost Lagoon Soft Cording (coming soon)
Riverside Irregular Pearls (coming soon)
Dimensionals
Adhesives

 Specialty Paper")


 Cardstock")


")
")


 Bordered Ribbon")
 Trim Combo Pack")


 Specialty Paper")
 Specialty Designer Series Paper")

