Coming Soon · January Mini Catalog

Made My Day

We’re marching right into Christmas, but I think I’m finally ready. What about you? Do you still have things on your to-do list? Today, I’ve put the last batch of holiday cards in the mail (I hope) and I’m making the last batch of holiday Chex mix and doing a bit of cleaning. But otherwise, packages are wrapped and we’re ready to go.

The last few days leading up to Christmas are always a bit reflective for me. As a church singer, the music I’m usually preparing for these last few days of Advent puts me in that frame of mind. But this year hits just a little differently.

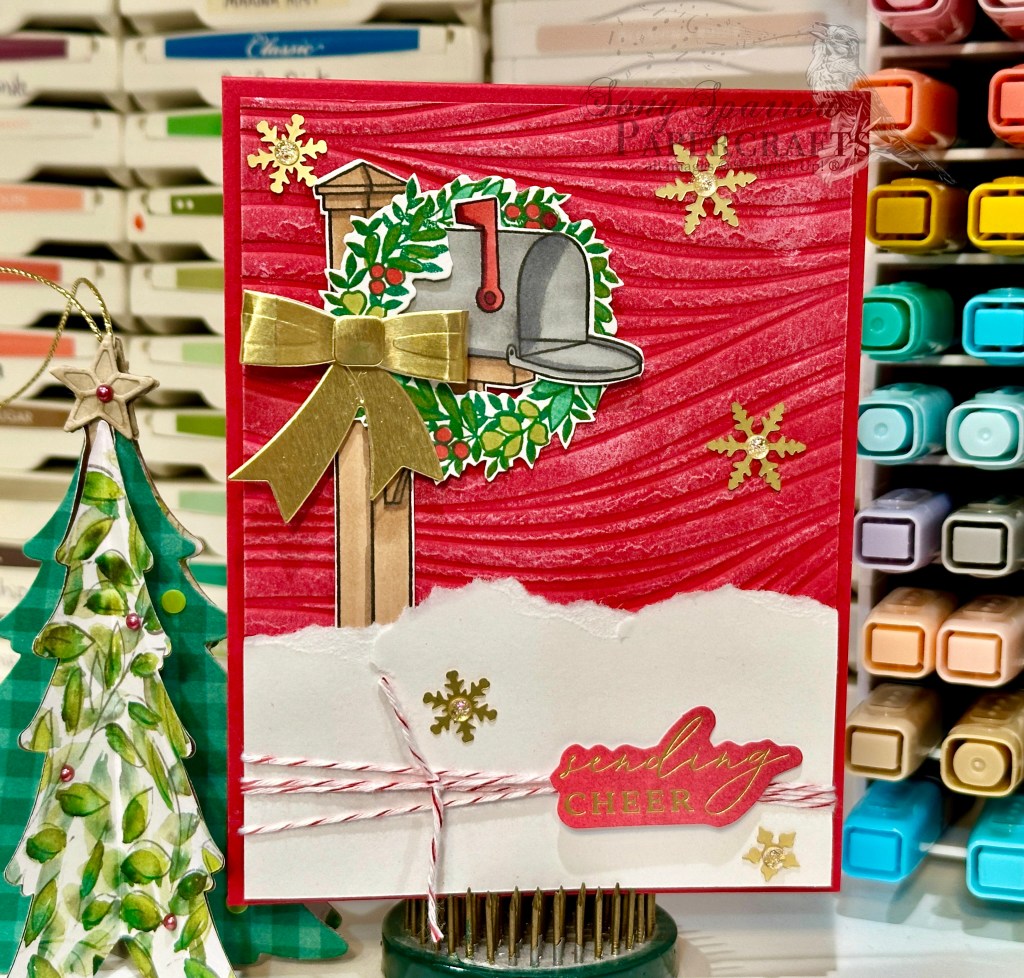
We’re continuing our sneak peeks at some of my favorite things from the new Stampin’ Up! January Mini and Sale-a-Bration catalogs that are set to release on January 7th. Today, we’re pairing Sketch #17 from the Annual Catalog with the new Timeless Plaid patterned paper and Mixed Labels stamps.

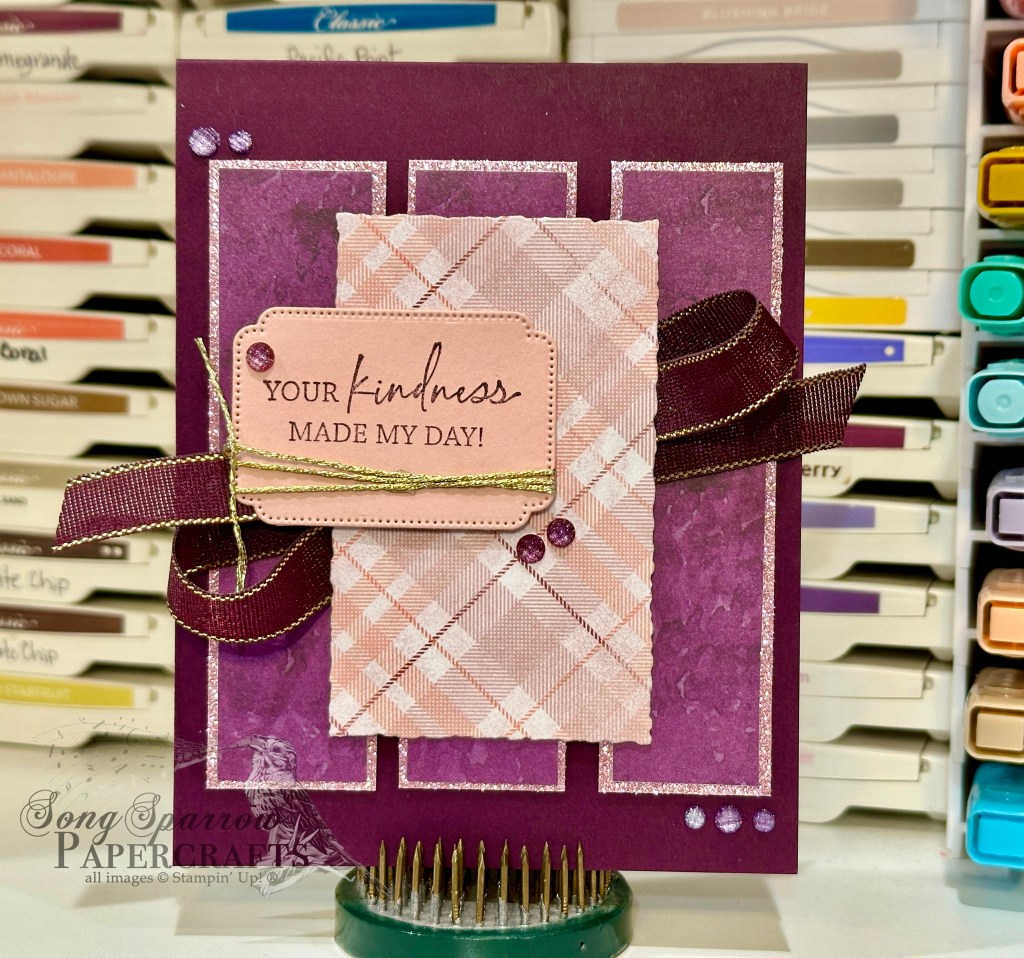
We get started with a base of Blackberry Bliss cardstock. Our backdrop is a split panel of Regal Winter cardstock matted with Pretty in Pink glimmer paper. The focal panel is a sheet of Timeless Plaid patterned paper cut with the Deckled Rectangles dies. I used some Blackberry Bliss & Gold ribbon to bring out the subtle stripes of purple in the plaid and really tie our color palette together. The sentiment from Mixed Labels is stamped in Blackberry Bliss on Petal Pink and then diecut using the Unbounded Love dies. A wrap of some gold thread and a few purple fine shimmer gems bring things together.

Products used in today’s card:
Blackberry Bliss, Petal Pink cardstock
In Color glimmer, Timeless Plaid (coming soon), Regal Winter DSP
Mixed Labels stamps (coming soon)
Unbounded Love, Deckled Rectangles dies
Blackberry Bliss & Gold ribbon, gold thread
Purple fine shimmer gems
Dimensionals
Adhesives

Coming Soon · January Mini Catalog

Clear Skies for ’25

We’re continuing our sneak peeks at some of my favorite products from the upcoming Stampin’ Up! January Mini and Sale-a-Bration catalogs. And today, we’re making a super easy easel calendar using the new Everyday Skies designer paper and (what is clearly showing as one of my top favorites) the pastel ombre glimmer paper. I just love all of the skies depicted in this paper pack — from moody to dark to beautiful sunrises & sunsets, this pack has them all!

I needed some simple Christmas gift stuffers, so I whipped up these two easel calendars last night. Let’s see how these two beauties come together.

For the first calendar, we get started with Basic Black cardstock. This is cut so that the card would be in portrait orientation and the score mark is at the top. To make the easel holder in the center of the base, I cut down a quarter panel of black to 4-inches by 5.5-inches and scored it in half and then a half-inch from each side on the short edge. I chose a lovely sunrise sheet from the Everyday Skies paper pack and matted it with the pink/purple ombre glimmer paper. I moved the mini calendar around until I got the placement just right to show off the beautiful sky. A few two-tone sparkle gems give us some twinkle.

For the second calendar, we start with a base of Night of Navy cardstock. This time I chose a night sky from the Everyday Skies paper pack. I kept the mat color the same but varied the direction of the ombre coloring to really bring out the subtle colors in the sky. Two-tone sparkle gems give little glints of twinkle like stars.

These calendars are super easy to put together. I made the two of these in less than 30 minutes. You can try it out for yourself by downloading the full PDF instructions here.

Products used in today’s featured designs:
Taylored Expressions mini calendars
Basic Black, Night of Navy cardstock
Everyday Skies (coming soon), Pastel ombre glimmer (coming soon) DSP
Two-tone sparkle gems (coming soon)
Adhesives

Coming Soon · January Mini Catalog

Sending Big Hugs

Today, we’re continuing through our stroll of some of my favorite products from the upcoming Stampin’ Up! January Mini and Sale-a-Bration catalogs. We’re using Sketch #2 from the Annual Catalog to create this bright and cheery card using the Floral Delight paper and Hugs for Love stamps & punch.

We get started with a base of Daffodil Delight cardstock. I chose a sheet of Floral Delight patterned paper with lots of white space for a nice contrast against our base. To help the focal panel stand out, I matted it in Crushed Curry to bring out the details in the flowers in the focal panel background. The sentiment from the Hugs for Love stamp set is stamped in Pool Party on white cardstock and then punched with the coordinating punch. I also punched a panel from the pastel ombré glimmer paper and cut it in half to make a sparkly mat. A twist of Daffodil Delight satin ribbon and Lost Lagoon soft cording behind the sentiment panel bring everything together. A few of the new low profile dots add a touch of glimmer to the sentiment and really draw the eye in.

This whole paper pack is bright & cheery and will make some wonderful pick-me-up cards, as well as designs for the floral-lovers in your life!

Products used in today’s design:
Daffodil Delight, Crushed Curry, Basic White cardstock
Floral Delight (coming soon), pastel ombré glimmer (coming soon) DSP
Hugs for Love bundle (coming soon)
Daffodil Delight satin ribbon (coming soon), Lost Lagoon soft cording
Low profile dots (coming soon)
Dimensionals
Adhesives

Coming Soon · January Mini Catalog · Sale-a-Bration

Time to Celebrate

This week, we’re getting some sneak peeks at some of my favorite products from the upcoming Stampin’ Up! January Mini and Sale-a-Bration catalogs that are set to release on January 7th. Today’s card comes together in a snap thanks to the newest paper packs — Wildflower Birthday and pastel ombré glimmer paper. The new Wildflower Birthday pack makes quick work of festive cards and is the perfect addition to any crafter’s stash for those last-minute cards.

This super clean-and-simple design starts with a base of Basic White cardstock. The focal panel is a panel cut from the sheet of tags in the Wildflower Birthday designer series paper pack. I used the pink/purple sheet of pastel ombré glimmer paper as the mat behind the focal panel and tied everything together with the new Fresh Freesia seam binding ribbon. The sentiment from Beautiful Butterflies is stamped in Melon Mambo directly on top of the focal panel. We finish things off with a little bling from the new two-tone sparkle gems pack.

Products used in today’s design:
Basic White cardstock
Pastel ombre (coming soon!), Wildflower Birthday (coming soon!) DSP
Beautiful Butterflies stamps (coming soon!)
Fresh Freesia seam binding ribbon (coming soon!)
Two-tone sparkle gems (coming soon!)
Dimensionals
Adhesives

Coming Soon · January Mini Catalog · Sale-a-Bration

Pretty Wonderful

As we’re racing to the finish of the fall semester, we find ourselves running to and fro from various school activities and holiday events and rehearsals. I think we might get one evening at home this week. I’m glad I took a little time over the weekend to work on some crafty projects!

This week, we’re taking some sneak peeks at products from the upcoming January Mini and Sale-a-Bration catalogs from Stampin’ Up! Today we’re pairing up a Sale-a-Bration patterned paper pack with new stamps & dies.

Our card design uses Sketch #18 from the Stampin’ Up! Annual Catalog, which makes putting this card together a breeze. Once again, we’re using the Luv 2 Stamp Group’s monthly color combo to make our color selections — Night of Navy, Pool Party, and Melon Mambo. We get started with a base of Night of Navy cardstock. Our background panel is a sheet of the new SAB Bloom Impressions paper separated into large shutters. The focal section consists of our sentiment and focal image. The sentiment from Mixed Labels is stamped in Pool Party on white cardstock and then cut with the coordinating sentiment die from the Mixed Labels die set, which is mounted over some crinkled Pool Party ribbon and a strip of the new Beautiful Bokeh paper cut into a banner. The butterfly is diecut using the new Beautiful Butterflies dies. I layered Pool Party pastel ombré glimmer paper and black cardstock to create the butterfly. The focal section is adhered with dimensionals to help it stand out against our field of flowers. A few of the new Sunny Day iridescent dots draw the eye to our sentiment.

I’m going to be showing you more of the Beautiful Butterflies a little later this week because, YOU GUYS, it is just fabulous! There are so many possibilities with this bundle, including some shape cards, that I can’t wait to share. But we’ll be getting a broader look at my new products favorites before we dive in to the details of each.

Products used in today’s design:
Night of Navy, Basic Black, Basic White cardstock
Bloom Impressions (coming soon!), Pastel ombre glimmer (coming soon!), Beautiful Bokeh (coming soon!) DSP
Beautiful Butterflies (coming soon!) dies
Mixed Labels bundles (coming soon!)
Pool Party crinkle ribbon
Sunny Day iridescent dots (coming soon!)
Dimensionals
Adhesives

Coming Soon · January Mini Catalog · Sale-a-Bration

Made My Day

It’s a bright and shiny new week already! It was a busy weekend for us between bowling league activities and lessons, holiday gatherings, and holiday preparations. Whew — I feel like I need a weekend from my weekend. What about you?!

As promised, this week we’re going to be getting some sneak peeks at some of my favorite items from the upcoming Stampin’ Up! January Mini and Sale-a-Bration catalogs. Today’s card is based on a super fun color combination that our Luv 2 Stamp Group is working a challenge with right now — Night of Navy, Pool Party, and Melon Mambo. As soon as I saw this combo, I knew exactly what new products I was going to pair to show you. So let’s get a closer look.

I decided to use a sketch from the Annual Catalog to simplify the design process, so this design is based on Sketch #16. We get started with a base of Melon Mambo cardstock. The focal panel consists of the lovely new Toadstool Gardens designer paper, which is a Sale-a-Bration freebie, and a double mat of Night of Navy and the new pastel ombré glimmer paper, which will launch in the January Mini. I wrapped this panel with some Pool Party crinkle ribbon and then placed the sentiment panel over it. The sentiment from the new Mixed Labels stamp set is stamped on white cardstock and then diecut with the coordinating sentiment die from the Mixed Labels die set. I used the size-up sentiment die to cut the mat from the same Pool Party pastel ombré glimmer paper. Dimensionals behind both the sentiment panel and main panel give this card some dimension. I added some shiny sequins for a touch of sparkle across the focal panel.

I’ll be sharing more product previews this week, so I hope you’ll pop in and see what caught my eye from the new January catalogs!

Products used in today’s design:
Melon Mambo, Night of Navy, Basic White cardstock
Pastel ombre glimmer (coming soon!), Toadstool Gardens (coming soon!) DSP
Mixed Labels bundle (coming soon!)
Pool Party crinkle ribbon
Shiny sequins
Dimensionals
Adhesives

Christmas · Coming Soon

Sending Snowy Cheer

It’s that time of year where we’re all in holiday mode. Swiping all of the sale items off our lists to give to loved ones and friends. Taking the annual family photos. Carefully choosing the annual holiday cards.

Today, I’m sharing another holiday card from this year’s crafting stash. I have several versions of this particular design that I hope to try, but this is by far the simplest one, I think. And I just love the look of the new Soft Waves embossing folder that will release with the new catalog in January. Doesn’t it give the perfect look of snow drifts swirling swiftly across this scene?

We get started with a base of Real Red cardstock. The background panel is a quarter panel of Real Red that’s embossed with the new (not yet released) Soft Waves embossing folder and then lightly wiped with craft ink to give the look of swirling snow. To create the snowdrift in the front, I took a panel of white cardstock and tore it to create the perfectly soft and frayed-looking top edges. Our mailbox from Sending Love is stamped in black on white cardstock and colored with Stampin’ Blends. I cut with the coordinating die and then made the cuts even tighter with my paper snips. The wreath from the Sophisticated Sled stamp set is stamped in Shaded Spruce and Old Olive and then colored with Stampin’ Blends before I cut it out with the coordinating die. I also tightened up the edges around the wreath with paper snips to reduce the white space. I slit the wreath and then put it around the mailbox. Dimensionals help give it definition all around. The bow is cut using the Peaceful Evergreens dies and is cut from gold foil paper. Dimensionals help give the whole scene layers and dimension for all of the elements. I wrapped some red & white baker’s twine around the bottom of the focal panel and added the sentiment from the Joyful Sayings ephemera pack. Gold snowflakes and gold iridescent gems finish things off with just the right amount of sparkle.

Tomorrow, I hope you’ll pop in to see how I’ve updated our dinner table prayer for the season of Advent.

Product List
Coming Soon

It’s Almost Time!

Happy Monday, everyone! It’s been a pretty dreary day here in North Texas, but we’ve received some much-needed rain. So I suppose we’ll take the dreary.

Tomorrow (November 5th) is the big day — the Stampin’ Up! Online Exclusives release day! I still have a few things that I plan to snag from this release. Can’t wait to hear what you think of the new products. Be sure to pop back and let me know in the comments!

Wanna know something else exciting? I’ll be hosting a Christmas card class at the end of the month, and you still have time to register. We’ll be using the Joyful Ephemera packs to make 9 gorgeous cards. Click the Upcoming Classes tab for more info.

Tune in tomorrow as we get started on projects with this week’s theme — thankfulness. Can’t wait to show what’s up my sleeve!

Coming Soon

Here for You

Do you ever find yourself stuck in a design rut? Sometimes w have to shake things up and get out of our comfort zone! And today’s card design does just that.

This week, we’re spotlighting the new Marbled Elegance paper that will launch on Tuesday with the new Stampin’ Up! Online Exclusives. For today’s card, we’re pairing it with the cute Otterly Adorable paper (also launching Tuesday) and Friends for Life dies in a unique take on the window design.

We get started with a base of Real Red cardstock. Our background panel is from the Marbled Elegance patterned paper pack. Using the Heartfelt Hexagon punch, we make a window in the top of the Marbked Elgance background. I cut the cute cuddling otter pair from a sheet of the Otterly Adorable paper pack and mounted them in the open window. I tied the white diagonal trim around the panel under the window, making a small bow, and then adhered the panel to the card base with dimensionals. I had leftover heart outlines from yesterday’s card design, and I used those to create nesting hearts. A few additional hearts were cut from red Season of Elegance foiled paper. The sentiment panel is cut from white cardstock with the Radiating Stitches heart die and then stamped with the sentiment from Changing Leaves in Real Red. The smaller hearts are adhered with varying levels of dimensionals to create some depth and interest. I finished things off with iridescent rhinestones basic jewels for a dash of twinkle.

It’s always fun to push our creative limits with new design techniques. I love the unexpected mix of shapes, colors, and textures in this design.

Products used in today’s card:
Real Red, Basic White cardstock
Marbled Elegance (coming soon), Melon Mambo foil (retired), Otterly Adorable (coming soon), Season of Elegance DSP
Friends for Life, Radiating Stitches dies
Changing Leaves stamps
Heartfelt Hexagon punch
White diagonal striped trim
iridescent rhinestones basic jewels
Dimensionals
Adhesives

Coming Soon

Hearts of Love

As I am sure you have gathered, my week has not exactly gone as I had planned. Between the day job, the kiddo’s band concert, and Halloween, it’s been a hectic few days. I even had to bow out of the group Instahop. But I know we’ve all been there. That’s just life sometimes.

It’s supposed to be a much quieter weekend, and I hope to be able to play a little catch-up in the craft room. Maybe I’ll even get to bring you some weekend bonus content if all goes well. We shall see.

For now, let’s continue our sneak peek at the new pack of gorgeous paper that will be releasing on Tuesday with the new Stampin’ Up! Online Exclusives. The Marbled Elegance paper is two-sided with a gold foiled side that looks like a paint pour and the other side of complementary patterns. This paper is perfect for making Valentines but honestly is pretty enough to work for absolutely any occasion. Today, I wanted to highlight the no-sentiment technique, where the card design simply speaks the message.

We get started with a base of Pretty in Pink cardstock. The lovely rose patterned sheet of Marbled Elegance serves as our backdrop for the card front. Using the Friends for Life heart die, I cut two large hearts — one from Marbled Elegance and the other from Melon Mambo foil paper (sadly retired). To complete the trio of hearts, I cut a smaller heart from white glimmer paper using the Radiating Stitches dies. All of the hearts are adhered with dimensionals at varying heights to create a lot of visual interest. I added a bit of Pretty in Pink ribbon bunched with some gold cord. And the design is finished off with a combination of gold hearts and iridescent rhinestones basic gems for that extra pop of twinkle.

What do you think? Are you a fan of no sentiments on the front?

Products used in today’s card:
Pretty in Pink cardstock
Marbled Elegance (coming soon), Melon Mambo foil (retired), white glimmer DSP
Friends for Life, Radiating Stitches dies
Pretty in Pink ribbon, Gold cord
Gold hearts (coming soon), iridescent rhinestones basic jewels
Dimensionals
Adhesives