birthday

Day to Celebrate

We’re winding up our spring break week, and although it’s been a little windy, we’ve had beautiful weather to enjoy our time together. I worked the end of the week, so getting back into the groove has been a little challenging with us mostly being off our regular schedule. But hopefully we’ll all get back in the swing next week.

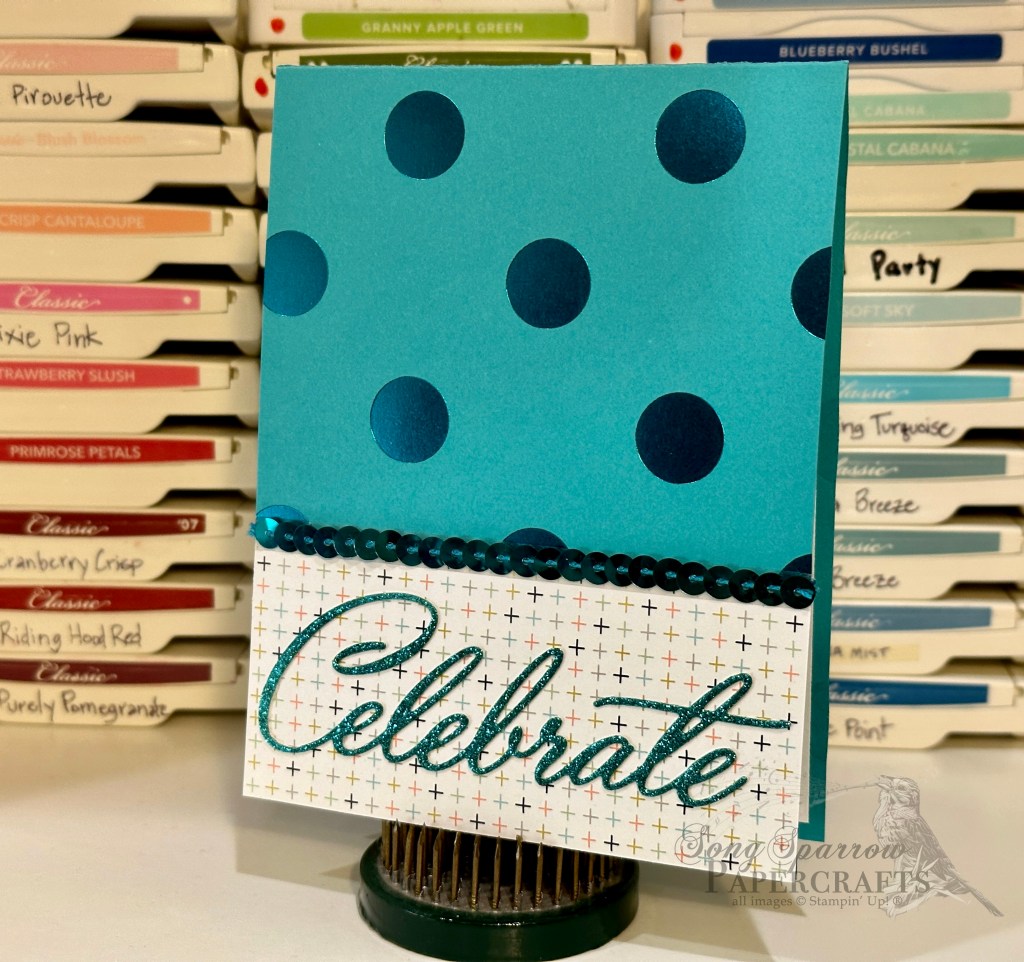
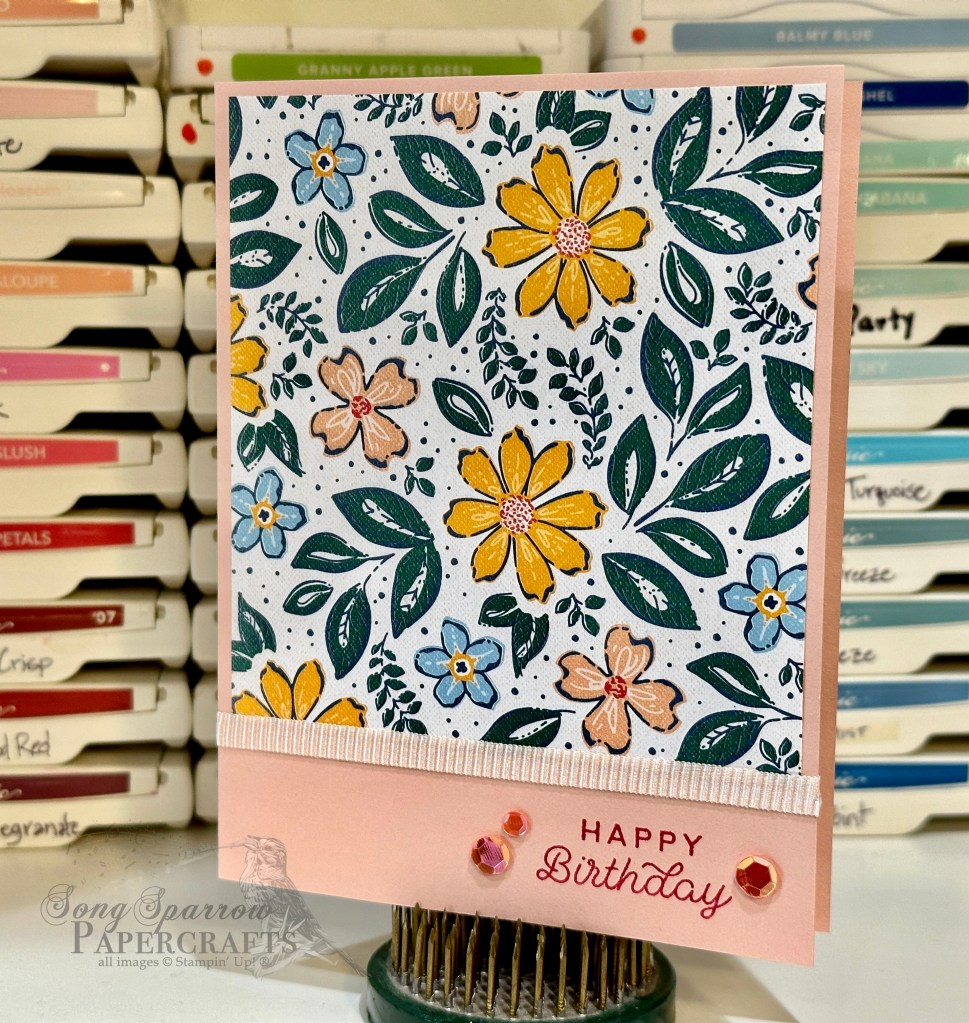
Today, I had a little time to whip up a simple birthday card. Not only does the kiddo have a birthday coming up, but we have several of his friends to celebrate with, as well. So I turned to the cute Wildflower Birthday paper pack for design inspiration for this card.

We get started with a base of Summer Splash cardstock. I cut a piece of the Lovely Garden polka dot paper using the Textured Notes dies to serve as the backdrop for the focal panel. Next up is the focal panel which is a sheet of the Wildflower Birthday foiled paper cut with the Perennial Postage dies. I fussy cut a cupcake from one of the smaller diecut elements from the birthday paper pack as the focal image and matted it with a gold foil circle cut with the Spotlight on Nature dies. I love how this really makes the cupcake pop against the fun patterns of the background. A twist of Summer Splash bordered ribbon gives that extra pop of color and pulls the eye to the center of the design. The sentiment from Day to Celebrate is stamped in Summer Splash on white cardstock and diecut using the Mixed Labels dies. A few Sunny Day iridescent dots add a subtle glimmer on either side of the focal panel.

I intentionally made this card in a more neutral color palette so the kiddo could give it to any one of his friends who is celebrating a birthday without having to worry about it being too girly or too masculine. This layout is one that is simple to replicate for any number of occasions, which makes this one a layout for the sketch book!

Next week is all about nature. I hope you’ll come along with me as we take a tour through the crafty stash to see what we can whip up with this theme.

Product List
birthday

I Can’t BeLEAF It’s Your Birthday

The leaves are really putting on a show in our area now. We have a beautiful Ash tree in our front yard that is covered in beautiful shades of yellow right now. And the drive up the main parkway in our neighborhood is beginning to look like it’s lined by fire. I just LOVE this time of year!

Today’s card is inspired by all of the beautiful foliage of fall. The card base is Pretty Peacock cardstock, and although hues of blue are not necessarily traditional for leaves, it certainly works to complement the lovely shades of foliage we traditionally see this time of year. I used a beautiful vanilla foiled pattern from the All About Autumn designer paper pack to help the leaves really pop. The different colored leaves are diecut from Oxidized Copper and All About Autumn using the Autumn Leaves die collection. The sentiment, from the Circle Sayings stamp set, is heat embossed in copper atop a layer of Early Espresso that has been diecut using the Nested Essentials dies. A scattering of brown sequins adds some dazzle and moves the eye across the design.

I love how an everyday thing, like a leaf, can be used to create a beautiful and versatile card design.

Products used:
Pretty Peacock, Early Espresso cardstock
All About Autumn (sold out), Oxidized Copper DSP
Nested Essentials, Autumn Leaves dies
Copper embossing powder
Adhesive-backed sequins
Dimensionals
Adhesives

All ads on this site are posted by WordPress and are based on your personal browsing history. I do not control ad content.

birthday · Gifting

Spruce Up a Gift Bag

As a paper crafter, I try not to miss an opportunity to add that special handmade touch to gifts. It’s incredibly simple to dress up those packages with a lovely little something. From beautiful ribbon to a unique gift tag, a gift can be jazzy in no time!

I recently whipped up these cute gift tags so I would be ready for the next birthday party. These designs may look fancy and a bit complicated, but each design came together quickly. Let’s see how these came together.

Candles. The tag base is Basic White cardstock diecut using the Merriest Trees dies. I used some older washi tape I had on hand to serve as the colorful grounding for the sentiment panel, which begins with a piece of vellum diecut using the circle from the All That die collection. The candles are stamped in multiple colors on white cardstock using the Big News stamps. I colored each one lightly with a coordinating watercolor pencil and then add a bit of sparkle to the flames of each one using Stickles. The “happy birthday” sentiment is stamped on white cardstock using the Papertrey Ink Birthday Basics stamps and then diecut using the Bunch of Banners dies. A few iridescent discs on either side of the sentiment keep the eye in the center of the tag.

Wish. The tag base is comprised of two layers. The base layer is cut from Oh So Ombre designer paper and the Crumb Cake is diecut using the Merry Tags dies. Next comes the silver star banner which is diecut from metallic silver cardstock using the Star Blast dies. The sentiment is a single Papertrey Ink die and cut from a sheet of Pretty Peacock. Everything is held together with glue from the precision glue pen.

Products used: Birthday candles
Basic White, vellum cardstock
Washi tape
PTI Birthday Basics stamps (retired)
Big News stamps (retired)
Merriest Trees, All That, Bunch of Banners (retired) dies
Watercolor pencils
Stickles
Iridescent discs
Dimensionals
Adhesives
Ribbon

Products used: Make a Wish
Crumb Cake, Pretty Peacock cardstock
Metallic silver cardstock (retired)
Oh So Ombre DSP (retired)
Circles Collection, Merry Tags, Star Blast dies (retired)
PTI Make a Wish die
Adhesives
Precision glue pen
Ribbon

All ads on this site are posted by WordPress and are based on your personal browsing history. I do not control ad content.

birthday · Fall

Falling for Birthdays

The All About Autumn designer series paper is another line that lends itself really well to a variety of fun fold designs. This pack of paper is full of stunning designs with one side of the sheet being fall-themed, full-color photographs and the other side showcasing gorgeous foil designs. The paper is so popular that it sells out quickly each time it comes back in stock, so you can’t hesitate to swipe it when you see it or else it’s usually gone on backorder again when you go back to the online store!

For this design, I wanted to create a card that you would be perfect for any recipient and selected elements that would draw out all of the finer details of the papers. The single-Z fun fold is perfect way to spice things up and create more visual interest and drama. The card base is a sheet of Crumb Cake cardstock, which helps draw out the lighter brown elements of the leaves in the sheet of DSP that serves as the card front. The sentiment panel is diecut from Very Vanilla cardstock using the Nested Essentials dies and stamped with the Charming Sentiments stamp in Copper Clay. A sheet of foiled Copper Clay provides a good base for the sentiment. Adding some dimensionals under the sentiment panel, along with the metallic Flirty Flamingo ribbon, allows it to pop against the busier background. The ribbon also draws out the orange and gold elements of the leaves. The inside of the card holds a small panel of foiled Copper Clay and a small sentiment panel.

I can think of so many of my friends with upcoming birthdays for whom this design would be perfect. What about you?

Products used:
Mossy Meadow, Very Vanilla cardstock
All About Autumn DSP
Charming Sentiments stamps
Nested Essential dies
Adhesive-backed speckled dots
Metallic Flirty Flamingo ribbon
Dimensionals
Adhesives

All ads on this site are posted by WordPress and are based on your personal browsing history. I do not control ad content.

birthday

Who Wants Cake

Growing up, one of my favorite things about my birthday was the family party with the homemade birthday cake. My grandmother was an excellent baker and made the most beautiful and delicious cakes. The floral pattern in this paper reminds me of the one of the cakes she made for my birthday one year. And I chose the pink accents for this design because strawberry cake is my absolute favorite!

I chose Crumb Cake as the card base since it provides the perfect neutral background for the beautiful floral patterned paper. The decorative nesting dies provide the perfect feminine touch for the sentiment panel and my favorite pink — Flirty Flamingo — provides the perfect pop of bright pink. When you want the look of a large bow in the background but an actual bow doesn’t really work, you can layer the ribbon and affix it underneath the sentiment panel to give the look and feel of a tied bow. The pink sequins provide some much-needed sparkle and pizzazz that just says, “Happy Birthday!” What do you think?

Products used:
Blushing Bride (retired), Flirty Flamingo, Crumb Cake
Regency Park DSP (retired)
Heartfelt Hexagon stamps
Papertrey Ink dies
Adhesive-backed sequins
Ribbon duo
Dimensionals
Adhesives

All ads on this site are posted by WordPress and are based on your personal browsing history. I do not control ad content.

birthday · Custom Orders

Celebrate

Celebrate is today’s blog post today, and it’s definitely a day to celebrate as it’s my birthday! I’m not exactly sure what the family has on the agenda today, but it will definitely involved a homecooked dinner by the hubby.

Today’s design is another card from a recent custom order. Knowing the intended recipient of this birthday card really helped shape the design. I just love this foiled polka-dot cardstock. It’s one of the last sheets from a custom order I completed about a year or so ago. I’ve been hoarding it. LOL! The polka cardstock pairs beautifully with the sheet of Sweet Sorbet designer paper by adding a soft and playful feel. The lighter background of the patterned paper also provides the perfect relief for the sentiment to really take the floor. To add another layer of sparkle and pizzazz, I added a strip of sequin trim between the two paper panels. I’m thrilled with how this came out and think it spells FUN — just like its recipient!

Products used:
Bazzill Foil Candy Necklace cardstock (retired)
Sweet Sorbet DSP (retired)
Kaiserkraft glitter cardstock
Papertrey Ink dies
Sequin trim
Dimensionals
Adhesives

All ads on this site are posted by WordPress and are based on your personal browsing history. I do not control ad content.

birthday · Custom Orders

Eat Cake

I recently had the opportunity to complete a custom order with the recipients being friends of mine. It’s always fun when you get to design cards for friends because you have the opportunity to tailor to the recipient.

I had just gotten a delivery of clearance product, and I knew the Regency Park paper was going to be perfect. The base of this card is Blushing Bride with the sheet of Regency Park taking center stage. The sentiment panel is punched from white cardstock using the Heartfelt Hexagon punch. I used two different shades of pink to give visual interest to the sentiment and help it to stand out against the busy floral background. The ribbon helps break up the background, as well. The sparkle from the sequins gives a festive look and helps draw the eye across the design to the sentiment. I love this bright and happy design, don’t you?

Products used:
Blushing Bride (retired), white cardstock
Regency Park DSP (retired)
Heartfelt Hexagon stamps & punch
Adhesive-backed sequins
Ribbon duo
Dimensionals
Adhesives

All ads on this site are posted by WordPress and are based on your personal browsing history. I do not control ad content.

birthday

Birthday Bouquet

Welcome to this shiny new week! It’s going to be a busy one for me with appointments, rehearsals, and professional meetings, but I’m ready for it.

Did you see the SU! Clearance Rack refresh last week? I love swiping things on sale. My hubby thinks I’m just about the most frugal person who ever lived. I mean, I save my paper scraps. Lol! But when there’s so much pretty paper, who wants to throw even the tiniest bit away?!

Speaking of swiping sale items, I nabbed the lovely Regency Park designer paper last week and was excited when it arrived on Friday, along with all of the other goodies I got on clearance. The whole paper pack is full of bright and cheery patterns, and I couldn’t wait to get started making some things.

A sheet of Blushing Bride cardstock serves as the base for this birthday card. The sheet of Regency Park is front and center here. To allow relief for the sentiment, I added ribbon under the patterned paper. To really draw the eye to the sentiment, I added the trio of sparkly sequins. This birthday bouquet just makes me happy. What about you?

Products used:
Blushing Bride cardstock (retired)
Regency Park DSP (retired)
Ribbon duo
Adhesive-backed sequins
Dimensionals
Adhesives

All ads on this site are posted by WordPress and are based on your personal browsing history. I do not control ad content.