Welcome to the weekend. I hope you enjoyed some weather as lovely as we did here today. It was spring in every way — warm temps, breezy, and sunny. We got some spring cleaning done both inside and outside today.
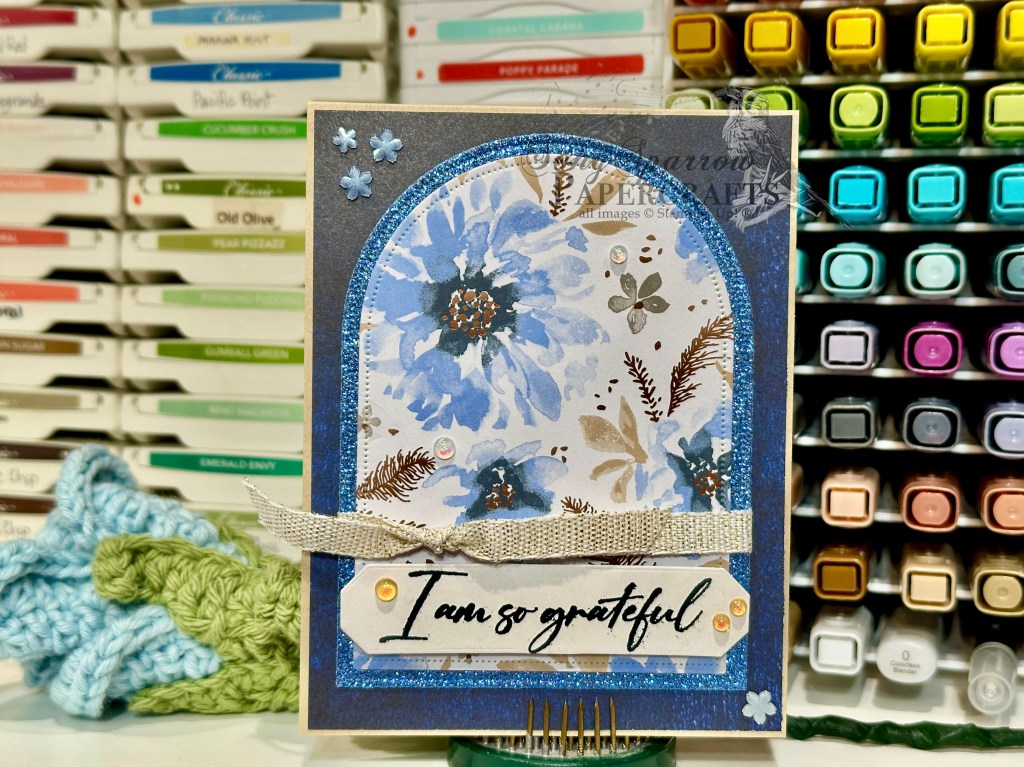
And speaking of spring, this week we’ve been using all the spring flowers to create our projects and using a sketch as design inspiration. Today we’re pairing up the Delicate Dreams paper with a sketch from the gold folks over at the Global Design Project.
We get started with a base of Crumb Cake cardstock. our background panel comes from the Nature Walk paper pack. I used the Everyday Arches dies to create our focal panel. Our mat is a sheet of Misty Moonlight glimmer paper from the Peaceful Garden glimmer pack and then our focal panel is from the Delicate Dreams pack. The panel is wrapped with some white & gold ribbon tied in a decorative knot. The sentiment from the Sentimental Framing stamp set is stamped in Secret Sea on white cardstock and then diecut with the Word of Beauty dies and then adhered at the base of the focal panel with dimensionals. We finish things off with opal rounds and hues of blue flowers.
Thanks for hopping along with me this week. I hope you’ve enjoyed this series.
Howdy, friends, and welcome back! This week is coasting along. And all I can think about is all of the things I have to do before we head out of town this weekend for a family funeral — get the kitties situated, tidy up the house, last-minute laundry, packing. Ack! So many things. But somehow I know it will all get done and things will be fine. We’re fortunate to have friends who are willing to let their teenager taking on the pet sitter gig, so we know our guys will be in good hands!
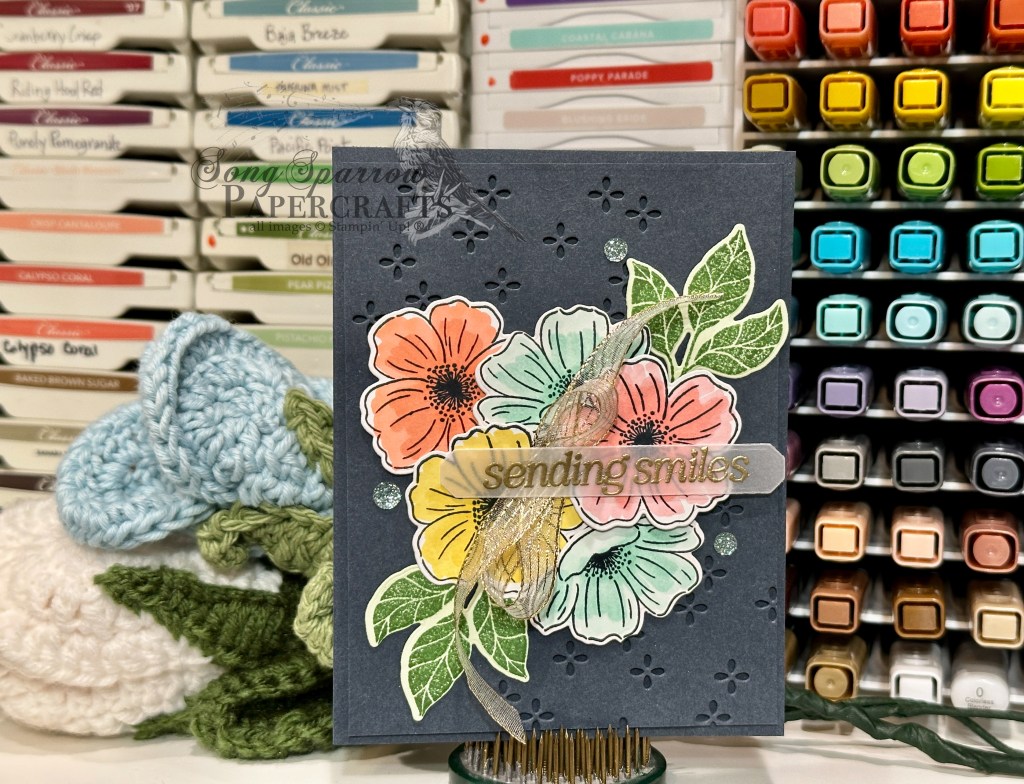
This week, we’re getting an in-depth look at the brand new suite called Lovely Blossoms. It just launched in the online store. Have you checked out all of the new goodies that dropped in the store this week? I’m really loving this suite because you can create so many different looks based on the products you combine. And today we’re letting our stamps and dies take center stage. I actually borrowed the inspiration for today’s card design from one of the samples in the online store. Maybe you can figure out which one?
Today’s card is actually pretty simple and comes together relatively easily. We get started with a base of Secret Sea cardstock. I used a quarter panel as the backdrop and punched it up by die cutting the eyelet pattern on the diagonal across it using the Lovely Arrangements die. The panel is then adhered to the card front with dimensionals to really give that eyelet pattern more prominence. Our focal section is the florals. I stamped a collection of both the large and small flowers from the Lovely Arrangements stamp set in Secret Sea on white paper and cut with the coordinating dies. The images are filled in with an assortment of Stampin’ Blends, using the darks from each pair for the centers and the lighter blends for the flower petals and edges. Nothing too precise — just swipes across the images. I really love this simple shading method and the look you get. I also stamped a couple of the leaf bunches in Garden Green on Soft Sea Foam paper and cut them with the coordinating die. And then we start arranging the flowers and leaves to get the layers of color and shapes that are most pleasing to the eye before sticking everything down. Glue dots adhere the elements that are in the background, while varying layers of dimensionals give us the depth and layers in the flowers. The sentiment sits on a banner of vellum cut with the Words of Beauty die. The sentiment from the Lovely Arrangements stamp set is stamped in Versamark on vellum and then heat embossed with gold and is adhered over a twist of the gold striped mesh ribbon with glue dots. A few traditional sparkling sequins finish things off with a pop of Pool Party.
I hope you’ll drop in tomorrow as we continue our Lovely Blossoms design series with a closer look at the dies.
Howdy, friends. It’s another balmy day here in N. Texas. We’re so confused that we think we’re in the Southern Hemisphere about now! But winter is supposedly on the way as the next cold front is due to arrive sometime tomorrow. I really hope so because shorts in December is pretty crazy!
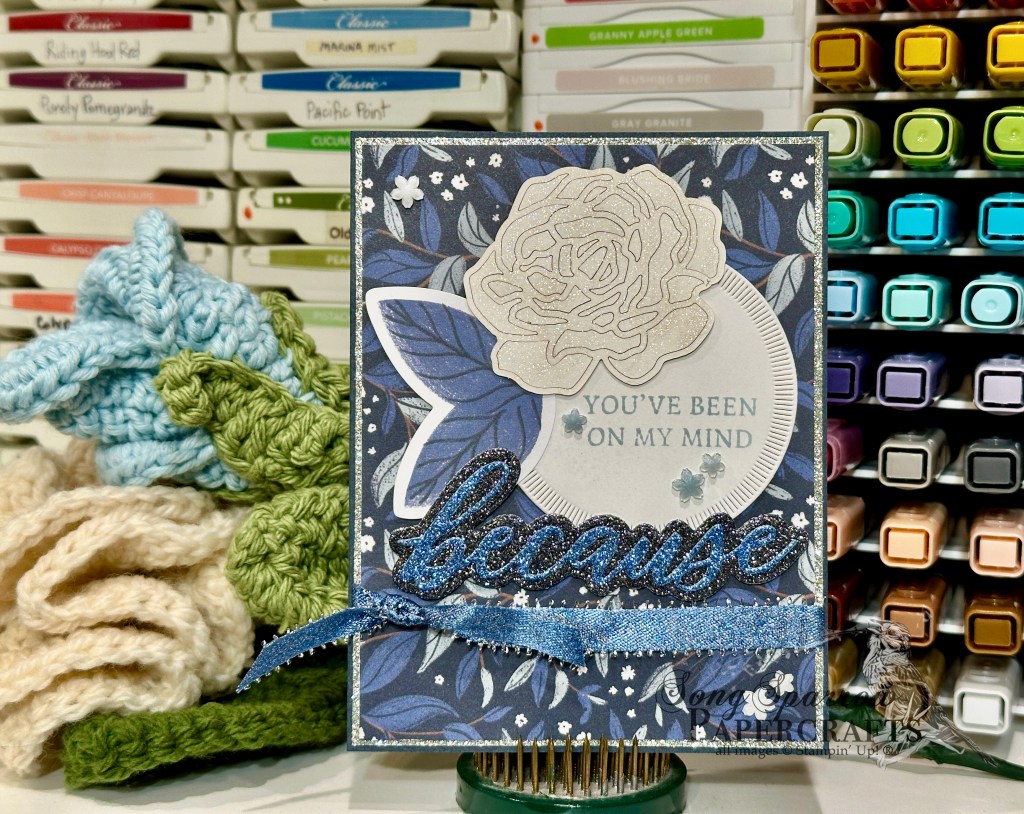
Today I’m bringing you another floral design in our ode to this Texas faux spring. And we’re pairing up the Words of Beauty stamps & die bundle with the oh-so lovely Peaceful Garden suite. And I’m giving you a little sneak peek of an upcoming release of the beautiful laser cut Covered in Flowers Accents.
This card comes together super quickly. We get started with a base of Secret Sea cardstock. Our background panel consists of the vine patterned sheet from the Peaceful Garden pack with the silver glimmer paper from the coordinating glimmer pack. Our focal panel consists of the sentiment and an overlapping image. We get started by cutting a circle from white cardstock with the middle size of Spotlight on Nature dies. I stamped a portion of the sentiment in Cloud Burst ink directly on this panel. The rose diecut is from the up-and-coming Covered in Flowers accents pack and overlaps the set of leaves from the Peaceful Garden sticker sheet. I covered the rose with Wink of Stella for some extra shimmer on our focal panel. The remainder of the sentiment is diecut from Secret Sea and Misty Moonlight glimmer paper from the Peaceful Garden glimmer pack using the Words of Beauty dies. This full panel is adhered to our card front on a single layer of dimensionals just above a bow of Misty Moonlight & silver edged ribbon. We finish things off with some Hues of Blue Flowers.
To me, this card feels like a warm hug and I know just who needs it right about now. This lovely will be headed out in the post next week to bring a little snail mail love to some family.
Next week, we’re going to be exploring two new sets and I can’t wait to show you how well they work together! I hope you’ll drop in.
Hello, crafty friends! I hope you all enjoyed your Christmas. We enjoyed time together and time with family. My voice managed to hold together well enough to do an okay job for Christmas Eve services and we’ve enjoyed just loafing around since.
While I have the time off, I’ve also been enjoying time in the craft room. I’ve had several boxes of new goodies arrive. So I’ve taken the time to put away the Christmas mess and get somewhat reorganized. I’m really looking forward to playing with all the new crafty goodness that has arrived.
For the remainder of this week, I thought it would be appropriate to tiptoe back through the garden florals since it’s in the 80s here in North Texas. And today we’re pairing up the ever-lovely Perennial Lavender patterned paper with the Words of Beauty stamp and die bundle.
We get started with a base of Crumb Cake cardstock. I love how this light neutral really pulls forward the lighter colors in our patterned papers. I chose two complimentary sheets from the Perennial Lavender paper pack. The larger fronds of lavender serve as the backdrop for our focal panel, which is a combination of summer wildflowers. To help the busier, smaller pattern stand out against the background panel, I decided to use some retired Highland Heather glimmer paper. The sentiment is a combination of dies and stamps from the Words of Beauty set. just because is cut from Petunia Pop glimmer paper and adhered directly to the focal panel with a glue pen. The remainder of the sentiment is stamped in Blackberry Bliss ink on white cardstock and cut with the larger sentiment panel from the Words of Beauty die set and then adhered between the two glittery words. We finish off the focal panel with Petunia Pop iridescent ribbon tied in a bow and a combination of shimmery gems.
Tomorrow we’re going to pair up Words of Beauty with some more florals from the crafty stash. I hope you’ll pop in and check it out.
Happy Saturday, friends! It’s been a busy day here as we’ve made preparations for our first deep cold snap of the season. And in true Texas fashion, that means that today was hot and sunny! *snicker*
Today we’re rounding out our trekking through the outdoors series. And what a fun opportunity to make another card combining old and new with Nests of Winter, Elegant Pine Snowflakes, and Words of Beauty.
We start with a sheet of Pretty Peacock as our card base. A sheet of the Elegant Pine Snowflakes is the perfect backdrop for our tufted titmouse pair from the Nests of Winter paper pack. Circles of Regal Distressed Patterns and Earthen Tone Metallic help our feathered friends really shine. The circles are cut with the Spotlight on Nature dies and then the birds are adhered on top with dimensionals. The sentiment from Words of Beauty are heat embossed in copper on white paper and then cut with the banner die from the coordinating die set. The sentiment panel is adhered over Pretty Peacock and gold ribbon with dimensionals. And we finish things off with a touch of copper sparkle with the drusy embellishments across the front.
Next we’re going to be in thankful mode before turning our thoughts to the Christmas holidays. I hope you’ll drop by and see all the ways you can share thankfulness next week!
Happy Friday, everyone! This felt like both the longest and shortest week on record. I’m not quite sure how that happens, but that’s where we are. Needless to say, I’m ready for the weekend and an opportunity to unwind.
Today is clean & simple Friday as we continue our trek through our crafting stash to create outdoorsy designs. And today’s card comes together in a jiffy with the help of the new Words of Beauty stamp set and the Nests of Winter patterned paper. Let’s check it out.
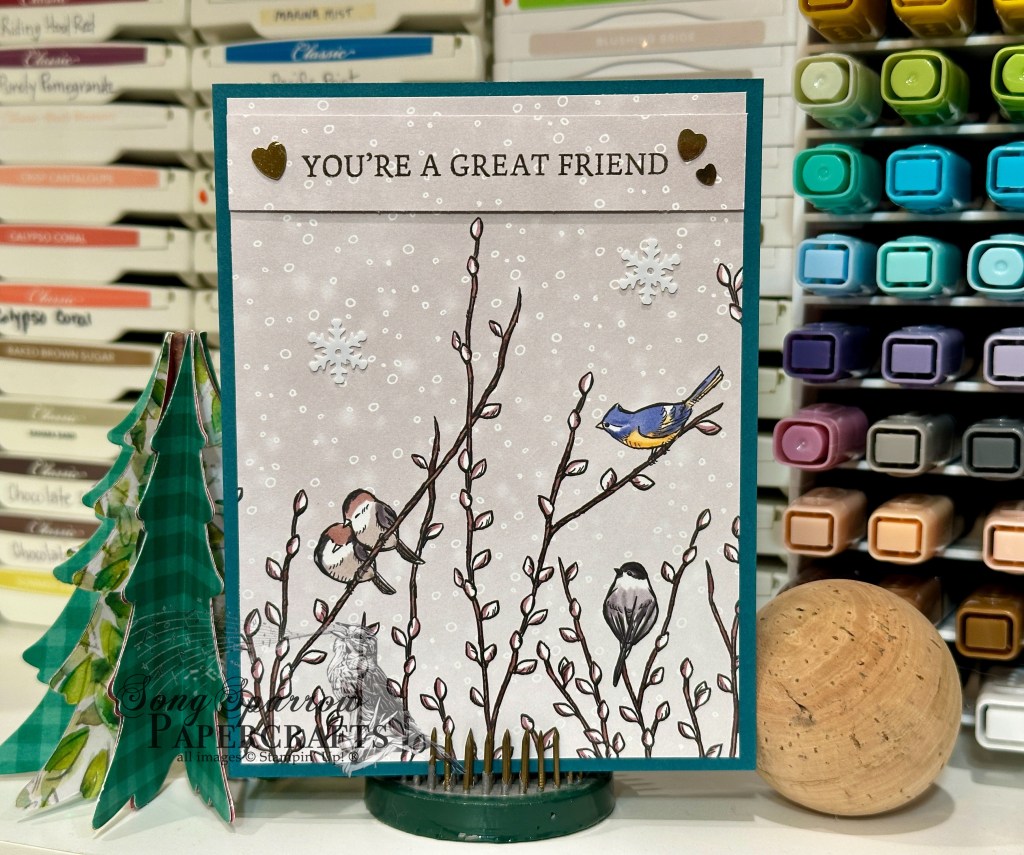
Today’s clean and simple card gets started with a base of Pretty Peacock cardstock. I cut down the one sheet wonder from Nests of Winter into panels and used one of the panels for the focal panel on this card. The strip cut to make it fit the A2 card front is used as the sentiment panel. The sentiment from the new Words of Beauty stamp set is stamped in Early Espresso on the patterned strip and then adhered at the top of the focal panel with dimensionals. A few snowflakes add a realistic look to the light snowfall in our panel and then the adhesive gold hearts reinforce the theme of our sentiment.
Card designs don’t have to be complicated to convey a strong message. And I love how this card hits you in the feels! Tune in tomorrow to see how we wrap up our series this week.
Happy Monday, crafty friends! It was a busy weekend here in the studio as I worked furiously all weekend to make Christmas-themed product for an upcoming craft show. While I made a lot of progress, I still have quite a ways to go to be fully prepared for a Christmas market. Eeek!
But I digress. This week, we’re on to a new design theme, and I thought we would continue to hang out in the woods this week. The fun thing about a general theme is that we get a lot of freedom to pull all kinds of things from our crafty stash. *grin* And I’ll be sneaking in some of the new Online Exclusives that I snagged in my preorder.
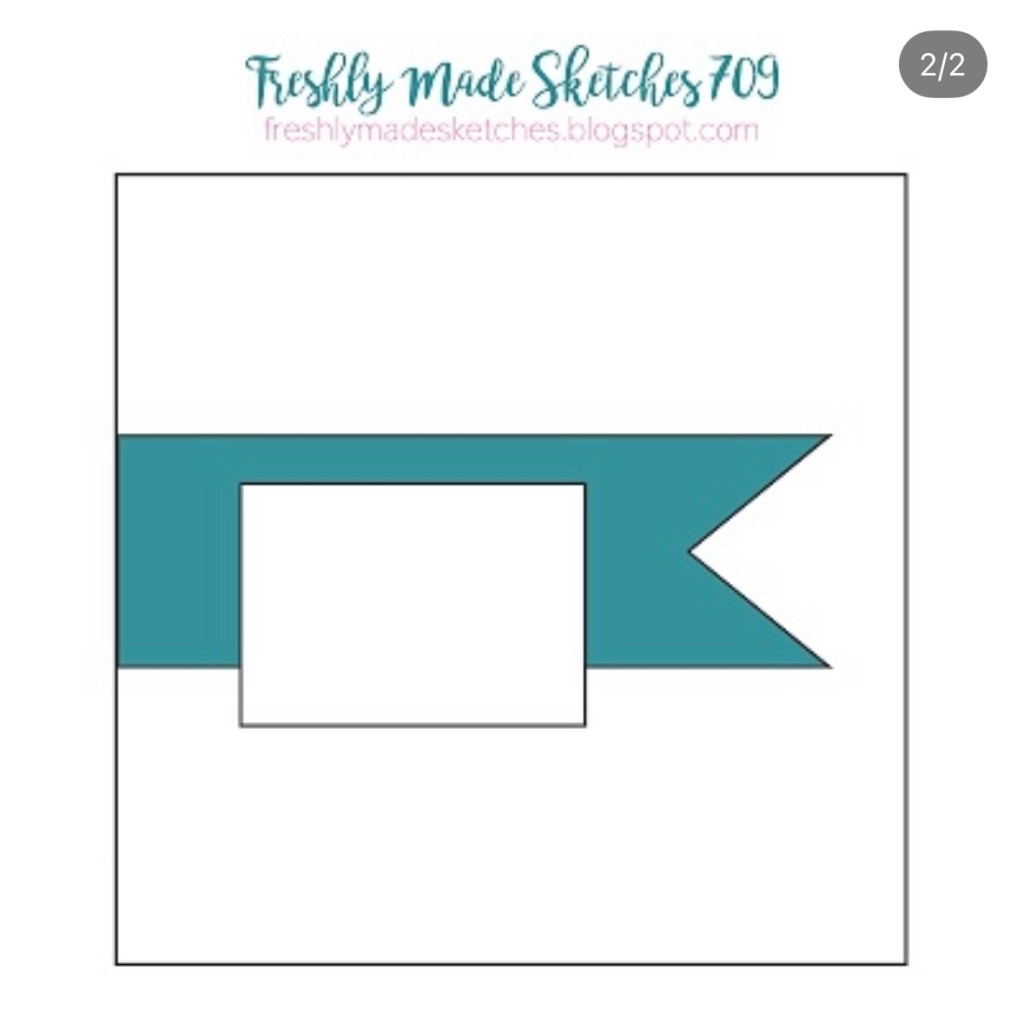
So today we’re getting started with a sketch. When I saw the Freshly Made Sketches #709, I knew exactly what I wanted to pair together — the new Winter Scenes stamp set, the Elegant Pine Snowflakes paper, and the brand new Words of Beauty stamp set (releasing tomorrow!).
I kept things super simple with today’s color palette. We get started with a base of Basic White cardstock. The sheet of white snowflakes from the Elegant Pine Snowflakes pack serves as our backdrop. Our focal panel starts with the mountain scene from the Winter Scenes stamp set on a postage stamp of white cardstock cut with the smaller square from the Perennial Postage die set. I did some light shading with Stampin’ Blends to add a touch of color to the scene and covered the scene with Wink of Stella for the perfect snowy twinkle. This scene is matted with some silver brushed silver and a square of Lost Lagoon cut with one of the smaller squares from the Stylish Shapes die set. The sentiment panel is a smaller banner cut from white cardstock using the Stylish Shapes dies. The sentiment from the *new* Words of Beauty stamp set is stamped in Pretty Peacock and then flanked with some silver drusy embellishments before being adhered on the back of the winter mountain scene panel. The full panel is adhered in the bottom-left corner with dimensionals.
Super simple but oh-so stunning, don’t you think? I hope you’ll tune in tomorrow to see where our trek in the woods takes us!
![Crumb Cake 8-1/2" X 11" Cardstock [ 120953 ]](https://assets1.tamsnetwork.com/images/EC042017NF/120953s.jpg "Crumb Cake 8-1/2\" X 11\" Cardstock [ 120953 ]")
![Basic White 8 1/2" X 11" Cardstock [ 166780 ]](https://assets1.tamsnetwork.com/images/EC042017NF/166780s.jpg "Basic White 8 1/2\" X 11\" Cardstock [ 166780 ]")
![Delicate Dreams 12" X 12" (30.5 X 30.5 Cm) Specialty Designer Series Paper [ 167498 ]](https://assets1.tamsnetwork.com/images/EC042017NF/167498s.jpg "Delicate Dreams 12\" X 12\" (30.5 X 30.5 Cm) Specialty Designer Series Paper [ 167498 ]")
![Peaceful Garden 12" X 12" (30.5 X 30.5 Cm) Glimmer Paper [ 165929 ]](https://assets1.tamsnetwork.com/images/EC042017NF/165929s.jpg "Peaceful Garden 12\" X 12\" (30.5 X 30.5 Cm) Glimmer Paper [ 165929 ]")
![Sentimental Framing Photopolymer Stamp Set (English) [ 165475 ]](https://assets1.tamsnetwork.com/images/EC042017NF/165475s.jpg "Sentimental Framing Photopolymer Stamp Set (English) [ 165475 ]")
![Everyday Arches Dies [ 164629 ]](https://assets1.tamsnetwork.com/images/EC042017NF/164629s.jpg "Everyday Arches Dies [ 164629 ]")
![Words Of Beauty Dies (English) [ 167089 ]](https://assets1.tamsnetwork.com/images/EC042017NF/167089s.jpg "Words Of Beauty Dies (English) [ 167089 ]")
![Secret Sea Classic Stampin' Pad [ 165285 ]](https://assets1.tamsnetwork.com/images/EC042017NF/165285s.jpg "Secret Sea Classic Stampin' Pad [ 165285 ]")
![Hues Of Blue Flowers [ 165930 ]](https://assets1.tamsnetwork.com/images/EC042017NF/165930s.jpg "Hues Of Blue Flowers [ 165930 ]")
![Opal Rounds Assortment [ 163298 ]](https://assets1.tamsnetwork.com/images/EC042017NF/163298s.jpg "Opal Rounds Assortment [ 163298 ]")
![White With Gold 3/8" (1 Cm) Ribbon [ 166979 ]](https://assets1.tamsnetwork.com/images/EC042017NF/166979s.jpg "White With Gold 3/8\" (1 Cm) Ribbon [ 166979 ]")
![Stampin' Dimensionals [ 104430 ]](https://assets1.tamsnetwork.com/images/EC042017NF/104430s.jpg "Stampin' Dimensionals [ 104430 ]")
![Secret Sea 8 1/2" X 11" Cardstock [ 165624 ]](https://assets1.tamsnetwork.com/images/EC042017NF/165624s.jpg "Secret Sea 8 1/2\" X 11\" Cardstock [ 165624 ]")
![Soft Sea Foam 8-1/2" X 11" Cardstock [ 146988 ]](https://assets1.tamsnetwork.com/images/EC042017NF/146988s.jpg "Soft Sea Foam 8-1/2\" X 11\" Cardstock [ 146988 ]")
![Vellum 12" X 12" (30.5 X 30.5 Cm) Specialty Paper [ 167099 ]](https://assets1.tamsnetwork.com/images/EC042017NF/167099s.jpg "Vellum 12\" X 12\" (30.5 X 30.5 Cm) Specialty Paper [ 167099 ]")
![Lovely Arrangements Bundle (English) [ 167176 ]](https://assets1.tamsnetwork.com/images/EC042017NF/167176s.jpg "Lovely Arrangements Bundle (English) [ 167176 ]")
![Pretty In Pink Stampin’ Blends Combo Pack [ 163824 ]](https://assets1.tamsnetwork.com/images/EC042017NF/163824s.jpg "Pretty In Pink Stampin’ Blends Combo Pack [ 163824 ]")
![Calypso Coral Stampin' Blends Combo Pack [ 154881 ]](https://assets1.tamsnetwork.com/images/EC042017NF/154881s.jpg "Calypso Coral Stampin' Blends Combo Pack [ 154881 ]")
![Daffodil Delight Stampin' Blends Combo Pack [ 154883 ]](https://assets1.tamsnetwork.com/images/EC042017NF/154883s.jpg "Daffodil Delight Stampin' Blends Combo Pack [ 154883 ]")
![Pool Party Stampin' Blends Combo Pack [ 154894 ]](https://assets1.tamsnetwork.com/images/EC042017NF/154894s.jpg "Pool Party Stampin' Blends Combo Pack [ 154894 ]")
![Garden Green Classic Stampin' Pad [ 147089 ]](https://assets1.tamsnetwork.com/images/EC042017NF/147089s.jpg "Garden Green Classic Stampin' Pad [ 147089 ]")
![Versamark Pad [ 102283 ]](https://assets1.tamsnetwork.com/images/EC042017NF/102283s.jpg "Versamark Pad [ 102283 ]")
![Metallics Wow! Embossing Powder [ 165678 ]](https://assets1.tamsnetwork.com/images/EC042017NF/165678s.jpg "Metallics Wow! Embossing Powder [ 165678 ]")
![Traditional Sparkling Sequins [ 165875 ]](https://assets1.tamsnetwork.com/images/EC042017NF/165875s.jpg "Traditional Sparkling Sequins [ 165875 ]")
![Mini Glue Dots [ 103683 ]](https://assets1.tamsnetwork.com/images/EC042017NF/103683s.jpg "Mini Glue Dots [ 103683 ]")
![Gold Striped 3/8" (1 Cm) Mesh Ribbon [ 165599 ]](https://assets1.tamsnetwork.com/images/EC042017NF/165599s.jpg "Gold Striped 3/8\" (1 Cm) Mesh Ribbon [ 165599 ]")
![Peaceful Garden Designer Series Paper & Sticker Sheet (English) [ 167363 ]](https://assets1.tamsnetwork.com/images/EC042017NF/167363s.jpg "Peaceful Garden Designer Series Paper & Sticker Sheet (English) [ 167363 ]")
![Words Of Beauty Bundle (English) [ 167090 ]](https://assets1.tamsnetwork.com/images/EC042017NF/167090s.jpg "Words Of Beauty Bundle (English) [ 167090 ]")
![Spotlight On Nature Dies [ 163580 ]](https://assets1.tamsnetwork.com/images/EC042017NF/163580s.jpg "Spotlight On Nature Dies [ 163580 ]")
![Cloud Cover Classic Stampin' Ink Refill [ 165279 ]](https://assets1.tamsnetwork.com/images/EC042017NF/165279s.jpg "Cloud Cover Classic Stampin' Ink Refill [ 165279 ]")
![Clear Wink Of Stella Glitter Brush [ 141897 ]](https://assets1.tamsnetwork.com/images/EC042017NF/141897s.jpg "Clear Wink Of Stella Glitter Brush [ 141897 ]")
![Misty Moonlight & Silver Edged 1/2" (1.3 Cm) Ribbon [ 165931 ]](https://assets1.tamsnetwork.com/images/EC042017NF/165931s.jpg "Misty Moonlight & Silver Edged 1/2\" (1.3 Cm) Ribbon [ 165931 ]")

![Perennial Lavender 12" X 12" (30.5 X 30.5 Cm) Designer Series Paper [ 162593 ]](https://assets1.tamsnetwork.com/images/EC042017NF/162593s.jpg "Perennial Lavender 12\" X 12\" (30.5 X 30.5 Cm) Designer Series Paper [ 162593 ]")
![2024–2026 In Color™ Glimmer 12" X 12" (30.5 X 30.5 Cm) Specialty Paper [ 163771 ]](https://assets1.tamsnetwork.com/images/EC042017NF/163771s.jpg "2024–2026 In Color™ Glimmer 12\" X 12\" (30.5 X 30.5 Cm) Specialty Paper [ 163771 ]")
![Three Color Glimmer 12" X 12" (30.5 X 30.5 Cm) Specialty Paper [ 162813 ]](https://assets1.tamsnetwork.com/images/EC042017NF/162813s.jpg "Three Color Glimmer 12\" X 12\" (30.5 X 30.5 Cm) Specialty Paper [ 162813 ]")
![Blackberry Bliss Classic Stampin' Pad [ 147092 ]](https://assets1.tamsnetwork.com/images/EC042017NF/147092s.jpg "Blackberry Bliss Classic Stampin' Pad [ 147092 ]")
![Petunia Pop 1/4" (6.4 Mm) Iridescent Ribbon [ 166203 ]](https://assets1.tamsnetwork.com/images/EC042017NF/166203s.jpg "Petunia Pop 1/4\" (6.4 Mm) Iridescent Ribbon [ 166203 ]")
![Purple Fine Shimmer Gems [ 162611 ]](https://assets1.tamsnetwork.com/images/EC042017NF/162611s.jpg "Purple Fine Shimmer Gems [ 162611 ]")
![Charming Shimmer Faceted Dots [ 166139 ]](https://assets1.tamsnetwork.com/images/EC042017NF/166139s.jpg "Charming Shimmer Faceted Dots [ 166139 ]")
![Mini Stampin' Dimensionals [ 144108 ]](https://assets1.tamsnetwork.com/images/EC042017NF/144108s.jpg "Mini Stampin' Dimensionals [ 144108 ]")
![Fine-Tip Glue Pen [ 138309 ]](https://assets1.tamsnetwork.com/images/EC042017NF/138309s.jpg "Fine-Tip Glue Pen [ 138309 ]")

![Pretty Peacock 8-1/2" X 11" Cardstock [ 150880 ]](https://assets1.tamsnetwork.com/images/EC042017NF/150880s.jpg "Pretty Peacock 8-1/2\" X 11\" Cardstock [ 150880 ]")
![Elegant Pine Snowflakes 12" X 12" (30.5 X 30.5 Cm) Designer Series Paper [ 166066 ]](https://assets1.tamsnetwork.com/images/EC042017NF/166066s.jpg "Elegant Pine Snowflakes 12\" X 12\" (30.5 X 30.5 Cm) Designer Series Paper [ 166066 ]")
![Earthen Toned Metallic 12" X 12" (30.5 X 30.5 Cm) Specialty Paper [ 165901 ]](https://assets1.tamsnetwork.com/images/EC042017NF/165901s.jpg "Earthen Toned Metallic 12\" X 12\" (30.5 X 30.5 Cm) Specialty Paper [ 165901 ]")
![Regal Distressed Patterns 12" X 12" (30.5 X 30.5 Cm) Specialty Designer Series Paper [ 164037 ]](https://assets1.tamsnetwork.com/images/EC042017NF/164037s.jpg "Regal Distressed Patterns 12\" X 12\" (30.5 X 30.5 Cm) Specialty Designer Series Paper [ 164037 ]")
![Nests Of Winter 12" X 12" (30.5 X 30.5 Cm) Designer Series Paper [ 164183 ]](https://assets1.tamsnetwork.com/images/EC042017NF/164183s.jpg "Nests Of Winter 12\" X 12\" (30.5 X 30.5 Cm) Designer Series Paper [ 164183 ]")
![Pretty Peacock & Gold 3/8" (1 Cm) Metallic Ribbon [ 162588 ]](https://assets1.tamsnetwork.com/images/EC042017NF/162588s.jpg "Pretty Peacock & Gold 3/8\" (1 Cm) Metallic Ribbon [ 162588 ]")
![Drusy Adhesive Backed Embellishments [ 164223 ]](https://assets1.tamsnetwork.com/images/EC042017NF/164223s.jpg "Drusy Adhesive Backed Embellishments [ 164223 ]")
![Words Of Beauty Photopolymer Stamp Set (English) [ 167083 ]](https://assets1.tamsnetwork.com/images/EC042017NF/167083s.jpg "Words Of Beauty Photopolymer Stamp Set (English) [ 167083 ]")
![Early Espresso Classic Stampin' Pad [ 147114 ]](https://assets1.tamsnetwork.com/images/EC042017NF/147114s.jpg "Early Espresso Classic Stampin' Pad [ 147114 ]")
![Adhesive Backed Snowflake Assortment [ 162129 ]](https://assets1.tamsnetwork.com/images/EC042017NF/162129s.jpg "Adhesive Backed Snowflake Assortment [ 162129 ]")
![Adhesive Backed Heart Sequins [ 164920 ]](https://assets1.tamsnetwork.com/images/EC042017NF/164920s.jpg "Adhesive Backed Heart Sequins [ 164920 ]")
![Lost Lagoon 8-1/2" X 11" Cardstock [ 133679 ]](https://assets1.tamsnetwork.com/images/EC042017NF/133679s.jpg "Lost Lagoon 8-1/2\" X 11\" Cardstock [ 133679 ]")
![Brushed Silver And Gold Foil 12" X 12" (30.5 X 30.5 Cm) Specialty Paper [ 164861 ]](https://assets1.tamsnetwork.com/images/EC042017NF/164861s.jpg "Brushed Silver And Gold Foil 12\" X 12\" (30.5 X 30.5 Cm) Specialty Paper [ 164861 ]")
![Winter Scenes Cling Stamp Set (English) [ 166088 ]](https://assets1.tamsnetwork.com/images/EC042017NF/166088s.jpg "Winter Scenes Cling Stamp Set (English) [ 166088 ]")
![Perennial Postage Dies [ 162607 ]](https://assets1.tamsnetwork.com/images/EC042017NF/162607s.jpg "Perennial Postage Dies [ 162607 ]")
![Stylish Shapes Dies [ 159183 ]](https://assets1.tamsnetwork.com/images/EC042017NF/159183s.jpg "Stylish Shapes Dies [ 159183 ]")
![Shaded Spruce Stampin' Blends Combo Pack [ 154903 ]](https://assets1.tamsnetwork.com/images/EC042017NF/154903s.jpg "Shaded Spruce Stampin' Blends Combo Pack [ 154903 ]")
![Smoky Slate Stampin' Blends Combo Pack [ 154904 ]](https://assets1.tamsnetwork.com/images/EC042017NF/154904s.jpg "Smoky Slate Stampin' Blends Combo Pack [ 154904 ]")
