Terrific Tuesdays

Thank a Teacher

This week we’re looking at two stamp sets, and today’s card shows you how the Trusty Tools stamp set goes beyond the obvious masculine designs to allow you to create a whole host of cute cards that can meet so many different occasions. One of the things that caught my eye in this stamp set is the pencil stamps. My mind immediately turned to design ideas for the teachers we all know and love.

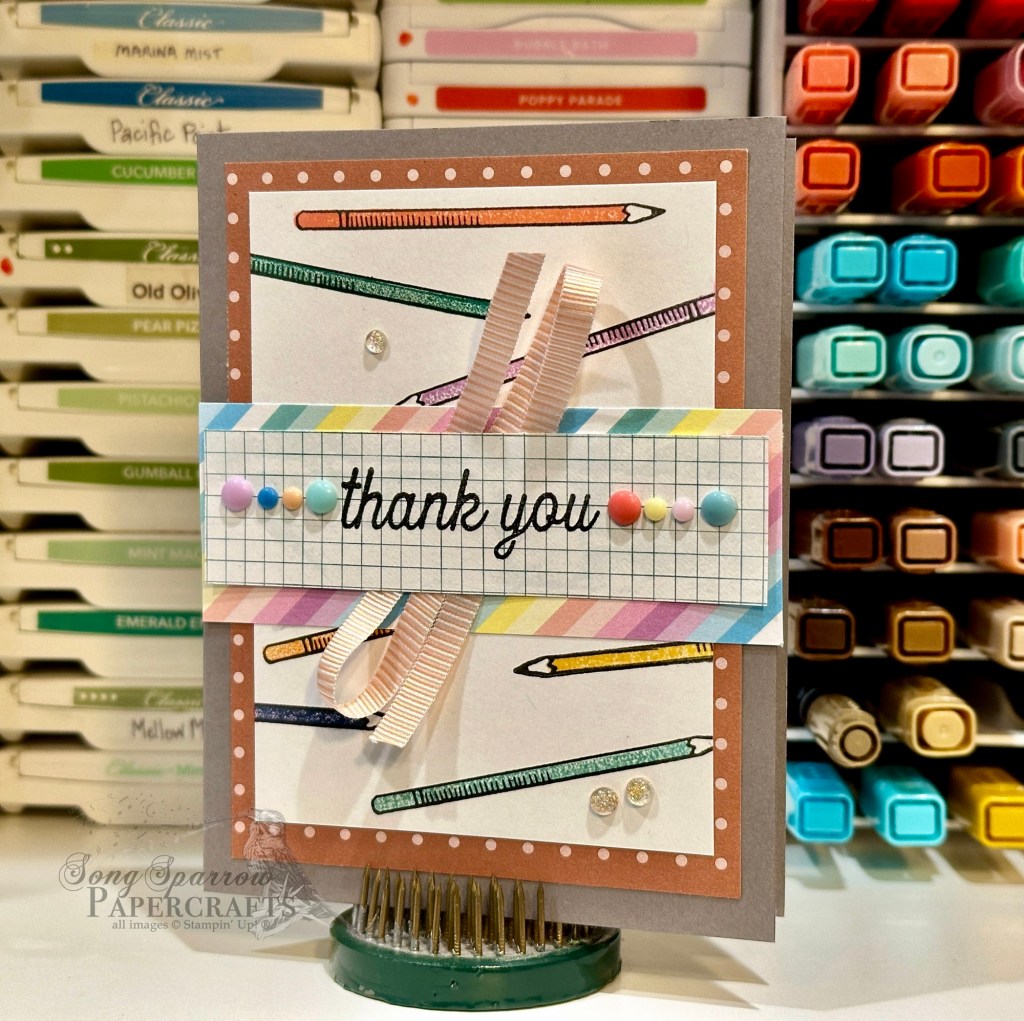
I wanted to recreate the look of an art teacher’s table with colored pencils scattered about. The pencil outline and filler stamps in the Trusty Tools stamp set are the easy ticket here to do just that.

We start with a card base of Pecan Pie. The mat for the focal panel is a cool polka-dotted sheet of Trusty Toolbox designer paper. I really like the effect of a border of dots around the focal panel. It reminds me on the Broadway marquis signs. And don’t you think teachers deserve to have their names in lights?! The focal panel is white cardstock, and I used the pencil stamps to create the look of scattered art pencils on a desk. The sentiment from the stamp set sits atop a strip of grid paper from the Trusty Toolbox paper pack. I used rainbow colored dots and a strip of Lighter than Air designer paper behind the sentiment to help it stand out and to repeat the rainbow of colors from the focal panel. The twist of ribbon and foiled dots add some pizzazz and help draw the eye to the greeting.

Check back tomorrow as we start exploring the Jungle Pals bundle!

Products used in today’s design:
Pecan Pie, Basic White cardstock
Trusty Toolbox, Lighter Than Air DSP
Trusty Tools stamps
Ribbon duo
Rainbow dots
Adhesives

All ads on this site are posted by WordPress.  Song Sparrow Papercrafts is not responsible for ad content.

Luv 2 Stamp Artisan Design Team · Terrific Tuesdays

Thankful for You

Although I have several packages of the Softly Stippled designer series paper, I’ve found myself at a loss for design ideas. As I sat down to map out the Terrific Tuesdays theme for this week, I thought there may be some of you who are similarly situated. So I chose a few paper packs that easily lend themselves to design ideas AND a few that I have found challenging. One thing I have discovered is that when I force myself to push forward designing with a “difficult” product or color, I often get on a roll once I just get started.

This design got rolling when I realized that there was a sheet of paper in the Softly Stippled paper pack that had a hint of Pretty Peacock in it. Pretty Peacock is one of my favorite colors in the current Stampin’ Up! line-up and I often have to make myself use the other colors. *grin* But for those tough ones, sometimes it’s good to start with things you love.

Here, we begin with a card base of Pretty Peacock cardstock. This is one of the ways to tease out the color in the sheet of selected designer series paper in the focal panel section. The sentiment panel is matted with soft shimmer paper in Pretty Peacock. The metallic ribbon and foiled gems draw the eye to the sentiment. Repeating the color here in the center with a touch of shimmer across all of the elements really draws the eye to the sentiment and also further highlights the color in the floral patterned piece. I’m just in love with how this turned out.

Looking for ways to use some of the Sale-a-Bration papers? Check out this week’s episode of Terrific Tuesdays to see ideas for 4 of the 7 paper packs!

Products used in today’s design:
Pretty Peacock, Basic White cardstock
Softly Stippled, Soft Shimmer DSP
So Sincere stamps
Pretty Peacock & Gold metallic ribbon
Foiled gems
Dimensionals
Adhesives

All ads on this site are posted by WordPress.  Song Sparrow Papercrafts is not responsible for ad content.

Luv 2 Stamp Artisan Design Team · Terrific Tuesdays

Brighten My Days

The Bright Skies stamps and dies pair beautifully with so many of the current Stampin’ Up! lineup. Today, we’re pairing the bundle with Playing in the Rain. And I love how SU! has the coordinating Sunny Days designer series paper in the Sale-a-Bration catalog. Some paper, a stamp or two, and some dies and *VOILA* a cheery card!

Today’s card is built on a base of Basic Grey cardstock. The focal panel is comprised of two patterns of the Sunny Days designer paper matted with Lost Lagoon cardstock. I stamped the cloud and sun using the Bright Skies stamps and diecut them with the coordinating dies. The sentiment is stamped on white cardstock and diecut using the All That die. The adorable rabbit and rainy puddles are from the Playing in the Rain set, which also has the coordinating set of dies. I colored the rabbit’s raincoat with Stampin’ Blends to coordinate with the color palette of the card. The focal elements are all on dimensionals and the decorative dots and ribbon further help draw the eye diagonally across the design.

Missed this week’s episode of Terrific Tuesdays where we made 3 fun designs with the Bright Skies bundle? No problem, you can catch it here!

Products used in today’s design:
Basic Grey, Basic White, Crushed Curry cardstock
Sunny Days DSP
Bright Skies, Playing in the Rain stamps
Bright Skies, Playing in the Rain, All That dies
Pool Party crinkle ribbon
White baker’s twine
Decorative dots
Wink of Stella
Stampin’ Blends
Dimensionals
Adhesives

All ads on this site are posted by WordPress.  Song Sparrow Papercrafts is not responsible for ad content.

Luv 2 Stamp Artisan Design Team · Terrific Tuesdays

Sunshine on a Cloudy Day

When you’re browsing a new Stampin’ Up! catalog, do you ever think to yourself, “I know exactly what I’m going to pair with that!” As soon as I saw the Bright Skies stamps and dies, I just knew that I had to try it out with the Playing in the Rain bundle. To quote one of my favorite movies, “they’re M-F-E-O!” (MFEO = Made For Each Other … And bonus points if you can name that movie! *wink-wink*)

For today’s card, I built this adorable scene using the Bright Skies and Playing in the Rain bundles. The overall theme is “You brighten my cloudy days” and I decided to place the sentiment on the inside message panel rather than cluttering the scene on the front.

I began building the front panel scene with a base of Pool Party cardstock. Using the Playing in the Rain set, I stamped raindrops on most of the base in Versamark and then heat embossed with clear embossing powder. I fussy cut a variety of clouds from the Sunny Days designer paper and also stamped and diecut one cloud using the Bright Skies set. I wanted the clouds to look “rainy” but cheery too, so I balanced the grey clouds with the two Lost Lagoon. I gave them a more realistic layered feel by varying the heights of the clouds with dimensionals, which easily allowed the sun to pop out and shine in between.

I knew I wanted the cute fox to be strolling across a bridge over water, so I set about bringing that portion of this design to life. The grass and hills are cut from Old Olive cardstock. I freehanded the banks and diecut the grass strips using the Sending Love die. All of the grass elements are adhered to a strip of Lost Lagoon cardstock which is popped up on a layer of dimensionals. I added a few adhesive flowers on the grass banks for a bit of whimsy and fun. To give a more realistic shimmer to the water, I added Wink of Stella to the Lost Lagoon cardstock, and I also added water rings for the raindrops using the Pool Party Stampin’ Blends. The cute fox is stamped on white cardstock and colored with Stampin’ Blends. I diecut the fox with the coordinating Playing in the Rain die and then trimmed down the diecut image to further reduce the white edging all around. The bridge is diecut from Crumb Cake cardstock using the Playing in the Rain dies. I very lightly sponged the bridge with Crumb Cake ink to bring out the details in the bridge railing. The fox is adhered to the card base with dimensionals and the bridge is then layered on top in the same manner.

Don’t you just love it when an idea comes together even better than you imagined? I love, love, LOVE this card! It just makes me smile!

Want to see other design ideas using the Bright Skies bundle? Check out this week’s Terrific Tuesdays episode for more inspiration!

Products used in this design:
Pool Party, Crushed Curry, Lost Lagoon, Old Olive, Crumb Cake, Basic White cardstock
Sunny Days DSP
Bright Skies, Playing in the Rain stamps
Bright Skies, Playing in the Rain, Sending Love dies
Clear embossing powder
Adhesive flowers
Stampin’ Blends
Wink of Stella
Dimensionals
Adhesives

All ads on this site are posted by WordPress.  Song Sparrow Papercrafts is not responsible for ad content.

Terrific Tuesdays

Brighter Days

This week, we’re going to explore all of the ways that we can use the Bright Skies bundle to make some wonderful cards. A lot like Sending Love, the Bright Skies bundle pairs beautifully with so many of the current Stampin’ Up!

Today’s card uses a fun mix of products. The Sunny Days designer series paper that is currently available as a Sale-a-Bration item (FREE with qualifying purchase of $50) is designed to pair perfectly with the Bright Skies stamps and dies, not to mention it’s awesome on its own!

So let’s talk more about how this card came together. I was inspired by the sheet of rainbow patterned paper in the Sunny Days paper pack, and that one sheet drove the bus on most of the design elements. Knowing that I was going to be mixing busy patterns, I decided to keep the base clean and simple with Basic White cardstock. With a rainbow theme, all of the paper selections reflect ingredients in a rainbow — clouds, rain, and sunshine.

To construct the rainbow, I diecut each color using the full set of the Everyday Essentials circle dies, along with the small circle from the Bright Skies set. After halving each circle, each layer was adhered together to complete the rainbow. The sun and clouds were diecut using dies from the Bright Skies die set. And the polka-dotted cloud is actually diecut from a sheet of the Sunny Days patterned paper. 

To add some eye relief and a visual transition between the rainbow scene up top and the bright and sunny scene down below, I used a strip of the Sunny Days paper that resembles falling rain. The adorable turtle is from the Playing in the Rain stamp and die set. He’s on his way to pick more flowers to bring sunshine to this cloudy day. The field of flowers were made using the Bright Skies dies. The little butterfly is from the Painted Lavender set and just adds the perfect touch of sunshine to “brighten” things up here.

This design is way outside my wheelhouse, but I liked the challenge of combining so many different patterns into one fun design. How do you think it turned out?

Looking for some simpler ways to use the Bright Skies bundle? Check out yesterday’s episode of Terrific Tuesdays for some great inspiration!

Products used in today’s featured design:
Basic White, Smoky Slate, Real Red, Pumpkin Pie, Crushed Curry, Old Olive, Blueberry Bushel, Gorgeous Grape cardstock
Sunny Days DSP
Bright Skies, Playing in the Rain, Painted Lavender stamps
Bright Skies, Everyday Essentials, Playing in the Rain, Painted Lavender dies
Opaque faceted gems
Dimensionals
Adhesives

All ads on this site are posted by WordPress.  Song Sparrow Papercrafts is not responsible for ad content.

Luv 2 Stamp Artisan Design Team · Terrific Tuesdays

On the Wings of Love

Anyone happen to be a Harry Potter fan? I absolutely loved the books and have read the series multiple times. I also enjoy the movies since they’re such a great adaptation of the books, thanks to J.K. Rowling’s involvement in the films. And though it might be a little hard to see it at first, Harry Potter was the inspiration behind today’s card design with its flying envelopes, which are inspired by the infamous Howlers in the books. Remember the screamer Ron received after crashing his dad’s car into the Womping Willow? I can still hear it!

This card design sits atop a piece of Berry Burst cardstock. The mat for the main focal images is a sheet of Lighter than Air designer series paper. I really loved the bright and cheery color combo and pattern of this particular sheet and felt it gave the perfect backdrop for this card theme. Each of the envelopes is cut from a piece of Delightfully Eclectic and Bright & Beautiful designer paper. Each of these designer series paper patterns plays off one another and pops beautifully from the busy pattern of the background mat, don’t you think? Each set of vellum wings is diecut using the flower in the Bright Skies dies. 

Two of the envelopes are winging their way to their recipients while the one in the middle is so full of love that it simply burst at the seams and all of that love has come floating out. The hearts are diecut from Berry Burst cardstock using the Sending Love hearts dies. And don’t you just love the escaping heart fluttering away up in the upper corner?! The sentiment is stamped in Melon Mambo ink on vellum that has been punched using the Heartfelt Hexagon punch. By placing the sentiment on vellum it allows it to appear as though it’s floating in the scene — perfect for flying envelopes, don’t you think? I really love how the tinsel gems draw the eye diagonally across the card.

Looking for some simple ways to create fun cards with the Sending Love bundle? Check out this week’s Terrific Tuesdays episode for 3 simple designs.

Products used in today’s design:
Berry Burst, vellum cardstock
Lighter than Air, Delightfully Eclectic DSP
Sending Love, Bright Skies dies
Tinsel gems
Dimensionals
Adhesives

All ads on this site are posted by WordPress.  Song Sparrow Papercrafts is not responsible for ad content.

Luv 2 Stamp Artisan Design Team · Terrific Tuesdays

Love From Me to You

Do you ever see a stamp set and have your idea wheels immediately start turning? That’s precisely what happened to me as soon as I saw the Sending Love bundle in the January mini catalog. One of the things that I look for in a set is versatility. And while this bundle certainly lends itself easily to Valentine cards, there are a whole host of other occasions for which you can put this bundle to work. And I can’t wait for you to see all of the cute designs I’ve been able to create with this bundle!

Today’s card design revisits a favorite fun fold that I recently learned from fellow team member Patti Dolan. The Center Step fun fold is just so versatile that I find myself circling back to it often right now. I mean, look at how perfectly it shows off the Sending Love mailbox die!

So this card is built on a base of Real Red cardstock. I pulled out my Sale-a-Bration Most Adored designer series paper pack for the perfect combination of patterns for the center and side panels. I love that you have the choice between foiled and patterned designs and, while the pack also lends itself easily to Valentines, the patterns can be used for so many different occasions. I built the mailbox scene using the Sending Love dies and cardstock. These dies make it so easy to build a detailed scene in no time flat. I decided on a more traditional look for the mailbox so that the eye would be drawn to the mail bursting from the mailbox. And I especially love the one taking flight with the hearts gushing out. I used the flower die from the Bright Skies die set to make the vellum wings. Doesn’t that envelope just remind you of that being-in-love feeling?

Want to see other design ideas using the Sending Love bundle? Check out this week’s Terrific Tuesdays episode for more inspiration!

Products used in this design:
Real Red, Smoky Slate, Crumb Cake, Basic White, vellum cardstock
Most Adored, One Horse Open Sleigh, Bright & Beautiful, More Dazzle, Rose Gold DSP
Sending Love stamps
Sending Love, Bright Skies dies
Blooming Pearls
Sequins trio
Dimensionals
Adhesives

All ads on this site are posted by WordPress.  Song Sparrow Papercrafts is not responsible for ad content.

Terrific Tuesdays

You’ve Got (Love) Mail

This week we’ll be exploring all of the fun ways that you can use the Sending Love bundle from Stampin’ Up! to make adorable cards. What I like most about this stamp and die bundle is that there are so many different ways you can it to create fun projects — whether it’s stamps and dies, just stamps, or just dies. And there are some terrific pairing possibilities with other cute Stampin’ Up bundles. So join me this week as we take a look at just a few ways that you’ll be able to use the Sending Love bundle in your craft room.

Today’s card is a nod to one of my favorite times of the day — mail time! I don’t know why, but I’ve always had a thing for knowing what’s in the mailbox. Now that I’m at home full-time, I typically hear the mailman running the route on our street and can go to the box fairly quickly after the mail has been delivered. And, naturally, I love it when there’s some special mail in the box. Do you like getting snail mail from friends or family?

Today’s card is built on a base of Pretty Peacock cardstock. A mat of Lost Lagoon serves as the base for the focal panel of this design. I began by cutting a piece of white cardstock with the Perennial Postage die and then cutting out the window using the largest rectangle in the Everyday Essentials die set. I love how these diecut two shapes work together with the theme of receiving some love in the mail. Don’t you think this panel kind-of resembles a stamp? To complete the look of the window pane, I diecut the curtains from Pool Party using the Zany Zoo dies and adhered them to the window panel to make it easier to determine placement of my stamped elements inside the window pane.

The focal panel is stamped on the inside rectangle that was cut from the white cardstock when the Everyday Essentials rectangle cut the window pane. Once proper placement of the scene was determined, I set to work stamping the mailbox using the Sending Love stamp set and used Stampin’ Blends to color the mailbox. A row of hedges was diecut from One Horse Open Sleigh designer series paper using the Sending Love die and then layered using adhesive and dimensionals. The heart is diecut from Melon Mambo using the Sending Love die and then colored using Wink of Stella for a little extra sparkle. The sentiment is stamped in Melon Mambo on white cardstock using the Sending Love stamps and then mounted on a mat of vellum that has been diecut using the Everyday Essentials dies.

To me, this is just like peeking out the window at the mailbox. Don’t you think?

Looking for some simpler ways to use the Sending Love bundle? Check out yesterday’s episode of Terrific Tuesdays for some great inspiration!

Products used in today’s featured design:
Pretty Peacock, Lost Lagoon, Pool Party, Melon Mambo, Basic White, vellum cardstock
One Horse Open Sleigh DSP
Sending Love stamps
Sending Love, Perennial Postage, Everyday Essentials, Zany Zoo dies
Iridescent discs
Stampin’ Blends
Dimensionals
Adhesives

All ads on this site are posted by WordPress.  Song Sparrow Papercrafts is not responsible for ad content.

Luv 2 Stamp Artisan Design Team · Terrific Tuesdays

Butterfly Thoughts

We’re wrapping up our week of Painted Lavender designs with this stunning center step fun fold card. If you’ve been following me for a little while, you may remember that I learned this fun fold from fellow Luv 2 Stamp team member Patti Dolan.

This time, I tried a little something different with the assembly and decided to cut one solid portion for the center and narrow bottom panel, which gives you a t-shaped panel. While getting the measurements down and everything cut correctly was a little tricky, I do like the look of having that continuous panel. And speaking of tricky, can anyone spot my cutting mistake? 😉

The base of this card is a sheet of Pretty Peacock cardstock. The designer series paper is all from the Perennial Lavender pack. I chose two different patterns for both the front and inside sections of the card. The sentiment is from the Wonderful Thoughts stamp set and stamped on vellum diecut using the Autumn Leaves die. The sentiment is matted by a Blackberry Bliss circle panel diecut using the Everyday Essentials dies. The sprig of lavender on the small step up panel is cut from Lost Lagoon and Blackberry Bliss cardstock using the Painted Lavender dies. A large paper butterfly serves as the focal image on the center panel and really draws the eye down to the sentiment.

Interested in seeing all of the designs we made this week using the Painted Lavender bundle? Check out Episode 9 of Terrific Tuesdays to see them all from start to finish!

Products used in today’s design:
Pretty Peacock, Lost Lagoon, Blackberry Bliss, vellum cardstock
Perennial Lavender DSP
Wonderful Thoughts stamps
Painted Lavender, Everyday Essentials, Autumn Leaves dies
Paper butterfly accents
Opaque faceted gems
Silver trim
Dimensionals
Adhesives

All ads on this site are posted by WordPress.  Song Sparrow Papercrafts is not responsible for ad content.

Luv 2 Stamp Artisan Design Team · Terrific Tuesdays

Thankful for Friendship

This week, we’ve been exploring all of the fun designs we can make with the new Perennial Postage bundle. This bundle includes a set of cling stamps and dies that cut shapes that resemble postage stamps, and the stamps nestle perfectly within a coordinating die. 

Our Luv to Stamp Group team challenge for the month is to use designated Color Buddies. For today’s design, I thought it would be great to choose a buddy group to work with. I chose a neutral color palette with Crumb Cake, Pecan Pie, and Early Espresso.

Today’s card design also uses a new technique known as dry embossing. Dry embossing involves using your regular dies to emboss rather than cut. One very valuable tip I can pass along is that the way you build your “sandwich” on your die cutting machine absolutely matters to your results. I found a terrific article that discusses a whole host of die cutting machines and what order works best for dry embossing with each. And I wish I had found it before I made this card!

This card begins with a base of Early Espresso, which serves to frame the whole design. A piece of Crumb Cake serves as the mat for our focal panel and is embossed using the Softly Sophisticated embossing folder (currently available in the Sale-a-Bration catalog) to help soften the look and add a bit of interest. This layer is thinly matted with Pecan Pie, which helps to draw out the lighter elements of the stamped images in the focal panel. The focal panel is diecut from Basic White using one of the largest of the Perennial Postage dies. I wanted this panel to resemble a partial book of stamps. Using three of the smaller dies, I made impressions to create stamp windows in the white panel. The Planted Paradise stamps serve as the images for each of the stamps. I was careful to mask the edges of each of the stamp frames to ensure the stamp look really shone through. The sentiment is stamped in Early Espresso atop a strip of Crumb Cake and then cut into a thin strip with each end snipped at an angle. To ensure the sentiment stood out, I diecut a small Deckled Rectangle from Early Espresso to serve as the sentiment backdrop. A few iridescent foil gems add a little sparkle and help draw the eye across the design. I stamped a coordinating image and sentiment in the inside of the card to tie everything together.

Interested in seeing all of the designs we made this week with the Perennial Postage bundle? Check out Episode 8 of Terrific Tuesdays to see the 3 projects we made from start to finish!

Products used in today’s design:
Early Espresso, Crumb Cake, Pecan Pie, Basic White cardstock
Perennial Postage, Planted Paradise stamps
Perennial Postage, Deckled Rectangles dies
Softly Sophisticated embossing folder
Iridescent foil gems
Dimensionals
Adhesives

All ads on this site are posted by WordPress.  Song Sparrow Papercrafts is not responsible for ad content.