We are continuing our look at the Stampin’ Up! photopolymer stamp set called Saying Hey today. Thus far, we’ve paired these stamps with patterned paper, other Stampin’ Up! bundles, and sketches to make an assortment of fun card designs.
Today, we’re tweaking a sketch to make another lovely clean and simple card design. The inspiration sketch from Global Design Project caught my eye for both its simplicity and large focal panel. A simple orientation change of the sketch layout makes today’s card come together in a breeze. Let’s take a closer look at how it all comes together.
We begin today’s card with a base of Misty Moonlight cardstock. I chose this beautiful prairie setting patterned paper from the Meandering Meadow paper pack as the large focal panel. To bring out the more subtle colors in the patterned sheet, I matted it in Petal Pink cardstock. I stamped the HEY sentiment from Saying Hey in Misty Moonlight on white cardstock and then heat embossed in clear embossing powder. I cut out the sentiment with paper snips. The second sentiment from Friends for Life is stamped on white cardstock and then diecut using the Happy Little Things banner die. Both sentiments are adhered over iridescent striped ribbon using dimensionals. I added a few Pretty in Pink shimmer gems for a bit of added sparkle.
Tune in tomorrow for a fun encouragement design.
Products used in today’s card: Misty Moonlight, Petal Pink, Basic White cardstock Meandering Meadow DSP Saying Hey, Friends for Life stamps Happy Little Things dies WOW embossing powder Iridescent striped ribbon In Color shimmer gems Dimensionals Adhesives
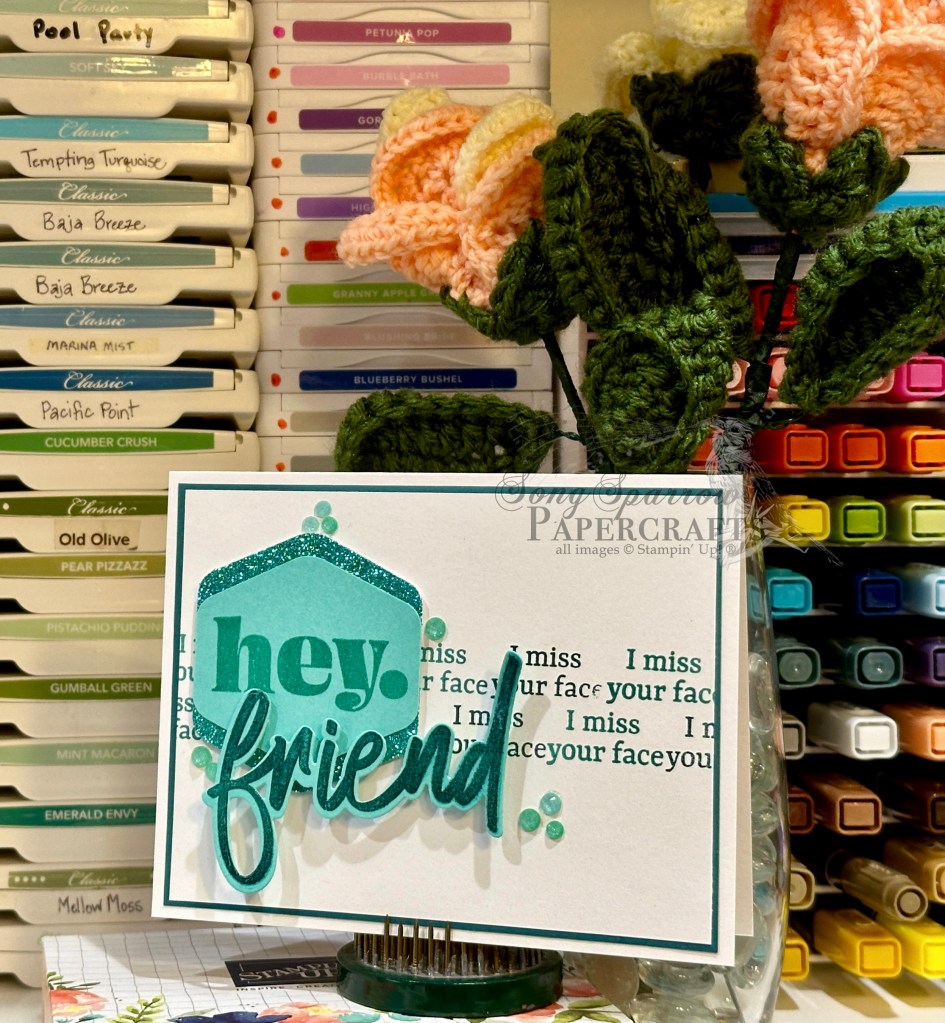
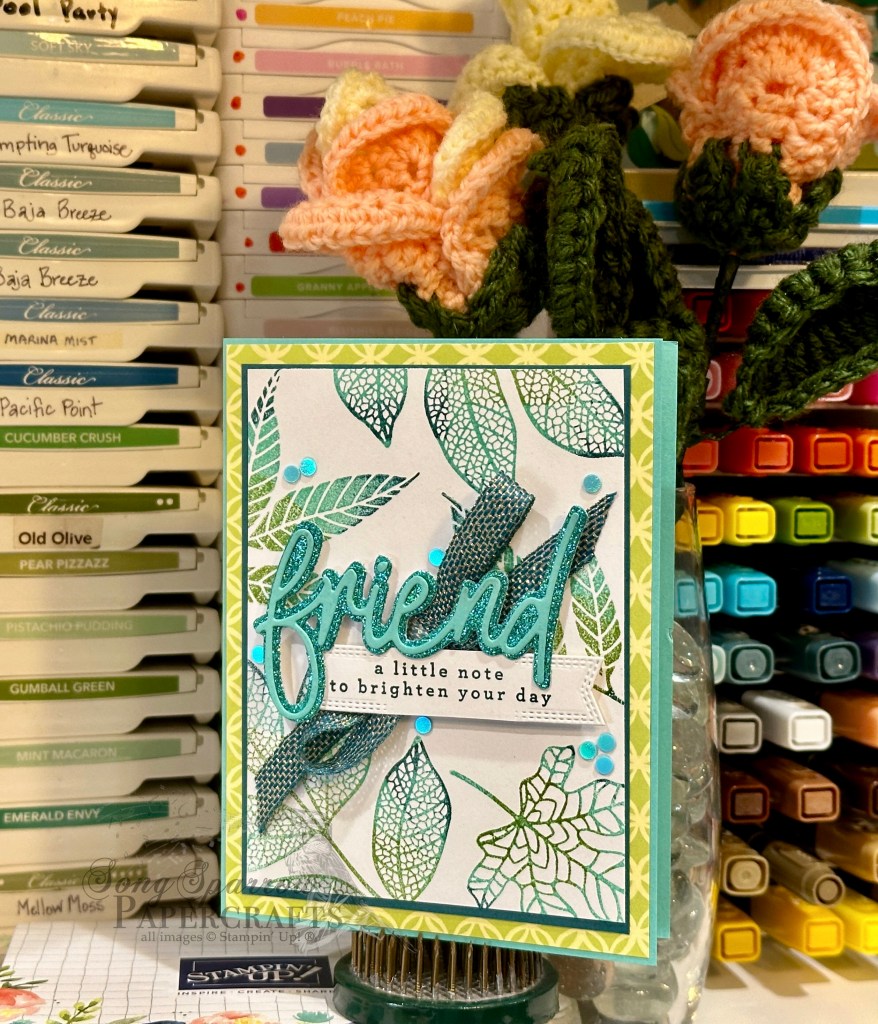
We’re already halfway through this week. Hard to believe, isn’t it?! This week, we’re working with the Saying Hey stamp set by Stampin’ Up! to create card designs of all kinds. Today’s clean and simple card design pairs our featured stamp set with the Friends for Life set. This card also works in my favorite color family and uses some of my favorite techniques.
We get started with a card base of white cardstock. Our focal panel is matted with a panel of Pretty Peacock cardstock. Only a small border peeks out around the edges to really help our center focal section pop. Our focal panel of white cardstock has a strip of text as the backdrop for the focal panel. This one sentiment is stamped in a repeating pattern of Pretty Peacock and Coastal Cabana inks across two lines, which is just enough width to nicely frame the focal point panel. Stamping part of the sentiment as a backdrop is one of my favorite techniques for repeating the card theme.
Our focal point consists of two large font sentiments. I stamped HEY from the Saying Hey stamp set tone-on-tone on Coastal Cabana cardstock. The sentiment is then punched with the Heartfelt Hexagon punch. A second hexagon is punched from Summer Splash glimmer paper, cut in half, and then mounted behind the sentiment panel to serve as an eye-catching mat. The word FRIEND from Friends for Life is stamped in Pretty Peacock on Coastal Cabana and heat embossed with clear embossing powder for an extra pop and twinkle. Each sentiment element is mounted on the panel with dimensionals. Things are finished off with In Color glimmer gems to draw the eye across the card design.
TIP: you can make any ink color sparkle with clear embossing powder. This is one of my favorite ways to punch up text on card designs when I really want them to stand out. Want to know more? Tune in to this week’s episode of Terrific Tuesdays to catch it all in action.
Tomorrow we’ll be using a sketch but with a twist. Tune in tomorrow to learn all about it!
Products used in today’s card: Basic White, Pretty Peacock, Coastal Cabana cardstock In Color glimmer paper Saying Hey, Friends for Life stamps Friends for Life dies Heartfelt Hexagon In Color shimmer gems WOW! embossing powder Dimensionals Adhesives
After a super hot week last week, we are now in the midst of rain from the remnants of Hurricane Beryl. As it stands right now, we’ve just gotten some rain and wind — not much more than we would expect from a spring storm. I hope that any of you who may have been in the path of the storm are safe and dry.
This week, we’re exploring designs using the Saying Hey stamp set by Stampin’ Up! This photopolymer stamp set coordinates with the Heartfelt Hexagon punch and contains sentiments that cover all of your major occasions. Today, we’re pairing up our stamp set with a number of different patterned papers from several designer series paper packs.
We get started on today’s card with a base of Basic Black cardstock. The background panel is the pieced sheet metal patterned paper sheet from the Take to the Sky paper pack. The center sentiment panel sits on a sheet of text with gold splatters from the Nature’s Sweetness paper pack that has been diecut using the Spotlight on Nature die set. The sentiment panel starts with a sheet of white cardstock where the sentiment from Saying Hey is heat embossed using the WOW! black embossing powder and then punched with the Heartfelt Hexagon punch. It’s framed with a black and gold hexagon. To accomplish the frame effect, each hexagon is cut in half on either the horizontal or vertical, depending on which direction it needed to be expanded in order to create the framed effect. So for example, the black hexagon is halved on the horizontal so that it can frame the top and bottom of the sentiment panel. The second portion of our sentiment is heat embossed in gold WOW! embossing powder on a banner of black cardstock that is diecut using the Happy Little Things banner die. The full center sentiment panel is matted with a sheet of the Pebble Path Tartan Foil specialty paper, which helps pull all of the color elements together. A few gold sequins and iridescent gems help tie all of the gold elements together.
Tomorrow we’re using a super fun stamping technique to create a focal element with the Saying Hey set. I hope you’ll pop in to check it out.
Products used in today’s card: Basic Black, Basic White cardstock Take to the Sky, Nature’s Sweetness, Tartan Foil, Gold foil DSP Saying Hey stamps Spotlight on Nature, Happy Little Things dies Heartfelt Hexagon punch WOW! embossing powder Neutrals sequins, iridescent gems Dimensionals Adhesives
Why is it that Monday always gets here quickest after a vacation? We enjoyed a little family get-away last week. It was nice to have a change of scenery, even if it was still a typical Texas roaster of a week! So I’m off to a little slower start this week.
Together we’re going to be working with the Saying Hey stamp set by Stampin’ Up! this week. This set coordinates with the Heartfelt Hexagon punch, but it goes beautifully with many other current SU! shapes. We’re going to be pairing this super versatile stamp set with a whole host of products this week.
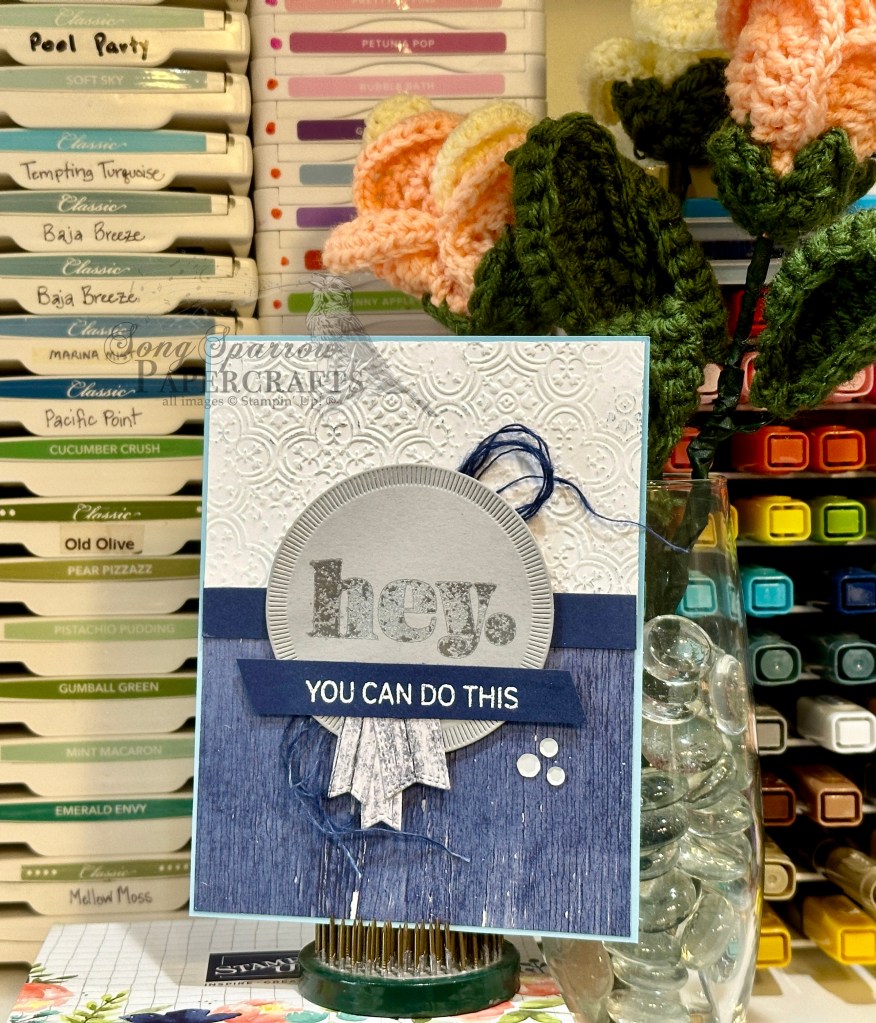
Today, we get started with a sketch from my sketch book. This sketch was inspired by a card from StampwithBrenda over on Insta. I loved the layout because it works with both large images and fonts.
Our card starts with a base of Balmy Blue cardstock. The bottom panel of our background panel is a sheet of the blue woodgrain pattern from the Country Woods designer series paper pack. This patterned paper is complimented with an embossed sheet of white cardstock using the Distressed Tile embossing folder. To help the embossed pattern pop, I applied some Misty Moonlight ink with my finger. A strip of Night of Navy cardstock in the center brings our background panel elements together.
For this card, our focal panel is comprised of the sentiment panel. The background panel is Smoky Slate diecut using the radiating stitch circle from the Spotlight on Nature die set. The HEY sentiment from the Saying Hey stamp set is stamped in Versamark and then heat embossed using the silver powder from the WOW! metallics set. Although not intentional, it didn’t heat set evenly which gives it this neat distressed look that coordinates perfectly with the embossed panel. I just love happy little accidents like that! The second portion of our sentiment panel is a strip of Night of Navy cardstock with the sentiment from Saying Hey stamped in Versamark and then heat embossed with the white WOW! basics embossing powder. The grey woodgrain banners underneath the navy panel helps bring all of our color elements together. Each of the sentiment panel layers is adhered together to make one flat sentiment panel. The full panel is popped up on dimensionals. I decided to add one additional shabby chic element with the frayed Night of Navy linen thread from the not-yet-released Natural Tones linen thread pack. You could achieve the same effect using a Night of Navy Stampin’ Blend to color linen thread. Our card is finished off with a grouping of white sequins from the Neutrals pack.
Tomorrow we’re going to be pairing our stamp set with several patterns of designer series paper for a fun masculine card. I hope you’ll pop by and check it out!
Products used in this card: Balmy Blue, Night of Navy, Smoky Slate, Basic White cardstock Country Woods DSP Saying Hey stamps Distressed Tile embossing folder Spotlight on Nature, Nested Essentials, Happy Little Things dies Basics, Metallics embossing powders Natural Tones linen thread (coming Fall ’24) Neutrals sequins Dimensionals Adhesives
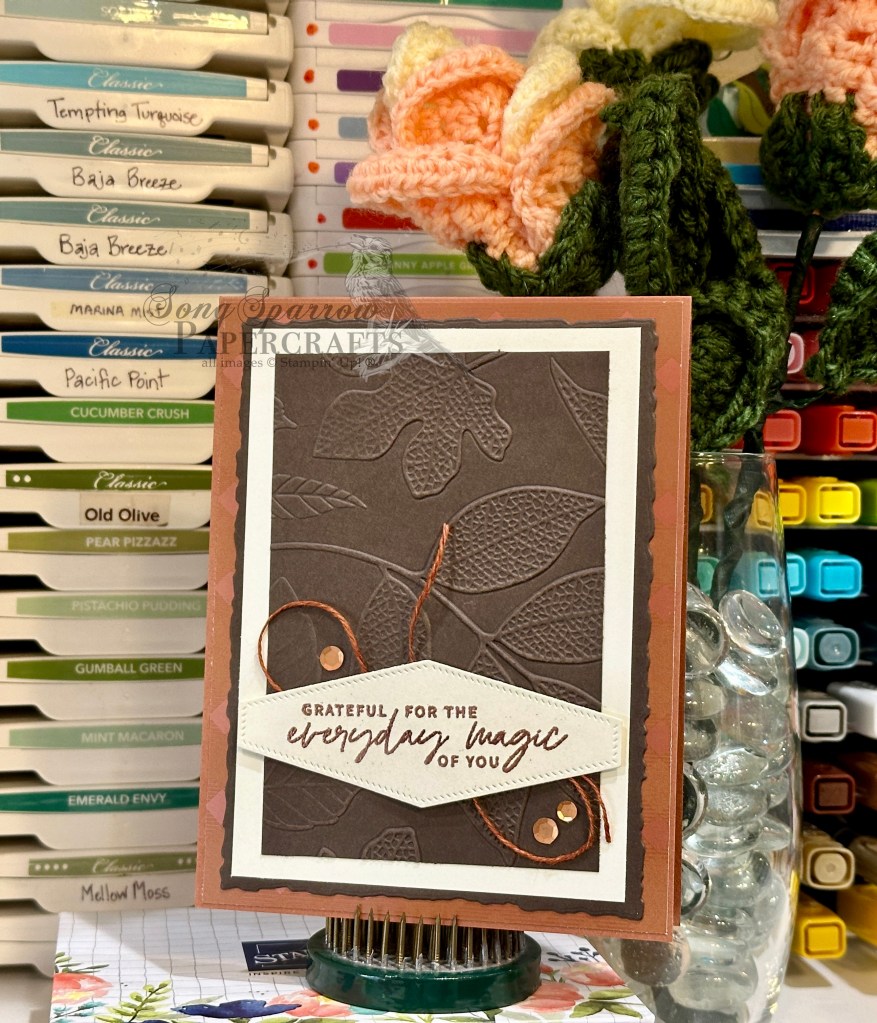
We’re closing out our sneak peek of the upcoming Online Exclusive bundle called Changing Leaves. This bundle, which includes a photopolymer stamp set, coordinating dies, and a hybrid embossing folder, launches in my online store on July 3rd! We’re rounding out this week’s designs with an earth tone color palette and a simple layout.
We get started on today’s card with a base of Cajun Craze cardstock. The background panel is a piece of the Cajun Craze Tartan Foil designer paper. Our focal panel is three layers of neutral goodness with a Deckled Rectangle mat of Early Espresso, a larger straight-edged mat of Very Vanilla, and an embossed layer of Early Espresso using the Changing Leaves embossing folder. I just love the deep impression you get every time with this embossing folder. It shows so much detail in the leave patterns. The sentiment panel is a piece of Very Vanilla cardstock diecut using the Nested Essentials dies, and the sentiment from Something Fancy is heat embossed in copper. I used a twist of Cajun Craze twine (releasing in the fall!) and added some copper sequins around the panel for eye-catching sparkle. A piece of linen thread would also work perfectly behind the sentiment.
This week, I really wanted to highlight how you can use the new Changing Leaves bundle in so many different ways. We’ll run another series closer to fall to showcase how you can pair this beautiful bundle with many other Stampin’ Up! products to stretch the design possibilities even further. But next week, we’re going to say HELLO to the Hollyhocks. I hope you’ll join me!
Products used in today’s card: Cajun Craze, Early Espresso, Very Vanilla cardstock Tartan Foil DSP Changing Leaves embossing folder (coming soon) Something Fancy stamps Nested Essentials, Deckled Rectangles dies Cajun Craze linen thread (coming Fall 2024) Neutrals sequins Dimensionals Adhesives
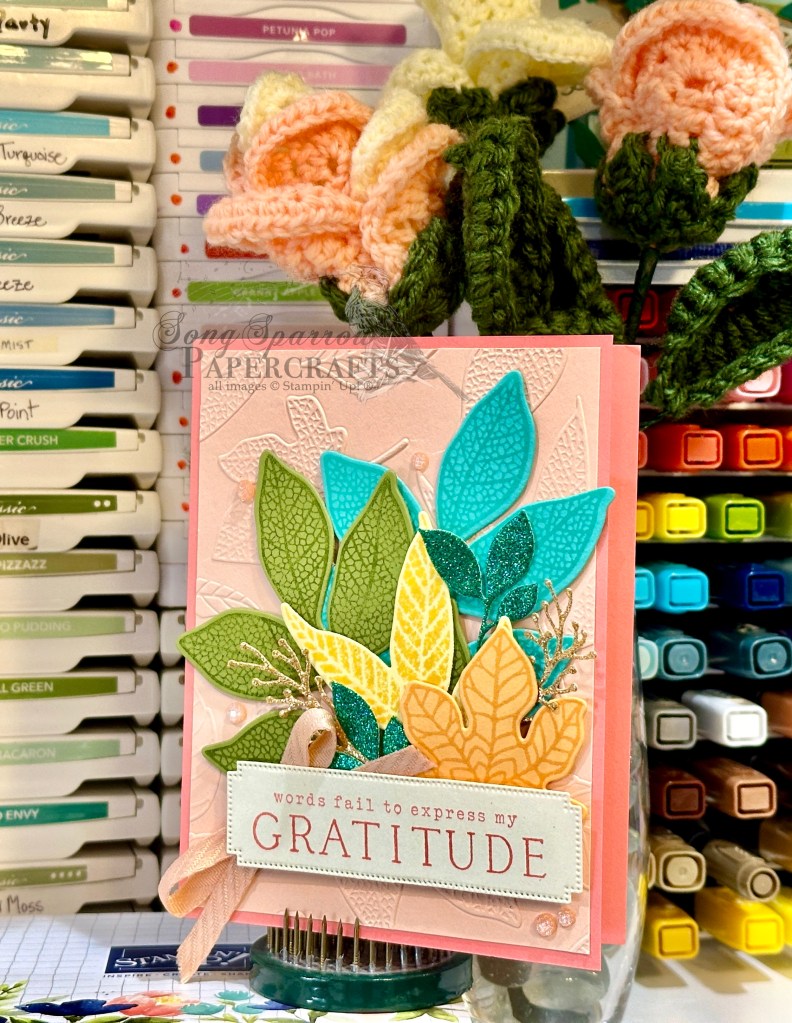
This week, we’re getting a sneak peek at the upcoming Online Exclusive called Changing Leaves. This bundle includes photopolymer stamps, coordinating dies, and a hybrid embossing folder. Today, I wanted to highlight another way you can use this set to create something other than a fall-themed card with a bright and cheery color palette and a fun complimentary product pairing.
Today’s card is all about a little friendly encouragement. With a fun color palette and incorporation of the Friends for Life set, we have a a terrific note to brighten someone’s day.
We get started with a card base of Summer Splash cardstock. Our background panel is a sheet of the Flowering Zinnias designer paper. Our focal panel backdrop is a leaf pattern using the Changing Leaves stamps. I used one of my larger stamp blocks to arrange my leaf stamps in a pattern I liked. I then layered the ink on the stamps for an ombre-looking effect by starting with Summer Splash over the entirety of the leaf images, then placing Old Olive up the centers, and then lightly tapping the edges with Pretty Peacock. I stamped these twice to get my panel, cut it to size, and then matted with Pretty Peacock for a nice contrast against the Flowering Zinnia DSP panel.
For the sentiment panel, start by diecutting the word friend using the Friends for Life dies. The background is Summer Splash glimmer paper, while the detail lettering is Summer Splash cardstock. The sentiment from Changing Leaves is stamped in Pretty Peacock on white cardstock and then diecut using the smallest banner from the Nested Essentials die set using the extension method. I liked the look of stitching on either end of the sentiment banner to really draw the eye in and give some interest. The sentiment is mounted on dimensionals over a twist of Pretty Peacock & Gold metallic ribbon. A scattering of the blue iridescent discs gives some eye-catching sparkle to draw the eye in.
Tomorrow we’re wrapping up our sneak peek of the Changing Leaves bundle with an earthy palette. I hope you’ll pop by and take a look.
Products used in today’s card: Summer Splash, Pretty Peacock, Basic White cardstock Flowering Zinnias, In Color Glimmer DSP Changing Leaves stamps Friends for Life, Nested Essentials dies Pretty Peacock & Gold metallic ribbon Iridescent discs Dimensionals Adhesives
This week we’re taking a sneak peek at the upcoming Online Exclusive by Stampin’ Up! called Changing Leaves. This bundle of products includes a stamp set, dies, and hybrid embossing folder. I love all of the detail included in the images in this set, and I’ve enjoyed thinking outside the box when designing with it. This set, although full of gorgeous fall foliage images, lends itself to all sorts of fun designs that don’t immediately make you think of fall. And today’s card is another example. So let’s get started.
I wanted a light and bright color palette for this thank-you card. I did let Mother Nature do a little of the talking with the choices in leaf color but then I worked to fill in with some fun complimentary colors. Our card begins with a base of Flirty Flamingo cardstock. The background panel is a quarter panel of Petal Pink embossed with the soon-to-release Changing Leaves embossing folder. I cut this panel down a bit to have a nice border of Flirty Flamingo all around. Our focal images are a whole smattering of stamped and diecut leaves from the soon-to-release Changing Leaves stamp set. All of the images are stamped tone-on-tone. Two of the larger leaves are stamped on Old Olive and Summer Splash with the two smaller leaves stamped on Lemon Lolly and Peach Pie. I added a few sparkly elements with the Peach Pie and Summer Splash foliage tucked in the mix. The sentiment from Simply Zinnia is stamped on Very Vanilla cardstock and diecut with the Autumn Leaves die set using the extension method. (For more on using the die extension method, check out this quick tutorial.) I tucked a faux bow of Petal Pink diagonal trim behind the sentiment panel and added a few Peach Pie shimmer gems across the card front for added sparkle.
Today’s card is a part of the Luv 2 Stamp Group Instagram Hop, which goes live at 9 AM Pacific Time (PST). Click here to head over to my Instagram feed and check out what the other demos in our L2S Group have created for you today!
Products used in today’s card: Flirty Flamingo, Petal Pink, Very Vanilla, Lemon Lolly, Old Olive, Peach Pie, Summer Splash cardstock In Color Glimmer paper Changing Leaves stamps, dies, hybrid embossing folder (coming soon) Autumn Leaves dies Simply Zinnia stamps Diagonal trim In Color shimmer gems Dimensionals Adhesives
This week, we’ve been using the Country Flowers bundle by Stampin’ Up! to make some lovely cards. Today, we’re rounding out the series with a clean and simple design. This is a layout that could be used over again and would work beautifully with a larger floral image, as well.
We get started with a card base of Basic White cardstock. Our focal panel is a pairing of Pretty Peacock and Moody Mauve cardstock. I stamped a repeating floral image in Versamark using the Country Flowers stamp set. The sentiment from Something Fancy is stamped in black on white cardstock and then diecut using the Unbounded Love set, which is then matted with a circle diecut using the Spotlight on Nature set. A pair of faux bows using Pretty Peacock & gold metallic ribbon and iridescent striped ribbon are adhered by the sentiment panel. To draw the eye across the design, I’ve used pink and peacock sequins from the Sequins Trio for some sparkle.
I hope you’ve been inspired by this weeks Country Flowers designs. Tune in next week as I give you a sneak peek at one of my favorite upcoming Online Exclusives bundle set to release on July 3rd!
Products used in today’s card: Basic White, Pretty Peacock, Moody Mauve cardstock Country Flowers, Something Fancy stamps Unbounded Love, Spotlight on Nature dies Pretty Peacock & gold metallic ribbon, iridescent striped trim Sequins trio Dimensionals Adhesives
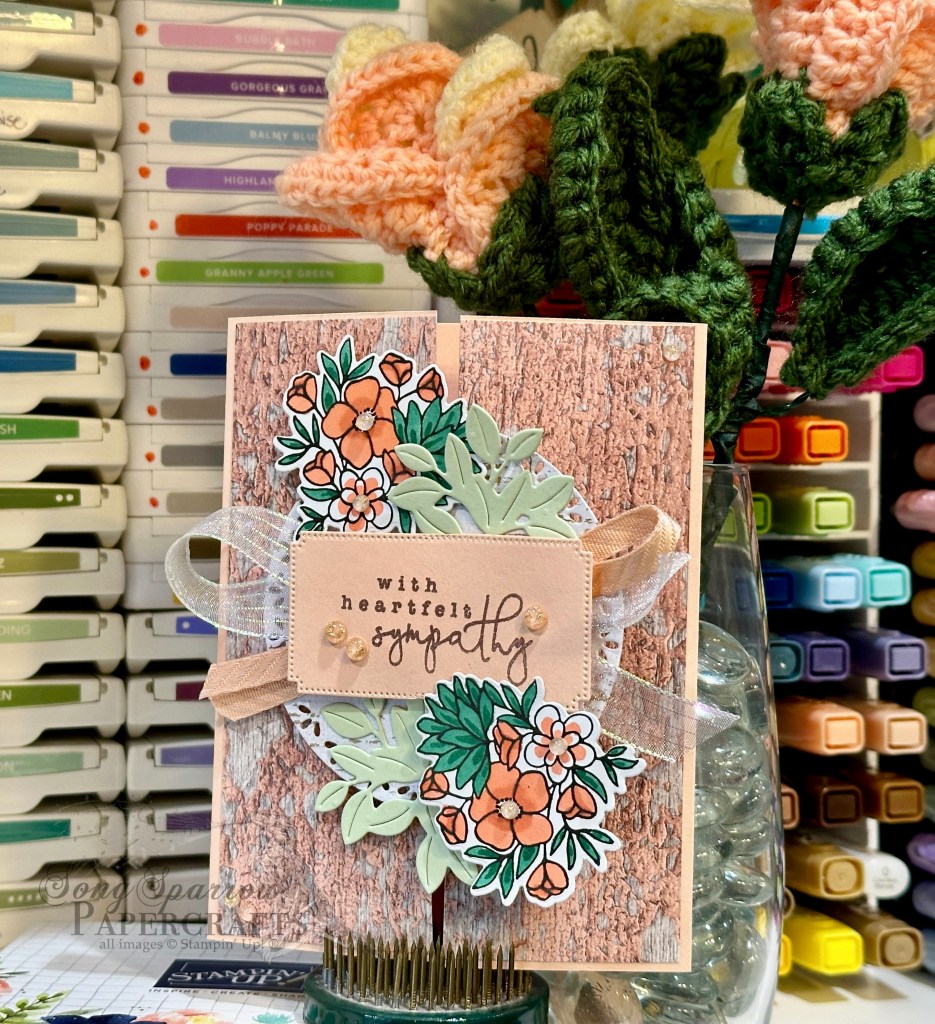
Welcome back, everyone! This week, we’re taking a tour of the country — Country Flowers, that is. We’re making an assortment of cards using products from the Stampin’ Up! Country Woods suite. Today’s card is a fun fold that features the Country Woods paper and Country Flowers bundle.
I really love the Barn Fold and once I discovered a little modification where your designer paper covers the center fold so the card front background looks totally cohesive once closed, I was even more sold on this fun fold! The Country Woods designer paper pack includes a whole host of woodgrain patterns and they come in any number of colors and textures. When I ran across the sheet of Petal Pink woodgrain, I knew it would be perfect for today’s card.
We get started with a card base of Petal Pink cardstock that is cut to open front and center, literally. The sheet of Petal Pink woodgrain serves as our backdrop for the front panel. The focal panel in the center has a base of white woodgrain, also from the Country Woods pack, that is diecut using the Spotlight on Nature set. The sentiment panel is diecut from Petal Pink cardstock with the Autumn Leaves die using the extension method. (You can watch a Terrific Tuesdays video tutorial on the extension method here.) The sentiment from Country Flowers is heat embossed in copper. Behind the sentiment panel are layers of iridescent striped ribbon and Petal Pink diagonal trim. And then nestled behind and around the sentiment are flowers and greenery that have been stamped or diecut using the Country Flowers bundle. I used Stampin’ Blends to color the flower bunches, and the greenery is diecut from Soft Sea Foam cardstock. Layers of dimensionals give the center focal panel lots of depth. The design is finished off with Petal Pink foiled gems scattered across the card front to draw the eye up and across the design.
With a simple sentiment substitution, you could easily make this a birthday or wedding design, or even a thinking of you. The possibilities are only limited by what’s in your stash!
Tomorrow, how about some tea? Stop in and join me for a cuppa — with some flowers, of course!
Products used in today’s card: Petal Pink, Soft Sea Foam, Basic White cardstock Country Woods DSP Country Flowers stamps & dies Spotlight on Nature dies Copper embossing powder Stampin’ Blends Iridescent striped ribbon, Petal Pink diagonal trim Petal Pink foiled gems Dimensionals Adhesives
This week, we are looking at all the ways we can use parts of the Stampin’ Up! suite of products called Country Woods. In particular, we’ve been focusing on the Country Flowers bundle, which includes stamps and coordinating dies, and the Country Woods designer series paper. Today, we continue with a brand new fun fold design.
Today’s fun fold is called the Front Panel Z-fold. What I love about this particular fun fold is that you can make it as simple or as complicated as you want. For this card design, I went somewhere in the middle. This design requires a little fussy stamping and some die cutting but all-in-all comes together pretty quickly once you get the hang of it. You can download the full PDF tutorial for today’s card, which includes a complete materials list and measurements, by clicking here. But for now, let’s take a closer look at how this card comes together.
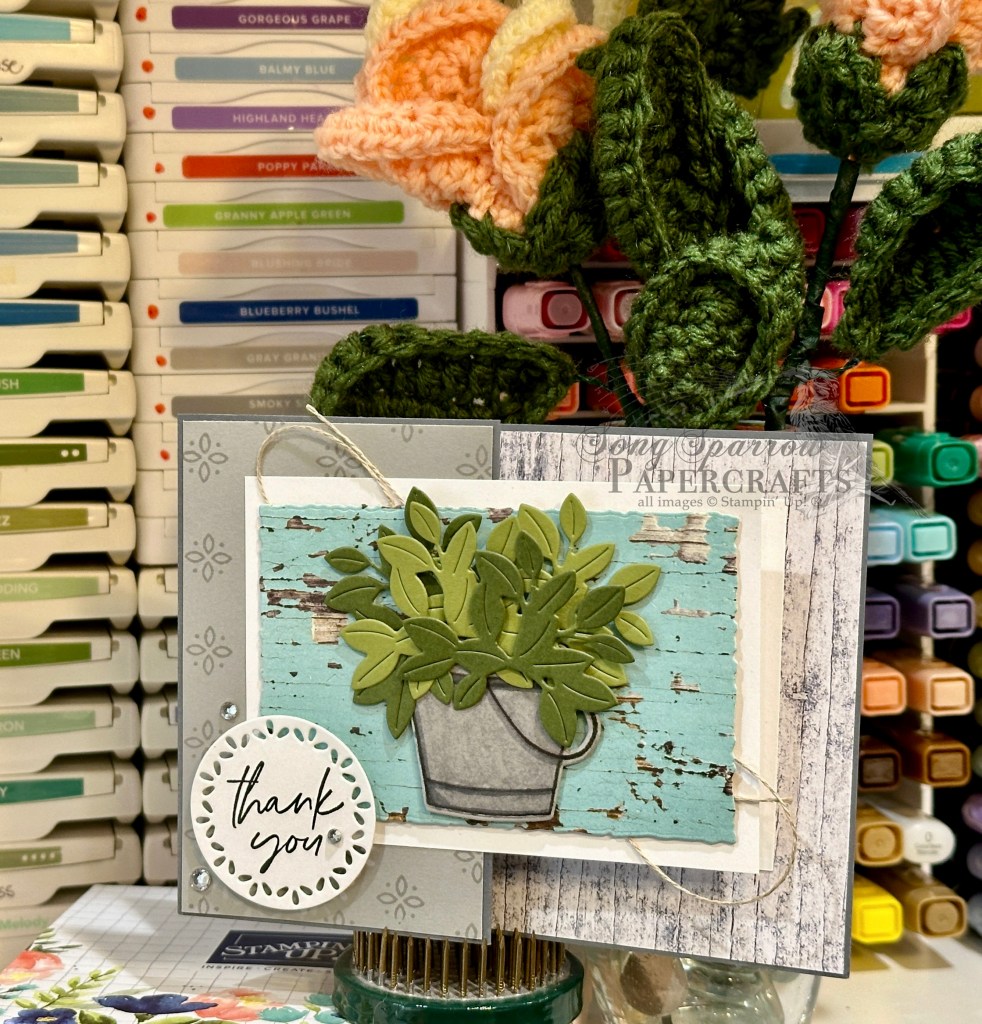
Our card front consists of the smaller panels of the Z fold. Using the small detail stamp from the Country Flowers stamp set, we stamp a repeating pattern tone-on-tone on Smoky Slate cardstock. I chose a very symmetrical pattern and used a sheet of grid paper along with grid lines on my stamp block to accomplish this. This stamped panel is then cut into two smaller panels that are just a tick smaller than the card base. We cut a second quarter panel of white cardstock to make an identical sized mat that is adhered on the outermost fold to precisely overlay the inside message panel.
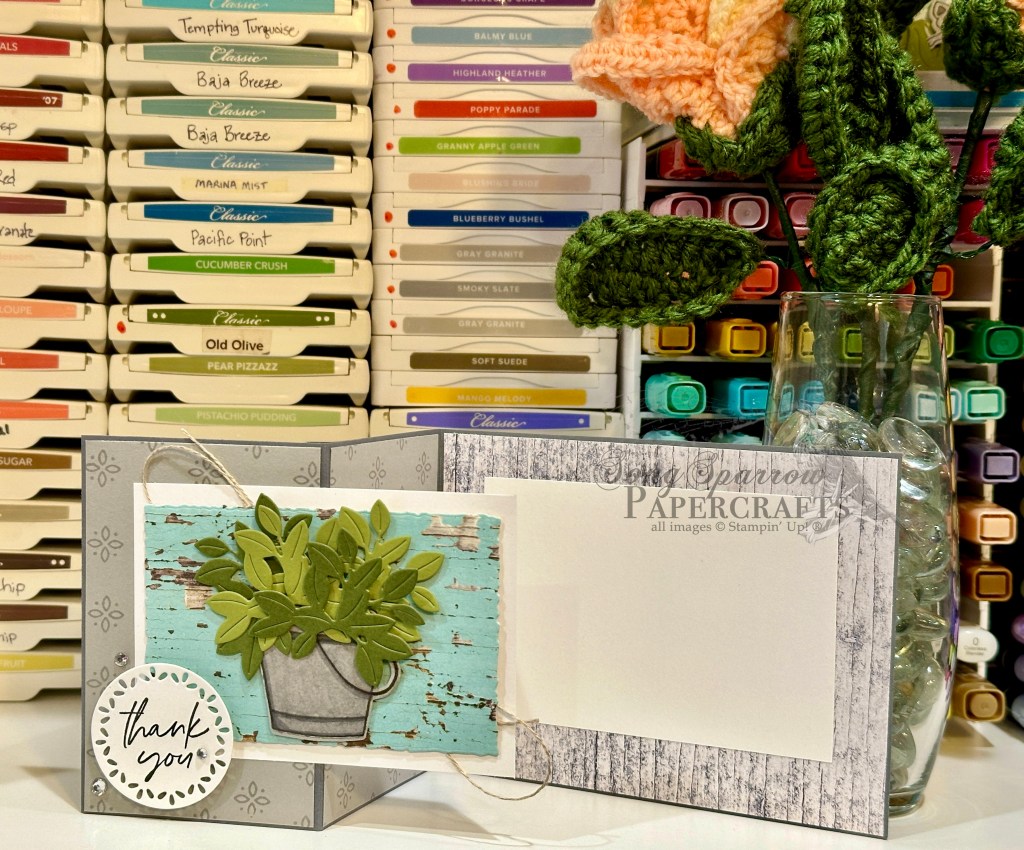
We start with a card base of Basic Gray cardstock. Our card base is of standard size and scored to give us our Z panel. The full-sized panel is our inside message panel, while our Z fold serves to give us a look inside with the overlapping front focal panel. For the inside panel, we cut a sheet of the gray woodgrain panel just a little smaller. The inside message panel is a quarter sheet of white cardstock that has been cut to size and then adhered to the center of the woodgrain panel. Be sure you only adhere to the outermost small panel so that your card will open. Next, we diecut a piece of the Pool Party woodgrain pattern from the Country Woods paper pack using the Deckled Rectangles die set. Using a glue dot, a faux bow is adhered diagonally across the front white mat and then the Deckled Rectangle piece is adhered over it using dimensionals. Using the Country Flowers stamps, stamp a bucket in black ink on Smoky Slate. I used Stampin’ Blends to provide shading and shadowing to the bucket, then diecut the bucket using the coordinating die from the Country Flowers die set. The greenery is cut from Old Olive and Mossy Meadow cardstock using the die from Country Flowers. The bucket and greenery are adhered with layers of dimensionals to give realistic visual planes. The sentiment from Something Fancy is stamped in black on white cardstock and then diecut using the Spotlight on Nature die set. The sentiment is adhered over the corner of the image panel using dimensionals. To draw the eye to the sentiment, rhinestone basic jewels are placed in a triangle around the sentiment panel.
Want to watch how this card comes together? You can watch the full episode of this week’s Terrific Tuesdays where we walk through the making of this card:
Tune in tomorrow for another fun fold design that showcases the beautiful greenery in the Country Flowers bundle. You want want to miss it!
Products used in today’s card: Basic Gray, Smoky Slate, Old Olive, Mossy Meadow, Basic White cardstock Country Woods DSP Country Flowers stamps & dies Something Fancy stamps Deckled Rectangles, Spotlight on Nature dies Stampin’ Blends Linen thread Rhinestone basic jewels Dimensionals Adhesives


 Designer Series Paper")
")


 Striped Trim")


 Specialty Paper")
")
")


 Designer Series Paper")
 Specialty Designer Series Paper")
 Specialty Designer Series Paper")


 Designer Series Paper")


 Specialty Designer Series Paper")
")


 Specialty Paper")
 Designer Series Paper")


")

 Metallic Ribbon")


")


 Diagonal Trim Combo Pack")


")


 Striped Trim")