Fall

Fall-ever Grateful

We recently had a virtual team stamping event. It was so fun to get to stamp together with team members who are scattered across North America. The beauty of that event was getting to play with some product that I don’t currently have in my own stash of products. After working with the Autumn Leaves dies, I just might have to change that though!

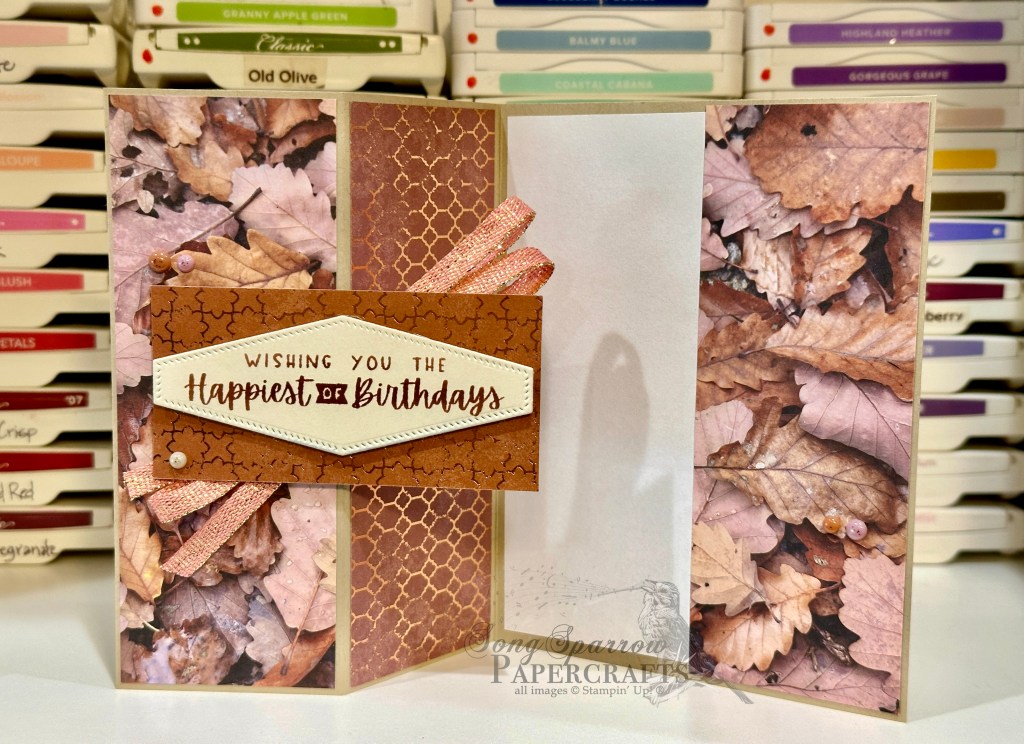
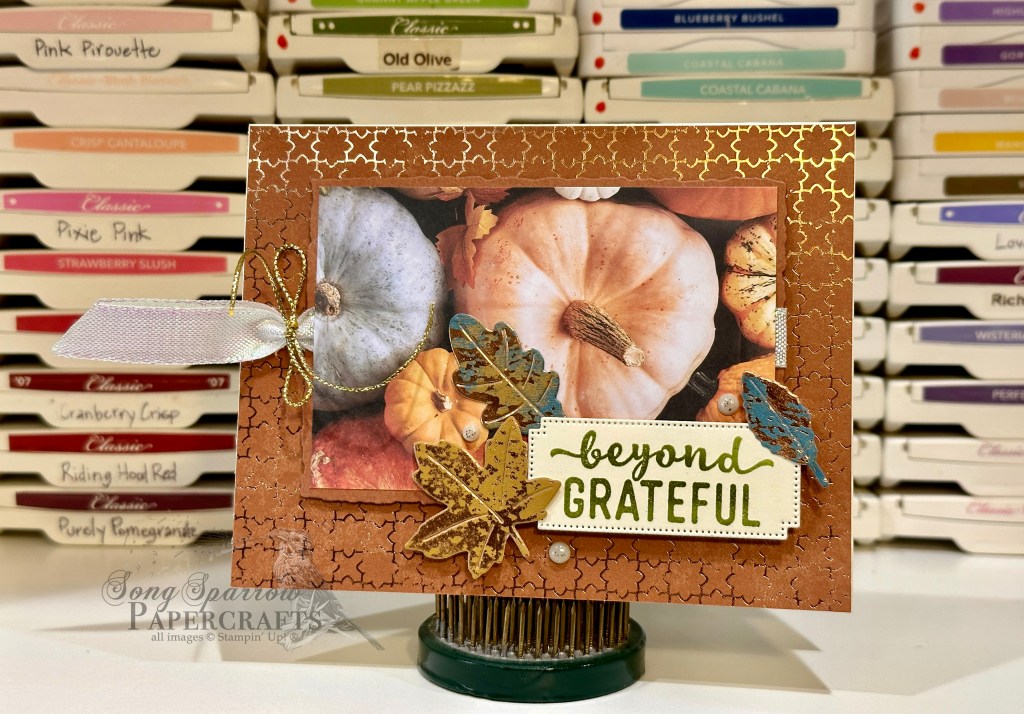
This design helps showcase the beauty of the autumn products on page 43 of the current Stampin’ Up! Holiday Mini catalog. This card sits atop a base of Very Vanilla. The card face sits atop a sheet of Copper Clay foiled designer paper from the All About Autumn paper pack. The focal image is mounted on a panel diecut from Copper Clay using the Deckled Rectangles dies. The iridescent ribbon is mounted between the Copper Clay mat and focal image sheet and tied using gold cord. The sentiment panel is diecut from Very Vanilla cardstock using the Autumn Leaves dies. The sentiment is stamped with Charming Sentiments in the center using Old Olive. The leaves are diecut from Oxidized Copper designer paper using the Autumn Leaves dies. (Check out the details in those leaves! Even more stunning in person!) The entire center panel sits atop dimensionals which really allows it to shine.

Products used:
Very Vanilla, Copper Clay cardstock
All About Autumn, Oxidized Copper DSP
Charming Sentiments stamps
Autumn Leaves dies
Adhesive-backed speckled dots
Iridescent ribbon
Gold cord
Dimensionals
Adhesives

All ads on this site are posted by WordPress and are based on your personal browsing history. I do not control ad content.

birthday · Fall

Falling for Birthdays

The All About Autumn designer series paper is another line that lends itself really well to a variety of fun fold designs. This pack of paper is full of stunning designs with one side of the sheet being fall-themed, full-color photographs and the other side showcasing gorgeous foil designs. The paper is so popular that it sells out quickly each time it comes back in stock, so you can’t hesitate to swipe it when you see it or else it’s usually gone on backorder again when you go back to the online store!

For this design, I wanted to create a card that you would be perfect for any recipient and selected elements that would draw out all of the finer details of the papers. The single-Z fun fold is perfect way to spice things up and create more visual interest and drama. The card base is a sheet of Crumb Cake cardstock, which helps draw out the lighter brown elements of the leaves in the sheet of DSP that serves as the card front. The sentiment panel is diecut from Very Vanilla cardstock using the Nested Essentials dies and stamped with the Charming Sentiments stamp in Copper Clay. A sheet of foiled Copper Clay provides a good base for the sentiment. Adding some dimensionals under the sentiment panel, along with the metallic Flirty Flamingo ribbon, allows it to pop against the busier background. The ribbon also draws out the orange and gold elements of the leaves. The inside of the card holds a small panel of foiled Copper Clay and a small sentiment panel.

I can think of so many of my friends with upcoming birthdays for whom this design would be perfect. What about you?

Products used:
Mossy Meadow, Very Vanilla cardstock
All About Autumn DSP
Charming Sentiments stamps
Nested Essential dies
Adhesive-backed speckled dots
Metallic Flirty Flamingo ribbon
Dimensionals
Adhesives

All ads on this site are posted by WordPress and are based on your personal browsing history. I do not control ad content.

Fall

Hello, Pumpkin

It’s really beginning to feel like fall here in Texas. And fall is my favorite season! I love everything about fall — cooler temperatures, beautiful colors as the leaves change, pumpkins, hot apple cider, toasty fires, going to sleep when it’s dark! There’s so much to love about fall.

The All About Autumn designer paper in the current Stampin’ Up! Holiday Mini Catalog has been popular, and it’s no wonder because it’s absolutely stunning in person! There are beautiful photos on one side and gorgeous foiled designs on the other. Honestly, it’s hard to choose, but the great thing about the 6×6 pack of papers it that you have 4 of each design so you don’t have to!

For this card design, I began with a base of Mossy Meadow. I wanted to bring out all of the detail in the various pumpkins and so I chose to use two different foiled sheets, one in vanilla and one in peacock. I love how it brings out both the lighter details of the pumpkins and the greens in the heirloom pumpkin. To carry on with the natural theme, the natural wavy trim pays tribute to the pumpkin stems. The little sentiment panel is diecut from white using the Nested Essentials dies. A few speckled dots add visual interest and draw the eye to the sentiment panel and help carry the green elements through the entire design.

Products used:
Mossy Meadow, white cardstock
All About Autumn DSP
Pansy Patch stamps
Nested Essential dies
Adhesive-backed speckled dots
Natural wavy trim
Dimensionals
Adhesives

All ads on this site are posted by WordPress and are based on your personal browsing history. I do not control ad content.

birthday

Who Wants Cake

Growing up, one of my favorite things about my birthday was the family party with the homemade birthday cake. My grandmother was an excellent baker and made the most beautiful and delicious cakes. The floral pattern in this paper reminds me of the one of the cakes she made for my birthday one year. And I chose the pink accents for this design because strawberry cake is my absolute favorite!

I chose Crumb Cake as the card base since it provides the perfect neutral background for the beautiful floral patterned paper. The decorative nesting dies provide the perfect feminine touch for the sentiment panel and my favorite pink — Flirty Flamingo — provides the perfect pop of bright pink. When you want the look of a large bow in the background but an actual bow doesn’t really work, you can layer the ribbon and affix it underneath the sentiment panel to give the look and feel of a tied bow. The pink sequins provide some much-needed sparkle and pizzazz that just says, “Happy Birthday!” What do you think?

Products used:
Blushing Bride (retired), Flirty Flamingo, Crumb Cake
Regency Park DSP (retired)
Heartfelt Hexagon stamps
Papertrey Ink dies
Adhesive-backed sequins
Ribbon duo
Dimensionals
Adhesives

All ads on this site are posted by WordPress and are based on your personal browsing history. I do not control ad content.

Christmas

In the Trees

I ran across a super cute layout by Stamp It Up With Jaimie on one of my recent strolls through my Instagram feed. I loved the funky layout and how she brought out the Old Olive in the tree pattern from A Walk in the Forest designer paper. And isn’t there something about imitation is the best form of flattery?

I changed up a few of the elements from the inspiration design to fit with the supplies in my stash. I started with a card base of basic white cardstock. The Old Olive is cut to cover the entirety of the card front and is embossed using a retired snowflake embossing folder. The tree pattern is matted by Pretty Peacock while the evergreen pattern is mounted on white. The sentiment is embossed in gold on a white panel diecut using the All That dies and the panel sits atop a folded bunch of natural finish ribbon. A few faceted gems scattered about give a pop of sparkle and complete the visual triangle around the focal point of the card design.

This particular layout is out of my wheelhouse, but I really love it and hope to incorporate it in some future designs to mix up my usual style. What do you think — is this layout a winner?

Products used:
Old Olive, Pretty Peacock, white cardstock
A Walk in the Forest DSP
All That dies
Gold embossing powder
Faceted gems
Magical Meadow stamps
Winter Snow embossing folder (retired)
Natural finish ribbon
Adhesives

All ads on this site are posted by WordPress and are based on your personal browsing history. I do not control ad content.

Christmas

We Wish You a Merry Christmas

During a recent stroll through the Instagram feed, I saw a lovely card design by LoritaMarie Crafts and immediately added it to the inspiration folder. It was the perfect combination of patterns and colors. I made a few modifications to paper selections and this design is the end result.

The card base is Mossy Meadow, which helps draw out the shades of green in the evergreen branches in the greenery panel. The evergreen panel is matted by Cherry Cobbler cardstock and mounted on dimensionals. The tree is diecut using the Merriest Trees dies and the sentiment is heat embossed in gold in the center of the tree. To keep the tree topper more delicate, I placed a star trinket at the top. The gold trim is tucked behind the elevated focal panel and gold pearls are scattered on the focal panel for visual interest. My favorite part of this design is the Christmas tree. What is yours?

My son helped me place a few of the elements, including the tree topper. We both decided that the end result is a really nice design that will be included in those that we personally send out to our holiday mailing list.

Products used:
Mossy Meadow, Cherry Cobbler, vellum cardstock
A Walk in the Forest DSP
Merriest Trees stamps & dies
Gold trim
Star trinkets
Gold pearls
Gold embossing powder
Dimensionals
Adhesives

All ads on this site are posted by WordPress and are based on your personal browsing history. I do not control ad content.

Custom Orders

Beyond Grateful

In the U.S., workers will celebrate Boss’s Day on October 16th. I love having the opportunity to help customers celebrate special days, so when a dear friend reached out about a design for Boss’s Day, I was all over it.

Much like the birthday designs you’ve seen over the last couple of days, I knew the intended recipient and could really tailor the end product to fit her style and personality. And I knew I wanted something classy, elegant, AND fun with elements of pink incorporated. The Simple Elegance designer paper is perfect with its rose gold, silver, and gold foiling of the delicate floral elements. Talk about classy! To help the rose gold really shine, the patterned paper is mounted on a sheet of Blushing Bride. The sentiment is heat embossed in copper atop a vellum backdrop, which allows the beautiful patterned paper below to peek through. The copper sequins add sparkle to the design.

I love the end result of this design so much that I’m considering a new line of cards. What do you think?

Products used:
Blushing Bride (retired), vellum cardstock
Simple Elegance DSP (retired)
Heartfelt Hexagon stamps & punch
Copper embossing powder
Adhesive-backed sequins
Dimensionals
Adhesives

All ads on this site are posted by WordPress and are based on your personal browsing history. I do not control ad content.

birthday · Custom Orders

Celebrate

Celebrate is today’s blog post today, and it’s definitely a day to celebrate as it’s my birthday! I’m not exactly sure what the family has on the agenda today, but it will definitely involved a homecooked dinner by the hubby.

Today’s design is another card from a recent custom order. Knowing the intended recipient of this birthday card really helped shape the design. I just love this foiled polka-dot cardstock. It’s one of the last sheets from a custom order I completed about a year or so ago. I’ve been hoarding it. LOL! The polka cardstock pairs beautifully with the sheet of Sweet Sorbet designer paper by adding a soft and playful feel. The lighter background of the patterned paper also provides the perfect relief for the sentiment to really take the floor. To add another layer of sparkle and pizzazz, I added a strip of sequin trim between the two paper panels. I’m thrilled with how this came out and think it spells FUN — just like its recipient!

Products used:
Bazzill Foil Candy Necklace cardstock (retired)
Sweet Sorbet DSP (retired)
Kaiserkraft glitter cardstock
Papertrey Ink dies
Sequin trim
Dimensionals
Adhesives

All ads on this site are posted by WordPress and are based on your personal browsing history. I do not control ad content.

birthday · Custom Orders

Eat Cake

I recently had the opportunity to complete a custom order with the recipients being friends of mine. It’s always fun when you get to design cards for friends because you have the opportunity to tailor to the recipient.

I had just gotten a delivery of clearance product, and I knew the Regency Park paper was going to be perfect. The base of this card is Blushing Bride with the sheet of Regency Park taking center stage. The sentiment panel is punched from white cardstock using the Heartfelt Hexagon punch. I used two different shades of pink to give visual interest to the sentiment and help it to stand out against the busy floral background. The ribbon helps break up the background, as well. The sparkle from the sequins gives a festive look and helps draw the eye across the design to the sentiment. I love this bright and happy design, don’t you?

Products used:
Blushing Bride (retired), white cardstock
Regency Park DSP (retired)
Heartfelt Hexagon stamps & punch
Adhesive-backed sequins
Ribbon duo
Dimensionals
Adhesives

All ads on this site are posted by WordPress and are based on your personal browsing history. I do not control ad content.

Christmas

Christmas Holly

I always find it funny when I can take an inspiration design and then have the end product look nothing like it! That’s definitely the case for today’s card. And all I did was tweak the look of the sentiment panel to achieve a completely different look.

A base of Cherry Cobbler provides the festive backdrop for the holly designer paper. The inspiration design had a solid sentiment panel with a diecut holly wreath. Because I wanted to see more of the beautiful foiled designer paper, I used a sheet of vellum for the sentiment panel and chose to stamp the holly wreath and nestle the sentiment in the center. Rather than placing the bow atop the wreath, I chose to use it as a design element along the side of the wreath instead.

As I was looking at the completed design, it seemed to be missing a little something. And if I had it to do over, the sentiment needs to be heat embossed in red rather than stamped. That would help it to have the *pop* it deserves. What do you think? Embossed sentiment or no?

Products used:
Cherry Cobbler, vellum cardstock
Shining Christmas DSP
Come to Bethlehem stamps (retired)
Bells & Boughs stamps (retired)
Adhesive-backed sequins
Faux linen ribbon (retired)
Dimensionals
Adhesives

All ads on this site are posted by WordPress and are based on your personal browsing history. I do not control ad content.