This is the day that the Lord has made. Let us rejoice and be glad in it!
Hello and happy Sunday, my crafty friends! I have survived the big work training event this last week. Remind me never to go into the party planning & logistics business! *belly laugh* It was a crazy week, to say the least, but all of the program attendees thought it went off without a hitch, so I guess I will call that a success!
I jumped straight into vacation prep on the heels of the big work event, but there’s something about a vacation that makes it feel a little bit less like work. *snicker* I’m checking in today from our cabin on the lake, where we’re planning to fish until we’re tired. The weather is beautiful and our cabin is perfect!
While I’m away, I do plan to pop in with a fun little project sometime tomorrow. Because what crafter can go on the road without taking a little project?! LOL! Seriously though, it’s the perfect opportunity to show off the new Christmas card kit and a few on-the-go design alternatives, so I hope you’ll drop in.
In the meantime, how about a little giveaway in honor of my birthday? Drop a comment on this post or on the posts in my socials (going up later today) to be entered to win a little packet of goodies. I’ll announce a winner on Wednesday (10/15) evening.
We’re rounding out this week’s design series with some home decor. I have a craft show in a couple of weeks, and I’m still working feverishly to prepare all of the things I have on my display wish list. Last year was the first year I offered home decor items, and they generated a lot of interest.
Today’s design is inspired by a recent post on the Stampin’ Up! official Instagram page. I, of course, put my own twist on it. And isn’t that the best thing about inspiration?! So let’s dig in and see how this comes together.
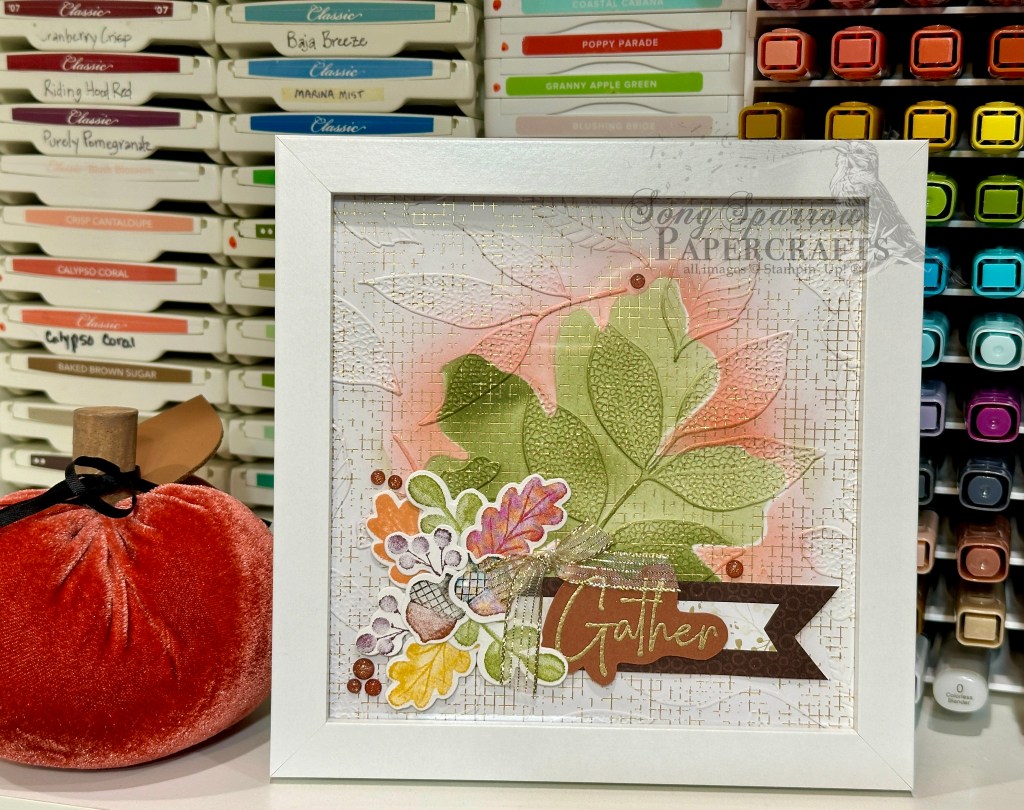
This is a 6×6 frame I found on Amazon. So we get started with a 6×6 card base. HINT: Before you fully commit to your layout, be sure that it shows through the frame as you intend. I neglected this step this time so my Cajun Craze base – that was supposed to be a small border around the focal panel – doesn’t show at all. *womp-womp*
The focal panel base is a sheet of the gold foil hashed patterned paper from the Nature’s Sweetness paper pack. I decided to use the retired Changing Leaves embossing folder to create the background texture because I wanted the pattern to more closely tie with the image theme. The focal image is an image rub using blending brushes.
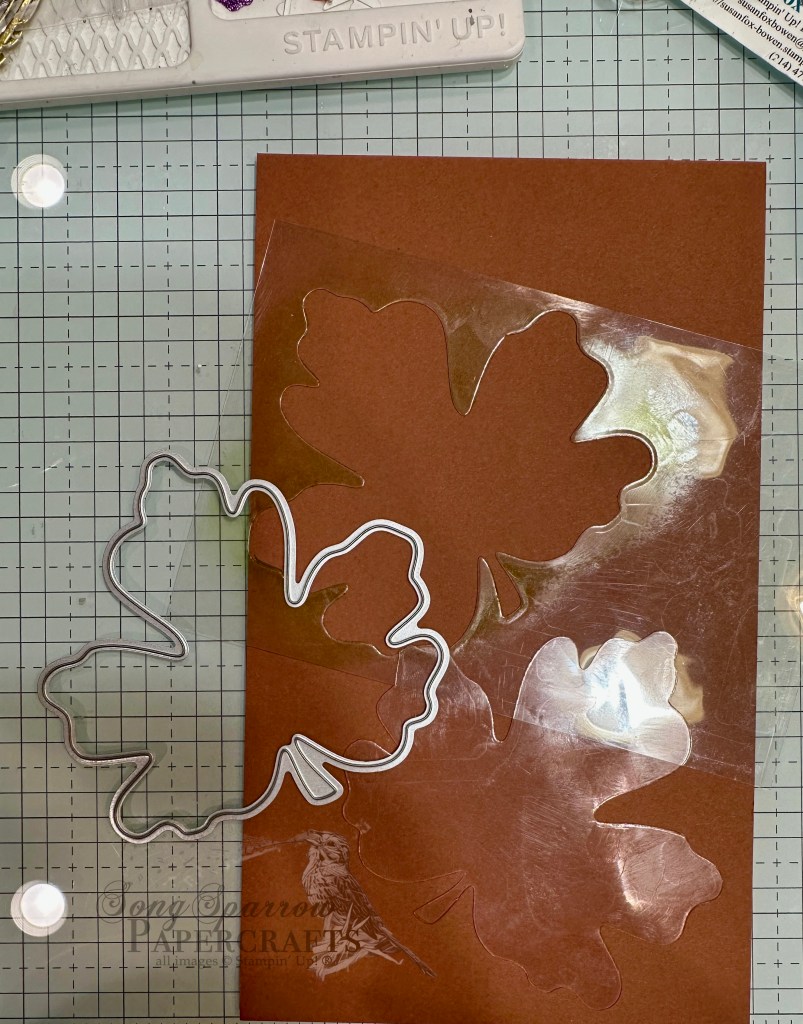
I decided to create a mask and negative that I could use more than once using some of the acetate sheets I had saved in my stash. When I unpack my acrylic stamps, I always save the thicker acetate sheet to use for shakers and window cards later on. It’s the perfect thickness for a mask and negative too! I used the larger leaf from the Gathering Moments dies to cut through the acetate. I used both pieces to create my focal image. The negative creates the center image, which is rubbed in Mossy Meadow, and then the shape is used to create the highlight around the leaf image, which is rubbed in Flirty Flamingo.
The sentiment panel has several layers. The backdrop is a banner created from two strips of the Gathering Together patterned paper. The sentiment from the Gathering Moments set is stamped in Versamark on Cajun Craze and then heat embossed in gold. I cut around the sentiment using paper snips. The fall foliage arrangement on the left is created using the Gathering Moments images and dies. We finish up with a bow of gold striped iridescent ribbon and some Cajun Craze & gold dots.
I hope you’ve enjoyed this week’s series. I’ll be in and out over the next two weeks as I prepare for the big educational program at the office and then head off to the woods for a little family fall break get-away. But I have new goodies arriving that I hope to be able to show you so don’t go too far!
Happy Sketchy Fridays, everyone, and welcome to the weekend! Except it’s Saturday, but we’re all good with that, right? *snicker* My week could be summed up by lions and tigers and bears, oh my! We had a major cloud data migration at my office over last weekend and everything that could go wrong did go wrong. So we were having to make due with alternative ways of accessing e-mail and cloud files all week, and let’s just say that it’s been a mess! In and amongst all of that, we’re hosting a big educational conference in our office next week annnnnnd naturally all of my spreadsheets and files were a part of the data migration. *sigh* So it’s been a little challenging at the office this week, to say the least!
BUT here I am on Saturday bringing you the Sketchy Fridays card because it was just going to be too cute not to make & share! For those of you who are new here, Sketchy Fridays is a weekly series where we use a card sketch to design our featured card.
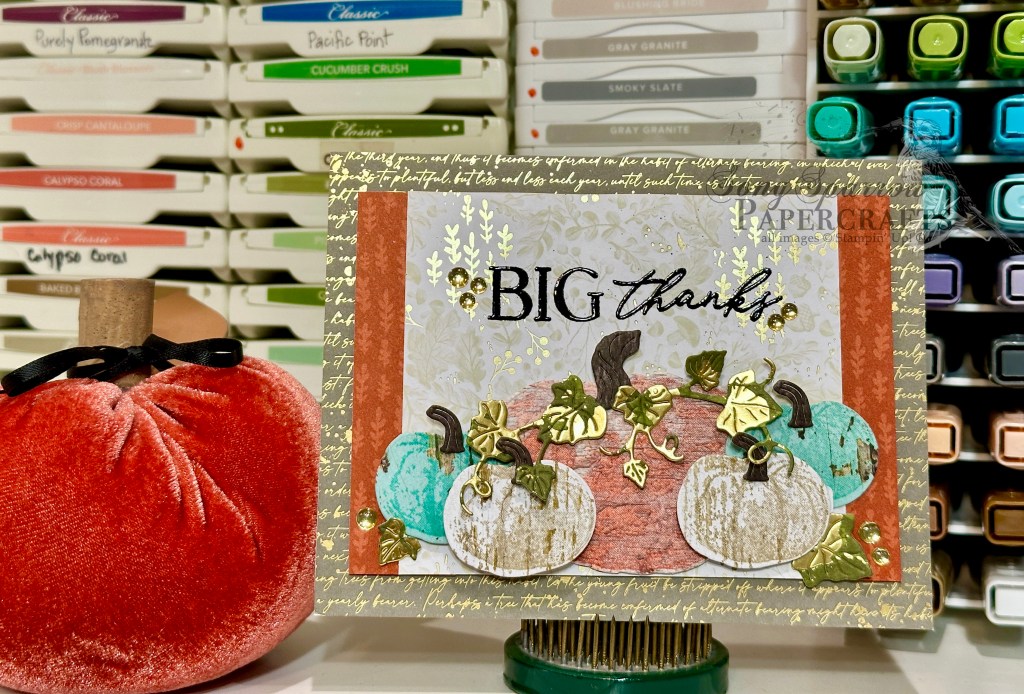
This week’s card is based on the Freshly Made Sketches #706 sketch. As soon as I saw it, I already had an idea in mind and that made it an easy choice! And we’re turning it on its head, so to speak, to make it landscape. Today’s design features the new Online Exclusives Beautiful Pumpkins bundle.
We get started with a neutral base of white cardstock. Our front panel backdrop is a sheet of the gold foiled script paper from the Nature’s Sweetness paper pack. The focal panel is a combination of two sheets of the Gathering Together paper – the Cajun Craze small leaf pattern and the gold foiled fall foliage pattern. It’s mounted to the card front with dimensionals. The sentiment from the *new* 12 Days of Crafting Advent Calendar stamp set is heat embossed in black at the top of the panel. I wanted the pumpkins to have more texture and interest than what the stamps alone would provide, so I selected several of the woodgrain patterns from the Country Woods paper pack and used the detail stamp from the Beautiful Pumpkins set and a coordinating, but light, color on top of each woodgrain and then used the coordinating dies to cut out each one. The pumpkin stems are also cut from one of the darker woodgrain patterns from the Country Woods paper pack. I tried several different colors for the leaves and vines before settling on the Old Olive sheet from the Season of Elegance paper pack. We give the pumpkins lots of depth of field by adhering them with varying heights of dimensionals. And we finish things off with some gold low profile dots.
I’ll be closing out this week’s design series with some home decor. I hope you’ll drop back by later to check it out.
Although the weatherman tells us it’s fall here in North Texas, in usual Texas fashion, summer refuses to go out quietly. While it’s certainly not August, we’re not quite into the glorious chill of fall mornings or altogether pleasant days either.
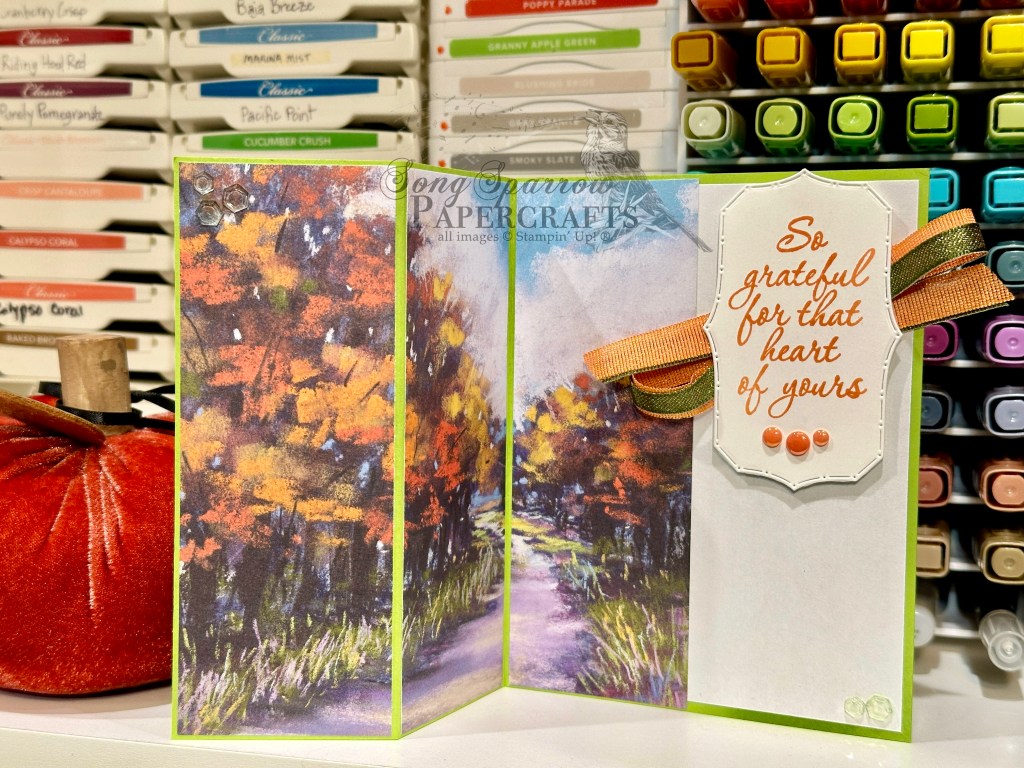
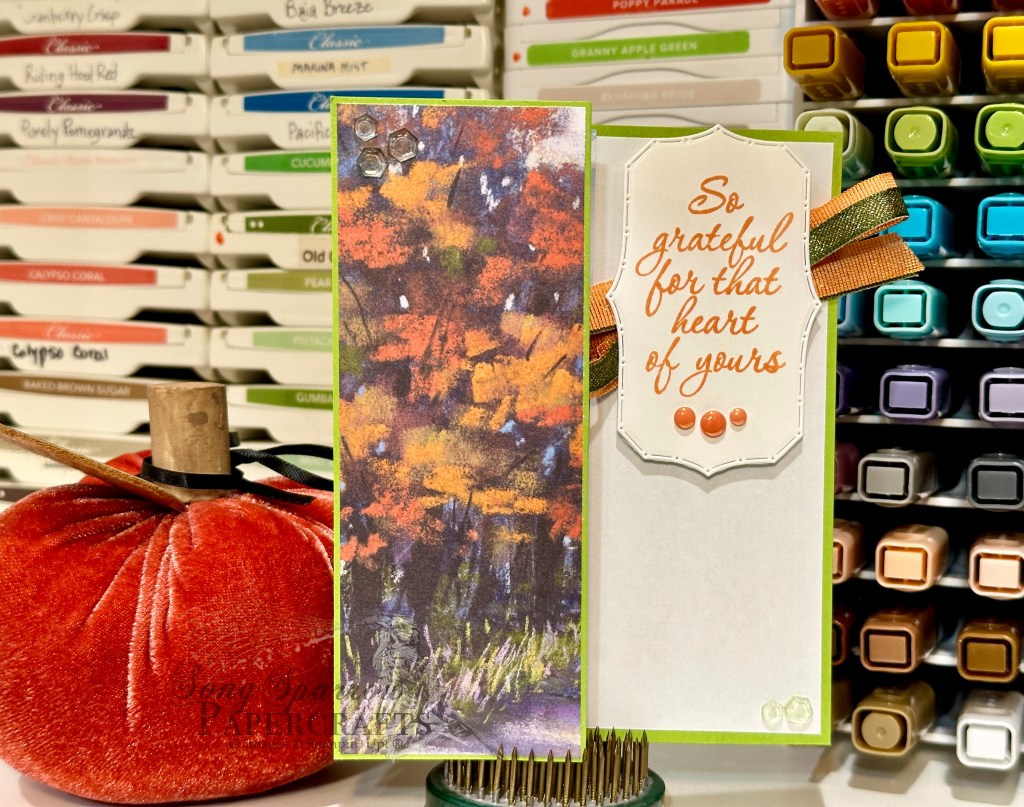
But that won’t stop us from continuing this week’s design series – all about fall. And today we’re revisiting the beautiful Splendid Autumn patterned paper and pairing it up with the Label Me Grateful stamps to create a super easy fun fold card. When you have paper as pretty as this, finding a design that takes full advantage is a must! And the simple z-fold design allows you to use the full sheet of paper.
I chose Granny Apple Green as the card base. It really allows all of the colors of the leaves and flowering grasses in our patterned paper to shine. The Splendid Autumn sheet features a winding path through a small grove of fall trees. And as you open the fold, you see the full scene. The sentiment panel is facing front when the card is closed. The sentiment from the Label Me Grateful stamp set is stamped in Timid Tiger ink on white cardstock and then cut out with the Traditional Labels dies. A few In Color flat pearls add the perfect finishing touch to the sentiment panel. It’s adhered over a bow of Timid Tiger and Mossy Meadow & Gold ribbon using dimensionals. We add some green hexagons in opposing corners of the card front. I chose the lightest color so they’re more sparkle than they are a pop of color.
What do you think of this clean & simple design? I hope you’ll tune in for tomorrow’s Sketchy Fridays to see what else we can pull together with our crafty stash of fall-inspired products.
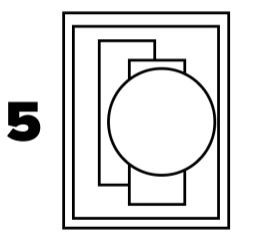
This week, we’re exploring our fall-themed crafty stash as we create our projects. And today, the Gathering Together suite is taking center stage. Because I’m a little pressed for time today, I decided to make things a lot simpler by using a sketch to get started. So I’m using Sketch #5 from the recent SU! Craft-a-Long, which takes the cards on page 42 of the Holiday Mini Catalog and turns them into versatile sketches.
Screenshot
Sketch #5 is the perfect way to use a few scraps of patterned paper and allows for an easy diecut focal point. Here we start with a base of white cardstock, which isn’t visible on the card front itself. A sheet of the white woodgrain pattern from the Country Woods paper pack. A sheet of the lovely Gathering Together paper serves as the backdrop for all of our focal elements. The Cajun Craze leaf pattern is the background panel, while the plaid and foliage strips provide the grounding for the focal leaf element. The leaf is cut from a combination of Gathering Together and Country Woods papers using the Gathering Moments die. To help the pattern leaf stand out against the busy background, I used a darker woodgrain-patterned leaf to provide the shadowing, which really brings out the brown details of the pattern nicely. The sentiment from the Simply Said stamp set is heat embossed in copper and then adhered over gold cording with dimensionals. Some Cajun Craze & Gold dots are scattered around the card front to provide the perfect pops of twinkly color.
Tune in tomorrow to see some more autumn inspiration!
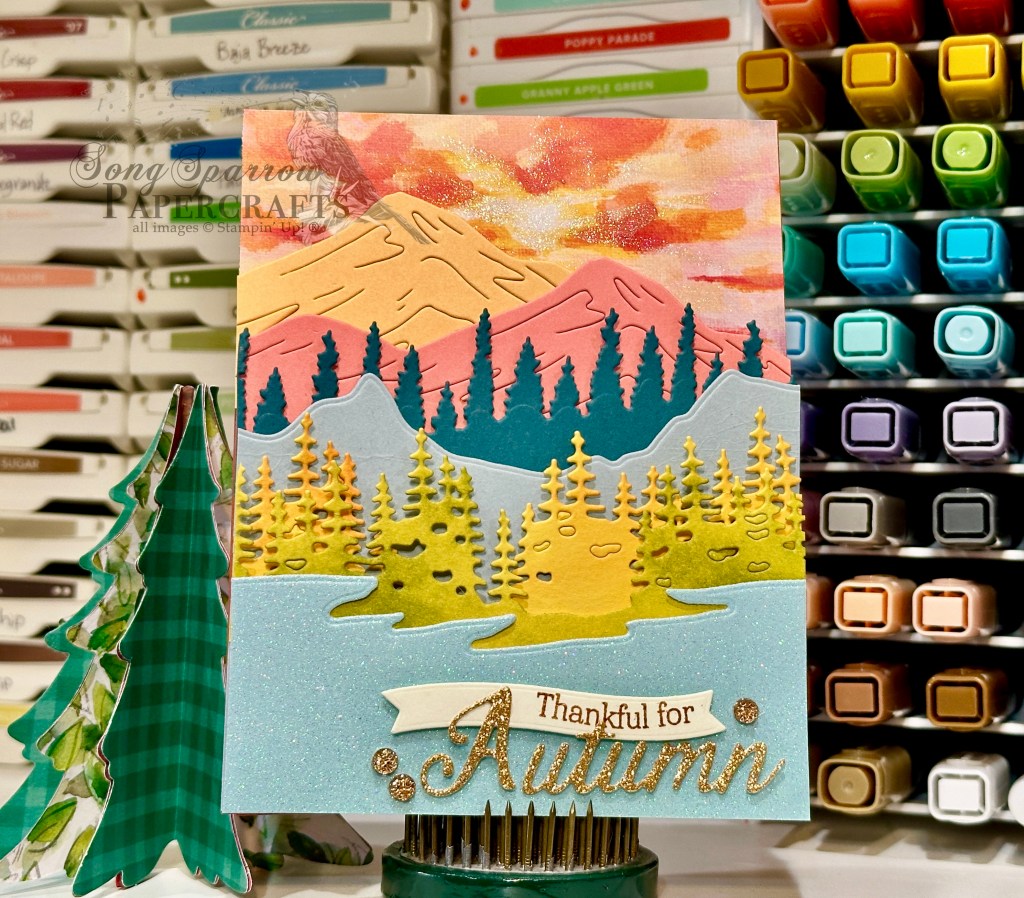
I’m having a good time with this week’s design theme – we’re all about fall! And today’s card is inspired by the Luv 2 Stamp Group monthly team challenge where I had to create a Thanksgiving card. Being in the heart of Autumn, my mind immediately goes to beautiful foliage when I think of Thanksgiving and, of course, we all tend to focus on what we are thankful for. So being that fall happens to my favorite season of the year, it only made sense to tie all of that together!
I drew inspiration from a gorgeous card I saw over on Insta from @didyoustamptoday. I really wanted to bring out the thoughts of fall when I worked on my version of the card. And so I drew on all of my favorite fall hues when selecting the foliage elements. I also wanted to recreate that sunrise/sunset feel from the inspiration card, which translates into some beautifully colored mountains in the background. And, of course, Everyday Skies and Wink of Stella do all of the work with the twinkling of the sun over the mountains.
So although it’s not readily visible on the front panel, we get started with a base of Cajun Craze cardstock. Our mountain scene is built with a combination of the Scenic Adventure and Lights & Wonder dies. I chose Peach Pie and Flirty Flamingo for the tall mountain range in the back that is catching all of the sun’s rays and they’re cut with the larger mountain die in the Scenic Adventure set. A sheet of the Everyday Skies gives us the gorgeous sunrise, and some carefully placed Wink of Stella draws the eye in to the rising sun and its rays peeking up over the range. To give the look of division between mountain ridges, I added the tree line of Pretty Peacock pines next. The next ridge is cut using the largest mountain die in the Lights & Wonder set. And then we have our trees along the water’s edge. These trees are cut from Daffodil Delight using Lights & Wonder die, and then to give the look of changing leaf colors, I used my blending brushes to give touches of Old Olive and Timid Tiger. The lake is cut from a sheet of the blue pastel ombre glimmer paper with the Lights & Wonder die. Each of our layers of mountains and trees are separated by dimensionals to give a more realistic depth of field. The sentiment is a combination of the Words for the Season dies and Beautiful Pumpkin sentiment stamp. A few drusy embellishments on either side really let the Autumn pop.
While some scene cards take a bit of time to build, I find it fun to stretch the creative wings and see if I can bring life to the picture in my mind’s eye. Do you like to undertake designs that take a bit more time sometimes? Tomorrow we’re going to get started with a sketch and see where that takes us. I hope you’ll drop by and check it out!
Welcome back, everyone! I hope you enjoyed a restful weekend. We always enjoy a weekend where we’re able to spend time together. And we had the perfect weekend for that. The weather was glorious. It’s really starting to feel like fall here.
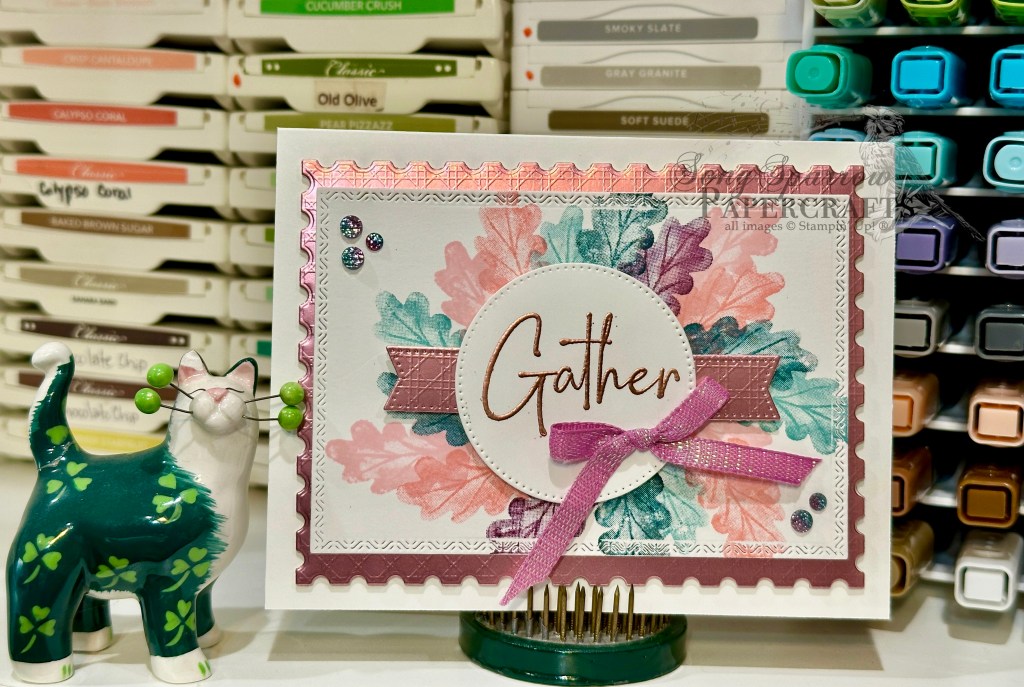
And speaking of fall, this week we’re going to be creating fall-inspired designs with our crafty stash. We’re getting started with the Gathering Moments stamps and a more unconventional color palette. I love looking for unique color pairings and there’s no better way to pull inspiration than simply taking a walk and making mental notes of all the hues you see! And today’s color palette is inspired by the pinks, blues, and purples that we see but that don’t get as much attention.
We get started with a neutral base of white cardstock. Our focal panel is a piece of white cardstock that is diecut with the Textured Notes die and matted with a piece of the pink Flower Garden Foils textured specialty paper cut with the largest Perennial Postage die. The smaller leaf stamp from the Gathering Moments stamp set provides the repeated image for our wreath of foliage. The leaves are stamped in a combination of pinks, blues, and purple. The sentiment is also from the Gathering Moments stamp set and is heat embossed with copper embossing powder before being cut with the Stylish Shapes circle die. The sentiment banner is cut from the pink textured foil and the sentiment panel is then mounted in the center of our foliage with dimensionals. We finish things off with a bow of Petunia Pop iridescent ribbon and some two-tone sparkle gems.
I really love how combining the lesser-scene hues of changing leaves provides such a stunning result. Tune in tomorrow as we continue our tour of fall design ideas.
Welcome to the weekend, crafty friends! What have you gotten up to? It’s a beautiful day here in N. Texas. We started out our day at the bowling alley for the kiddos’ weekly league games. And our afternoon has been a mixed bag. We started with a trip to a local wildlife rehabber after rescuing one of our backyard doves from the clutches of one of our outside cats. The exciting life of owning pets!
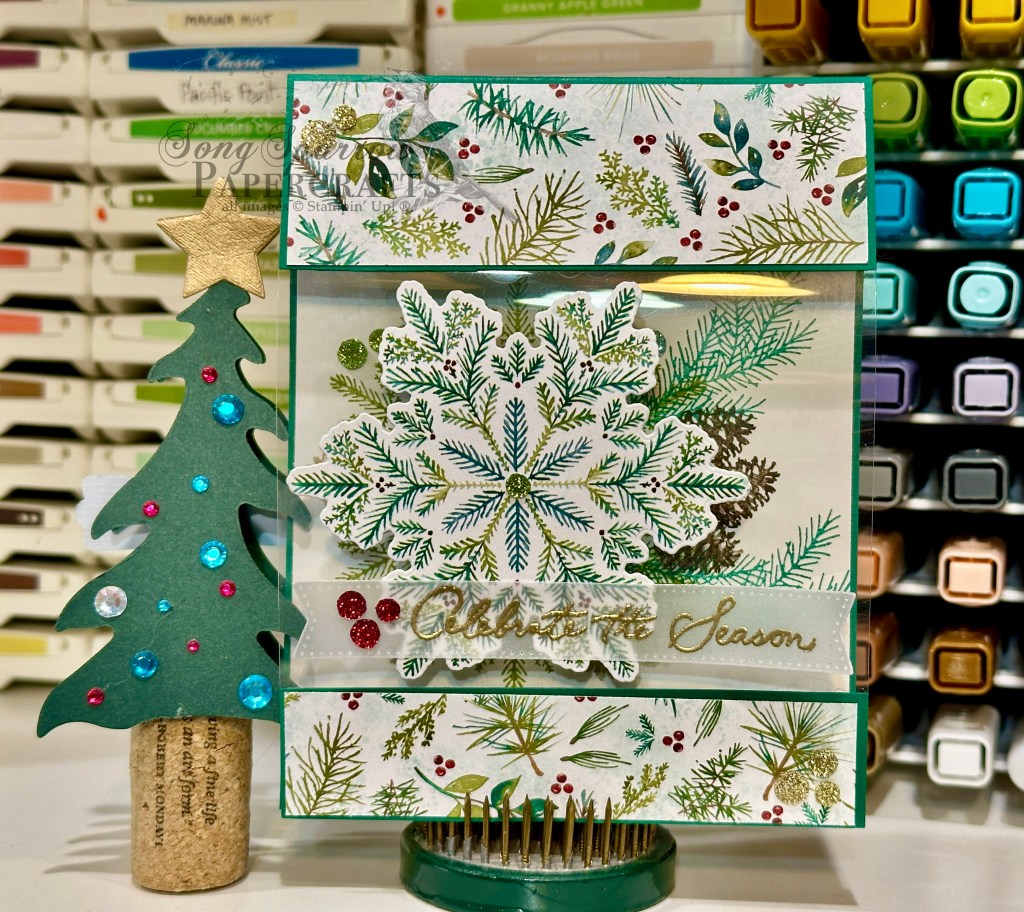
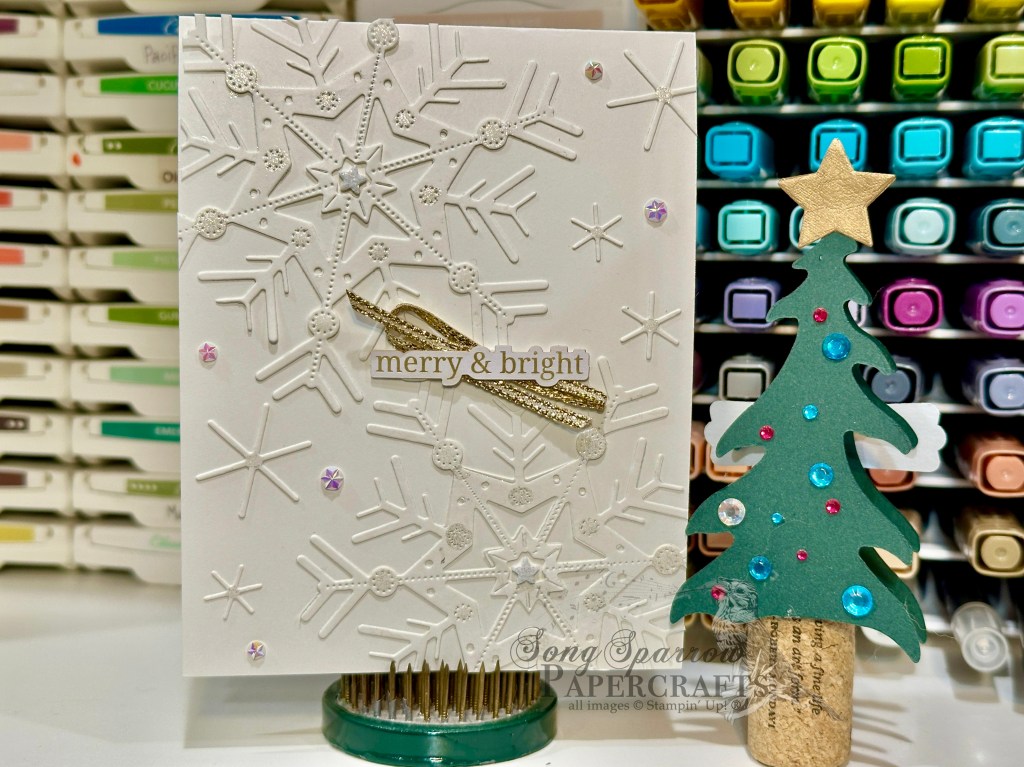
But on to some crafty things as we close out our week of snowy designs. Today we’re using the snowflakes from the Elegant Pine Snowflakes suite to create our window card design. I recently saw a peek-through window design that I just loved and it made me think about how this beautiful set could create a peek-through scene.
So we get started with a base of Shaded Spruce cardstock. The center section has been removed to insert the window sheet section. Each side of the front panel cardstock pieces are covered with the evergreen patterned sheet from the Elegant Pine Snowflakes paper pack. The snowflake is cut from another sheet and then adhered on the window section. The sentiment from the Delicate Pines stamp set is stamped in Versamark and then heat embossed with gold embossing powder on vellum. The panel is then cut with one of the smaller banner dies from the Stylish Shapes set using the extension method. It’s adhered with tear-n-tape over the snowflake.
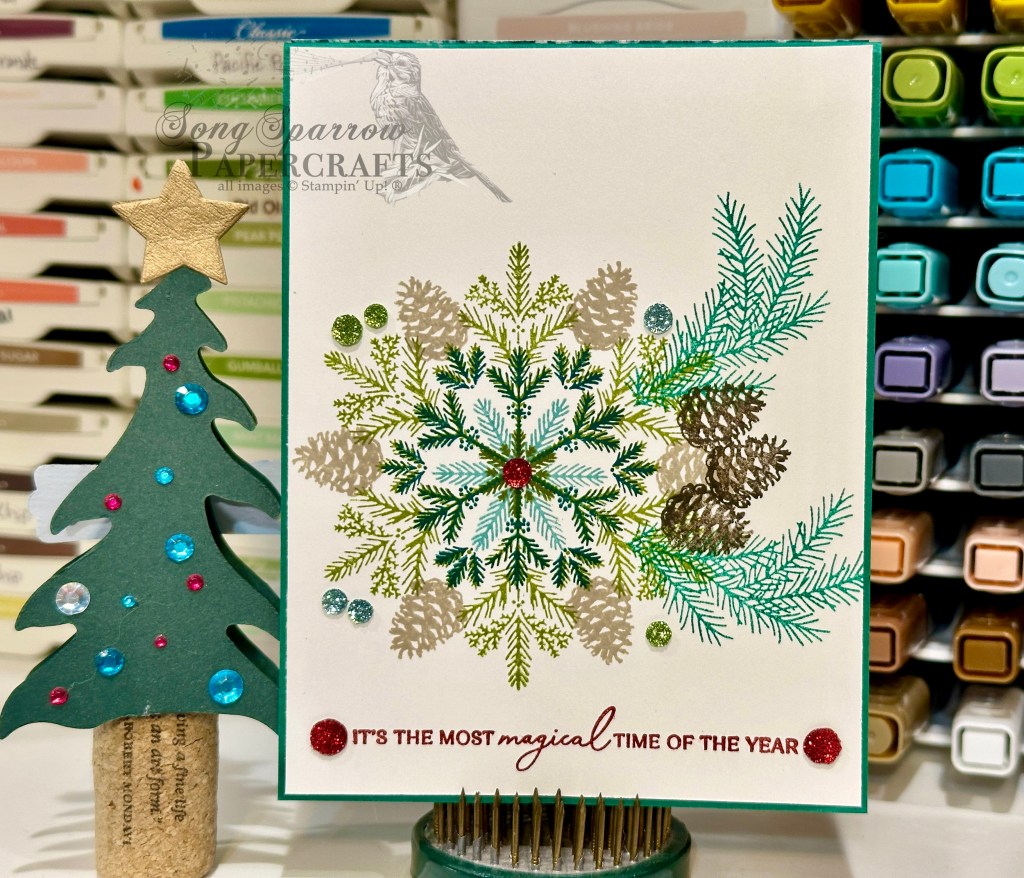
The inside panel of the card begins with white cardstock. I used the window sheet as a stamping block, which made lining up the images a 100% guarantee. I started layering with the largest snowflake from the Delicate Pines stamp set then the middle-sized snowflake image, and then the feather flake. The pinecones are stamped in the negative space of the snowflake in Crumb Cake. I wanted a bit of detail peeking through when the card is closed and so I stamped a group of pinecones in Early Espresso and then surrounded them on either side with pine branches stamped in Shaded Spruce. The sentiment from the same Delicate Pines set is stamped in Real Red in the bottom-center of the panel. Both the inside and outside panels are finished with Traditional Sparkling sequins for the perfect amount of sparkle and pops of contrasting colors.
I hope you’ve enjoyed our snowflake series this week. Next week, we’re headed back to more fall-inspired designs. I think you’ll find some of the twists pretty fun. Hope you’ll tune in and see what’s in store!
Happy Friday, everybody! It’s been a week, let me tell you. Between a busy work schedule, an unexpected interruption in my SSP Pinterest account, and a failed attempt at today’s card, I’m ready for a refresh! And it’s going to be the perfect weekend for it as we enjoy the first real feel of fall weather here in N. Texas. It’s due to be a glorious weekend to be outside.
But on to crafting. This week, we’re pulled our snowflakes from the crafty stash to create our projects. Today’s card combines the Snowy Delights dies with the Greetings for You ephemera to create our lovely white wonderland.
But I just have to share a little about today’s card idea and failure to launch first. Because guess what? Every crafter has good ideas that don’t execute.
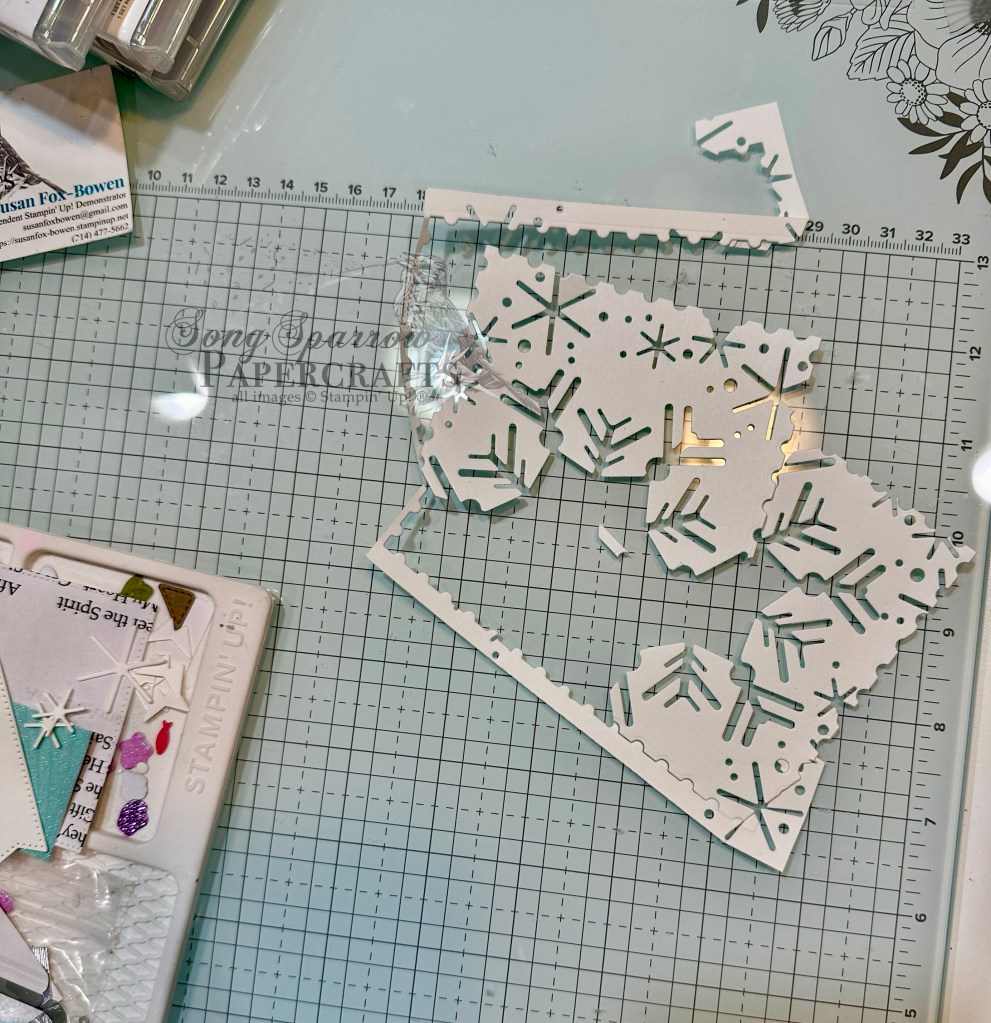
I gave you a little tease that today’s project was going to be a snowflake childhood throwback. And in my mind’s eye, I was going to use some current dies in the stash to create the look of the paper snowflakes we used to make as kids. You know the ones where we would fold the paper and cut shapes out of the edges to create unique snowflake designs? Well, I was hoping to do that with a quarter panel and my dies. And I really wanted it to look like a postage stamp to boot. And no matter how many placements and combinations of the dies I tried, I kept ending up with big sections coming apart – like the photo above. I decided to table the idea for now – I won’t be deterred from getting this one eventually *grin* – and move on with creating with the actual diecut shapes I had instead of using the sheet of negatives. And that’s how we arrive at today’s card design.
This is a super simple color palette – white as snow. So we get started with a sheet of white cardstock. All of the snowflakes are cut from a quarter sheet of white using the Snowy Delights dies. I used the larger detail die as the star of the show and used 2 of them in opposing corners of the card front, allowing them to overlap the edges of the card. After adhering the larger flakes to the card front, I snipped off the overhanging edges with my paper snips. I filled in the gaps of white space in the other corners with the smaller, less detailed flakes. I chose a small sentiment – merry & bright – from the Greetings for You ephemera pack and adhered it over some gold trim. To finish things off with the perfect amount of twinkle, I added Wink of Stella to the round elements of each of the snowflakes and then also added a few iridescent faceted gems in the white space between the smaller flakes.
Don’t you just love this tone-on-tone look? It is super sparkly in person (I’ll have to remember to add a little video to the Instagram post later so you can see it for yourself) and it just makes me smile.
I saw the coolest idea in my inspiration searching recently that I can’t wait to try out for you tomorrow. I hope you’ll drop in and see what that’s all about!
Thanks for dropping in today, friends! After a looooong day at work yesterday, I didn’t have any zip left to play in the craft room. But never fear, that childhood throwback card is coming to you tomorrow!
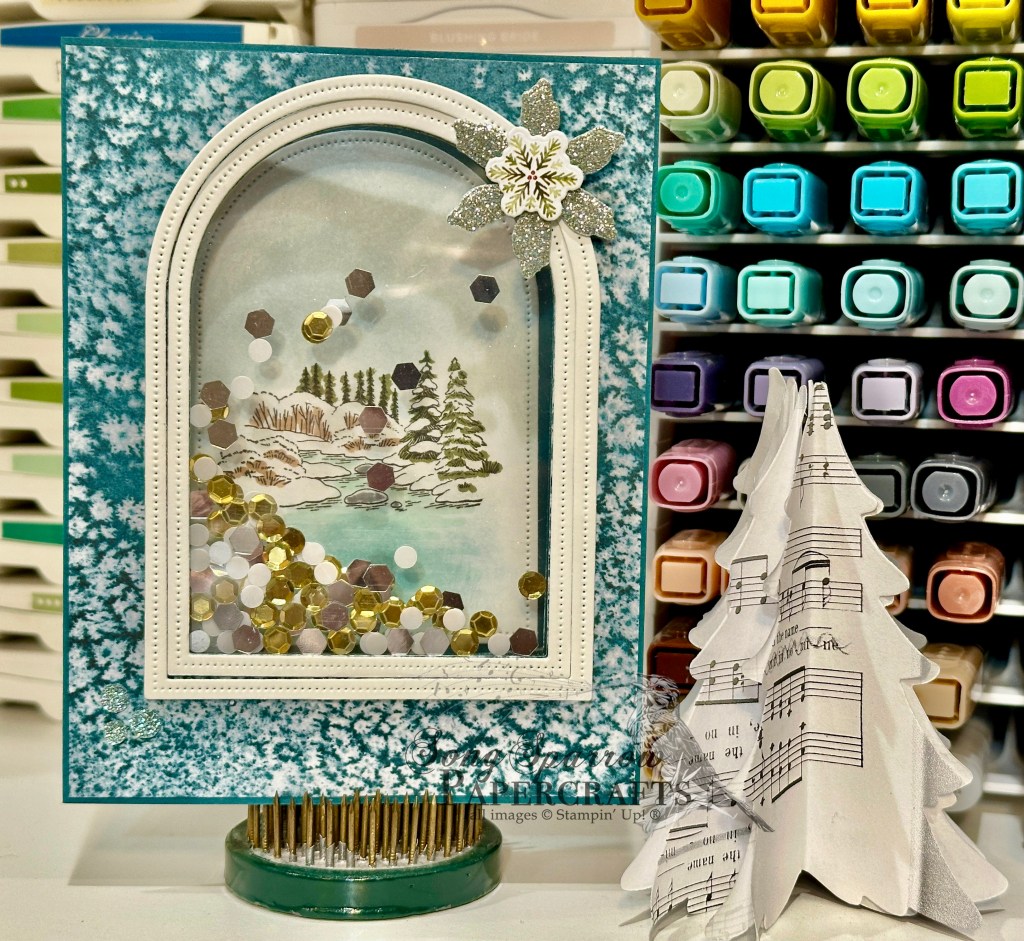
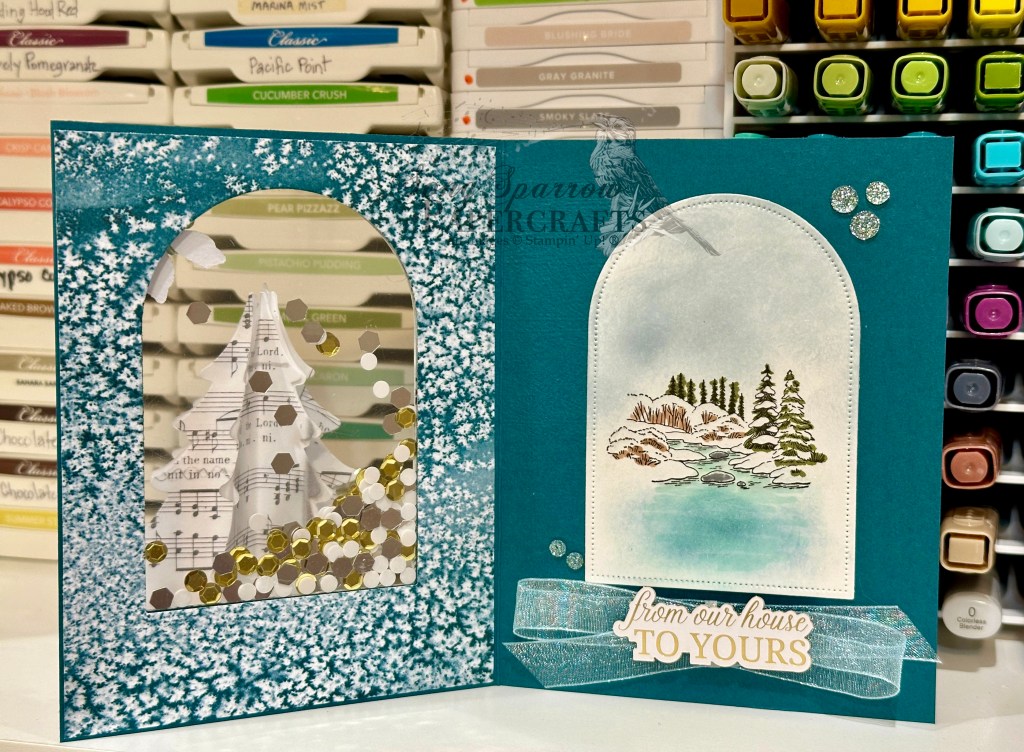
But today, we’re hopping along with the Luv 2 Stamp Group over on Instagram. And we’re continuing our snowflake series as we combine the Elegant Pine Snowflakes paper with the Winter Scenes stamps to create today’s shaker window card. Let’s check it out.
We get started with a base of Pretty Peacock cardstock. Two panels of the Pretty Peacock frost pattern from the Elegant Pine Snowflakes paper cover both the front and back of our front card panel. The window is cut using the Everyday Arches dies, and I ran the whole sheebang through the machine a couple of times to be sure it cut all the way through all of the layers. Acetate window sheets create our shaker panel, and we adhere one on each side of our card front, filling the shaker with sparkly things, and then adhering our patterned paper covers on each side. We dressed up the window with two small arches cut from white cardstock using nesting dies from the Everyday Arches set. And then the upper corner of the window has a snowflake cut from a combination of Peaceful Garden silver glimmer paper and a sheet of the Elegant Pine Snowflakes paper. This snowflake is the perfect compliment to our snowy winter scene.
The smallest center arched piece is used for our image panel. The image from the Winter Scenes stamp set is stamped in black and then colored with a combination of Stampin’ Blends and blending brushes. To give it the sparkle of falling and fallen snow, I covered the snowy bits with Wink of Stella. The sentiment from the Greetings for You ephemera pack is adhered over Balmy Blue sheer ribbon with several layers of dimensionals and affixed underneath the focal image. A few Traditional Sparkling sequins on the inside and outside focal panels finish things off with the perfect amount of twinkle.
Today’s card is a part of the Luv 2 Stamp Group Instagram Hop, which goes live at 9 AM Pacific Time (PST). Click here to head over to my Instagram feed at 9 AM Pacific/11 AM Central and check out what the other demos in our L2S Group have created for you today!
![Cajun Craze 8-1/2" X 11" Cardstock [ 119684 ]](https://assets1.tamsnetwork.com/images/EC042017NF/119684s.jpg "Cajun Craze 8-1/2\" X 11\" Cardstock [ 119684 ]")
![Basic White 8 1/2" X 11" Cardstock [ 166780 ]](https://assets1.tamsnetwork.com/images/EC042017NF/166780s.jpg "Basic White 8 1/2\" X 11\" Cardstock [ 166780 ]")
![Nature's Sweetness 12" X 12" (30.5 X 30.5 Cm) Specialty Designer Series Paper [ 162616 ]](https://assets1.tamsnetwork.com/images/EC042017NF/162616s.jpg "Nature's Sweetness 12\" X 12\" (30.5 X 30.5 Cm) Specialty Designer Series Paper [ 162616 ]")
![Gathering Together 12" X 12" (30.5 X 30.5 Cm) Specialty Designer Series Paper [ 165969 ]](https://assets1.tamsnetwork.com/images/EC042017NF/165969s.jpg "Gathering Together 12\" X 12\" (30.5 X 30.5 Cm) Specialty Designer Series Paper [ 165969 ]")
![Changing Leaves Hybrid Embossing Folder [ 164138 ]](https://assets1.tamsnetwork.com/images/EC042017NF/164138s.jpg "Changing Leaves Hybrid Embossing Folder [ 164138 ]")
![Gathering Moments Bundle (English) [ 165980 ]](https://assets1.tamsnetwork.com/images/EC042017NF/165980s.jpg "Gathering Moments Bundle (English) [ 165980 ]")
![Mossy Meadow Classic Stampin' Pad [ 147111 ]](https://assets1.tamsnetwork.com/images/EC042017NF/147111s.jpg "Mossy Meadow Classic Stampin' Pad [ 147111 ]")
![Flirty Flamingo Classic Stampin' Pad [ 147052 ]](https://assets1.tamsnetwork.com/images/EC042017NF/147052s.jpg "Flirty Flamingo Classic Stampin' Pad [ 147052 ]")
![Real Red Classic Stampin' Pad [ 147084 ]](https://assets1.tamsnetwork.com/images/EC042017NF/147084s.jpg "Real Red Classic Stampin' Pad [ 147084 ]")
![Crushed Curry Classic Stampin' Pad [ 147087 ]](https://assets1.tamsnetwork.com/images/EC042017NF/147087s.jpg "Crushed Curry Classic Stampin' Pad [ 147087 ]")
![Timid Tiger Classic Stampin' Pad [ 165278 ]](https://assets1.tamsnetwork.com/images/EC042017NF/165278s.jpg "Timid Tiger Classic Stampin' Pad [ 165278 ]")
![Old Olive Classic Stampin' Pad [ 147090 ]](https://assets1.tamsnetwork.com/images/EC042017NF/147090s.jpg "Old Olive Classic Stampin' Pad [ 147090 ]")
![Blackberry Bliss Classic Stampin' Pad [ 147092 ]](https://assets1.tamsnetwork.com/images/EC042017NF/147092s.jpg "Blackberry Bliss Classic Stampin' Pad [ 147092 ]")
![Early Espresso Classic Stampin' Pad [ 147114 ]](https://assets1.tamsnetwork.com/images/EC042017NF/147114s.jpg "Early Espresso Classic Stampin' Pad [ 147114 ]")
![Cajun Craze Classic Stampin' Pad [ 147085 ]](https://assets1.tamsnetwork.com/images/EC042017NF/147085s.jpg "Cajun Craze Classic Stampin' Pad [ 147085 ]")
![Versamark Pad [ 102283 ]](https://assets1.tamsnetwork.com/images/EC042017NF/102283s.jpg "Versamark Pad [ 102283 ]")
![Metallics Wow! Embossing Powder [ 165678 ]](https://assets1.tamsnetwork.com/images/EC042017NF/165678s.jpg "Metallics Wow! Embossing Powder [ 165678 ]")
![Gold Striped 3/8" (1 Cm) Mesh Ribbon [ 165599 ]](https://assets1.tamsnetwork.com/images/EC042017NF/165599s.jpg "Gold Striped 3/8\" (1 Cm) Mesh Ribbon [ 165599 ]")
![Cajun Craze & Gold Dots [ 165984 ]](https://assets1.tamsnetwork.com/images/EC042017NF/165984s.jpg "Cajun Craze & Gold Dots [ 165984 ]")
![Stampin' Dimensionals [ 104430 ]](https://assets1.tamsnetwork.com/images/EC042017NF/104430s.jpg "Stampin' Dimensionals [ 104430 ]")
![Mini Glue Dots [ 103683 ]](https://assets1.tamsnetwork.com/images/EC042017NF/103683s.jpg "Mini Glue Dots [ 103683 ]")


![Country Woods 12" X 12" (30.5 X 30.5 Cm) Designer Series Paper [ 163393 ]](https://assets1.tamsnetwork.com/images/EC042017NF/163393s.jpg "Country Woods 12\" X 12\" (30.5 X 30.5 Cm) Designer Series Paper [ 163393 ]")
![Season Of Elegance 12" X 12" (30.5 X 30.5 Cm) Specialty Designer Series Paper [ 164144 ]](https://assets1.tamsnetwork.com/images/EC042017NF/164144s.jpg "Season Of Elegance 12\" X 12\" (30.5 X 30.5 Cm) Specialty Designer Series Paper [ 164144 ]")
![Beautiful Pumpkins Bundle (English) [ 166012 ]](https://assets1.tamsnetwork.com/images/EC042017NF/166012s.jpg "Beautiful Pumpkins Bundle (English) [ 166012 ]")
![Crumb Cake Classic Stampin' Pad [ 147116 ]](https://assets1.tamsnetwork.com/images/EC042017NF/147116s.jpg "Crumb Cake Classic Stampin' Pad [ 147116 ]")
![Calypso Coral Classic Stampin' Pad [ 147101 ]](https://assets1.tamsnetwork.com/images/EC042017NF/147101s.jpg "Calypso Coral Classic Stampin' Pad [ 147101 ]")
![Coastal Cabana Classic Stampin' Pad [ 147097 ]](https://assets1.tamsnetwork.com/images/EC042017NF/147097s.jpg "Coastal Cabana Classic Stampin' Pad [ 147097 ]")
![12 Days Of Crafting Advent Calendar (English) [ 167335 ]](https://assets1.tamsnetwork.com/images/EC042017NF/167335s.jpg "12 Days Of Crafting Advent Calendar (English) [ 167335 ]")
![Basics Wow! Embossing Powder [ 165679 ]](https://assets1.tamsnetwork.com/images/EC042017NF/165679s.jpg "Basics Wow! Embossing Powder [ 165679 ]")
![Low Profile Dots [ 164658 ]](https://assets1.tamsnetwork.com/images/EC042017NF/164658s.jpg "Low Profile Dots [ 164658 ]")
![Granny Apple Green 8-1/2" X 11" Cardstock [ 146990 ]](https://assets1.tamsnetwork.com/images/EC042017NF/146990s.jpg "Granny Apple Green 8-1/2\" X 11\" Cardstock [ 146990 ]")
![Splendid Autumn 6" X 6" (15.2 X 15.2 Cm) Designer Series Paper [ 164173 ]](https://assets1.tamsnetwork.com/images/EC042017NF/164173s.jpg "Splendid Autumn 6\" X 6\" (15.2 X 15.2 Cm) Designer Series Paper [ 164173 ]")
![Label Me Grateful Cling Stamp Set (English) [ 166108 ]](https://assets1.tamsnetwork.com/images/EC042017NF/166108s.jpg "Label Me Grateful Cling Stamp Set (English) [ 166108 ]")
![Traditional Labels Dies [ 165864 ]](https://assets1.tamsnetwork.com/images/EC042017NF/165864s.jpg "Traditional Labels Dies [ 165864 ]")
![Timid Tiger 3/8" (1 Cm) Faux Linen Ribbon [ 165275 ]](https://assets1.tamsnetwork.com/images/EC042017NF/165275s.jpg "Timid Tiger 3/8\" (1 Cm) Faux Linen Ribbon [ 165275 ]")
![Mossy Meadow & Gold 1/4" (6.4 Mm) [ 166158 ]](https://assets1.tamsnetwork.com/images/EC042017NF/166158s.jpg "Mossy Meadow & Gold 1/4\" (6.4 Mm) [ 166158 ]")
![2025–2027 In Color™ Flat Pearls [ 165192 ]](https://assets1.tamsnetwork.com/images/EC042017NF/165192s.jpg "2025–2027 In Color™ Flat Pearls [ 165192 ]")
![Shades Of Green Hexagons [ 165233 ]](https://assets1.tamsnetwork.com/images/EC042017NF/165233s.jpg "Shades Of Green Hexagons [ 165233 ]")

![Gathering Moments Dies [ 165979 ]](https://assets1.tamsnetwork.com/images/EC042017NF/165979s.jpg "Gathering Moments Dies [ 165979 ]")
![Simply Said Mix & Match Photopolymer Stamp Set (English) [ 163756 ]](https://assets1.tamsnetwork.com/images/EC042017NF/163756s.jpg "Simply Said Mix & Match Photopolymer Stamp Set (English) [ 163756 ]")
![Gold Twisted Thread [ 164603 ]](https://assets1.tamsnetwork.com/images/EC042017NF/164603s.jpg "Gold Twisted Thread [ 164603 ]")
![Peach Pie 8 1/2" X 11" Cardstock [ 163799 ]](https://assets1.tamsnetwork.com/images/EC042017NF/163799s.jpg "Peach Pie 8 1/2\" X 11\" Cardstock [ 163799 ]")
![Flirty Flamingo 8-1/2" X 11" Cardstock [ 141416 ]](https://assets1.tamsnetwork.com/images/EC042017NF/141416s.jpg "Flirty Flamingo 8-1/2\" X 11\" Cardstock [ 141416 ]")
![Pretty Peacock 8-1/2" X 11" Cardstock [ 150880 ]](https://assets1.tamsnetwork.com/images/EC042017NF/150880s.jpg "Pretty Peacock 8-1/2\" X 11\" Cardstock [ 150880 ]")
![Cloud Cover 8 1/2" X 11" Cardstock [ 165621 ]](https://assets1.tamsnetwork.com/images/EC042017NF/165621s.jpg "Cloud Cover 8 1/2\" X 11\" Cardstock [ 165621 ]")
![Daffodil Delight 8-1/2" X 11" Cardstock [ 119683 ]](https://assets1.tamsnetwork.com/images/EC042017NF/119683s.jpg "Daffodil Delight 8-1/2\" X 11\" Cardstock [ 119683 ]")
![Very Vanilla 8 1/2" X 11" Cardstock [ 166784 ]](https://assets1.tamsnetwork.com/images/EC042017NF/166784s.jpg "Very Vanilla 8 1/2\" X 11\" Cardstock [ 166784 ]")
![Everyday Skies 6" X 6" (15.2 X 15.2 Cm) Designer Series Paper [ 164622 ]](https://assets1.tamsnetwork.com/images/EC042017NF/164622s.jpg "Everyday Skies 6\" X 6\" (15.2 X 15.2 Cm) Designer Series Paper [ 164622 ]")
![Pastel Ombre Glimmer 12" X 12" (30.5 X 30.5 Cm) Specialty Paper [ 164851 ]](https://assets1.tamsnetwork.com/images/EC042017NF/164851s.jpg "Pastel Ombre Glimmer 12\" X 12\" (30.5 X 30.5 Cm) Specialty Paper [ 164851 ]")
![2024–2026 In Color™ Glimmer 12" X 12" (30.5 X 30.5 Cm) Specialty Paper [ 163771 ]](https://assets1.tamsnetwork.com/images/EC042017NF/163771s.jpg "2024–2026 In Color™ Glimmer 12\" X 12\" (30.5 X 30.5 Cm) Specialty Paper [ 163771 ]")
![Scenic Adventure Dies [ 165467 ]](https://assets1.tamsnetwork.com/images/EC042017NF/165467s.jpg "Scenic Adventure Dies [ 165467 ]")
![Light & Wonder Dies [ 165762 ]](https://assets1.tamsnetwork.com/images/EC042017NF/165762s.jpg "Light & Wonder Dies [ 165762 ]")
![Words For The Season Dies (English) [ 165797 ]](https://assets1.tamsnetwork.com/images/EC042017NF/165797s.jpg "Words For The Season Dies (English) [ 165797 ]")
![Beautiful Pumpkins Photopolymer Stamp Set (English) [ 166009 ]](https://assets1.tamsnetwork.com/images/EC042017NF/166009s.jpg "Beautiful Pumpkins Photopolymer Stamp Set (English) [ 166009 ]")
![Small Blending Brushes [ 160518 ]](https://assets1.tamsnetwork.com/images/EC042017NF/160518s.jpg "Small Blending Brushes [ 160518 ]")
![Clear Wink Of Stella Glitter Brush [ 141897 ]](https://assets1.tamsnetwork.com/images/EC042017NF/141897s.jpg "Clear Wink Of Stella Glitter Brush [ 141897 ]")
![Drusy Adhesive Backed Embellishments [ 164223 ]](https://assets1.tamsnetwork.com/images/EC042017NF/164223s.jpg "Drusy Adhesive Backed Embellishments [ 164223 ]")
![Flower Garden Foils 12" X 12" (30.5 X 30.5 Cm) Specialty Paper [ 165511 ]](https://assets1.tamsnetwork.com/images/EC042017NF/165511s.jpg "Flower Garden Foils 12\" X 12\" (30.5 X 30.5 Cm) Specialty Paper [ 165511 ]")
![Gathering Moments Cling Stamp Set (English) [ 165970 ]](https://assets1.tamsnetwork.com/images/EC042017NF/165970s.jpg "Gathering Moments Cling Stamp Set (English) [ 165970 ]")
![Perennial Postage Dies [ 162607 ]](https://assets1.tamsnetwork.com/images/EC042017NF/162607s.jpg "Perennial Postage Dies [ 162607 ]")
![Textured Notes Dies [ 165555 ]](https://assets1.tamsnetwork.com/images/EC042017NF/165555s.jpg "Textured Notes Dies [ 165555 ]")
![Stylish Shapes Dies [ 159183 ]](https://assets1.tamsnetwork.com/images/EC042017NF/159183s.jpg "Stylish Shapes Dies [ 159183 ]")
![Pretty In Pink Classic Stampin Pad [ 163807 ]](https://assets1.tamsnetwork.com/images/EC042017NF/163807s.jpg "Pretty In Pink Classic Stampin Pad [ 163807 ]")
![Lost Lagoon Classic Stampin' Pad [ 161678 ]](https://assets1.tamsnetwork.com/images/EC042017NF/161678s.jpg "Lost Lagoon Classic Stampin' Pad [ 161678 ]")
![Pretty Peacock Classic Stampin’ Pad [ 150083 ]](https://assets1.tamsnetwork.com/images/EC042017NF/150083s.jpg "Pretty Peacock Classic Stampin’ Pad [ 150083 ]")
![Petunia Pop 1/4" (6.4 Mm) Iridescent Ribbon [ 166203 ]](https://assets1.tamsnetwork.com/images/EC042017NF/166203s.jpg "Petunia Pop 1/4\" (6.4 Mm) Iridescent Ribbon [ 166203 ]")
![Two Tone Sparkle Gems [ 164633 ]](https://assets1.tamsnetwork.com/images/EC042017NF/164633s.jpg "Two Tone Sparkle Gems [ 164633 ]")
![Shaded Spruce 8-1/2" X 11" Cardstock [ 146981 ]](https://assets1.tamsnetwork.com/images/EC042017NF/146981s.jpg "Shaded Spruce 8-1/2\" X 11\" Cardstock [ 146981 ]")
![Elegant Pine Snowflakes 12" X 12" (30.5 X 30.5 Cm) Designer Series Paper [ 166066 ]](https://assets1.tamsnetwork.com/images/EC042017NF/166066s.jpg "Elegant Pine Snowflakes 12\" X 12\" (30.5 X 30.5 Cm) Designer Series Paper [ 166066 ]")
![Window Sheets [ 142314 ]](https://assets1.tamsnetwork.com/images/EC042017NF/142314s.jpg "Window Sheets [ 142314 ]")
![Delicate Pines Bundle (English) [ 166074 ]](https://assets1.tamsnetwork.com/images/EC042017NF/166074s.jpg "Delicate Pines Bundle (English) [ 166074 ]")
![Shaded Spruce Classic Stampin' Pad [ 147088 ]](https://assets1.tamsnetwork.com/images/EC042017NF/147088s.jpg "Shaded Spruce Classic Stampin' Pad [ 147088 ]")
![Traditional Sparkling Sequins [ 165875 ]](https://assets1.tamsnetwork.com/images/EC042017NF/165875s.jpg "Traditional Sparkling Sequins [ 165875 ]")
![Tear & Tape Adhesive [ 154031 ]](https://assets1.tamsnetwork.com/images/EC042017NF/154031s.jpg "Tear & Tape Adhesive [ 154031 ]")
![Snowy Delights Dies [ 165807 ]](https://assets1.tamsnetwork.com/images/EC042017NF/165807s.jpg "Snowy Delights Dies [ 165807 ]")
![Greetings For You Mix & Match Ephemera Pack (English) [ 166208 ]](https://assets1.tamsnetwork.com/images/EC042017NF/166208s.jpg "Greetings For You Mix & Match Ephemera Pack (English) [ 166208 ]")
![Gold & Silver 1/8" (3.2 Mm) Trim Combo Pack [ 161633 ]](https://assets1.tamsnetwork.com/images/EC042017NF/161633s.jpg "Gold & Silver 1/8\" (3.2 Mm) Trim Combo Pack [ 161633 ]")
![Shimmer Star Foam Stickers [ 166202 ]](https://assets1.tamsnetwork.com/images/EC042017NF/166202s.jpg "Shimmer Star Foam Stickers [ 166202 ]")
![Iridescent Faceted Gems [ 163368 ]](https://assets1.tamsnetwork.com/images/EC042017NF/163368s.jpg "Iridescent Faceted Gems [ 163368 ]")
![Mini Stampin' Dimensionals [ 144108 ]](https://assets1.tamsnetwork.com/images/EC042017NF/144108s.jpg "Mini Stampin' Dimensionals [ 144108 ]")
![Peaceful Garden 12" X 12" (30.5 X 30.5 Cm) Glimmer Paper [ 165929 ]](https://assets1.tamsnetwork.com/images/EC042017NF/165929s.jpg "Peaceful Garden 12\" X 12\" (30.5 X 30.5 Cm) Glimmer Paper [ 165929 ]")
![Winter Scenes Cling Stamp Set (English) [ 166088 ]](https://assets1.tamsnetwork.com/images/EC042017NF/166088s.jpg "Winter Scenes Cling Stamp Set (English) [ 166088 ]")
![Jet Black Stāzon Ink Pad [ 101406 ]](https://assets1.tamsnetwork.com/images/EC042017NF/101406s.jpg "Jet Black Stāzon Ink Pad [ 101406 ]")
![Old Olive Stampin' Blends Combo Pack [ 154892 ]](https://assets1.tamsnetwork.com/images/EC042017NF/154892s.jpg "Old Olive Stampin' Blends Combo Pack [ 154892 ]")
![Crumb Cake Stampin' Blends Combo Pack [ 154882 ]](https://assets1.tamsnetwork.com/images/EC042017NF/154882s.jpg "Crumb Cake Stampin' Blends Combo Pack [ 154882 ]")
![Pool Party Stampin' Blends Combo Pack [ 154894 ]](https://assets1.tamsnetwork.com/images/EC042017NF/154894s.jpg "Pool Party Stampin' Blends Combo Pack [ 154894 ]")
![Smoky Slate Stampin' Blends Combo Pack [ 154904 ]](https://assets1.tamsnetwork.com/images/EC042017NF/154904s.jpg "Smoky Slate Stampin' Blends Combo Pack [ 154904 ]")
![Cloud Cover Classic Stampin' Ink Refill [ 165279 ]](https://assets1.tamsnetwork.com/images/EC042017NF/165279s.jpg "Cloud Cover Classic Stampin' Ink Refill [ 165279 ]")
![Misty Moonlight Classic Stampin' Pad [ 153118 ]](https://assets1.tamsnetwork.com/images/EC042017NF/153118s.jpg "Misty Moonlight Classic Stampin' Pad [ 153118 ]")
![Everyday Arches Dies [ 164629 ]](https://assets1.tamsnetwork.com/images/EC042017NF/164629s.jpg "Everyday Arches Dies [ 164629 ]")
![Balmy Blue 1/2" (1.3 Cm) Sheer Ribbon [ 165767 ]](https://assets1.tamsnetwork.com/images/EC042017NF/165767s.jpg "Balmy Blue 1/2\" (1.3 Cm) Sheer Ribbon [ 165767 ]")
