Retiring

Country Love

Whew, we’ve made it to the weekend! I don’t know about you guys, but I really ride the struggle bus toward the end of the week. The week is go-go and my energy is no-no. And my crafty mojo just hasn’t been very cooperative lately. Anyone else?

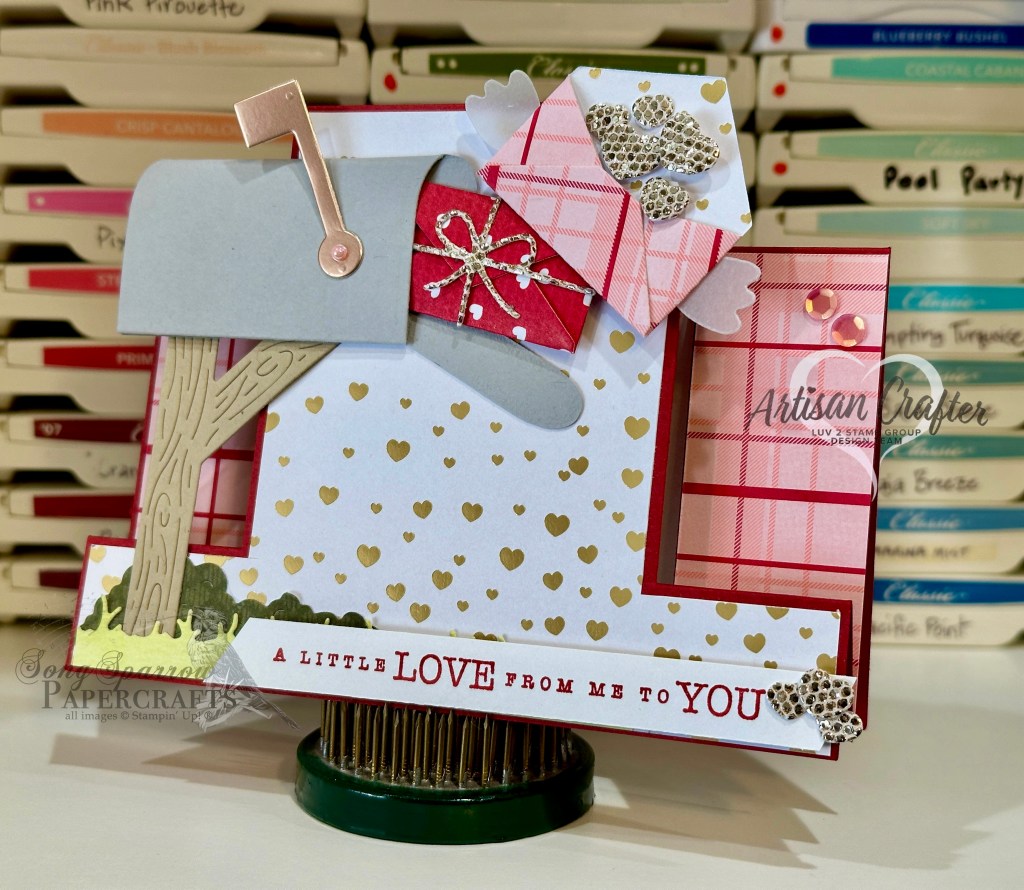
This week, we’re looking at some of my favorite sets that have made it to the Stampin’ Up! Last Chance list. If any of these happen to be your favorites, now is the time to add to cart before they’re gone for good! Today’s design uses a combination of my crafty favorites — Cute Crochet embossing folder, Country Flowers and Sending Love dies, and an already-retired sentiment called Heartfelt Hellos. I’ve seen so many cute designs that incorporate an envelope exploding with flowers and just knew I had to take a stab at it. Our color palette is inspired by two colors from a triad — with hues of turquoise and purple.

We get started with a neutral base of basic white cardstock. I embossed a quarter panel of Fresh Freesia with the Cute Crochet embossing folder and then diecut with the largest Perennial Postage die to serve as the backdrop for our main focal panel. I cut an envelope from white cardstock using the Sending Love dies and then foliage and flowers using the Country Flowers dies. The foliage is a combination of Old Olive cardstock and Season of Elegance papers and then the flowers are cut from a variety of glimmer papers, including pastel ombre, Summer Splash, and white. The florals are spilling out of the envelope with layers of dimensionals giving us our realistic-looking arrangement. A combination of gems give us our floral centers, including In Color, two tone sparkle, and purple shimmer gems and iridescent faceted gems. The sentiment from the retired Heartfelt Hellos set is stamped in Fresh Freesia on Pool Party cardstock and then cut with the Mixed Labels dies. I cut a second Mixed Label banner from Highland Heather glimmer paper, cut the banner in half, and then offset the pieces on either side to create a mat for the sentiment panel. I tied some Fresh Freesia seam binding ribbon around the embossed panel before adhering the other elements with dimensionals. A few purple sequins add an extra touch of sparkle and draw the eye to our sentiment.

I still have a few more of my retiring favorites to show you, so I hope you’ll pop back by over the weekend to see how we can use these sets!

Product List

Fun Folds · Holidays

Sending a Little Love

This week is all about honoring the Valentines in our life – be they friends, family, or significant others. Anyone whose special to you deserves a little handmade love from time to time. And today we’re pairing up some older Stampin’ Up! bundles with some of the newer papers to create this super cute spanner fun fold card design. We’re also going to be using the reverse stamp technique to flip an image. So let’s get to it.

We get started with a base of Fresh Freesia cardstock, which is cut to standard A2 size. We’re creating a fun fold today that is inspired by the Spanner Panel fold by fellow demo Jackie Bolhuis. To create the front spanner panel, the front panel of the card is cut from the bottom edge to the center score line on each side at the 1 1/4-inch mark, giving you a front panel that has 3 flaps – 1 1/4-inch, 3-inch, and 1 1/4-inch. The two smaller front flaps are covered with strips of the striped pattern from the Toadstool Gardens paper pack. The center flap is covered with a piece of the Everyday Skies paper, which is going to serve as the backdrop for our focal scene. We’ll cut a 3/4-inch strip of Fresh Freesia to span the front card panel and connect only the two smaller side panels, which are going to lift up separately from the center panel. This strip is going to serve as the structural base for our focal scene, so we’ll begin by covering it with grass. Our grass is cut from Old Olive and a piece of the Floral Delight paper using the Bright Skies long cloud edge die. This provides some nice rolling tufts of grass that don’t distract from our scene. These strips of grass are adhered to the strip of Fresh Freesia with dimensionals, layering one on top of the other to give depth. Using the Playing in the Rain dies, we’ll cut some tufts of grass from Shaded Spruce and Granny Apple Green cardstock and tuck them in, adhering with glue dots. The mailbox is diecut using the Sending Love dies. The post is cut from Blackberry Bliss, while the box is cut from Fresh Freesia glimmer paper and Fresh Freesia cardstock. The flag is Petal Pink for a pop of contrast. An industrial trinket serves as the screw that affixes the flag to our mailbox. A larger envelope is diecut from Beautiful Bokeh paper and closed with a heart sequin. Once assembled, we’ll tuck the mailbox into the grass and adhere to the far left panel with dimensionals, ensuring that we don’t have any overlap onto our center panel of clouds. Tuck the envelope inside the box an adhere with a dimensional or two inside the box.

Now for our main character. Turtle is from the Playing in the Rain stamp set, but when stamped as-is, he will be facing the wrong direction. To get our turtle facing toward the left, you’ll want to stamp the image onto your silicone mat and then carefully press your white cardstock on top to transfer the image onto the paper. Be sure that you’ve inked the stamp heavily to ensure that the image is dark enough once you’ve transferred from the silicone mat to paper. Next, I colored the turtle with a combination of Old Olive and Shaded Spruce Stampin’ Blends. I used a color lifter on the shell to lighten things up a bit and provide good contrast with the skin of turtle’s body. I cut him out with paper snips and then adhered to the grass with several layers of dimensionals for plenty of height. I stamped a smaller envelope from Sending Love on Beautiful Bokeh and cut out with the coordinating die.

The front sentiment is stamped in Blackberry Bliss using the Sending Love sentiment and then diecut with the Friends for Life banner using the extension method so that each end has matching shape. I adhered over the grass with dimensionals. We finish off the front with a selection of purple sequins. On the center panel, tucked discretely behind the mailbox, I stamped the small “sent with love” sentiment and added a few heart sequins around it. The inside panel of the card is left blank for a personalized message. The message panel is flanked with two strips of Beautiful Bokeh paper.

Isn’t this such a fun card?! I love creating scenes, and while we have some terrific products in the current mini catalog, Stampin’ Up! has some great go-tos in the main catalog that should get a little love, as well! Tune in tomorrow for Sketchy Fridays…with a twist!

Products used in today’s card:
Fresh Freesia, Old Olive, Granny Apple Green, Shaded Spruce, Blackberry Bliss, Petal Pink, Basic White cardstock
Everyday Skies, Floral Delight, Three Color glimmer, Toadstool Gardens, Beautiful Bokeh DSP
Playing in the Rain bundle
Sending Love bundle
Stampin’ Blends
Bright Skies, Friends for Life dies
Industrial Trinkets, purple sequins, heart sequins
Dimensionals
Adhesives

Product List
Christmas · Coming Soon

Sending Snowy Cheer

It’s that time of year where we’re all in holiday mode. Swiping all of the sale items off our lists to give to loved ones and friends. Taking the annual family photos. Carefully choosing the annual holiday cards.

Today, I’m sharing another holiday card from this year’s crafting stash. I have several versions of this particular design that I hope to try, but this is by far the simplest one, I think. And I just love the look of the new Soft Waves embossing folder that will release with the new catalog in January. Doesn’t it give the perfect look of snow drifts swirling swiftly across this scene?

We get started with a base of Real Red cardstock. The background panel is a quarter panel of Real Red that’s embossed with the new (not yet released) Soft Waves embossing folder and then lightly wiped with craft ink to give the look of swirling snow. To create the snowdrift in the front, I took a panel of white cardstock and tore it to create the perfectly soft and frayed-looking top edges. Our mailbox from Sending Love is stamped in black on white cardstock and colored with Stampin’ Blends. I cut with the coordinating die and then made the cuts even tighter with my paper snips. The wreath from the Sophisticated Sled stamp set is stamped in Shaded Spruce and Old Olive and then colored with Stampin’ Blends before I cut it out with the coordinating die. I also tightened up the edges around the wreath with paper snips to reduce the white space. I slit the wreath and then put it around the mailbox. Dimensionals help give it definition all around. The bow is cut using the Peaceful Evergreens dies and is cut from gold foil paper. Dimensionals help give the whole scene layers and dimension for all of the elements. I wrapped some red & white baker’s twine around the bottom of the focal panel and added the sentiment from the Joyful Sayings ephemera pack. Gold snowflakes and gold iridescent gems finish things off with just the right amount of sparkle.

Tomorrow, I hope you’ll pop in to see how I’ve updated our dinner table prayer for the season of Advent.

Product List
Coming Soon

Pocket Full of Love

We’re continuing with our sneak peeks of the upcoming Stampin’ Up! Online Exclusives release, which releases in just a week! This week, we’re pairing up the lovely Marbled Elegance designer series paper with other products in the Stampin’ Up! lineup.

Today, we’re combining a whole host of fun products from the current stash, including Sending Love, Perennial Postage, and Playing in the Rain just to name a few. So let’s see how we put this cutie together.

We get started with a Basic White cardstock base. Our background panel is the heart patterned sheet from the Marbled Elegance paper pack that is diecut using the Perennial Postage dies. Our focal panel background is a piece of vellum that is also diecut with the Perennial Postage dies. Our little envelope is made from Marbled Elegance paper and the Sending Love die set. Inside the envelope are stems of heart flowers. The floral stems are cut from Mossy Meadow using the Playing in the Rain dies, while the heart flowers are cut from white glimmer paper using the Sending Love dies. A few gold hearts finish the flower centers and add a pop of golden sparkle to compliment the gold foiling of the envelope and the twist of gold trim in the background. The sentiment from Country Flowers is stamped in black on white cardstock and then fussy cut with paper snips. The design is finished off with iridescent rhinestones basic jewels.

I’ll be taking a little break tomorrow due to my kiddo’s band concert but will be back Thursday morning with the Luv 2 Stamp Group Instahop. Hope you’ll drop in and check it out!

Products used in today’s card:
Basic White, Mossy Meadow cardstock
Marbled Elegance (coming soon), vellum, white glimmer DSP
Country Flowers stamps
Perennial Postage, Sending Love dies
Playing in the Rain dies
Gold trim
Gold hearts (coming soon), iridescent rhinestones basic jewels
Dimensionals
Adhesives

Product List
Luv 2 Stamp Artisan Design Team · Terrific Tuesdays

On the Wings of Love

Anyone happen to be a Harry Potter fan? I absolutely loved the books and have read the series multiple times. I also enjoy the movies since they’re such a great adaptation of the books, thanks to J.K. Rowling’s involvement in the films. And though it might be a little hard to see it at first, Harry Potter was the inspiration behind today’s card design with its flying envelopes, which are inspired by the infamous Howlers in the books. Remember the screamer Ron received after crashing his dad’s car into the Womping Willow? I can still hear it!

This card design sits atop a piece of Berry Burst cardstock. The mat for the main focal images is a sheet of Lighter than Air designer series paper. I really loved the bright and cheery color combo and pattern of this particular sheet and felt it gave the perfect backdrop for this card theme. Each of the envelopes is cut from a piece of Delightfully Eclectic and Bright & Beautiful designer paper. Each of these designer series paper patterns plays off one another and pops beautifully from the busy pattern of the background mat, don’t you think? Each set of vellum wings is diecut using the flower in the Bright Skies dies. 

Two of the envelopes are winging their way to their recipients while the one in the middle is so full of love that it simply burst at the seams and all of that love has come floating out. The hearts are diecut from Berry Burst cardstock using the Sending Love hearts dies. And don’t you just love the escaping heart fluttering away up in the upper corner?! The sentiment is stamped in Melon Mambo ink on vellum that has been punched using the Heartfelt Hexagon punch. By placing the sentiment on vellum it allows it to appear as though it’s floating in the scene — perfect for flying envelopes, don’t you think? I really love how the tinsel gems draw the eye diagonally across the card.

Looking for some simple ways to create fun cards with the Sending Love bundle? Check out this week’s Terrific Tuesdays episode for 3 simple designs.

Products used in today’s design:
Berry Burst, vellum cardstock
Lighter than Air, Delightfully Eclectic DSP
Sending Love, Bright Skies dies
Tinsel gems
Dimensionals
Adhesives

All ads on this site are posted by WordPress.  Song Sparrow Papercrafts is not responsible for ad content.

Terrific Tuesdays

Special Delivery

I have been having so much fun this week exploring all of the fun ways that the Sending Love bundle can turn out cute cards. Simply changing a product pairing can give a totally different look and feel to this versatile stamp and die bundle. 

Today, we’re pairing Sending Love with Trucking Along and Lighter Than Air for this card. The Trucking along bundle, like Sending Love, is perfect for building scenes. I love the cheerful paper in the Lighter Than Air designer series paper pack and felt it would be perfect for making a light and bright scene of a sunny day delivery.

This card is built on a base of Pool Party cardstock. The center focal panel is matted with Coastal Cabana to draw the eye and allow the variety of colors to pop. I stamped the truck in Lost Lagoon and Pool Party and loaded the back with envelopes stamped and diecut with the Sending Love bundle. I pulled a variety of colors for the envelopes for a bit of interest and to punch up the fun. To give a sense of movement, I let the Lost Lagoon envelope spill from the back of the truck. The truck is able to stand out in this busy scene by placing it on doubled dimensionals. I wanted to keep the front sentiment simple and understated, so I stamped it on a diecut vellum banner and used rainbow dots to add punches of coordinating color to tie everything together.

Looking for more inspiration using the Sending Love stamps and dies? Check out this week’s Terrific Tuesdays episode for some quick and simple designs.

Products used in today’s featured design:
Pool Party, Coastal Cabana, Basic White, Granny Apple Green, Calypso Coral, Fresh Freesia, Melon Mambo, Blackberry Bliss, Lost Lagoon cardstock
Vellum
Lighter Than Air DSP
Sending Love, Trucking Along stamps
Sending Love, Trucking Along, Zany Zoo dies
Ribbon duo
Tinsel gems
Rainbow dots
Dimensionals
Adhesives

All ads on this site are posted by WordPress.  Song Sparrow Papercrafts is not responsible for ad content.

Terrific Tuesdays

Sending Ewe Love

Are you having as much fun with the Sending Love bundle as I am? This stamp and die set is so very versatile — it can stand on its own or pair beautifully with other products. Here, I’ve borrowed an adorable character from the Zoo Crew designer series paper pack to complete this cute card.

I liked the idea of playing off the postage theme, and so I incorporated the Perennial Postage dies for adding interest to the edges of my focal panel pieces. This card begins with a piece of Pretty Peacock cardstock. While a standard size, I chose to use the portrait orientation with the score mark at the top. The two-layer focal panel consists of a Lost Lagoon mat and linen pattern from the Softly Stippled designer series paper pack in the current Sale-a-Bration catalog. The mailbox and envelope are each stamped in black ink on white cardstock and then colored the mailbox with Stampin’ Blends before diecutting with the coordinating Sending Love dies. I cut the cute little lamb from a sheet of Zoo Crew designer paper and filled in a few places with Stampin’ Blends. To build the scene, I cut a strip of grass from a piece of Inked Botanicals designer paper and then a few shrubs from Lost Lagoon. Adding dimensionals behind the strip of grass gives depth to the scene. The mailbox and grass are both in the forefront of the scene. I added a few flowers diecut from Highland Heather using the Painted Lavender dies. I used a few leftover hearts from another one of this week’s cards to finish off the LOVE theme for this cute design. Don’t you just love it?!

Check out this week’s Terrific Tuesdays video for even more inspiration using the Sending Love stamps and dies.

Products used in today’s featured design:
Pretty Peacock, Lost Lagoon, Highland Heather, Melon Mambo, Basic White cardstock
Softly Stippled, Inked Botanicals, golf foil DSP
Sending Love stamps
Sending Love, Perennial Postage, Painted Lavender dies
Opaque faceted gems
Rainbow dots
Pool Party & silver twine (retired)
Stampin’ Blends
Dimensionals
Adhesives

All ads on this site are posted by WordPress.  Song Sparrow Papercrafts is not responsible for ad content.

Terrific Tuesdays

Send a Little Love

This week’s posts are all about Sending Love. The Sending Love bundle by Stampin’ Up! includes a set of cling stamps and coordinating dies. This set makes terrific cards for friends and loved ones when you want to say you love them or miss them or are thinking of them. I love this bundle because it can easily be paired with other products to make super cute cards, just like this one.

For today’s card, I paired the Sending Love bundle with the Zoo Crew designer series paper. I love the entire Zany Zoo bundle, which includes stamps and dies, and am always looking for ways to bring these super cute characters into fun and playful designs. I just started layering up some of my favorite characters and that’s how this adorable card came to be.

I decided to lean into the love theme for this card, which is built on a base of Fresh Freesia. I kept the peek-through portion of the base very small because I wanted to darker shades to shine through a bit more to keep things more neutral on the recipient end of things. The image panel is matted with a combination of Melon Mambo and Blackberry Bliss and a fun pop of Pool Party in the center with the crinkle ribbon. The cute images cut from the Zoo Crew designer paper are riding on a base of white cardstock. And all but one character is on their merry way to deliver their little love notes, which have been stamped and diecut using our featured bundle. I chose to have the little rabbit in the center as the usher of the sentiment. Don’t you think it’s fitting that the smallest character brings in the “little” sentiment? *wink-wink* Since love is definitely on everyone’s mind, you can literally see it in the air with all of the diecut hearts floating about.

Check out this week’s Terrific Tuesdays video for even more inspiration using the Sending Love stamps and dies.

Products used in today’s featured design:
Fresh Freesia, Melon Mambo, Blackberry Bliss, Basic White cardstock
Zoo Crew, Gold foil, Melon Mambo soft shimmer DSP
Sending Love stamps
Sending Love, Zoo Crew dies
Pool Party crinkle ribbon
Stampin’ Blends
Dimensionals
Adhesives

All ads on this site are posted by WordPress.  Song Sparrow Papercrafts is not responsible for ad content.

Luv 2 Stamp Artisan Design Team · Terrific Tuesdays

Love From Me to You

Do you ever see a stamp set and have your idea wheels immediately start turning? That’s precisely what happened to me as soon as I saw the Sending Love bundle in the January mini catalog. One of the things that I look for in a set is versatility. And while this bundle certainly lends itself easily to Valentine cards, there are a whole host of other occasions for which you can put this bundle to work. And I can’t wait for you to see all of the cute designs I’ve been able to create with this bundle!

Today’s card design revisits a favorite fun fold that I recently learned from fellow team member Patti Dolan. The Center Step fun fold is just so versatile that I find myself circling back to it often right now. I mean, look at how perfectly it shows off the Sending Love mailbox die!

So this card is built on a base of Real Red cardstock. I pulled out my Sale-a-Bration Most Adored designer series paper pack for the perfect combination of patterns for the center and side panels. I love that you have the choice between foiled and patterned designs and, while the pack also lends itself easily to Valentines, the patterns can be used for so many different occasions. I built the mailbox scene using the Sending Love dies and cardstock. These dies make it so easy to build a detailed scene in no time flat. I decided on a more traditional look for the mailbox so that the eye would be drawn to the mail bursting from the mailbox. And I especially love the one taking flight with the hearts gushing out. I used the flower die from the Bright Skies die set to make the vellum wings. Doesn’t that envelope just remind you of that being-in-love feeling?

Want to see other design ideas using the Sending Love bundle? Check out this week’s Terrific Tuesdays episode for more inspiration!

Products used in this design:
Real Red, Smoky Slate, Crumb Cake, Basic White, vellum cardstock
Most Adored, One Horse Open Sleigh, Bright & Beautiful, More Dazzle, Rose Gold DSP
Sending Love stamps
Sending Love, Bright Skies dies
Blooming Pearls
Sequins trio
Dimensionals
Adhesives

All ads on this site are posted by WordPress.  Song Sparrow Papercrafts is not responsible for ad content.

Terrific Tuesdays

You’ve Got (Love) Mail

This week we’ll be exploring all of the fun ways that you can use the Sending Love bundle from Stampin’ Up! to make adorable cards. What I like most about this stamp and die bundle is that there are so many different ways you can it to create fun projects — whether it’s stamps and dies, just stamps, or just dies. And there are some terrific pairing possibilities with other cute Stampin’ Up bundles. So join me this week as we take a look at just a few ways that you’ll be able to use the Sending Love bundle in your craft room.

Today’s card is a nod to one of my favorite times of the day — mail time! I don’t know why, but I’ve always had a thing for knowing what’s in the mailbox. Now that I’m at home full-time, I typically hear the mailman running the route on our street and can go to the box fairly quickly after the mail has been delivered. And, naturally, I love it when there’s some special mail in the box. Do you like getting snail mail from friends or family?

Today’s card is built on a base of Pretty Peacock cardstock. A mat of Lost Lagoon serves as the base for the focal panel of this design. I began by cutting a piece of white cardstock with the Perennial Postage die and then cutting out the window using the largest rectangle in the Everyday Essentials die set. I love how these diecut two shapes work together with the theme of receiving some love in the mail. Don’t you think this panel kind-of resembles a stamp? To complete the look of the window pane, I diecut the curtains from Pool Party using the Zany Zoo dies and adhered them to the window panel to make it easier to determine placement of my stamped elements inside the window pane.

The focal panel is stamped on the inside rectangle that was cut from the white cardstock when the Everyday Essentials rectangle cut the window pane. Once proper placement of the scene was determined, I set to work stamping the mailbox using the Sending Love stamp set and used Stampin’ Blends to color the mailbox. A row of hedges was diecut from One Horse Open Sleigh designer series paper using the Sending Love die and then layered using adhesive and dimensionals. The heart is diecut from Melon Mambo using the Sending Love die and then colored using Wink of Stella for a little extra sparkle. The sentiment is stamped in Melon Mambo on white cardstock using the Sending Love stamps and then mounted on a mat of vellum that has been diecut using the Everyday Essentials dies.

To me, this is just like peeking out the window at the mailbox. Don’t you think?

Looking for some simpler ways to use the Sending Love bundle? Check out yesterday’s episode of Terrific Tuesdays for some great inspiration!

Products used in today’s featured design:
Pretty Peacock, Lost Lagoon, Pool Party, Melon Mambo, Basic White, vellum cardstock
One Horse Open Sleigh DSP
Sending Love stamps
Sending Love, Perennial Postage, Everyday Essentials, Zany Zoo dies
Iridescent discs
Stampin’ Blends
Dimensionals
Adhesives

All ads on this site are posted by WordPress.  Song Sparrow Papercrafts is not responsible for ad content.