Fun Folds · Sketchy Fridays

Sketchy Fridays: I Love You

Here we are again – back to Friday! What do you have on the weekend agenda? I’m hoping to finish everything from last weekend’s to-do list myself. We got about halfway through our storage unit transfer. One wouldn’t think it would take all that long to move junk across town, but even with 2 people and 2 carts, each trip was almost an hour! The plan is to finish up this weekend. Now whether that leaves me time to get to all of the other things on my to-do list…well, that remains to be seen! Haha!

But how about we get to our task at hand – Sketchy Fridays! For those of you who are new here, Sketchy Fridays is a weekly series where we’re using a card sketch to design our featured card. Right now, we’re working through a full series of designs using the card sketches found in current Stampin’ Up! catalogs.

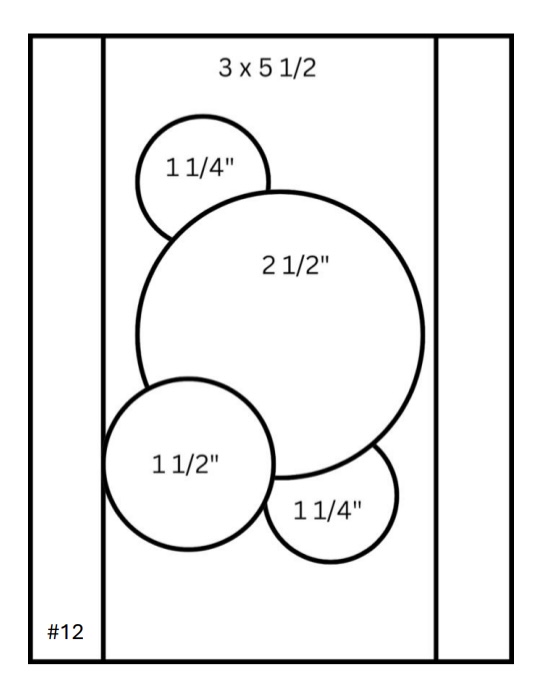
This week’s card is based on a card sketch I drew up of a card from the Stampin’ Up! Sale-a-Bration Catalog. Today, we’re pairing up the Season of Elegance and Marbled Elegance papers with several die sets to create this lovely Valentine design.

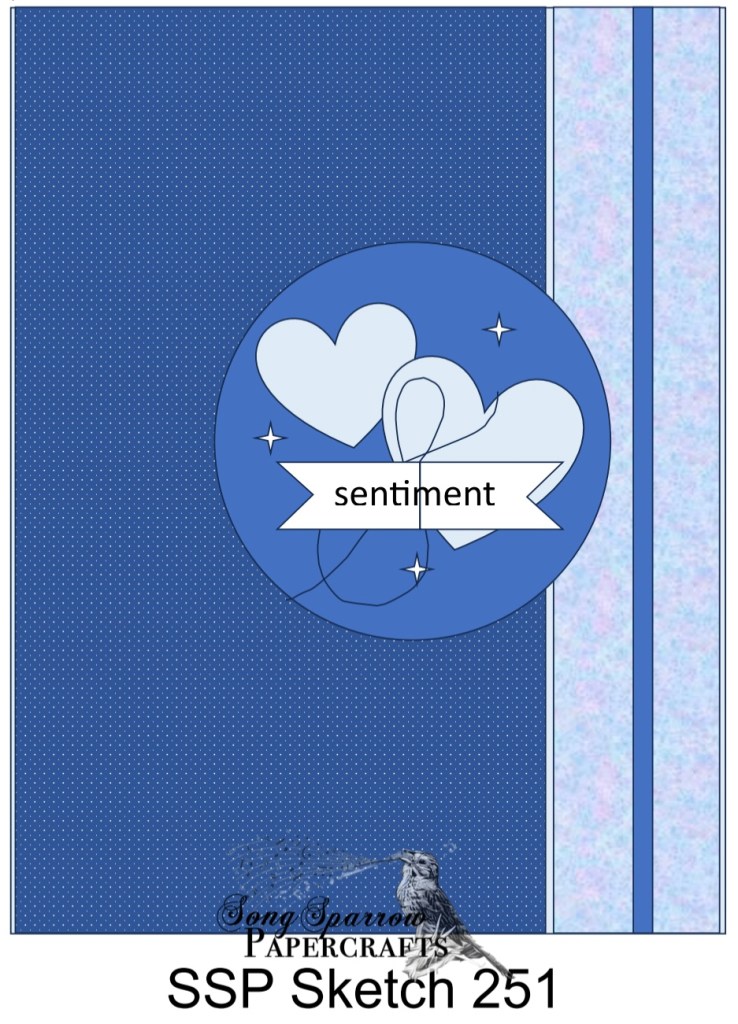
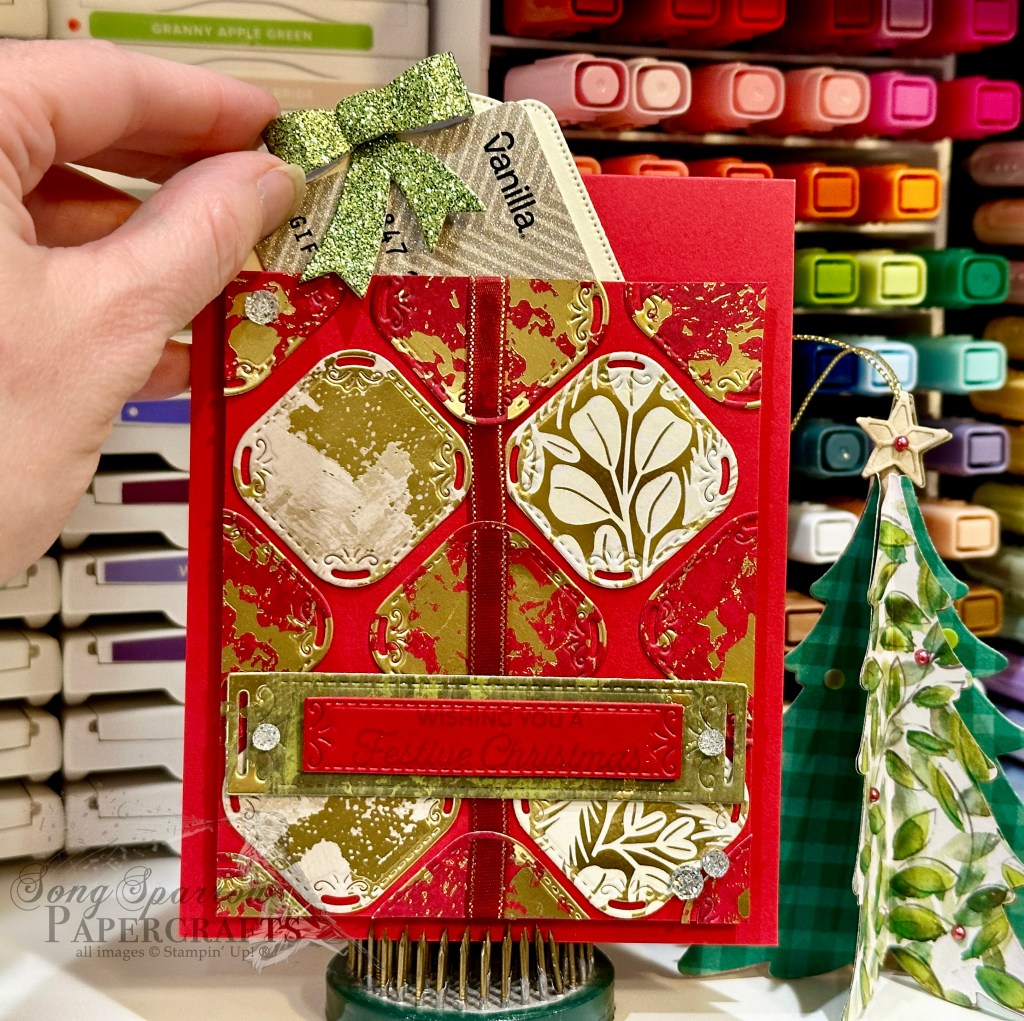
We get started with a base of Real Red cardstock. Today’s card is a peek-through fun fold design, where we’re removing 1 1/4-inches from the card front to create a small peek-through strip to the inside card panel. Our front flap is covered with a sheet of the red Season of Elegance foiled paper. The inside message panel is simply a sheet of white paper. The peek-through section is a strip of the Marbled Elegance paper, which is covered with a strip of Cherry Cobbler & gold ribbon that is tied in a bow in the center. Our front focal panel base is piece of foiled paper from the Nature’s Sweetness paper pack that is diecut with the Spotlight on Nature dies. It’s adhered to the front panel with dimensionals. Our hearts are cut from a piece red floral patterned paper from the Regal Winter pack and is diecut with the Hot Air Balloon dies. They’re adhered to the panel with dimensionals. The sentiment from Saying Hey is stamped on white cardstock and diecut with the Nested Essentials banner die using the extension method. I used an extra layer of dimensionals behind the sentiment to ensure that it stood proud over the hearts. Some gold thread and drusy embellishments finish things off with a touch of sparkle.

Tomorrow we’re going to be closing out our Valentines series in the air. I hope you’ll come take flight with me!

Products used in today’s card:
Real Red, Basic White cardstock
Season of Elegance, Marbled Elegance, Nature’s Sweetness, Regal Winter DSP
Saying Hey stamps
Spotlight on Nature, Hot Air Balloon, Nested Essentials dies
Gold thread, Cherry Cobbler & gold satin ribbon
Drusy embellishments
Dimensionals
Adhesives

Product List
Christmas · Holiday Mini Catalog · Holidays

Bright & Beautiful Greenery

Welcome to a brand new week and the start of FALL! Have I mentioned that fall is my absolute favorite season? Unfortunately, Texas isn’t being very cooperative with me right now, and it doesn’t feel a bit like fall. Not one bit!! In fact, it’s still feeling like we’ve been thrown into the deep end of the frying pan. But we’re only a couple of good cold fronts away from fall officially being here to stay! *wink-wink*

This week, we’re going to be spending time with the Season of Green & Gold suite of products by Stampin’ Up! And we’re going to mix it up with some obvious holiday designs and some out-of-the-box fall designs. Today’s card is solidly in the holiday mood.

We get started with a base of Shaded Spruce cardstock. Our focal panel is a sheet of white cardstock that has been diecut using the Dotted Circles embossing folder and then the panel is matted with gold mercury vellum. Using the Golden Greenery dies, we cut a variety of greenery from the Season of Green & Gold patterned paper with coordinating shapes. These are then layered on the focal panel using dimensionals to create several different visual planes. Our sentiment from Peaceful Season is stamped white cardstock in Versamark and then heat embossed with gold embossing powder. We cut it out with the smallest circle from the Everyday Details die set. This is then mounted on a circle of white glimmer paper cut using the Spotlight on Nature dies and adhered over a twist of Cherry Cobbler & Gold satin ribbon in the center of our greenery. A few iridescent faceted gems finish things off with a nice sparkle.

Tune in tomorrow as we keep things in the holiday zone.

Products used in today’s card:
Shaded Spruce, Basic White cardstock
White glimmer, gold mercury vellum, Season of Green & Gold DSP
Dotted Circles embossing folder
Golden Greenery, Spotlight on Nature, Everyday Details dies
Peaceful Season stamps
Versamark
Gold embossing powder
Cherry Cobbler & gold satin ribbon
Iridescent faceted gems
Dimensionals
Adhesives

Product List
Christmas · Holiday Mini Catalog · Holidays

Festive Christmas Gift

Do you ever include a gift with a Christmas card? Do you ever find yourself looking for cute and/or creative ways to include the gift? Today, we’re looking at a fun way to include a gift card with this year’s Christmas card to friends or relatives. This card is literally a gift that keeps giving!

For our special gift card, we’re pairing some of the beautiful new patterned paper packs with the dies from the Season of Elegance Suite included in the new Stampin’ Up! Holiday Mini catalog. So let’s take a closer look at how this all comes together.

We get started with a base of Real Red cardstock. Our focal gift panel also starts with a base of Real Red that is cut down to leave enough room at the top for our decorative gift card insert. Using the smaller square from the Peaceful Season dies, we cut squares from two sheets of the Season of Elegance paper and one sheet of the Season of Green & Gold paper pack. I alternated the red and cream-colored rows and tried to ensure the center squares lined up so that the Cherry Cobbler & Gold ribbon element ran cleanly from top to bottom. Our sentiment from the Trucking Along stamp set is stamped tone-on-tone on Real Red cardstock and then diecut using the Peaceful Season die, which is matted with the larger rectangle banner from the same die set. The sentiment panel is adhered at the bottom of our package focal panel using dimensionals. I added Drusy embellishments to the panel for added sparkle and to ensure the eye moves to the sentiment. We adhere our full focal panel to the card front using foam strips on three sides to create a pocket behind the panel.

Our gift card holder is a piece of Very Vanilla cardstock that is diecut with the largest tag in the Greetings of the Season die set. We create the bow for the top by cutting Garden Green Festive glimmer paper with the Peaceful Evergreens dies. The bow is assembled with glue dots and then adhered to the top of our tag with dimensionals. You can lightly hold a gift card in place by placing a few glue dots on the back and then placing it on the tag. Tuck it into the pocket and you have an instant gift in more ways than one!

I really love how this turned out and can’t wait to use this design this year. It’s always fun to be able to present a gift card in a fun and creative way and with a lengthier note.

Tune in tomorrow for a new Sketchy Fridays card design and see what our snowman is getting up to!

Products used in today’s card:
Real Red, Very Vanilla cardstock
Season of Elegance, Season of Green & Gold, Festive glimmer DSP
Trucking Along stamps
Peaceful Season, Peaceful Evergreens, Greetings of the Season dies
Cherry Cobbler & gold metallic ribbon
Drusy embellishments
Foam strips
Dimensionals
Adhesives

Product List
Coming Soon · Holiday Mini Catalog · Sketchy Fridays

Sketchy Fridays: Cheer All Year

This week has come and gone in a flash! We’ve survived the first full week of school and are starting to feel like we’re getting back into the school year rhythm. Definitely looking forward to the weekend and having some down time!

And speaking of Fridays, it’s time for another installment of Sketchy Fridays, where each week we’ll be using a card sketch to design our featured card. Right now, we’re working through a full series of designs using the card sketches found on page 22 of the current Stampin’ Up! Annual Catalog.

This week’s card is based on Sketch #12 and features several products from the new Stampin’ Up! Holiday Mini catalog that launches on September 6th.

We get started on our card today with a base of Cherry Cobbler cardstock. Our background panel consists of a mat of Festive Glimmer paper and a sheet of the gorgeous new Season of Elegance patterned paper. Our focal images are diecut from Cherry Cobbler using the Peaceful Season dies. On our larger square, I’ve heat embossed the sentiment from Peaceful Season in gold. The word Christmas is diecut from Festive Glimmer Paper and Gold Foil using the Peaceful Season dies and then adhered with dimensionals. Our larger square is adhered with dimensionals to ensure the sentiment is front and center. A twist of gold trim and some drusy embellishments draw extra attention to our sentiment. I added a few earth tones shimmer gems around the cluster of focal images to help the eye pass across the design.

One of the fun things about sketches is remembering that they’re a starting point for your design. You can stick to the spirit of the sketch without compromising on an idea for using something a little different. Take, for example, the circles in the sketch. For this card, I wanted to showcase the new Peaceful Season dies, which does not have any circles, but look how beautifully the rounded squares work here in this layout. Dare to color outside the lines the next time you’re using a sketch. You’ll be glad you did!

Tomorrow, we’ll be in the evergreens. I hope you’ll pop by and check it out!

Products used in today’s card:
Cherry Cobbler cardstock
Festive Shimmer (coming soon!), Season of Elegance (coming soon!), gold foil DSP
Peaceful Season stamps & dies
Gold embossing powder
Drusy embellishments, earth tones shimmer gems (both coming soon!)
Gold trim
Dimensionals
Adhesives