Fun Folds

Pop-Up Smile

Happy Monday, everyone! We’re on the downward slope for the month of June and summer is just cranking up. Thus far, we haven’t had any unusually hot days here in North Texas just yet, but the temps are definitely starting to creep up and the rain is becoming less frequent.

This week, we’re beginning a new design series — 3D projects. And today we get started with a fun fold card called a Z-fold pop-up card. This is a card design that I’ve had hanging out in my “want to make it” pile for quite a while and I thought there was no time like the present to give it a whirl! We’re combining the Lovely Garden patterned papers with the Beautiful Butterflies dies to create this fun garden scene.

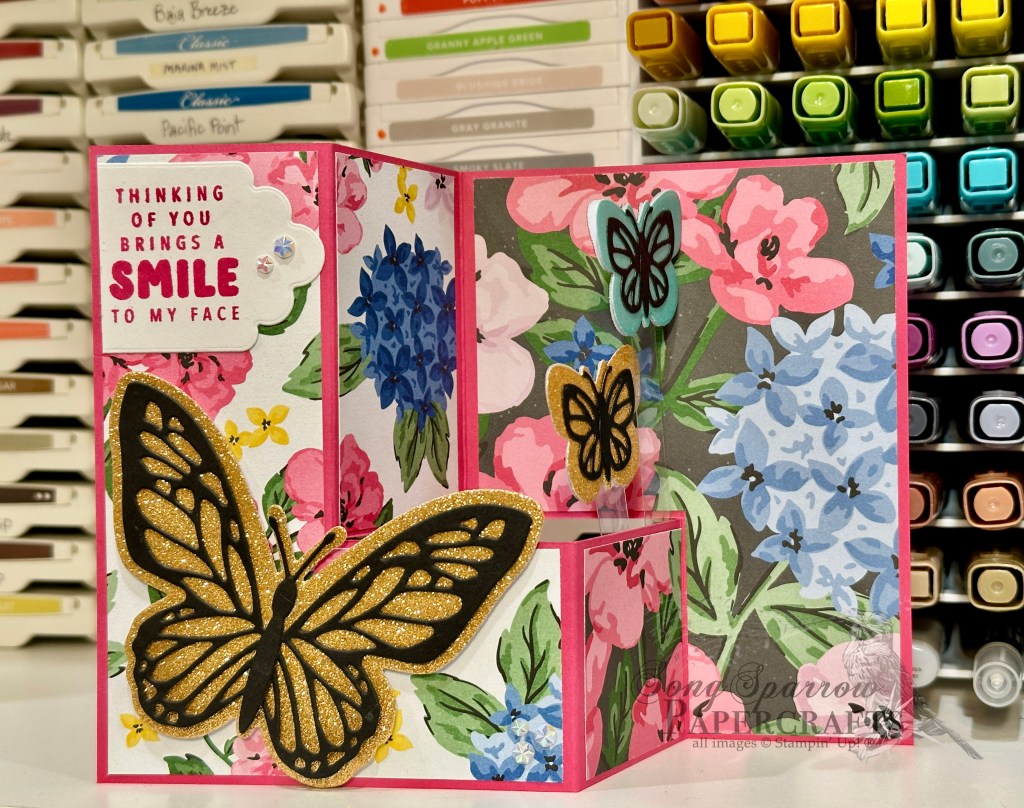
As you might expect, this garden scene is full of bright, vibrant color. And we get started with a base of Melon Mambo cardstock. This is a standard A2 card base that is scored in the center as you would with any standard A2 card. To create the Z-fold pop-up base though, we add a slit and a few extra score lines to give us the dynamic portion of our design.

I chose two coordinating floral patterns from the Lovely Garden paper pack. I really like the contrast between the white and dark backgrounds. Each panel is a quarter sheet that is cut to cover each side of the card panel, including the small panels of the dynamic folding portion in the center.

Our butterflies are the real stars of the show here and the perfect opportunity to add not only beautiful pops of color, but the lovely pops of sparkle to really draw the eye in. I pulled out my collection of glimmer papers, including the pastel ombré and In Color packs, along with the (now retired) three color pack. I cut the larger butterfly background pieces in both sizes from the glimmer papers and then all of the detail pieces are cut from black cardstock. Each of the small butterflies is two-sided with a small strip of acetate window sheet in between, which is what allows them to look as tho they’re fluttering in the flower garden.

We’re keeping the sentiment panel very simple by cutting it from white cardstock using the smallest Something Fancy scalloped tag die and then cutting it to fit at the top of the front panel. The sentiment from Pattern of Friendship is stamped on the tag in Melon Mambo. And we finish things off with some iridescent faceted gems.

And here’s the Z-panel pop-up card in action. What do you think — does it look as though the butterflies are fluttering in the garden?

Wanna give a pop-up card a try? You can download the tutorial for today’s card here.

Product List
Sentiments

Joy and Laughter

This week, our designs have the sentiment taking center stage. We’re going to be working with sentiments of all shapes and sizes to keep things interesting and to show how even a small sentiment can be eye-catching. Today, we’re using both ribbon and dimension to bring the eye to our intended focal point. We’re combining a medium-sized sentiment from the Pattern of Friendship stamp set and a very busy piece of patterned paper from the Perennial Lavender paper pack to create this fun friendship card.

We get started with a base of Crumb Cake cardstock. I wanted to keep this design super simple, so we’re combining two major elements – patterned paper and a sentiment. The Perennial Lavender sheet is cut to leave a very small border around all sides of the focal panel. I tied a strip of Fresh Freesia velvet ribbon around the front panel, which will help draw the eye to the sentiment panel we will mount on top. The sentiment panel is cut from Fresh Freesia cardstock with the Sentimental Framing dies using the extension method to ensure that the panel is long enough to fit the full sentiment. The sentiment is stamped onto the panel in Fresh Freesia and Versamark and then heat embossed with clear embossing powder. The panel is mounted over the velvet ribbon on the right. I colored the butterfly with Wink of Stella and added purple shimmer gems to add shimmer and draw the eye up to the sentiment panel.

Tomorrow we’re going to use a fun fold to make our sentiment the feature statement (pun intended) of the design. I hope you’ll drop by and check it out!

Product List
Coming Soon · Sketchy Fridays

Sketchy Fridays: Smile!

This week, we’re getting some sneaky peeks at some of the brand new product that will be launching next week. And today we’re making another trip to the garden as we combine some new products with a sketch for Sketchy Fridays.

For those of you who are new here, Sketchy Fridays is a weekly series where we’re using a card sketch to design our featured card. Right now, we’re working through a full series of designs using the card sketches found in current Stampin’ Up! catalogs.

This week’s card is based on Sketch #3 from the Stampin’ Up! Annual Catalog. Today’s design features the Florals in Bloom suite that will release next week. This week, I’m staying pretty true to the sketch. I simply flipped the side where the focal panel is affixed.

We get started with a base of Blackberry Bliss cardstock. I used the Pattern of Friendship die on the front panel to add a little texture in the background. Our background panels are a combination of Florals in Bloom and Petunia Pop glimmer paper, and these are all adhered directly to the card front. I tied a piece of Fresh Freesia velvet ribbon around the card front before placing the focal panel. The focal panel base is a white circle cut using the Spotlight on Nature dies. Using the Pretty Florals dies, I cut some flowers from the Florals in Bloom paper and then affixed them to the circle using a combination of dimensionals and glue dots. The sentiment panel is cut from vellum using the Something Fancy dies. The sentiment from Sweet Blooms is stamped in Blackberry Bliss ink and then heat embossed with clear embossing powder before being adhered to the focal panel with glue dots. We finish things off with two tone sparkle gems across the card front.

Tomorrow we’re going to have our sentiments take center stage. I hope you’ll drop by and check it out.

Products used in today’s card:
Blackberry Bliss, Basic White cardstock
Florals in Bloom (coming soon), In Color glimmer, vellum DSP
Sweet Blooms stamps (coming soon)
Pretty Florals (coming soon), Spotlight on Nature, Something Fancy, Pattern of Friendship dies
Clear embossing powder
Fresh Freesia velvet ribbon
Two tone sparkle gems
Dimensionals

Online Exclusives · Pattern of Friendship

Joy & Laughter

TGIF, everybody! We’ve made it to the end of the week. And it’s certainly been a busy one. Finishing up the work week and packing for a trip is no small task, and that completely put me off schedule yesterday. But in between packing and cleaning today in preparation for our family spring break trip, I squeezed in a little time to make this cutie.

This week, we’ve been exploring all of the cute ways that we can use the new Pattern of Friendship bundle from Stampin’ Up! And today, we’re pairing it up with the Bright Skies and Playing in the Rain dies to make this chipper scene. I also tried a new stamp technique to create an ombré effect with the sentiment and I’m pretty pleased with how it turned out!

This design starts with a base of white cardstock. I love how it makes the scene really pop. The scene is built on a base of Balmy Blue cardstock. I wanted the grassy hills to look like they were freshly mowed and so I began by using the Pattern of Friendship die to make the mower lines in the Lemon Lime Twist panel before cutting the hills using the Bright Skies long cloud die. I already had the flowers cut from a previous project — they’re a combination of Mossy Meadow and Pretty in Pink. I adhered the grass and flowers with dimensionals and create depth with different heights. I added a few clouds to the sky that are cut from Graceful Greenery vellum with the Bright Skies dies. The sentiment is stamped in between in Misty Moonlight that is stamped off using different pressure across the stamp to create an ombré look to the stamped sentiment. I finished things off by cutting a butterfly from the pastel ombré glimmer paper using the Playing in the Rain dies and added two tone sparkle gems to the wings to give some definition to the butterfly. A few starburst sequins finish things off with a little detailed sparkle.

I’ll be taking tomorrow off to enjoy some time with the family. I hope you all have a fantastic weekend! I’ll be popping in on Monday to bring you a perfectly festive design. ☘️ I hope you’ll check it out!

Products used in today’s card:
Basic White, Balmy Blue, Lemon Lime Twist, Mossy Meadow, Pretty in Pink cardstock
Graceful Greenery vellum, pastel ombré glimmer paper
Pattern of Friendship bundle
Bright Skies, Playing in the Rain dies
Two tone sparkle gems, starburst sequins
Dimensionals

Online Exclusives · Pattern of Friendship

Let’s Keep in Touch

We’re already halfway through this week, folks! My fellow demos are off to North Carolina for the annual Stampin’ Up! convention. And I’m here at home prepping for a little spring break adventure with the fam in just a few days. Needless to say, I’m actually a little sad that this week is halfway gone!

This week, our designs feature the new Online Exclusive bundle called Pattern of Friendship. I’ve had a lot of fun coming up with different ways to use this fun set. Today we’re pairing it up with the Hot Air Balloon dies and Everyday Skies paper. See if you can spot where the fun texture die comes into play.

We get started with a base of white cardstock. I chose white to provide contrast with the focal panel. Our focal panel starts with a piece of Petal Pink glimmer paper that is diecut with the Textured Notes dies. This serves as the eye-catching mat for our focal sheet of Everyday Skies patterned paper that is diecut with the Perennial Postage dies. I cut two hot air balloons with the Hot Air Balloon dies. And for a fun little twist, I add texture to both balloons with the Pattern of Friendship die and the Painted Texture embossing folder. To give some dimension to the scene, I adhered the balloons on dimensionals of different heights. I added a few clouds that I cut from Graceful Greenery vellum using the Hot Air Balloon dies. The sentiment from Pattern of Friendship is stamped in Cajun Craze on white cardstock and then cut with the small banner die from the Countryside Corners dies. I scattered some shiny sequins across the panel for some eye-catching sparkle.

We’ll look for more fun ways to make patterns as we continue our design series through the week. I hope you’ll stop in and check it out.

Product List
Online Exclusives · Pattern of Friendship

Birthday Plaid

Our featured product for this week’s designs is the new Pattern of Friendship bundle that just released in the Stampin’ Up! Online Exclusives section. This fun bundle comes with a set of stamps and a large-scale pattern die. And today we’re pairing it up with the Timeless Plaid and Wildflower Birthday papers to create a fun birthday card.

We get started with a base of Lost Lagoon cardstock. I used a sheet of Crumb Cake as the mat for the focal panel to provide some structure and stability to the panel. The mat has some detailing on the edges thanks to the Textured Notes die. I chose a sheet of the blue-green Timeless Plaid paper as the focal panel background and added some additional detailing with the Pattern of Friendship die before cutting it down to size with a smaller Textured Notes die. I loved the smaller cupcake panel from the Wildflower Birthdays accessories set and cut it down a little smaller using the Greetings of the Season dies. I ended up deciding not to use the decorative portion with the hole in the center and instead option to make a square with rounded corners instead. The sentiment from Pattern of Friendship is stamped in Misty Moonlight on Very Vanilla and then cut with the Autumn Leaves die using the extension method. I wrapped the ends with gold thread to tie the sentiment and focal image together with their gold elements. I added a few gold low profile dots for a pop of shimmer.

Sometimes our patterns don’t have to be complicated to be interesting. And playing up the plaid pattern was just the ticket for today’s card. I hope you’ll tune in tomorrow for another fun way to have the new Pattern of Friendship set work for you.

Product List
Online Exclusives · Pattern of Friendship

A Smile to My Face

This week, our featured design product is the Pattern of Friendship bundle by Stampin’ Up! This stamp and die bundle just released with the new Online Exclusive products. It’s not your typical stamp and die bundle though. The accompanying die is a full-size background die that leaves delicate lines of dots in your paper. What I love about this die is being able to create so many different looks with this one very simple die. Let’s check out today’s card to see what I mean.

This design was inspired by a card I saw made by fellow demo Mikaela Titheridge over at the Crafty O’ Ink Pen. We get started with a base of Balmy Blue cardstock. The focal panel has a mat of Misty Moonlight cardstock which serves to give some structure and stability to our focal panel and some depth to our color palette. The focal panel is a sheet of the blue Beautiful Bokeh that has been cut with the Pattern of Friendship die on the diagonal to create an argyle pattern. I love how this pattern gives the illusion of blowing rain. Using the Bright Skies dies, I cut several different sized clouds from white cardstock and adhered them in several different layers onto our focal panel. I stamped the sentiment from Pattern of Friendship in Versamark and then heat embossed with white embossing powder onto a sheet of the yellow Beautiful Bokeh paper and then cut a circle using the Spotlight on Nature dies to create the sun for the scene. I tucked the sun behind the clouds. I added some raindrops under the clouds using the blue tinsel gems and then added some bits of sparkly interest with the white and yellow starburst sequins.

Reimagining how to pair products in our crafty stash is what making a papercrafter so much fun. When I’m looking for a unique spin on an otherwise very traditional idea, I try to think of how I can use something from my stash differently. Like using the Pattern of Friendship background die to create the look of rain. How can you reimagine some of your favorites?

I hope you’ll pop in tomorrow to see what else we can get up to with this week’s featured bundle!

Product List