Coming Soon · Sketchy Fridays

Sketchy Fridays: Otterly Love

We’ve made it to another Friday, and you know what that means? It’s time for another Sketchy Fridays!

Each week we’ll be using a card sketch to design our featured card. Right now, we’re working through a full series of designs using the card sketches found in current Stampin’ Up! catalogs.

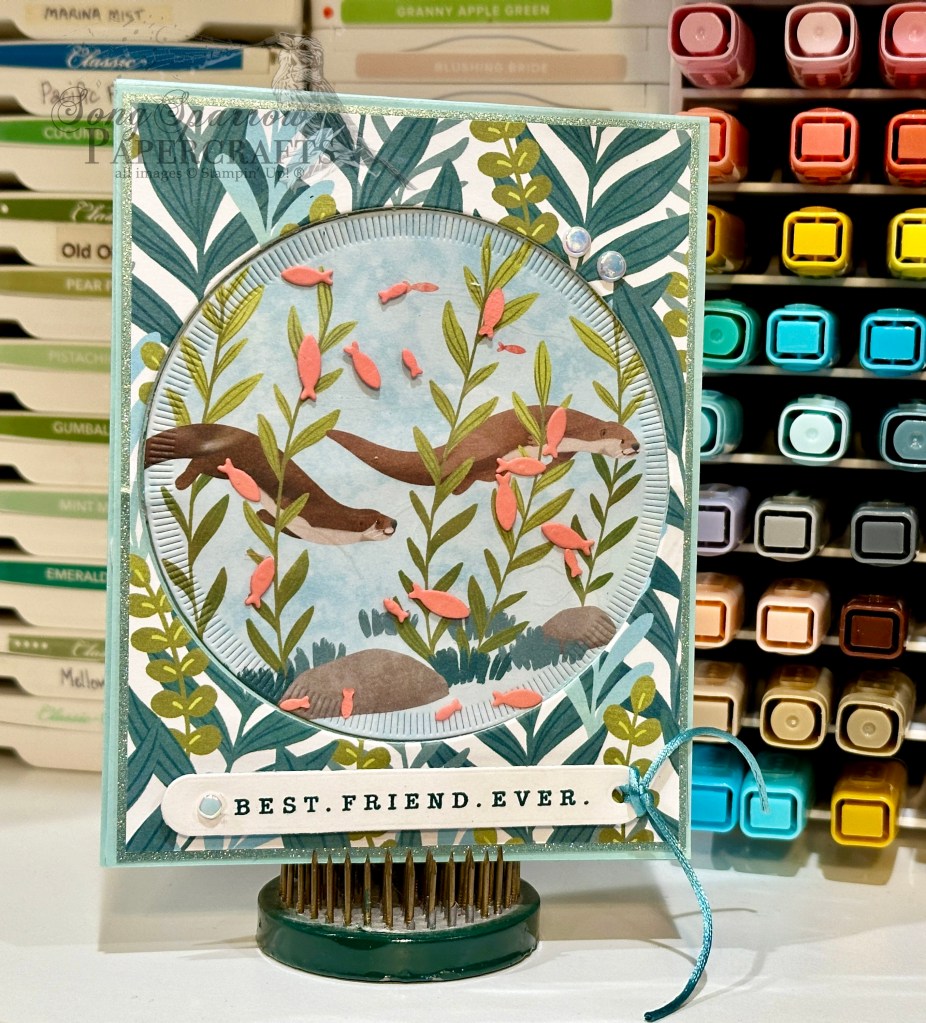
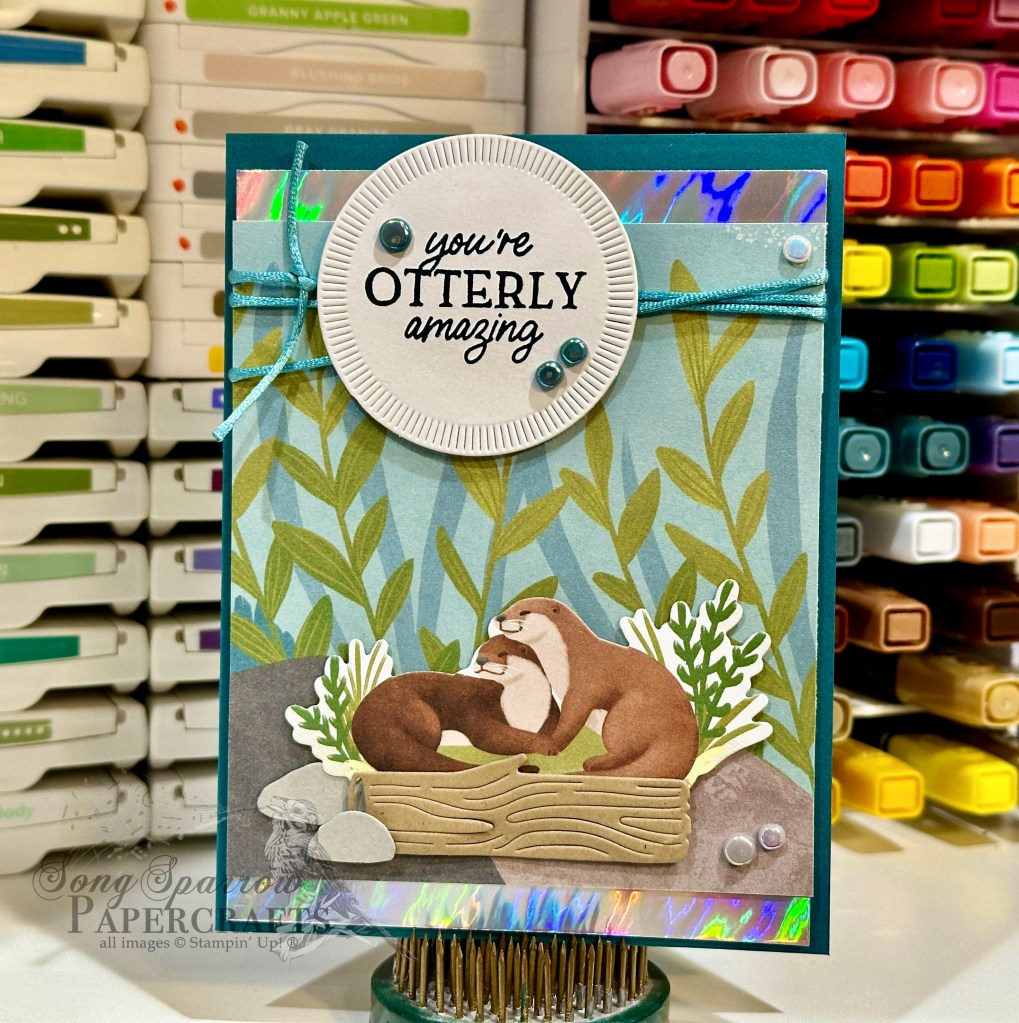
This week’s card is based on Sketch #1 in the Stampin’ Up! Annual Catalog and features the Otterly Adorable products which will release on November 5, along with a whole bunch of other new Online Exclusives.

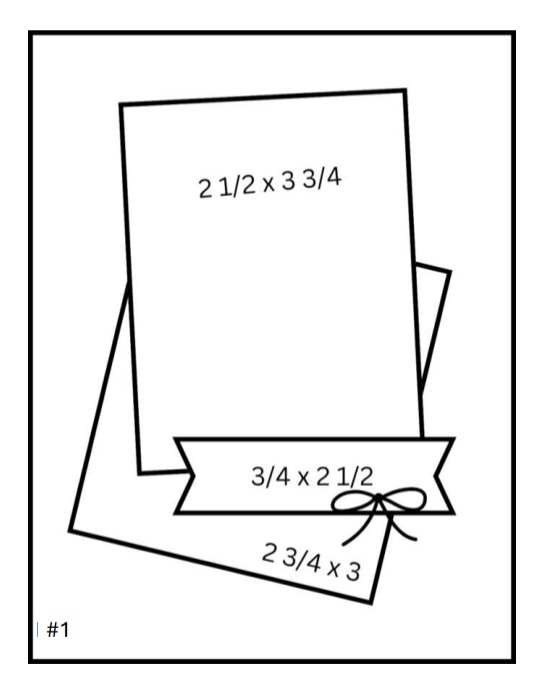
In all honesty, I’ve had a really hard time finding a way to use this sketch. Until today. This sketch just seems to be made for this suite! While I’m not usually one to mix a lot of busy patterns, this sketch gives you the opportunity to break up busy patterns with the offset center focal panels.

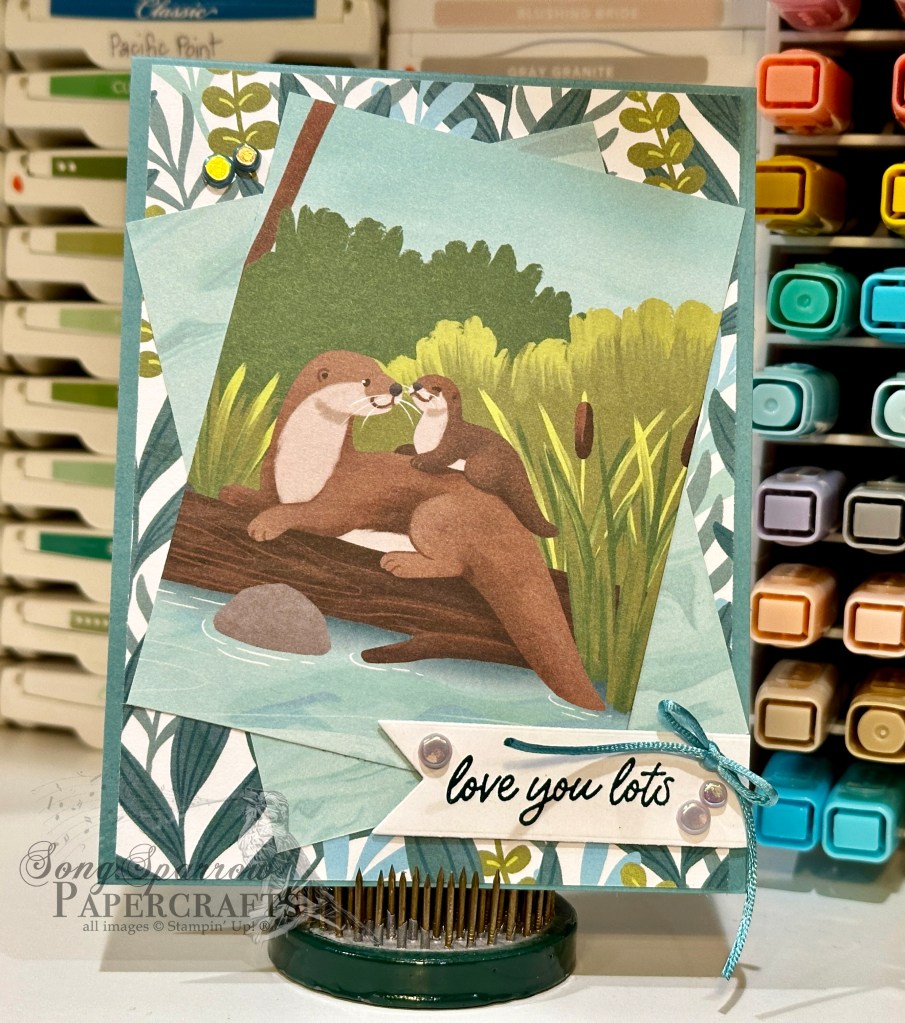
Our card starts today with a base of Lost Lagoon cardstock. I used the pond flora sheet from the Otterly Adorable paper pack as the backdrop for our two offset focal panels. The sweet scene of the mom and baby otter sit atop the rippling water pattern. The sentiment from the Otterly Amazing stamp set is stamped in Pretty Peacock on a banner diecut from white cardstock using the Greetings of the Season dies. A small bow tied from the Lost Lagoon soft cording and the riverside pearls add nice touches of soft shimmer to this cute and lovable design.

Tomorrow I hope to bring you the promised fun fold that failed earlier in the week. I hope you’ll pop in and see if I was able to pull it off!

Products used in today’s card:
Lost Lagoon, Basic White cardstock
Otterly Adorable DSP (coming soon)
Otterly Amazing stamps (coming soon)
Greetings of the Season dies
Lost Lagoon soft cording (coming soon)
Riverside irregular pearls (coming soon)
Dimensionals
Adhesives

Coming Soon

Otter Failure

This week, we’re getting a closeup at one of the latest Stampin’ Up! Online Exclusive releases called Otterly Adorable, coming to a cart near you on November 5! This adorable suite of products includes coordinating stamps, dies, and patterned paper, along with some silky cording and pearlized embellishments.

Today, I had planned to show you a super cute flip-panel design, but it turned out to be an otter failure. *snicker* In all seriousness though, my design was flawed from the start and I realized why after I switched gears to salvage the design. So I promise to make good on a cute flip-panel design later this week when I have a bit more time to execute a more complicated design. In the meantime, let’s get a closer look at how a failure turned into a cute peek-through panel.

Today’s card starts with a base of Pool Party cardstock. Our backdrop is a combination of Lost Lagoon shimmer pape (sadly retired) and the water foliage pattern from the Otterly Adorable paper pack. Using the largest circle from the Spotlight on Nature die set, I cut a circle through all layers of the card front. Separately, I also used the die to cut the two swimming otters from a separate patterned sheet from the Otterly Adorable pack. I adhered the swimming otters panel to the Pool Party circle and then to a quarter sheet of Pool Party to keep the inside of the card neat and tidy and one color. Behind our backdrop panel, I mounted some acetate to serve as the peek-through window into the water below and adhered all of this to the card front. From Flirty Flamingo, I cut several sets of the smaller fish using the Otterly Amazing dies and let them free-float on the acetate. Our swimming otter panel is adhered to the inside of the card using dimensionals to allow a little room for our fish to swim in the window. The sentiment from Country Flowers is stamped in Pretty Peacock on white cardstock diecut using the Greetings of the Season die and finished off with the Lost Lagoon soft cording. A few riverside irregular pearls add that last touch of sparkle to the design.

When I showed my son my “otter failure,” he said, “but mom, that doesn’t look like a failure….that’s cute!” One of the many lessons I’ve learned is that sometimes you just need to pivot when your first idea doesn’t work out. Not ever failure turns out to be something for the trash bin. Sometimes it’s cute!

Products used in today’s card:
Pool Party, Flirty Flamingo, Basic White cardstock
Soft Shimmer (retired), Otterly Adorable (coming soon), acetate DSP
Otterly Amazing (coming soon), Spotlight on Nature, Greetings of the Season dies
Country Flowers stamps
Lost Lagoon soft cording (coming soon)
Riverside irregular pearls (coming soon)
Dimensionals
Adhesives

Product List
Coming Soon

Make Today Otterly Amazing

In just two short weeks, Stampin’ Up! will release a brand new set of Online Exclusive products, including the too-cute-for-words Otterly Adorable suite. This week, I’m featuring this cute selection of products in hopes of providing some inspiration for your future projects. This bundle has so much potential — from playful designs to love-themed projects and all kinds of things in between!

Today, we’re using the paper and embellishments to create an encouragement card. Pairing the paper with a few dies makes this the perfect scene to bring a smile to someone’s otherwise less than bright and happy day!

Our card starts with a base of Lost Lagoon cardstock. I chose the watery pattern from the Otterly Amazing paper pack to serve as the backdrop for our scene and matted it with the Pretty Peacock shimmer paper from my retired paper stash. Our focal panel consists of two sheets of paper — the water reed patterned sheet and a cute otter sitting in the reeds from one of the sheets full of otter vignettes. I used the Spotlight on Nature dies to cut the reed background and a smaller inset panel on which our sunbathing otter sits among the reeds. I used my paper snips to cut more detail in this cute vignette and to help it stand out from the background. All of these layers are adhered with varying heights of dimensionals to give more depth and pop to our scene. A twisted some of the new Lost Lagoon soft cording around the background panel before adhering the focal panel. The sentiment from the You Are Beautiful stamp set is stamped in Pretty Peacock directly on our background panel under the focal point. A few riverside irregular pearls are scattered about our card front to add a little sheen and draw the eye across the design.

Tomorrow we’re going to make a splash with a fun fold design!

Products used in today’s card:
Lost Lagoon cardstock
Otterly Amazing (coming soon), Soft Shimmer (retired) DSP
You Are Beautiful stamps
Spotlight on Nature dies
Lost Lagoon soft cording (coming soon)
Riverside irregular pearls (coming soon)
Dimensionals
Adhesives

Product List
Coming Soon

Otterly Amazing

Happy Monday, everyone! I don’t know about you, but I needed a weekend from my weekend. *grin* Craft shows, while always fun, are always exhausting. I got everything home, but I haven’t unpacked a single thing. It’s onward and upward to new products!

That’s right, in just a few short weeks, there will be a brand new bunch of Online Exclusives. And let me tell you, there are some C-U-T-E, CUTE things in this release, including the suite that I’m showcasing for you this week — the Otterly Adorable suite. This suite includes patterned paper, coordinating stamps & dies, some specialty cording, and iridescent pearls. We’re starting off with a super simple layout.

Our card base is a piece of Pretty Peacock cardstock. Our backdrop is a piece of the patterned scene papers from the Otterly Amazing designer series paper pack that’s releasing soon. I really loved the look of the (now retired) Holographic Trio silver foil and how it looks like a flowing river, and so while I don’t usually use too many products from my retired stash, this one just had to be a part of today’s card! Our cute otter pair is diecut from a sheet of the Otterly Adorable paper using the coordinating Otterly Amazing dies. To complete the scene, I cut our otter’s log den from Crumb Cake cardstock and the rocks from Smoky Slate. Dimensionals add depth and dimension to our scene. The sentiment from the Otterly Amazing stamp set is stamped in Pretty Peacock and diecut using the Spotlight on Nature dies and then mounted over the Lost Lagoon soft cording with dimensionals. A few Riverside Irregular Pearls finish things off with some iridescent sparkle.

This whole set is so cute and I can’t wait to show you all of the ideas I have floating in my head (pun intended!)!

Products used in this card:
Pretty Peacock, Crumb Cake, Smoky Slate, Basic White cardstock
Holographic Trio (retired), Otterly Adorable (coming soon) DSP
Otterly Amazing stamps & dies (coming soon)
Spotlight on Nature dies
Lost Lagoon Soft Cording (coming soon)
Riverside Irregular Pearls (coming soon)
Dimensionals
Adhesives

Product List
Changing Leaves · Coming Soon

Grateful Leaves

We’re closing out our sneak peek of the upcoming Online Exclusive bundle called Changing Leaves. This bundle, which includes a photopolymer stamp set, coordinating dies, and a hybrid embossing folder, launches in my online store on July 3rd! We’re rounding out this week’s designs with an earth tone color palette and a simple layout.

We get started on today’s card with a base of Cajun Craze cardstock. The background panel is a piece of the Cajun Craze Tartan Foil designer paper. Our focal panel is three layers of neutral goodness with a Deckled Rectangle mat of Early Espresso, a larger straight-edged mat of Very Vanilla, and an embossed layer of Early Espresso using the Changing Leaves embossing folder. I just love the deep impression you get every time with this embossing folder. It shows so much detail in the leave patterns. The sentiment panel is a piece of Very Vanilla cardstock diecut using the Nested Essentials dies, and the sentiment from Something Fancy is heat embossed in copper. I used a twist of Cajun Craze twine (releasing in the fall!) and added some copper sequins around the panel for eye-catching sparkle. A piece of linen thread would also work perfectly behind the sentiment.

This week, I really wanted to highlight how you can use the new Changing Leaves bundle in so many different ways. We’ll run another series closer to fall to showcase how you can pair this beautiful bundle with many other Stampin’ Up! products to stretch the design possibilities even further. But next week, we’re going to say HELLO to the Hollyhocks. I hope you’ll join me!

Products used in today’s card:
Cajun Craze, Early Espresso, Very Vanilla cardstock
Tartan Foil DSP
Changing Leaves embossing folder (coming soon)
Something Fancy stamps
Nested Essentials, Deckled Rectangles dies
Cajun Craze linen thread (coming Fall 2024)
Neutrals sequins
Dimensionals
Adhesives

Product List
Changing Leaves · Coming Soon

Note to Brighten Your Day

This week, we’re getting a sneak peek at the upcoming Online Exclusive called Changing Leaves. This bundle includes photopolymer stamps, coordinating dies, and a hybrid embossing folder. Today, I wanted to highlight another way you can use this set to create something other than a fall-themed card with a bright and cheery color palette and a fun complimentary product pairing.

Today’s card is all about a little friendly encouragement. With a fun color palette and incorporation of the Friends for Life set, we have a a terrific note to brighten someone’s day.

We get started with a card base of Summer Splash cardstock. Our background panel is a sheet of the Flowering Zinnias designer paper. Our focal panel backdrop is a leaf pattern using the Changing Leaves stamps. I used one of my larger stamp blocks to arrange my leaf stamps in a pattern I liked. I then layered the ink on the stamps for an ombre-looking effect by starting with Summer Splash over the entirety of the leaf images, then placing Old Olive up the centers, and then lightly tapping the edges with Pretty Peacock. I stamped these twice to get my panel, cut it to size, and then matted with Pretty Peacock for a nice contrast against the Flowering Zinnia DSP panel.

For the sentiment panel, start by diecutting the word friend using the Friends for Life dies. The background is Summer Splash glimmer paper, while the detail lettering is Summer Splash cardstock. The sentiment from Changing Leaves is stamped in Pretty Peacock on white cardstock and then diecut using the smallest banner from the Nested Essentials die set using the extension method. I liked the look of stitching on either end of the sentiment banner to really draw the eye in and give some interest. The sentiment is mounted on dimensionals over a twist of Pretty Peacock & Gold metallic ribbon. A scattering of the blue iridescent discs gives some eye-catching sparkle to draw the eye in.

Tomorrow we’re wrapping up our sneak peek of the Changing Leaves bundle with an earthy palette. I hope you’ll pop by and take a look.

Products used in today’s card:
Summer Splash, Pretty Peacock, Basic White cardstock
Flowering Zinnias, In Color Glimmer DSP
Changing Leaves stamps
Friends for Life, Nested Essentials dies
Pretty Peacock & Gold metallic ribbon
Iridescent discs
Dimensionals
Adhesives

Product List
Changing Leaves · Coming Soon · L2S Group Instahop

Words Fail

This week we’re taking a sneak peek at the upcoming Online Exclusive by Stampin’ Up! called Changing Leaves. This bundle of products includes a stamp set, dies, and hybrid embossing folder. I love all of the detail included in the images in this set, and I’ve enjoyed thinking outside the box when designing with it. This set, although full of gorgeous fall foliage images, lends itself to all sorts of fun designs that don’t immediately make you think of fall. And today’s card is another example. So let’s get started.

I wanted a light and bright color palette for this thank-you card. I did let Mother Nature do a little of the talking with the choices in leaf color but then I worked to fill in with some fun complimentary colors. Our card begins with a base of Flirty Flamingo cardstock. The background panel is a quarter panel of Petal Pink embossed with the soon-to-release Changing Leaves embossing folder. I cut this panel down a bit to have a nice border of Flirty Flamingo all around. Our focal images are a whole smattering of stamped and diecut leaves from the soon-to-release Changing Leaves stamp set. All of the images are stamped tone-on-tone. Two of the larger leaves are stamped on Old Olive and Summer Splash with the two smaller leaves stamped on Lemon Lolly and Peach Pie. I added a few sparkly elements with the Peach Pie and Summer Splash foliage tucked in the mix. The sentiment from Simply Zinnia is stamped on Very Vanilla cardstock and diecut with the Autumn Leaves die set using the extension method. (For more on using the die extension method, check out this quick tutorial.) I tucked a faux bow of Petal Pink diagonal trim behind the sentiment panel and added a few Peach Pie shimmer gems across the card front for added sparkle.

Today’s card is a part of the Luv 2 Stamp Group Instagram Hop, which goes live at 9 AM Pacific Time (PST). Click here to head over to my Instagram feed and check out what the other demos in our L2S Group have created for you today!

Products used in today’s card:
Flirty Flamingo, Petal Pink, Very Vanilla, Lemon Lolly, Old Olive, Peach Pie, Summer Splash cardstock
In Color Glimmer paper
Changing Leaves stamps, dies, hybrid embossing folder (coming soon)
Autumn Leaves dies
Simply Zinnia stamps
Diagonal trim
In Color shimmer gems
Dimensionals
Adhesives

Product List
Changing Leaves · Coming Soon

Couldn’t Have Done It Without You

It’s hard to believe we’re already halfway through this bright and shiny week. I’m having such a good time working with the brand new Online Exclusive from Stampin’ Up! called Changing Leaves, which releases just one week from TODAY! This new bundle includes a photopolymer stamp set, which happens to be my favorite kind of stamps! And it also includes coordinating dies and a hybrid embossing folder. If you’re not familiar with a hybrid embossing folder, check out yesterday’s blog post where I have a video showing you all about it!

But without further adieu, let’s get to today’s card, shall we? I think the fun thing about any stamp set is finding unique ways to use it. When sitting down with a leaf-themed set, my mind naturally walks down the path to fall. But you know what? You don’t HAVE to make a fall card just because your stamp set has images of leaves. And today’s card does a little thinking outside the box to show you how you can use this gorgeous new bundle of leaf images and make something that doesn’t scream fall.

So we get started with a card base of Summer Splash cardstock. I embossed a full quarter panel of Summer Splash using the soon-to-release Changing Leaves embossing folder and adhered it to the card front. (You could simply emboss the card front itself if you want to lighten up the layers and card weight.) On a quarter sheet of white cardstock, I stamped the Hey sentiment from the Saying Hey stamp set in Summer Splash and then cut the strip with my paper trimmer. On the remaining portion of the white cardstock, I stamped the sentiment from the soon-to-release Changing Leaves stamp set and then punched it out with the Heartfelt Hexagon punch and adhered to the sentiment strip. The full sentiment panel is then adhered to the card front. Using the soon-to-release Changing Leaves dies, I diecut a set of leaves from Shaded Spruce and then a twig from Pretty In Pink shimmer paper. These are adhered to the sentiment panel with glue dots. A bow tied with the white diagonal trim is then adhered on top so tha it looks like a tied greenery bunch. A few Pretty in Pink shimmer gems on either side of the sentiment add a bit of sparkle and draw your eye across the card design.

Isn’t this a super fun design? Swap out colors and sentiments and you can have a quick and easy card for just about any occasion! Tune in tomorrow when we get a closer look at our Changing Leaves stamps. You won’t want to miss it!

Products used in today’s card:
Summer Splash, Shaded Spruce, Basic White cardstock
In Color glimmer paper
Changing Leaves stamps, dies, embossing folder (coming soon)
Saying Hey stamps
Diagonal trim
In Color shimmer gems
Glue dots
Adhesives

Product List
Changing Leaves · Coming Soon

Amazing Leaves

Welcome to another fabulous day and another sneak peek at the new Stampin’ Up! Online Exclusive bundle called Changing Leaves. This brand new bundle is set to launch on July 3rd and includes a set of photopolymer stamps, coordinating dies, and a hybrid embossing folder. Today, we’re taking a closer look at that gorgeous hybrid embossing folder and putting it to work.

We get started with a card base of Pretty Peacock cardstock. A strip of the Pretty Peacock Oxidized Copper designer paper serves as a backdrop for our center focal point. The base of our focal point is a sheet of the Early Espresso woodgrain paper from the Country Woods designer paper pack that has been diecut using the Nested Essentials set and then adhered to the card base using dimensionals. The gorgeous leaves are diecut from a sheet of the Copper Clay Tartan Foil specialty paper using the soon-to-release Changing Leaves hybrid embossing folder, which both cuts and embosses at the same time, and then adhered to the focal panel with dimensionals. The sentiment from the soon-to-release Changing Leaves stamp set is stamped in Versamark on Very Vanilla cardstock and then heat embossed with copper embossing powder. The sentiment is then diecut using the banner die from the soon-to-release Changing Leaves die set. A few copper sequins are scattered across the card front to draw the eye diagonally down the card.

Want to see this beautiful new hybrid embossing folder in action? Check out today’s episode of Terrific Tuesdays and watch this card come together from start to finish:

Need something easy and maybe not so fall-ish? Tune in tomorrow to check out a unique thank-you card. You won’t want to miss it!

Products used in today’s card:
Pretty Peacock, Very Vanilla cardstock
Oxidized Copper, Country Woods, Tartan Foil DSP
Changing Leaves stamps, dies, hybrid embossing folder (coming soon!)
Nested Essentials dies
Copper embossing powder
Neutrals sequins
Dimensionals
Adhesives

Product List
Changing Leaves · Coming Soon

Amazing in Every Way

Welcome to a bright and shiny new week, everyone! This week, we’re going to be taking a sneak peek at a brand NEW Stampin’ Up! Online Exclusive bundle that launches in just a little over a week. Eeek — I’m so excited! The upcoming Online Exclusives release has a little bit of everything, including some holiday items. And all this week, I’ll be showing you the gorgeous Changing Leaves bundle, which includes a set of photopolymer stamps, coordinating dies, and a hybrid embossing folder. So let’s get started!

For today’s design, I wanted to keep things super simple. And in particular, I wanted to highlight the beautiful embossing folder with its detailed leaf prints and a few of the coordinating leaves in the die set.

So we get started with a card base of Early Espresso cardstock. A sheet of the Early Espresso woodgrain pattern from the Country Woods designer series paper pack serves as the backdrop. The center panel is a sheet of the Copper Clay Oxidized Copper specialty paper that has been machine embossed using the soon-to-release Changing Leaves hybrid embossing folder. The sentiment from the soon-to-release Changing Leaves stamp set is stamped in Coastal Cabana on Very Vanilla cardstock and then diecut using the smallest frame from the Everyday Details die set. The sentiment is matted with a piece of the Summer Splash In Color Glimmer Paper and adhered with dimensionals. Two sets of leaves from the soon-to-release Changing Leaves die set have been diecut from Coastal Cabana cardstock and tucked behind the sentiment panel. I finished things off with a few In Color Shimmer Gems.

Like what you see so far? Tune in tomorrow for a closer look at the Changing Leaves hybrid embossing folder!

Products used in today’s card:
Early Espresso, Coastal Cabana, Very Vanilla cardstock
Country Woods, Oxidized Copper, In Color Glimmer DSP
Changing Leaves stamps, dies, hybrid embossing folder (coming soon!)
Everyday Details dies
In Color shimmer gems
Dimensionals
Adhesives

Product List