Online Exclusives · Words of Beauty

Appreciate You

Happy Saturday, friends! It’s been a busy day here as we’ve made preparations for our first deep cold snap of the season. And in true Texas fashion, that means that today was hot and sunny! *snicker*

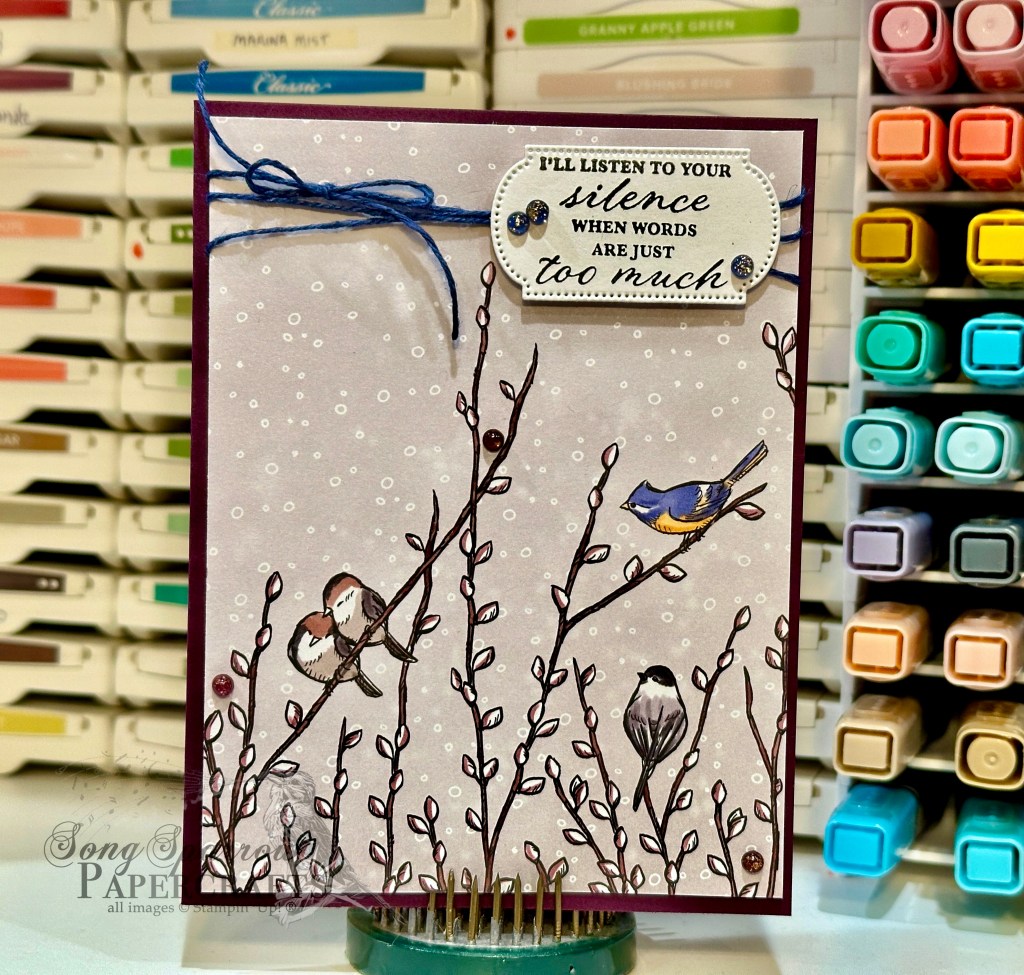
Today we’re rounding out our trekking through the outdoors series. And what a fun opportunity to make another card combining old and new with Nests of Winter, Elegant Pine Snowflakes, and Words of Beauty.

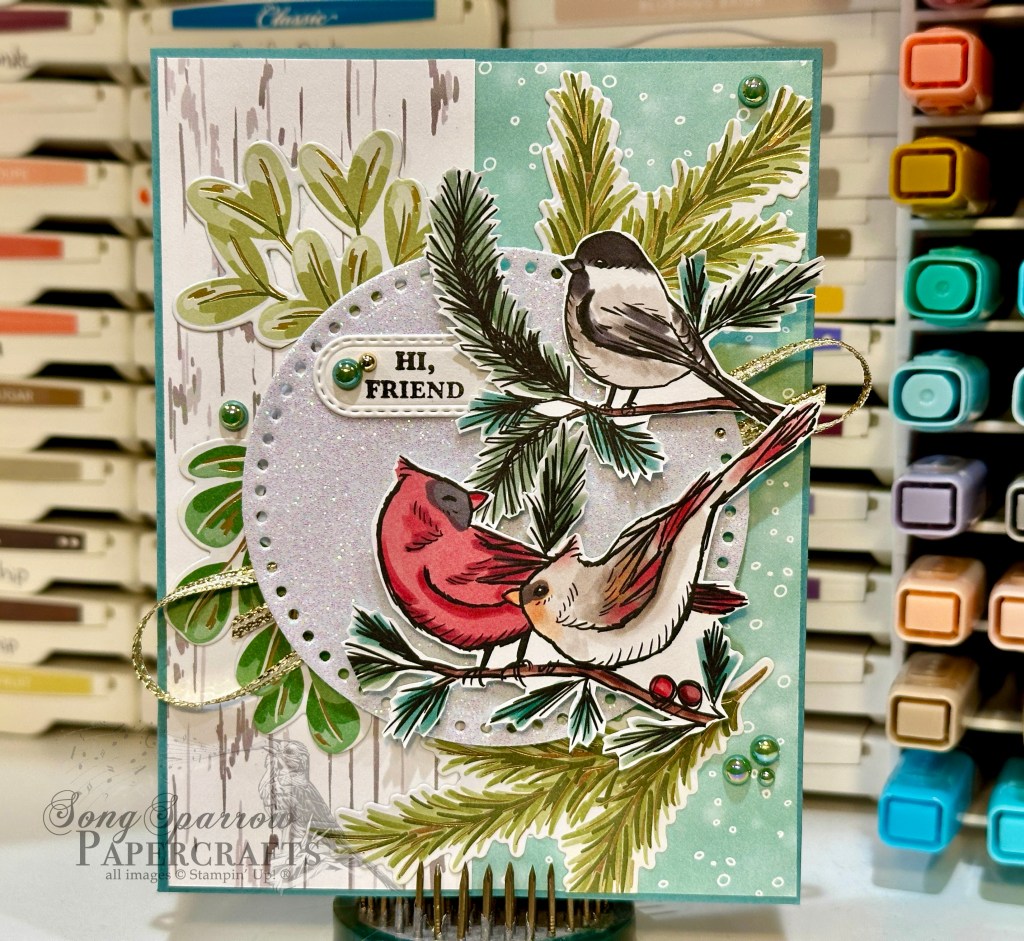
We start with a sheet of Pretty Peacock as our card base. A sheet of the Elegant Pine Snowflakes is the perfect backdrop for our tufted titmouse pair from the Nests of Winter paper pack. Circles of Regal Distressed Patterns and Earthen Tone Metallic help our feathered friends really shine. The circles are cut with the Spotlight on Nature dies and then the birds are adhered on top with dimensionals. The sentiment from Words of Beauty are heat embossed in copper on white paper and then cut with the banner die from the coordinating die set. The sentiment panel is adhered over Pretty Peacock and gold ribbon with dimensionals. And we finish things off with a touch of copper sparkle with the drusy embellishments across the front.

Next we’re going to be in thankful mode before turning our thoughts to the Christmas holidays. I hope you’ll drop by and see all the ways you can share thankfulness next week!

Product List
Words of Beauty

Great Friend

Happy Friday, everyone! This felt like both the longest and shortest week on record. I’m not quite sure how that happens, but that’s where we are. Needless to say, I’m ready for the weekend and an opportunity to unwind.

Today is clean & simple Friday as we continue our trek through our crafting stash to create outdoorsy designs. And today’s card comes together in a jiffy with the help of the new Words of Beauty stamp set and the Nests of Winter patterned paper. Let’s check it out.

Today’s clean and simple card gets started with a base of Pretty Peacock cardstock. I cut down the one sheet wonder from Nests of Winter into panels and used one of the panels for the focal panel on this card. The strip cut to make it fit the A2 card front is used as the sentiment panel. The sentiment from the new Words of Beauty stamp set is stamped in Early Espresso on the patterned strip and then adhered at the top of the focal panel with dimensionals. A few snowflakes add a realistic look to the light snowfall in our panel and then the adhesive gold hearts reinforce the theme of our sentiment.

Card designs don’t have to be complicated to convey a strong message. And I love how this card hits you in the feels! Tune in tomorrow to see how we wrap up our series this week.

Product List
Christmas

Through the Branches

I have sent handmade Christmas cards for many, many years — even before I became a Stampin’ Up! demonstrator. In recent years, I’ve moved away from creating one single card design because I found myself agonizing over which of my favorites would be the star of the holiday card show each year. I love being able to create a variety of designs using both current and retired products in my stash and then choosing a design that really fits a recipient. What about you? Do you send a single card design? Or do you mix it up?

I love creating designs that seem to be peering through the trees. I’ve made several cards over the last couple of months that use this design concept. Today, we’re peering through the evergreens to this lovely Christmas tree in the center.

We get started with a base of Mossy Meadow cardstock. Our background panel is a sheet of the Take a Bow designer paper. I loved the variety of greens and the contrast that this patterned sheet provided to the design. Our focal panel has many layers and begins with a background panel of Mossy Meadow that is diecut using the largest Deckled Rectangle die. The evergreen branches are cut from Mossy Meadow using the Winterly Treetops dies from the Nests of Winter suite. Layers of dimensionals give the illusion of us looking through layers and layers of branches. Our focal tree is from the Joyful Images ephemera pack, and I cut around the image to remove as much white space as possible. I added a star, also from the ephemera pack, to the top of the tree. The sentiment is from the Joyful Sayings ephemera pack, and I love how the lighter green really pops against our mossy background panel. We finish things off with gold thread and snowflakes for a little touch of sparkle to bring out the small gold foiling elements on our tree.

Next week, we’ll be looking at all the ways we can use our crafty goodies to create special holiday gifts. I hope you’ll tag along.

Products used in today’s design:
Mossy Meadow cardstock
Take a Bow DSP
Joyful ephemera
Deckled Rectangles, Winterly Treetops dies
Gold thread
Snowflakes assortment
Dimensionals
Adhesives

Holiday Mini Catalog

Hello, Fall Wreath

This week, we’re using the Nests of Winter suite by Stampin’ Up! to create our designs. This suite of products includes coordinating stamps & dies, patterned paper, an embossing folder, twine, and shimmer gems. Today’s card showcases the versatility of this set as we make a lovely fall design.

I don’t know if you’re one to change your decor based on the seasons, but I really love to do that. Some seasons I go more “all out” than others, but I have some very basic elements around the house that change based on the season. One thing I’m sure to change is the wreath on my front door, which inspired today’s design. The greenery swag in the Winterly Tree Tops set is perfect for wreath-making!

We get started on our card with a base of Mossy Meadow cardstock. Our background panel is the woodgrain pattern from the Nests of Winter patterned paper pack. I just love the old barn door look here! Our wreath is made with the greenery swag image from the Winterly Tree Tops stamp set. The image is stamped in Crumb Cake on Wild Wheat cardstock. The berries are completed with a combination of In Color resin dots and Rainbow dots using a combination of pinks, oranges, and yellows to really reflect our fall color palette. I decided to mimic the look of fall wreath picks and used the smaller greenery elements in the Winterly Tree Tops die set to accomplish this. The picks are a combination of Early Espresso, Old Olive, Mossy Meadow, Calypso Coral, Daffodil Delight, Cajun Craze, and gold foil papers. They’re tied together with some of the lovely Very Vanilla satin ribbon. Our greeting placard is a combination of Very Vanilla and Early Espresso cardstock diecut using the Unbounded Love dies and the sentiment is stamped from Wonderful Thoughts is stamped in black. Everything is adhered with dimensionals to really give the look of a wreath hanging on the door. A few drusy embellishments add a little sparkle and really bring our eyes across the lovely wreath.

Tomorrow we’re going to be using a new sketch and once again using our Nests of Winter to create a lovely fall-inspired card design. Come check it out!

Products used in today’s card:
Mossy Meadow, Very Vanilla, Calypso Coral, Daffodil Delight, Cajun Craze, Old Olive, Early Espresso cardstock
Nests of Winter, gold foil DSP
Winterly Tree Tops stamps & dies
Unbounded Love dies
Rainbow dots, In Color resin dots
Very Vanilla satin ribbon
Drusy embellishments
Dimensionals
Adhesives

Product List
Holiday Mini Catalog

Hi, Friend

We’ve made it to the halfway point of the week already, friends. I don’t know about you, but I have more things to do than I have time to do them these days! I’m preparing for 2 craft shows this month and my craft room looks like it! *snicker*

This week, we’re using the Stampin’ Up! Nests of Winter suite of products to create our projects. Today, we’re pairing up the lovely patterned papers with a few other current products in the SU! lineup to create this lovely Hello card.

We start with a base of Lost Lagoon cardstock. I love how this base brings out the subtle hues in the greenery around the birds. The background panel consists of the snowy and woodgrain patterns from Nests of Winter. Our focal panel is all about the birds. I chose to fussy cut the chickadee and pair of cardinals from the sheet from Nests of Winter to serve as our focal images. Our birds are layered on top of a sparkly glimmer paper circle cut with the Spotlight on Nature dies and greenery cut from the Season of Green & Gold paper with the Golden Greenery dies. A twist of gold trim behind the panel complements the sparkle of the gold-foiled greenery. The sentiment from Wonderful Thoughts is stamped in black on white cardstock and then diecut with the Changing Leaves dies and tucked behind the greenery. A few blooming pearls across our design help the eye move across our focal panel to take in every detail.

Tomorrow we’re going to build a fall design with our feature suite. I hope you’ll pop in and see how it turns out!

Products used in today’s card:
Lost Lagoon, Basic White cardstock
Nests of Winter, white glimmer, Season of Green & Gold DSP
Wonderful Thoughts stamps
Golden Greenery, Spotlight on Nature, Changing Leaves dies
Gold trim
Blooming pearls
Dimensionals
Adhesives

Product List
Holiday Mini Catalog

Nested Love

It’s starting to feel a lot more like fall in North Texas as our mornings are beginning to be more brisk. Fall is one of my favorite seasons, and one of the things I love about fall is that our winter bird friends return. My son got the family into bird watching when he was younger and we have enjoyed it ever since. We have birds that come and go from our area each year, and we enjoy looking for them.

This week, we’re using the Stampin’ Up! Nests of Winter to suite to design our projects. This suite of products includes lovely patterned paper, stamps, and dies that all share bird images. Today, we’re using a very simple layout to create our design.

We get started with a base of Smoky Slate cardstock. Our center background panel is a strip of patterned papers. The woodgrain pattern is from the Nests of Winter pack, while the mat is from Nature’s Sweetness. I love how the mat really accentuates the colors and shading in the woodgrain pattern.

Our focal panel also has several layers. The base is a piece of the Pretty Peacock Season of Elegance foiled paper that is diecut using the Nested Essentials set. I wanted to pull in pops of color that would accentuate the blue undertones in the birds’ feathers.

The sentiment panel is a piece of white cardstock diecut using the Greetings of the Season dies, and then the sentiment from Wonderful Thoughts is stamped in black on the left side to allow for our focal image. Our duo of birds is stamped in black on Smoky Slate and then colored with Stampin’ Blends. I used a combination of Smoky Slate, Pretty Peacock, and Calypso Coral to shade the birds to resemble tufted titmice—some of my favorite little winter birds. I fussy cut the birds to omit the seasonal greenery to keep things more seasonally neutral for this card design.

The focal panel is adhered with dimensionals over a twist of the Pretty Peacock & Gold metallic ribbon. Groups of Pretty Peacock sequins are added on either side of our focal panel for a pop of sparkle and to help move the eye across our design.

Tomorrow we’re going to be using more of the images from the papers in this suite. I hope you’ll pop by.

Products used in today’s card:
Smoky Slate, Basic White cardstock
Nests of Winter, Season of Elegance, Nature’s Sweetness DSP
Winterly Tree Tops, Wonderful Thoughts stamps
Nested Essentials, Greetings of the Season dies
Stampin’ Blends
Pretty Peacock & Gold metallic ribbon
Sequins trio
Dimensionals
Adhesives

Product List
Holiday Mini Catalog

When Words Are Too Much

Welcome to a brand new week. It’s the last day of September. Who else is reeling a little bit about that?!

This week, we’re starting a brand new series using the Stampin’ Up! Nests of Winter suite. We’re starting off super simple by letting the beautiful paper do all the talking. With so many of you dealing with the aftermath of Hurricane Helene, this sentiment felt appropriate today. The photos of the damage left behind is simply overwhelming! Our prayers are definitely with you all.

We start our card with a base of Blackberry Bliss cardstock. I love how that pulled the subtle purple hues in this paper more forward. I chose the one-sheet-wonder sheet from the Nests of Winter paper pack as our focal sheet for this card. I twisted the Night of Navy linen thread around the top. I love how this makes the little blue bird in our focal sheet really pop. The sentiment from Wonderful Thoughts is stamped in black on white cardstock and then diecut using the Greetings of the Season dies. I added a few regal foiled dots on the sentiment panel and scattered a few among the branches below.

This clean and simple design is a great way to let a gorgeous piece of paper do all the heavy lifting. Check in tomorrow to see more from this lovely suite of products.

Products used in today’s card:
Blackberry Bliss, Basic White cardstock
Nests of Winter DSP
Wonderful Thoughts stamps
Greetings of the Season dies
Natural Tones linen thread
Regal foiled dots
Dimensionals
Adhesives

Product List
Coming Soon · Holiday Mini Catalog

Good Courage

Happy Wednesday, everyone! Halfway through the week we already are. As I mentioned on Monday, it’s been run-run-run around here as we adjust to our schoolyear routine. On that note, you may have noticed that I haven’t released a new Terrific Tuesdays video the last 2 weeks and that is why. We’ve focused on family time and getting adjusted to the new routine. I’m working on some new fun folds that I look forward to sharing with you in the next episode, so have no fear, new content is coming!

But for now, this week we’re sneak peeking into the new Stampin’ Up! Holiday Mini catalog that goes live on September 6th. And today’s card design features a new bundle called Nests of Winter, which includes coordinating patterned paper, stamps, dies, embossing folder, shimmer gems, and linen thread. I really love when the dies and paper can be used together, and our card today showcases that beautifully. So let’s take a closer look.

We get started with a base of Shaded Spruce cardstock. Our background panel consists of two different patterns from the Nests of Winter paper pack. I paired the Garden Green stripe with the white birch pattern. I used the Winterly Treetops dies to diecut the bird elements. One of the patterns in the paper pack includes them both, and I liked the look of them both together on one card. Our sentiment from the Courage & Faith set is stamped in black on white cardstock and then diecut using the Greetings of the Season die. I carefully placed the oriole over the pre-punched hole in the die. I placed a twist of Shaded Spruce satin & sheer ribbon behind the sentiment panel to make our color palette more cohesive and added a few drusy embellishments to add sparkle and draw the eye across our design.

This suite would pair perfectly with the sketches in the Annual Catalog. And BONUS, there’s a whole new set of sketches in the Holiday Mini catalog, too! And I look forward to sharing more of this suite with you so you can appreciate just how wonderful it is.

Tomorrow we’re going wild with ephemera. Tune in to see how you can shortcut your way to beautiful cards!

Products used in today’s card:
Shaded Spruce, Basic White cardstock
Nests of Winter DSP (coming soon!)
Winterly Treetops (coming soon!), Greetings of the Season dies
Courage & Faith stamps
Shaded Spruce satin & sheer ribbon (coming soon!)
Drusy embellishments (coming soon!)
Dimensionals
Adhesives