Retiring · Take to the Sky

Up, Up and Away Birthday

This week, we’re exploring some of my favorite sets that are on the Stampin’ Up! Last Chance List. Today, we’re playing around with the Take to the Sky suite. As the spouse of a heavy jet pilot, this whole suite was a no-brainer for me and will definitely be sticking around in my crafty stash even after it officially retires!

For today’s card, we’re keeping it pretty simple and letting our dies and paper do the heavy lifting for this design.

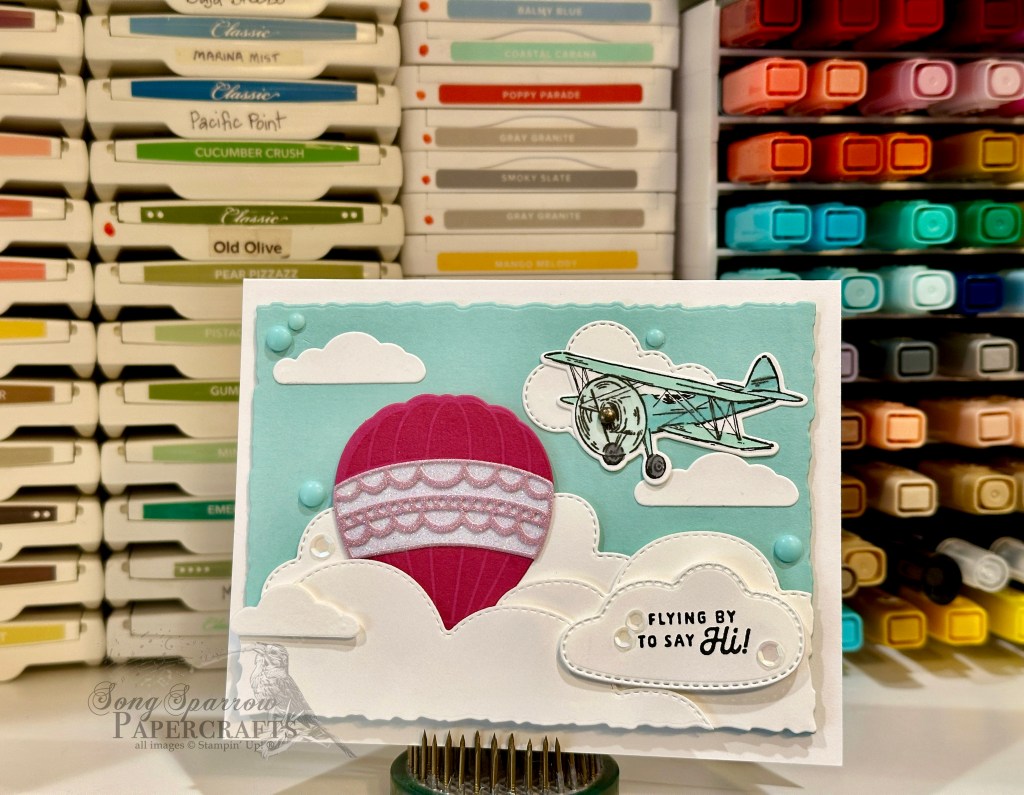
We get started with a base of Night of Navy cardstock. I chose the cloud patterned sheet from the Take to the Sky paper pack as the backdrop for our flying biplane. Our plane is constructed using the Adventurous Sky dies and is a combination of the red Season of Elegance foiled paper and textured gold specialty paper. To give a realistic look to our spinning props, I added a small circle of Graceful Greenery vellum cut using the Spotlight on Nature dies. A few gold textured dots serve as the wheel and prop hubs.

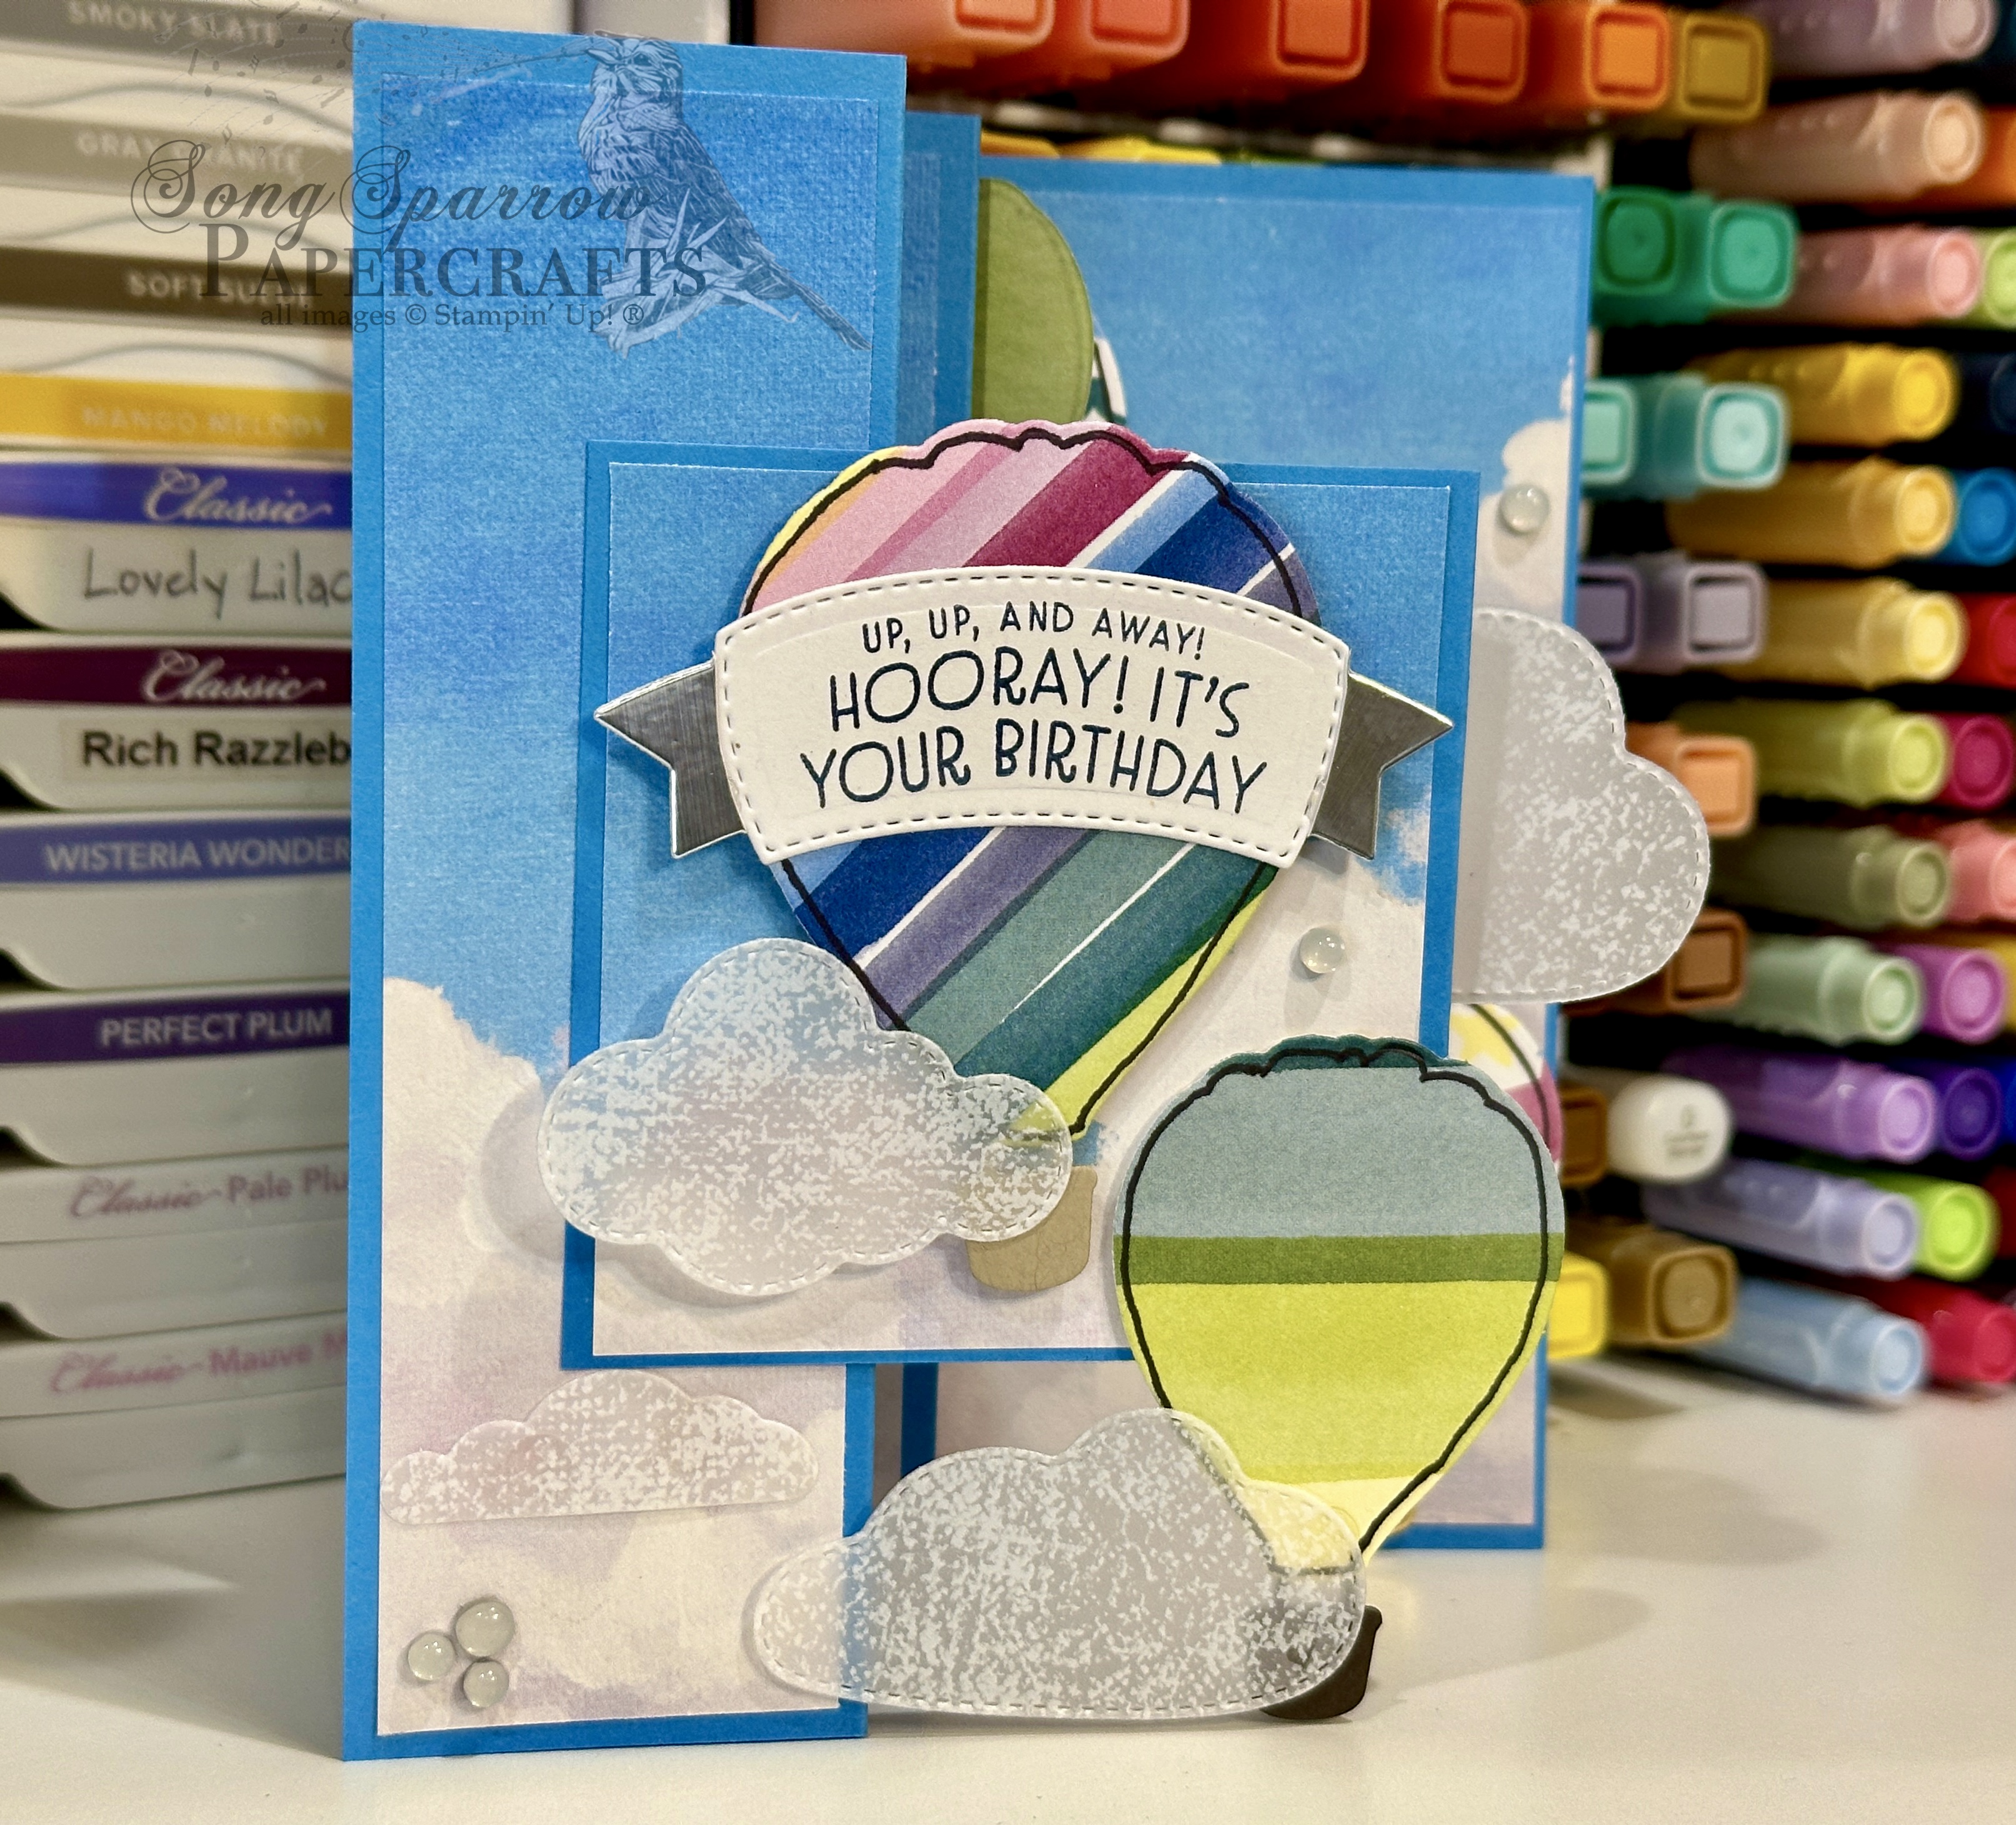
The sentiment from the Hot Air Balloon stamp set is stamped in Real Red on Smoky Slate cardstock and diecut with the coordinating Hot Air Balloon banner die. The sentiment backdrop is a combination of grey and blue plaid patterns from the Take to the Sky paper pack with a strip of Cherry Cobbler & Gold metallic ribbon in the center to help things pop. A few red iridescent discs finish things off by drawing the eye to the sentiment. I added some starburst sequins in the opposing corners for a little extra pop of shimmer in the clouds.

We’ll be putting the stamps to work this afternoon. I hope you’ll fly by and check it out!

Product List
Fun Folds · L2S Group Instahop

Up & Away Birthday

This week, we’re working with the Everyday Skies designer series paper that is currently available as a Stampin’ Up! Online Exclusive. We’re pairing it up with the Hot Air Balloon bundle to make this super fun birthday fun fold. I’m using the Accordion Z-Fold by fellow demo Jackie Bolhuis.

Our card starts with a base of Azure Afternoon cardstock, which also serves as the z-fold base. I used several sheets of the blue skies sheets from the Everyday Skies paper pack to build the background. I made sure that all of my panels fit together to build the scene without any odd junctions between pieces and adhered them according to Jackie’s instructions. I cut a variety of balloons from several patterns from the Bright & Beautiful paper pack using the Hot Air Balloon dies. I outlined each balloon with a black marker to give some defined shape to each balloon. The balloon baskets are cut from several different paper scraps, including Crumb Cake, Early Espresso, and gold foil. The sentiment from the Hot Air Balloon stamp set is stamped in Night of Navy ink on white cardstock and then diecut with the banner die from the Hot Air Balloon set. The banner edges are pieces of silver foil for a little festive sparkle on the sentiment panel. The sentiment banner is adhered directly to the balloon. The balloons are all adhered to the card panel with dimensionals of varying heights and in such a way that when the card is closed they overlap so that only the small front panel scene is visible. The clouds are cut from the white spotted sheet of vellum from the Graceful Greenery vellum pack using both the Bright Skies and Hot Air Balloon dies. I used glue dots to affix the clouds in our scene. The largest cloud holds our inside sentiment which is from the Pattern of Friendship stamp set, which is set to release in the newest batch of Online Exclusives next week. This sentiment is heat embossed with white embossing powder. We finish things off with a scattering of white transparent dots.

It’s always fun to build scene cards, and this fun fold is a terrific way to combine this beautiful Everyday Skies paper with the Hot Air Balloon bundle. I love how you’ll be writing your message in the sky when leaving a note for the recipient!

Today’s card is a part of the Luv 2 Stamp Group Instagram Hop, which goes live at 9 AM Pacific Time (PST).  Click here to head over to my Instagram feed at 9 AM Pacific/11 AM Central and check out what the other demos in our L2S Group have created for you today! 

Product List
Back to School

New Heights

Welcome back to a brand new week! I hope everyone enjoyed a restful weekend. We enjoyed watching more of the Olympic Games. Hard to pick a favorite event because we enjoy watching many of them. Have you been watching?

This week is our last week of summer break. School will be back in session on Monday and we’re still squeezing in all the end-of-summer fun. Break felt both short and long all at the same time! Did summer feel that way to you?

In honor of a new school year, this week’s design theme is back to school. And I must admit that I may have bitten off a little more than I can chew with this one. But I promised a week of using our products in surprising ways, didn’t I?! Well, I will certainly have to in order to work within our theme!

Today’s outside the box opportunity is solving a sentiment dilemma when you don’t have a stamp that fits the bill. How did I solve it? Well, let’s talk about our card and find out.

We get started with a base of Pool Party cardstock. After cutting a pice of white cardstock into quarter sheets, I used the Bright Skies dies to cut the two large clouds for the bottom of our front panel scene. Layers of dimensionals give the clouds are more realistic look against our Pool Party backdrop. I used my computer to set up a Word document sized to my quarter panel, sized up the space I would need to fill the medium cloud die, and printed my sentiment on the white cardstock. I then diecut the sentiment with the cloud die. I really wanted large font for the sentiment and that meant orienting my cloud in an unconventional way. But then, when you think about it, clouds come in all sorts of shapes and sizes, so is there really a conventional orientation? *grin* Several layers of dimensionals allow the sentiment panel to rise above the rest of our scene.

For the balloons, I pulled out the Hot Air Balloon stamps and dies set. I really liked the patterns that the Bright and Beautiful designer paper pack had to offer and decided I would layer the balloon shaping stamps on top. I think it turned out pretty neat. Our balloon baskets are cut from gold foil specialty paper. Each balloon is adhered on a different layer to give lots of dimension to our scene and really reinforce the sentiment theme of rising to new heights.

One of the fun things about challenging ourselves with various themes or ideas is that we don’t always have everything we think we need to pull it off. But with a little creative thinking and using tools that we maybe don’t turn to as often in a certain medium, like the printer in this case, we can usually make it work with beautiful results.

Tomorrow, we’ll be trucking along to school. I hope you’ll tune in to see what that’s all about!

Products used in today’s card:
Pool Party, Basic White cardstock
Bright & Beautiful, gold foil DSP
Hot Air Balloon stamps & dies
Bright Skies dies
Rainbow dots
Dimensionals
Adhesives

Product List
Coming Soon

Flying Hi

This week, we’re taking to the skies with some Stampin’ Up! flying-themed products. Thus far, we’ve made some cute cards using the Hot Air Balloon bundle. And today, I’m sharing a sneak peek of a brand NEW bundle that will be available in the upcoming 2024-25 Annual Catalog that releases in May.

Say hello to Adventurous Sky! Did you know that my husband is a commercial pilot? And he’s the inspiration for this week’s theme and the reason that I just had to have this new aviation-themed bundle!

Like all of the Stampin’ Up! product line, the NEW Adventurous Sky stamps and dies pair perfectly with other existing product lines. For today’s card designed, I’ve paired it with the Bright Skies and Hot Air Balloon bundles to make this fun card.

Our card starts with a base of white cardstock. The focal panel is built on a background of Pool Party cardstock that has been diecut using the largest Deckled Rectangles die. I cut a variety of clouds using the Bright Skies and Hot Air Balloon dies and layered them across the background for lots of billowy dimension. The hot air balloon combines a Berry Burst balloon with a white glimmer banner and Bubble Bath frills — the whole balloon made with the Hot Air Balloon bundle. The staggerwing aircraft is the medium-sized airplane stamp in the Adventurous Sky stamp set. It’s stamped in black and then colored with Stampin’ Blends before being diecut with the coordinating die. The sentiment is also from the Adventurous Sky stamp set. The scene is finished off with a combination of white sequins from the Sequins Trio and the Pool Party dots from the Rainbow Dots set.

Fly back in tomorrow to see more of the Adventurous Sky set at work!

Products used in today’s design:
Pool Party, Berry Burst, Basic White cardstock
White glimmer, Bubble Bath soft shimmer SP
Hot Air Balloon, Adventurous Sky (coming soon!) bundles
Bright Skies dies
Sequins trio, rainbow dots
Dimensionals
Adhesives

January Mini Catalog

Wishes Up and Away

This week, we’re flying high with Stampin’ Up! sets that feature vehicles of flight. Thus far, we’ve been soaring with the Hot Air Balloon bundle. And today’s design is (almost) directly inspired by fellow SU! demo Anne Granger. Just a few tweaks here & there with products I had on hand and *voila* a fantastic birthday card ready to hoist your well wishes.

This card design begins with a base of Lost Lagoon cardstock. The background panel consists of a mat of Pretty Peacock soft shimmer paper and the lovely rainbow pattern designer paper from the Sale-a-Bration pack called Sunny Days. The focal panel is also matted with the shimmer paper and the balloon is stamped directly on the white cardstock panel in coordinating colors of Lost Lagoon and Pretty Peacock. I dressed up the sentiment by diecutting it separately using the Autumn Leaves dies. This design is finished off with Pretty Peacock sequins from the Sequins Trio set and the Pretty Peacock & Gold metallic ribbon.

Tune in tomorrow to get a SNEAK PEEK at a brand new flight-related suite of products. I know you’re gonna love it as much as I do!

Products used in today’s card:
Lost Lagoon, Basic White cardstock
Pretty Peacock fine shimmer SP
Sequins trio
Pretty Peacock & Gold metallic ribbon
Dimensionals
Adhesives

All ads on this site are posted by WordPress.  Song Sparrow Papercrafts is not responsible for ad content.

January Mini Catalog

A Note to Lift You

I love a good play on words. And Stampin’ Up! never fails to deliver on them in their sentiments. I find that a good pun always makes me smile or even chuckle. And who doesn’t need a little bit of that in their life?!

Today’s card is all about the pun in the Hot Air Balloon set. We get started with a base of Lost Lagoon cardstock. The background panel consists of a mat of Lost Lagoon shimmer paper and a sheet of the Lighter Than Air designer series paper. Our focal images are diecut from another sheet of Lighter Than Air using the Hot Air Balloon dies. I added a few detail die strips to a few balloons and each balloon got a treatment of coordinating Rainbow Dots to really punch things up (see what I did there? *snicker*). The balloon baskets are a combination of Calypso Coral and Crumb Cake cardstock. I added dimensionals and a vellum cloud for a bit of realism to our scene. The sentiment from the Hot Air Balloon set is stamped on white cardstock and then cut with trimmers to resemble a banner. The sequins and ribbon add a bit of sparkle and help the eye move diagonally across the card design.

Sail in tomorrow to see what card is taking flight!

Products used in today’s design:
Lost Lagoon, Crumb Cake, Calypso Coral, Pretty Peacock, Basic White, vellum cardstock
Lost Lagoon shimmer, Lighter Than Air DSP
Hot Air Balloon stamps
Silver & white sheer ribbon
Rainbow dots
Neutrals sequins
Dimensionals
Adhesives

All ads on this site are posted by WordPress.  Song Sparrow Papercrafts is not responsible for ad content.