Holiday Mini Catalog

Noel to You

Happy Monday, friends! Glad you’ve stopped by. We had a busy weekend. What about you? And with it being so hot (welcome to August in Texas!), it meant some creative changes in plans too. But we had no shortage of things to do inside so it kinda worked out.

We’re still working through the new stash of holiday products that will be releasing in a few weeks and this week is all about the razzle dazzle. If there’s something sparkly, shiny, or otherwise blingy, it usually comes to join my stash. But this catalog has some particular nice razzle dazzle things! And today we’re pulling out some of the Neutral Noel products to build this scene.
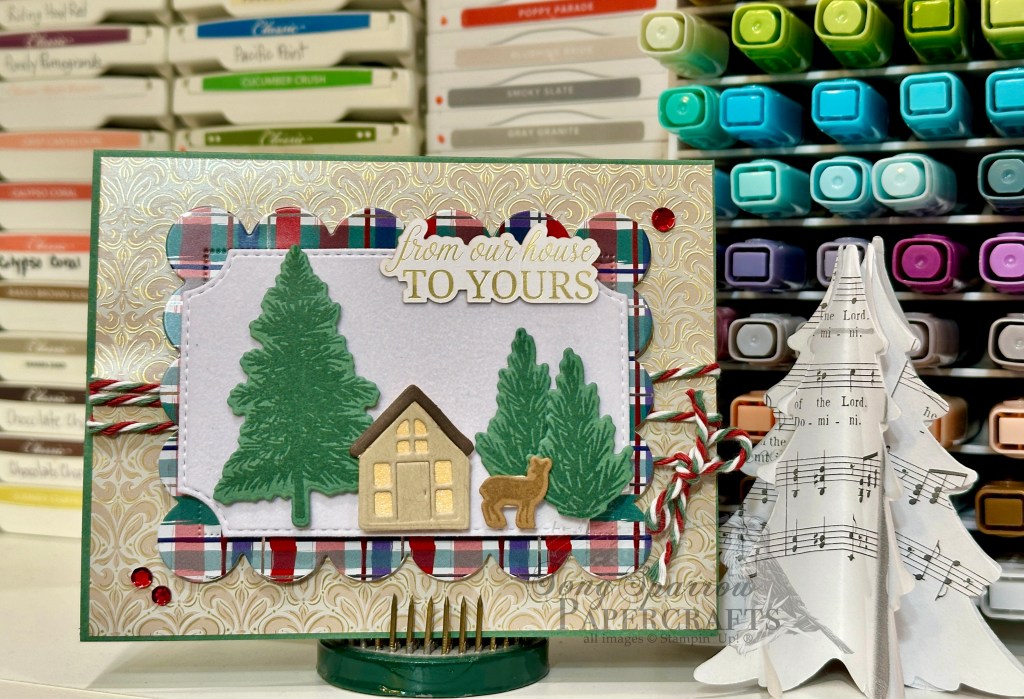
We get started with a base of Peaceful Pine cardstock. A sheet of the foiled filagree paper from the Neutral Noel paper pack serves as our backdrop. And it’s wrapped in a nice bow of festive baker’s twine before getting adhered to our card front. Special note: I really should adhered the background panel with dimensionals to provide some relief from the wrapping of twine. It works okay directly adhered to the card front, but I think I would have liked a flatter look.

Our focal panel begins with a sheet of foiled plaid from the All Wrapped Up paper pack that’s cut with the new Scalloped Christmas Cheer dies. We cut a piece of white velveteen paper with the Branching Out dies to create our snowy scene that’s built with the Welcome Noel stamp & die bundle. The trees are stamped tone-on-tone on Peaceful Pine and cut with the coordinating dies, while the houses are paper pieced with a combination of Crumb Cake, Early Espresso, and Golden Glow pearlized paper to create a warm glow in the windows. The deer is cut from Pecan Pie cardstock and placed in our scene with dimensionals for depth of scene. We finish things off with a sentiment from the Greetings for You ephemera pack and a few red sequins from the new sparkle pack.

We continue rolling through the dazzle dazzle tomorrow. I hope you’ll drop in!

Products used in today’s card:
Peaceful Pine, Pecan Pie, Early Espresso, Crumb Cake CS
Velveteen SP, Pearlized SP, *Neutral Noel, *All Wrapped Up DSP
*Welcome Noel bundle
Branching Out, *Scalloped Christmas Cheer dies
Greetings for You ephemera (retired)
*Festive twine
*Sparkle sequins
Dimensionals
Adhesives
*coming in Sept
Holiday Mini Catalog · Winter

Wonderful Snowflakes

TGIF, everybody! We have made it to the weekend, and I don’t know about you but I’m ready. After surviving the first week of school schedule change, downtime is required and stat!

And speaking of downtime, I got to put an idea into action in the studio this evening as I put this card together. I put the latest SU! sketch into action and had fun adding a few twists to meet our them this week. We’re letting the new Dreamy Snowflakes bundle take center stage today.

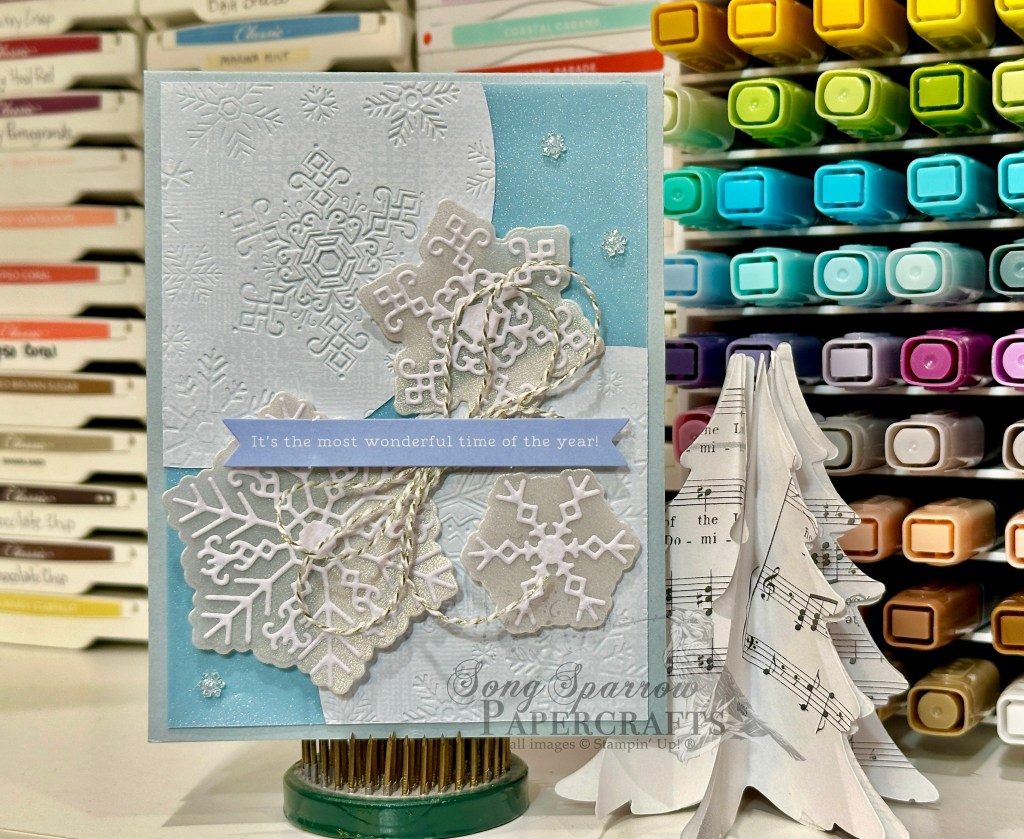
We get started with a base of Cloud Cover cardstock. To capture the twinkle of freshly falling snow, I decided to have our focal panel backdrop be a sheet of blue shimmer vellum. I picked a coordinating piece of the Velvet Meadow patterned paper to create the corner circle elements. Before cutting them out, the full panel is run through the Dreamy Snowflakes embossing folder to give us our background flakes in each corner. The three snowflakes in the center are created with a combination of shimmer vellum and white velvet specialty paper using the Dreamy Snowflakes dies. After glueing the vellum and velvet together, they’re adhered to our card front with dimensionals. The sentiment from the Season of Celebration ephemera pack is stacked on some gold and white baker’s twine and then adhered over the snowflakes with dimensionals. A few adhesive snowflakes finish things off with the perfect amount of twinkle.

We will finish off this week’s trek in the woods tomorrow. I hope you’ll drop by!

Products used in today’s card:
Cloud Cover CS
Velvet Meadow, Velveteen, Sunset Shimmer vellum DSP
Dream Snowflakes dies & EF (coming in Sept)
Season of Celebration ephemera (coming in Sept)
Gold & white baker’s twine
Adhesive snowflakes (coming in Sept)
Dimensionals
Adhesives

Coming Soon · Holiday Mini Catalog

Christmas Joy

Welcome back, everybody! As I’m sure you could tell, yesterday didn’t exactly go as planned. By the time I had the free time to craft, my giddy up had gone and went! Alas, that’s the way it goes sometimes.

But I got some inspiration and a little time today and pulled out the new Neutral Noel suite and a few other new releases to pull this one together as we continue our outdoor frollicks.

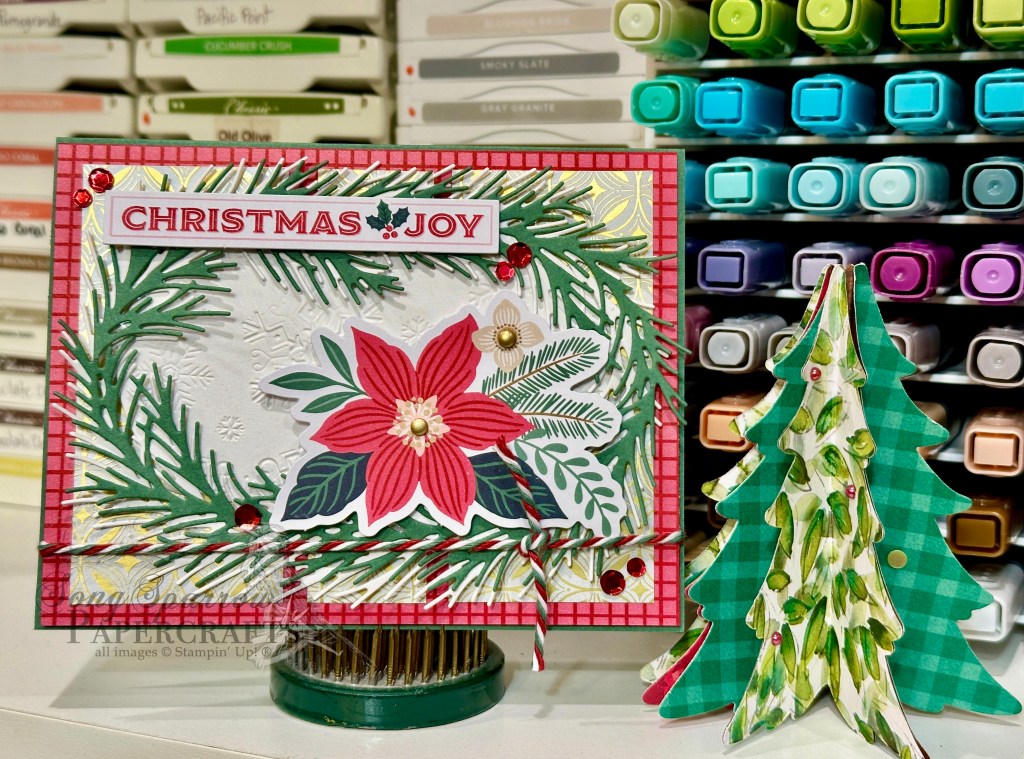
So for this one, we get started with a base of Peaceful Pine cardstock. The backdrop is a sheet of the red plaid paper from the Creative Celebrations paper pack and then we finish it off with strips of the gorgeous gold trefoil from the Neutral Noel pack. We wrap the whole caboodle with some festive tricolor twine. Our focal panel starts with a large white oval panel that’s cut with the Noel Tidings dies and then machine embossed with the new Dreamy Snowflakes embossing folder, we affix to that two evergreen wreaths also cut with the Noel Tidings dies. To that we add a sprig of evergreen and poinsettias from the Season of Celebration ephemera pack and top it all off with our sentiment banner, also from the ephemera pack. We finish everything off with a pop of sparkle with a scattering of red sequins.

Tomorrow we’re going to trek along with Mr. Frost. I hope you’ll drop by!

Products used in today’s card:
Peaceful Pine, Basic White CS
Creative Celebrations & Neutral Noel (coming in Sept) DSP
Season of Celebration ephemera (coming in Sept)
Noel Tidings bundle (coming in Sept)
Dreamy Snowflakes EF (coming in Sept)
Sparkle sequins & gold dots (coming in Sept)
Holiday baker’s twine (coming in Sept)
Dimensionals
Adhesives

Coming Soon · Holiday Mini Catalog

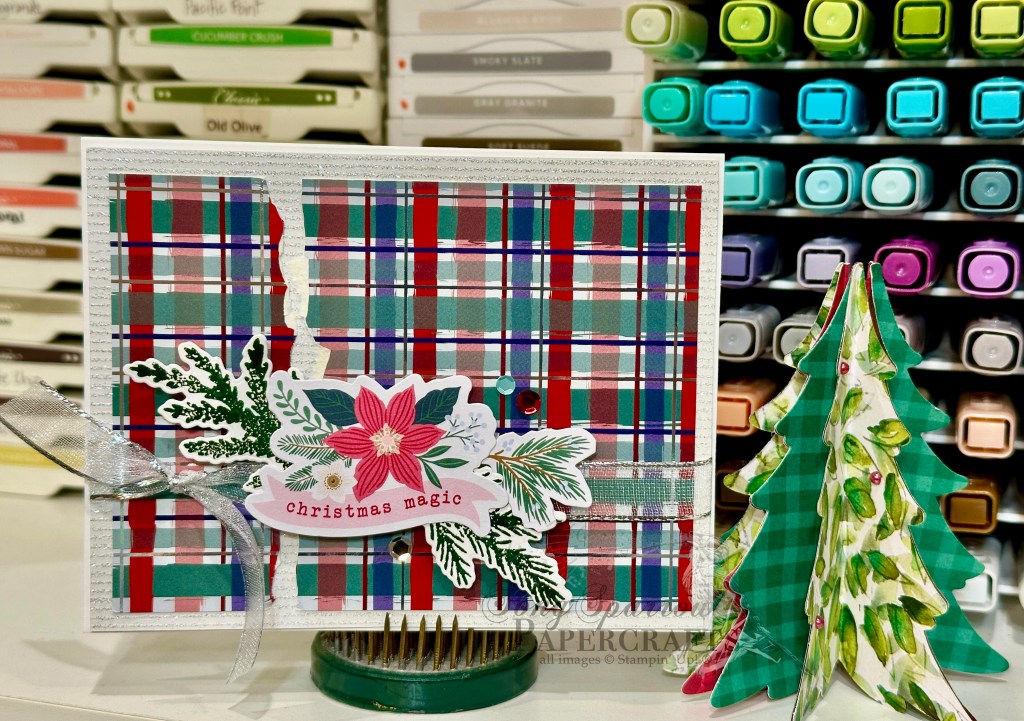
Christmas Magic

Howdy, friends! Welcome to the nest. I’m glad you’ve stopped by today. This week, we’re designing around the great outdoors. And today is one of the cards where you have an idea but you have to pivot. I had this grand idea using one of the new holiday sets that will launch in September but then didn’t have quite enough time or brain power to pull it all together. But I had enough pieces to make a variation of yesterday’s layout with a little holiday magic from the Season of Celebration ephemera pack.

So we get started with a base of white cardstock and then use a sheet of the gorgeous Shimmering Stripes glitter paper as the backdrop. I pulled the gorgeous Christmas plaid paper from the new All Wrapped Up paper pack. HINT: if you decide to use the new foiled paper, it’s much thicker paper and the foil bit do not tear easily since they’re more stretchy than fibrous, but I used the paper snips here and there to help keep the tearing going. I adhered my two sparkly panels together with tear and tape for added adhesiveness. The panel is then wrapped in silver-edged sheer ribbon before adhering it to the card front with dimensionals. Our focal section uses a couple of images from the Season of Celebration ephemera pack and then a couple of stamped evergreen branches using the new Noel Tidings stamp & die bundle. It’s adhered to our card front with several layers of dimensionals so it stands nice and proud above our ribbon. We finish things off with a few of the new sparkle sequins.

We’re continuing our trek in the great outdoors tomorrow. Who knows — maybe I can get that card in my head out on paper! You’ll have to drop by to see. *wink*

Products used in today’s card:
White CS
Shimmering Stripes, All Wrapped Up (coming in Sept) DSP
Season of Celebration ephemera (coming in Sept)
Noel Tidings bundle (coming in Sept)
Sparkle sequins (coming in Sept)
Silver-edged sheer ribbon
Dimensionals
Adhesives

Holiday Mini Catalog · Holidays

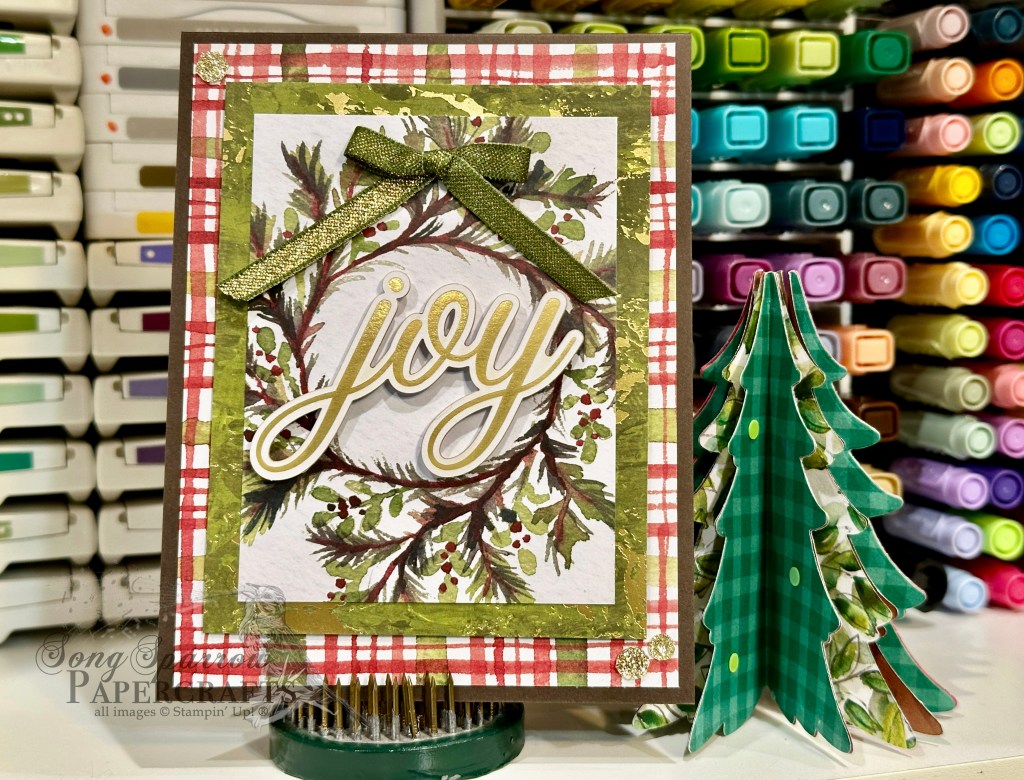
Wreath of Joy

This week we’ve been making clean & simple holiday card designs using some of the new Stampin’ Up! holiday products that just launched this week. Today we’re pairing up the Joyful Days Memories & More cards with the Greetings for You ephemera to create this lovely wreath of joy.

We get started with a base of Early Espresso cardstock. I love how it pulls out the wood stem of the evergreen in the wreath. Our backdrop is one of the larger cards of Christmas plaid from the Joyful Days pack. This really makes things festive. Our focal panel consists of two panels – the wreath card from the Joyful Days pack and the mat of Old Olive Season of Elegance paper. I love how this gives the perfect amount of sparkle that really helps bring our sentiment front and center. The full panel is adhered to the card backdrop using dimensionals. The sentiment JOY is from the Greetings for You ephemera pack and is adhered on multiple layers of dimensionals to ensure it stands tall above the rest of the design. We finish things off with a bow of Mossy Meadow & Gold ribbon at the top-center of our wreath and then some gold sparkly sequins from the Traditional Sparkling Sequins pack in opposing corners to tie the gold elements together.

I hope you’ve gotten some good ideas from this week’s designs to get you started on your holiday card stash. Next week is all about birthdays. I hope you’ll come along as we tour through the crafty stash to make some fun birthday cards.

Product List
Holiday Mini Catalog · Holidays

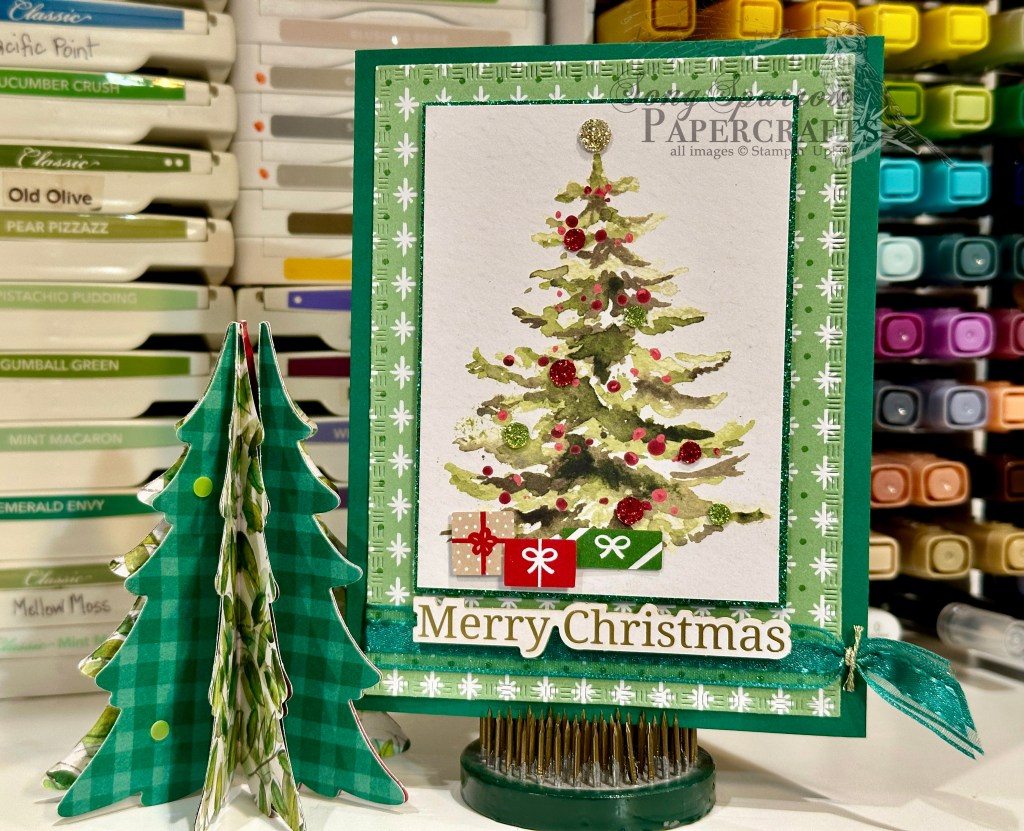
Christmas Wishes

Howdy, friends! Have this week’s card designs gotten you into the holiday spirit? Well, today’s card will have you smelling evergreens. *wink*

We’re using some of the new Stampin’ Up! holiday release products to create our clean & simple holiday card designs this week. And today, we’re pairing up the Joyful Days Memories & More card pack with the Christmas Tags & More paper pack with coordinating ephemera sheets and the Greetings for You ephemera pack. And what kind of card would it be if I didn’t include some sparkle? *grin*

We get started with this card with a base of Shaded Spruce cardstock. The background panel is a sheet of snowflake pattern Christmas Tags & More paper diecut with the largest Textured Notes die. The bottom of the panel is wrapped with Shaded Spruce sheer ribbon that is tied off with some gold thread (both now retired). Our focal panel is the smaller evergreen card from the Joyful Days card pack that is matted with some (retired) Shaded Spruce festive glimmer paper and mounted on dimensionals. I added some of the packages from the ephemera sheet included in the Christmas Tags & More pack and mounted them on varying levels of dimensionals for some realistic depth of scene. The tree baubles are some of the traditional sparkling sequins. We finish things off with a holiday sentiment from the Greetings for You ephemera pack and mount it with enough dimensionals to stand above the center focal point.

This is such a super simple design – so fun & so easy to put together. And don’t you think it’s just a lovely way to send some holiday cheer? Tomorrow we’re going to close out this week’s design series with a traditional evergreen wreath. I hope you’ll pop in and check it out.

Product List
Holiday Mini Catalog · Holidays

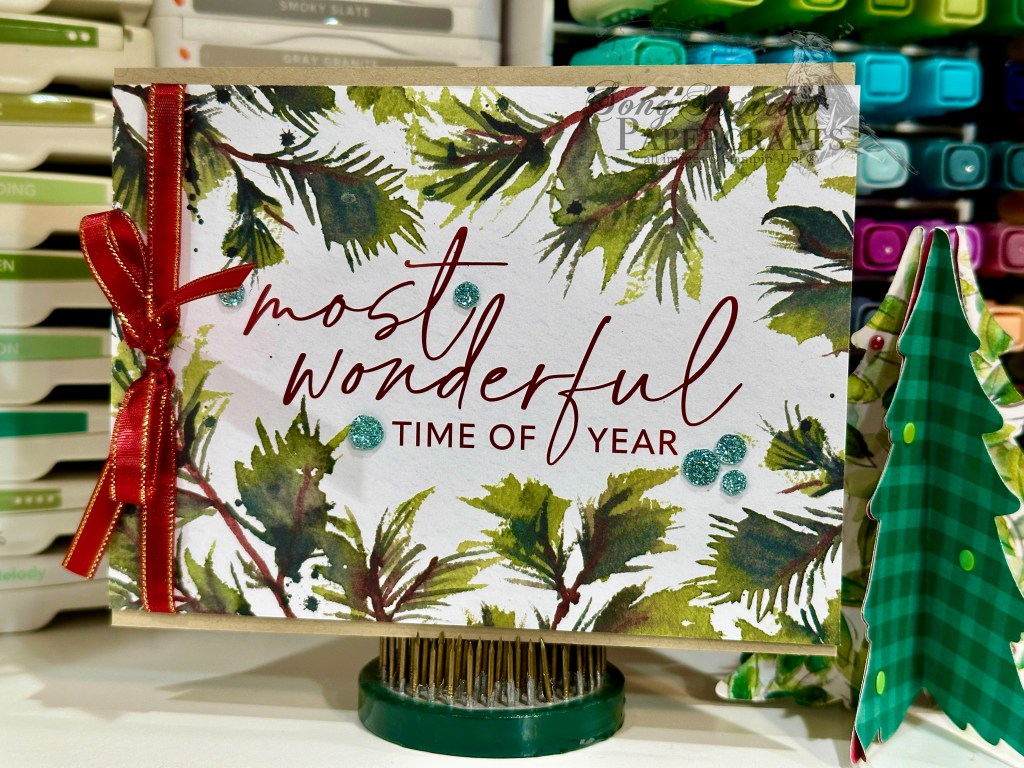
Wonderful Time

It is most definitely the most wonderful time of the year. Wanna know why? Two things: (1) it’s starting to feel like fall, which is my most favorite season; AND (2) it’s time for the new Stampin’ Up! Holiday Mini Catalog!!! Have you checked out all the new goodies in the shop today? What’s on your shopping list? I’ve already shopped twice and still have a few more things I’m on the fence about.

This week, we’re creating very clean & simple holiday cards using the Joyful Days Memories & More card pack, Greetings for You ephemera pack, and the Christmas Tags & More 6×6 designer series paper pack with coordinating ephemera sheets. Today’s card is maybe just about the simplest design of the whole week. You can literally turn out 6 cards just. like. that.

Today’s card starts with a base of Crumb Cake cardstock. I selected the most wonderful time of year card from the Joyful Days pack and cut off just enough so it fits horizontally on the card front. Before adhering with dimensionals, I wrapped the decorative card with some (sadly retired) Cherry Cobbler & Gold satin ribbon tied with a nice, big bow. I finished it all off with a scattering of Pool Party sequins from the Traditional Sparkling sequins pack. Easy peasy!

Tomorrow we’re going to be creating a holiday card that has long legs. You’ll have to drop by to see what I mean. *wink*

Product List
Coming Soon · Holiday Mini Catalog

Merry & Bright Plaid

I don’t know about you, but I have a love-hate relationship with holiday weeks. We all love a short work week, but it always feels to me like I’m just squeezing in a lot more work into a shorter time period. That was definitely the case today anyway!

And I’ve been SO off on my days as of late that I was thinking today was the new product release day when it’s actually tomorrow….womp-womp! But it doesn’t dampen my enthusiasm for you to see all of the new stuff. I’m just sad you have to wait one more day.

Anywho, this week we’re getting another peek at some of the cute holiday products that will be available tomorrow. Our design focus this week is clean and simple holiday cards using the Joyful Days Memories & More card pack, the Greetings for You ephemera, and the Christmas Tags & More patterned paper pack with ephemera sheets included. So much good stuff! Today we’re mixing in an embossing folder.

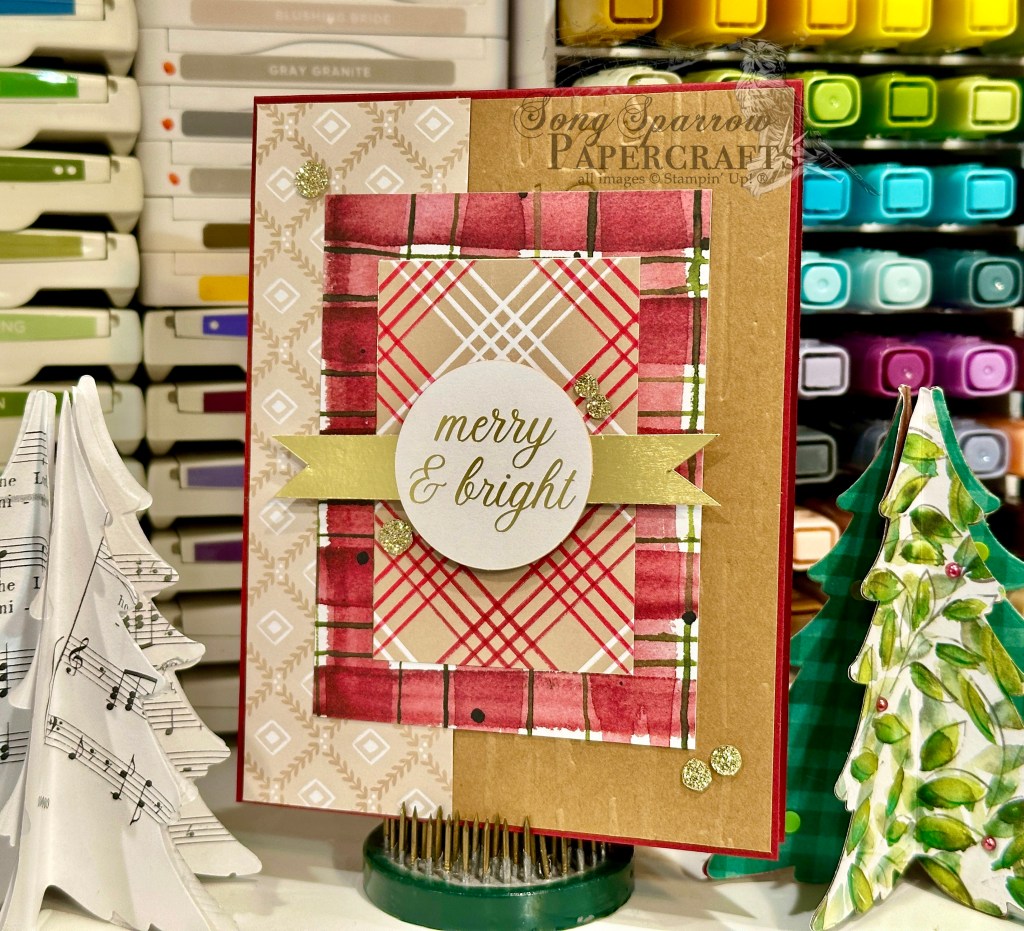
Today’s card starts with a base of Cherry Cobbler cardstock. I had a leftover strip of light brown patterned cardstock from one of the sheets in the Christmas Tags & More pack which served as the jumping-off spot for the color palette and design for the rest of the card. I paired it up with a piece of Pecan Pie machine embossed with the Birch Wood embossing folder to create the backdrop for the focal panel. The focal panel backdrop is a combination of one of the smaller cards of plaid from the Joyful Days card pack and a plaid tag from the sheet of tags in the Christmas Tags & More pack. I chose the Merry & Bright circle sentiment from the Greetings for You ephemera pack and matted it with a banner of gold foil specialty paper and adhered it to the focal panel with several layers of dimensionals to be sure it really catches the eye. I finished things off with some gold sparkly sequins from the Traditional Sparkling Sequins pack so your eye catches some sparkles all the way across the card front.

I hope you’ll tune in tomorrow to see another clean & simple holiday card design.

Products used in today’s card:
Cherry Cobbler, Pecan Pie cardstock
Gold foil, Christmas Tags & More DSP
Greetings for You ephemera
Joyful Days Memories & More card pack
Birch Wood embossing folder
Traditional sparkling sequins
Dimensionals

Coming Soon · Holiday Mini Catalog · Holidays

Happy Season

Welcome to a bright, shiny new week, everyone! We’re enjoying a day off and taking full advantage of not doing much! So that means plenty of time to play in the craft room with some new goodies and getting a start on making new gifties for an October craft show, which means playing around with goodies from the retired stash.

It’s hard to believe that a whole new batch of Online Exclusives AND the brand new Holiday Mini Catalog goodies are due to launch tomorrow! I’m so excited for you to see all of the new things. The last few releases have been a little underwhelming, in my opinion anyway, but this one is worth the wait. This release is jam-packed full of good, GOOD stuff!

This week, we’re taking an early tour of some holiday goodies as we play with the new Joyful Days Memories & More card pack, the Greetings for You ephemera, and the Christmas Tags & More patterned paper pack that includes coordinating ephemera.

For today’s card, we get started with a base of Crumb Cake cardstock. The background panel is a combination of patterns – a sheet of red Season of Elegance foiled paper and a sheet of the festive plaid from the Christmas Tags & More pack. The focal panel is one of the smaller tree scene cards from the Joyful Days card pack that is matted with some gold textured paper. Some new Real Red shiny ribbon is tied around the bottom third of the full panel. And tucked underneath on several layers of dimensionals is the foiled sentiment from the Greetings for You ephemera pack. I’ve finished things off with a touch of sparkle in opposing corners from the Traditional Sparkling Sequins.

I hope you’ll drop by tomorrow to see another holiday-inspired design.

Products used in today’s card:
Crumb Cake cardstock
Christmas Tags & More (launching tomorrow!), textured gold metallic, Season of Elegance DSP
Joyful Days Memories & More card pack (launching tomorrow!)
Greetings for You ephemera pack (launching tomorrow!)
Real Red shiny ribbon (launching tomorrow!)
Traditional sparkling sequins (launching tomorrow!)
Dimensionals
Adhesives

Coming Soon · Holiday Mini Catalog · Lights of Aurora

Year of Magic

Welcome to the weekend, everyone! I don’t know about you, but I had the Monday-ist Friday everrrrrrrr. So needless to say, by the time work was over and I was home, I had zero energy or creativity left for getting crafty. But I’m hoping to make up for it today as we close out our design series using the new SU! Lights of Aurora suite set to launch in a little over a week.

Today we’re pairing up the Lights of Aurora paper and dies to create this stunning fun fold scene. I’m calling this the Dutch Door fold because it reminds me of the divided swinging doors. What do you think?

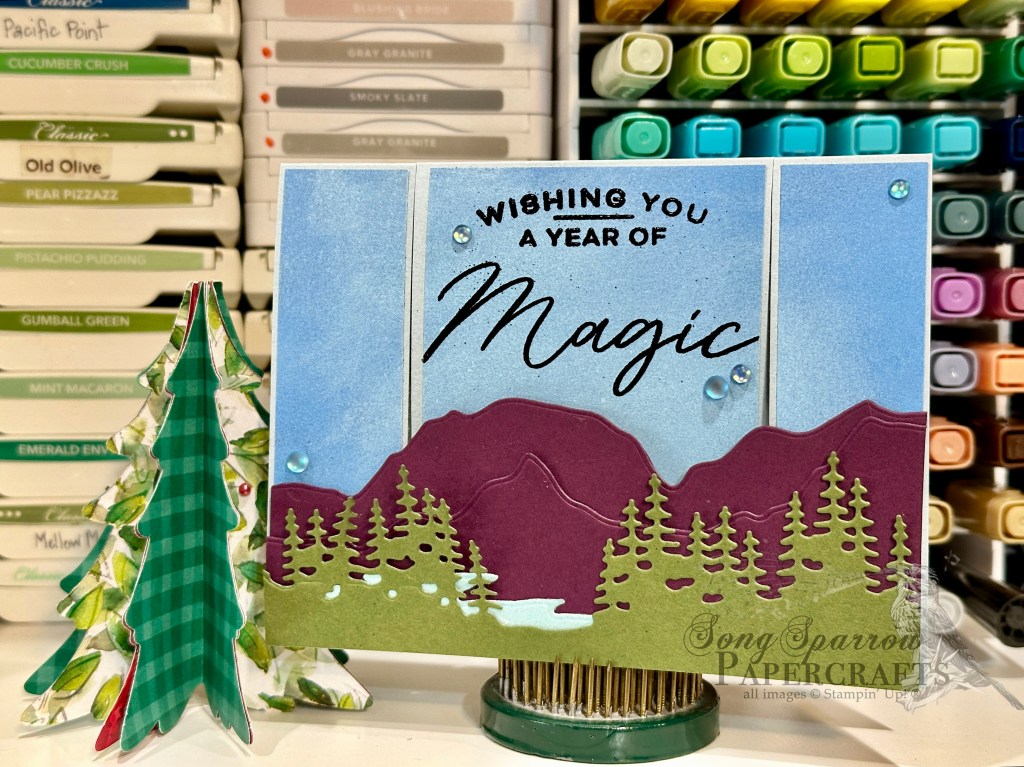
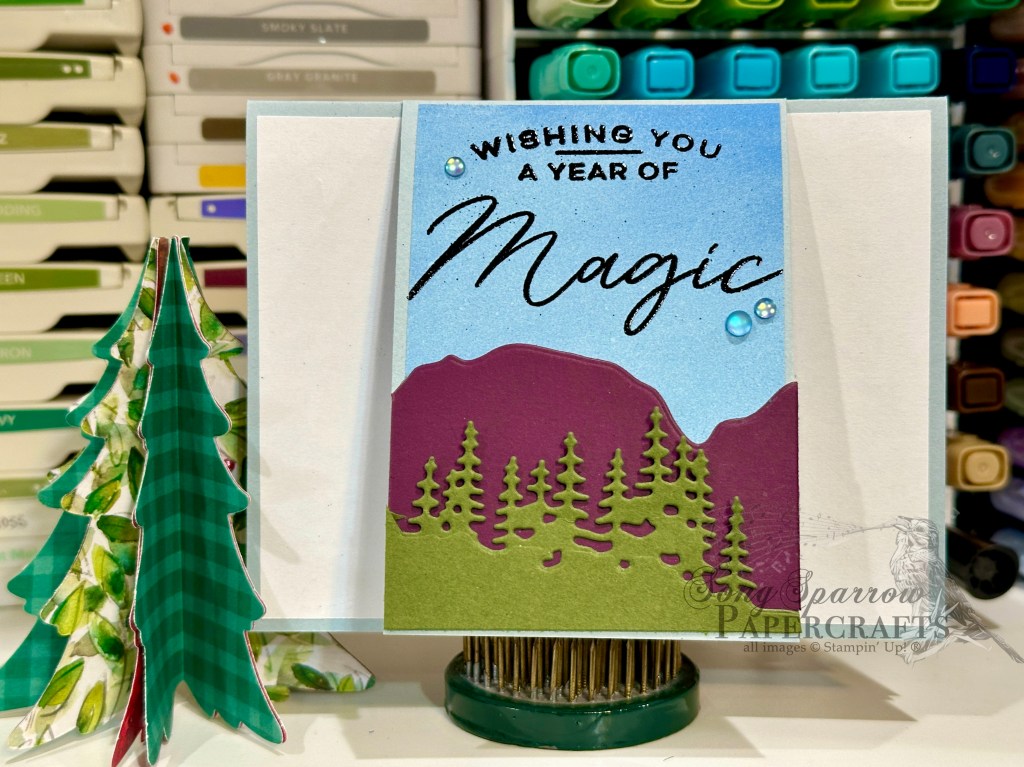
Our card gets started with a base of Cloud Cover cardstock. I have to say that I think this might be my new favorite neutral background starter! I chose a sheet of blue paper from the Lights of Aurora paper pack that reminded me of the sky, which happens to look bright & blue just like this in our area today. The card front is cut into three sections to create the center section and then spanning section over the top. The Light & Wonder dies help us create the mountains and trees that span the front of the card. A small lake created with the pastel ombre paper peeks out from the glad in the middle of the trees. The sentiment from the Light & Wonder stamp set is stamped on the center panel and heat embossed in black. When the connected panel is lifted to reveal the center section of the card front, you can see that I’ve used the Light & Wonder dies to recreate a portion of the larger scene – a lot like a picture-in-picture effect. A scattering of some frosted iridescent dots finish things off with a little twinkle.

I think the Dutch Fold would work perfectly with similar die sets that create a cut that spans a longer distance. Think tree lines, mountains, or something similar. Would you like to try your hand at this fold? You can download the free PDF tutorial here.

Products used in today’s card:
Cloud Cover, Blackberry Bliss, Mossy Meadow, Basic White cardstock
Lights of Aurora (coming in Sept), pastel ombre glimmer DSP
Light & Wonder stamps & dies (coming in Sept)
Black embossing powder
Frosted iridescent dots (coming in Sept)
Dimensionals
Adhesives