TGIF and happy weekend, everybody! I actually had this card all ready to go last night but ran out of juice to do the photo editing and write-up. So it goes sometimes. We’re midway into a busy Saturday as we shuttle the kiddo around for bowling league and school supplies and the like. What are you up to this weekend?
This week, we’re keeping clean & simple at the forefront as I continue to hunt for my crafty mojo. I have to say that this particular card was a struggle for me. I knew what I wanted to put together but was having a hard time getting it right. So I picked the kiddo’s brain. Do you ever do that? Phone a friend? Sometimes it can be super helpful when you’re feeling stuck. What I needed to make this card right was the appropriate color palette, which seemed obvious after the kiddo pointed it out!
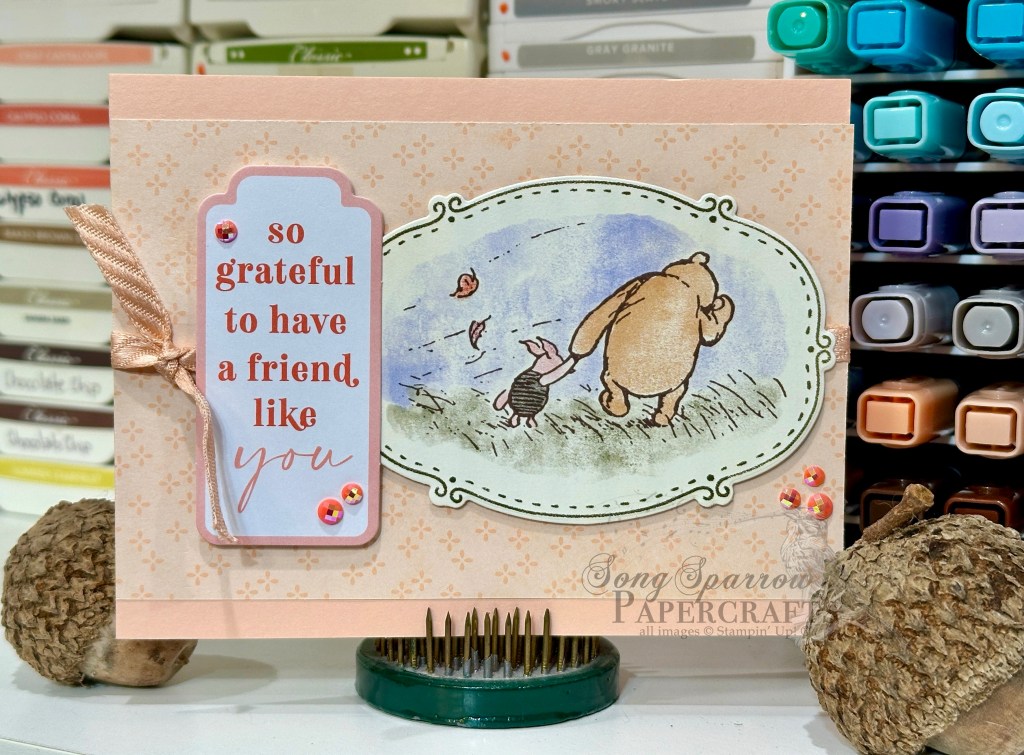
We get started with some Petal Pink cardstock as our card base and then use a sheet of the Lovely Blossoms paper as the backdrop for our focal section. The backdrop is wrapped in some retired Petal Pink striped ribbon before the panel is adhered to the card front with adhesive runner. Our focal section consists of the cute Pooh & Piglet image panel and then sentiment. The image panel is cut from a sheet of the Silly Old Bear paper using the coordinating Sweet Words & Labels dies. Both panels are adhered to our card front using layers of dimensionals. And we finish things off with some of the Petal Pink pearlized faceted circles for a little sparkle.
I just love how the image and the sentiment work together for this one, which I think is why I struggled so much with the layout at first. I was dead set on using the sentiment because nothing says wonderful friend like someone who holds your hand through life’s topsy-turvy moments!
I’m hoping to bring you one more clean and simple design to round out our week. But first….we have a few more things to knock off our Saturday to-do list!
Product List![Petal Pink 8-1/2" X 11" Cardstock [ 146985 ]](https://assets1.tamsnetwork.com/images/EC042017NF/146985s.jpg "Petal Pink 8-1/2\" X 11\" Cardstock [ 146985 ]")
![Lovely Blossoms 12" X 12" (30.5 X 30.5 Cm) Designer Series Paper [ 167168 ]](https://assets1.tamsnetwork.com/images/EC042017NF/167168s.jpg "Lovely Blossoms 12\" X 12\" (30.5 X 30.5 Cm) Designer Series Paper [ 167168 ]")
![Silly Old Bear 12" X 12" (30.5 X 30.5 Cm) Designer Series Paper [ 167616 ]](https://assets1.tamsnetwork.com/images/EC042017NF/167616s.jpg "Silly Old Bear 12\" X 12\" (30.5 X 30.5 Cm) Designer Series Paper [ 167616 ]")
![Sweet Words & Labels Dies [ 167627 ]](https://assets1.tamsnetwork.com/images/EC042017NF/167627s.jpg "Sweet Words & Labels Dies [ 167627 ]")
![Sincerely Noted Mix & Match Ephemera Pack (English) [ 167706 ]](https://assets1.tamsnetwork.com/images/EC042017NF/167706s.jpg "Sincerely Noted Mix & Match Ephemera Pack (English) [ 167706 ]")
![Ribbon Duo Combo Pack [ 161318 ]](https://assets1.tamsnetwork.com/images/EC042017NF/161318s.jpg "Ribbon Duo Combo Pack [ 161318 ]")
![Pearlized Faceted Circles [ 166978 ]](https://assets1.tamsnetwork.com/images/EC042017NF/166978s.jpg "Pearlized Faceted Circles [ 166978 ]")
![Stampin' Dimensionals [ 104430 ]](https://assets1.tamsnetwork.com/images/EC042017NF/104430s.jpg "Stampin' Dimensionals [ 104430 ]")
![Crumb Cake 8-1/2" X 11" Cardstock [ 120953 ]](https://assets1.tamsnetwork.com/images/EC042017NF/120953s.jpg "Crumb Cake 8-1/2\" X 11\" Cardstock [ 120953 ]")
![Beautiful Gallery 6" X 6" (15.2 X 15.2 Cm) Designer Series Paper [ 165196 ]](https://assets1.tamsnetwork.com/images/EC042017NF/165196s.jpg "Beautiful Gallery 6\" X 6\" (15.2 X 15.2 Cm) Designer Series Paper [ 165196 ]")
![Basic White 8 1/2" X 11" Cardstock [ 166780 ]](https://assets1.tamsnetwork.com/images/EC042017NF/166780s.jpg "Basic White 8 1/2\" X 11\" Cardstock [ 166780 ]")
![Scenic Coast 6" X 6" (15.2 X 15.2 Cm) Specialty Designer Series Paper [ 167773 ]](https://assets1.tamsnetwork.com/images/EC042017NF/167773s.jpg "Scenic Coast 6\" X 6\" (15.2 X 15.2 Cm) Specialty Designer Series Paper [ 167773 ]")
![Fresh Freesia 1/4" (6.4 Mm) Satin Ribbon [ 168199 ]](https://assets1.tamsnetwork.com/images/EC042017NF/168199s.jpg "Fresh Freesia 1/4\" (6.4 Mm) Satin Ribbon [ 168199 ]")
![Purple Fine Shimmer Gems [ 162611 ]](https://assets1.tamsnetwork.com/images/EC042017NF/162611s.jpg "Purple Fine Shimmer Gems [ 162611 ]")
![Sunset Shimmer Vellum 12" X 12" (30.5 X 30.5 Cm) Specialty Paper [ 167784 ]](https://assets1.tamsnetwork.com/images/EC042017NF/167784s.jpg "Sunset Shimmer Vellum 12\" X 12\" (30.5 X 30.5 Cm) Specialty Paper [ 167784 ]")
![Sunset Coast Bundle (English) [ 167781 ]](https://assets1.tamsnetwork.com/images/EC042017NF/167781s.jpg "Sunset Coast Bundle (English) [ 167781 ]")
![Saying Something Mix & Match Ephemera Pack (English) [ 163761 ]](https://assets1.tamsnetwork.com/images/EC042017NF/163761s.jpg "Saying Something Mix & Match Ephemera Pack (English) [ 163761 ]")
![Lost Lagoon Classic Stampin' Pad [ 161678 ]](https://assets1.tamsnetwork.com/images/EC042017NF/161678s.jpg "Lost Lagoon Classic Stampin' Pad [ 161678 ]")
![Secret Sea Classic Stampin' Pad [ 165285 ]](https://assets1.tamsnetwork.com/images/EC042017NF/165285s.jpg "Secret Sea Classic Stampin' Pad [ 165285 ]")
![Crumb Cake Classic Stampin' Pad [ 147116 ]](https://assets1.tamsnetwork.com/images/EC042017NF/147116s.jpg "Crumb Cake Classic Stampin' Pad [ 147116 ]")
![Gray Granite Classic Stampin' Pad [ 147118 ]](https://assets1.tamsnetwork.com/images/EC042017NF/147118s.jpg "Gray Granite Classic Stampin' Pad [ 147118 ]")
![Early Espresso Classic Stampin' Pad [ 147114 ]](https://assets1.tamsnetwork.com/images/EC042017NF/147114s.jpg "Early Espresso Classic Stampin' Pad [ 147114 ]")
![Daffodil Delight Classic Stampin' Pad [ 147094 ]](https://assets1.tamsnetwork.com/images/EC042017NF/147094s.jpg "Daffodil Delight Classic Stampin' Pad [ 147094 ]")
![Timid Tiger Classic Stampin' Pad [ 165278 ]](https://assets1.tamsnetwork.com/images/EC042017NF/165278s.jpg "Timid Tiger Classic Stampin' Pad [ 165278 ]")
![Strawberry Slush Classic Stampin' Pad [ 165286 ]](https://assets1.tamsnetwork.com/images/EC042017NF/165286s.jpg "Strawberry Slush Classic Stampin' Pad [ 165286 ]")
![Shimmering Dots [ 167949 ]](https://assets1.tamsnetwork.com/images/EC042017NF/167949s.jpg "Shimmering Dots [ 167949 ]")
![Black & White & Gold Baker's Twine [ 166005 ]](https://assets1.tamsnetwork.com/images/EC042017NF/166005s.jpg "Black & White & Gold Baker's Twine [ 166005 ]")
![Small Blending Brushes [ 160518 ]](https://assets1.tamsnetwork.com/images/EC042017NF/160518s.jpg "Small Blending Brushes [ 160518 ]")
![Cloud Cover 8 1/2" X 11" Cardstock [ 165621 ]](https://assets1.tamsnetwork.com/images/EC042017NF/165621s.jpg "Cloud Cover 8 1/2\" X 11\" Cardstock [ 165621 ]")
![Pastels Shimmer 12" X 12" (30.5 X 30.5 Cm) Specialty Paper [ 167198 ]](https://assets1.tamsnetwork.com/images/EC042017NF/167198s.jpg "Pastels Shimmer 12\" X 12\" (30.5 X 30.5 Cm) Specialty Paper [ 167198 ]")
![Stylish Shapes Dies [ 159183 ]](https://assets1.tamsnetwork.com/images/EC042017NF/159183s.jpg "Stylish Shapes Dies [ 159183 ]")
![Sunset Coast Dies [ 167780 ]](https://assets1.tamsnetwork.com/images/EC042017NF/167780s.jpg "Sunset Coast Dies [ 167780 ]")
![Far Away Landscapes Photopolymer Stamp Set [ 167543 ]](https://assets1.tamsnetwork.com/images/EC042017NF/167543s.jpg "Far Away Landscapes Photopolymer Stamp Set [ 167543 ]")
![Pool Party Stampin' Blends Combo Pack [ 154894 ]](https://assets1.tamsnetwork.com/images/EC042017NF/154894s.jpg "Pool Party Stampin' Blends Combo Pack [ 154894 ]")
![Shaded Spruce Stampin' Blends Combo Pack [ 154903 ]](https://assets1.tamsnetwork.com/images/EC042017NF/154903s.jpg "Shaded Spruce Stampin' Blends Combo Pack [ 154903 ]")
![Soft Sea Foam Stampin' Blends Combo Pack [ 154902 ]](https://assets1.tamsnetwork.com/images/EC042017NF/154902s.jpg "Soft Sea Foam Stampin' Blends Combo Pack [ 154902 ]")
![Old Olive Stampin' Blends Combo Pack [ 154892 ]](https://assets1.tamsnetwork.com/images/EC042017NF/154892s.jpg "Old Olive Stampin' Blends Combo Pack [ 154892 ]")
![Smoky Slate Stampin' Blends Combo Pack [ 154904 ]](https://assets1.tamsnetwork.com/images/EC042017NF/154904s.jpg "Smoky Slate Stampin' Blends Combo Pack [ 154904 ]")
![Fresh Freesia Stampin' Blends Combo Pack [ 155518 ]](https://assets1.tamsnetwork.com/images/EC042017NF/155518s.jpg "Fresh Freesia Stampin' Blends Combo Pack [ 155518 ]")
![Dewdrops Embellishments [ 167748 ]](https://assets1.tamsnetwork.com/images/EC042017NF/167748s.jpg "Dewdrops Embellishments [ 167748 ]")
![Mini Stampin' Dimensionals [ 144108 ]](https://assets1.tamsnetwork.com/images/EC042017NF/144108s.jpg "Mini Stampin' Dimensionals [ 144108 ]")
![Fresh Freesia 8 1/2" X 11" Cardstock [ 155613 ]](https://assets1.tamsnetwork.com/images/EC042017NF/155613s.jpg "Fresh Freesia 8 1/2\" X 11\" Cardstock [ 155613 ]")
![Blackberry Bliss 8-1/2" X 11" Cardstock [ 133675 ]](https://assets1.tamsnetwork.com/images/EC042017NF/133675s.jpg "Blackberry Bliss 8-1/2\" X 11\" Cardstock [ 133675 ]")
![Blackberry Bliss Classic Stampin' Pad [ 147092 ]](https://assets1.tamsnetwork.com/images/EC042017NF/147092s.jpg "Blackberry Bliss Classic Stampin' Pad [ 147092 ]")
![Mini Glue Dots [ 103683 ]](https://assets1.tamsnetwork.com/images/EC042017NF/103683s.jpg "Mini Glue Dots [ 103683 ]")
![Fine-Tip Glue Pen [ 138309 ]](https://assets1.tamsnetwork.com/images/EC042017NF/138309s.jpg "Fine-Tip Glue Pen [ 138309 ]")
![Balmy Blue 8-1/2" X 11" Cardstock [ 146982 ]](https://assets1.tamsnetwork.com/images/EC042017NF/146982s.jpg "Balmy Blue 8-1/2\" X 11\" Cardstock [ 146982 ]")
![Thoughtful Journey 6" X 6" (15.2 X 15.2 Cm) Designer Series Paper [ 163303 ]](https://assets1.tamsnetwork.com/images/EC042017NF/163303s.jpg "Thoughtful Journey 6\" X 6\" (15.2 X 15.2 Cm) Designer Series Paper [ 163303 ]")
![Beautiful Bokeh 6" X 6" (15.2 X 15.2 Cm) Designer Series Paper [ 164607 ]](https://assets1.tamsnetwork.com/images/EC042017NF/164607s.jpg "Beautiful Bokeh 6\" X 6\" (15.2 X 15.2 Cm) Designer Series Paper [ 164607 ]")
![Branching Out Dies [ 165775 ]](https://assets1.tamsnetwork.com/images/EC042017NF/165775s.jpg "Branching Out Dies [ 165775 ]")
![Splash & Relax Bundle [ 167903 ]](https://assets1.tamsnetwork.com/images/EC042017NF/167903s.jpg "Splash & Relax Bundle [ 167903 ]")
![Cloud Cover Classic Stampin' Ink Refill [ 165279 ]](https://assets1.tamsnetwork.com/images/EC042017NF/165279s.jpg "Cloud Cover Classic Stampin' Ink Refill [ 165279 ]")
![Misty Moonlight Classic Stampin' Pad [ 153118 ]](https://assets1.tamsnetwork.com/images/EC042017NF/153118s.jpg "Misty Moonlight Classic Stampin' Pad [ 153118 ]")
![Pretty Peacock Classic Stampin’ Pad [ 150083 ]](https://assets1.tamsnetwork.com/images/EC042017NF/150083s.jpg "Pretty Peacock Classic Stampin’ Pad [ 150083 ]")
![Melon Mambo Classic Stampin' Pad [ 147051 ]](https://assets1.tamsnetwork.com/images/EC042017NF/147051s.jpg "Melon Mambo Classic Stampin' Pad [ 147051 ]")