Inspiration

Birthday Waves

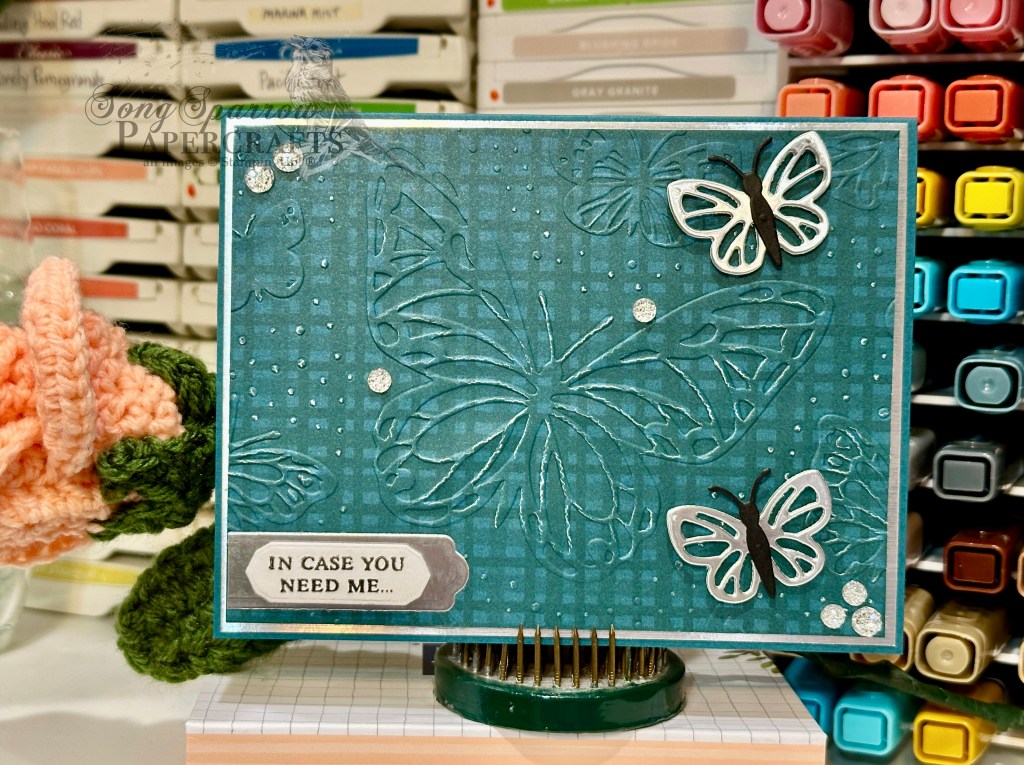
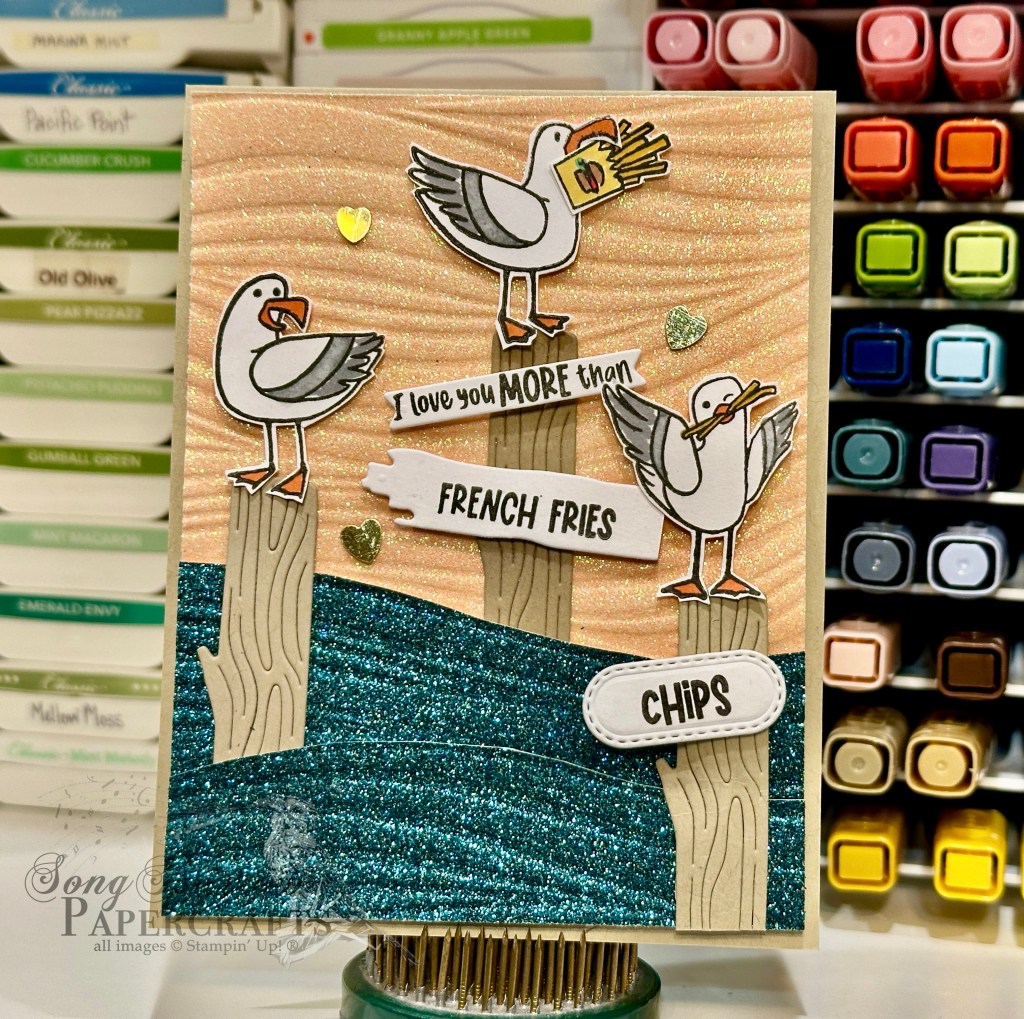
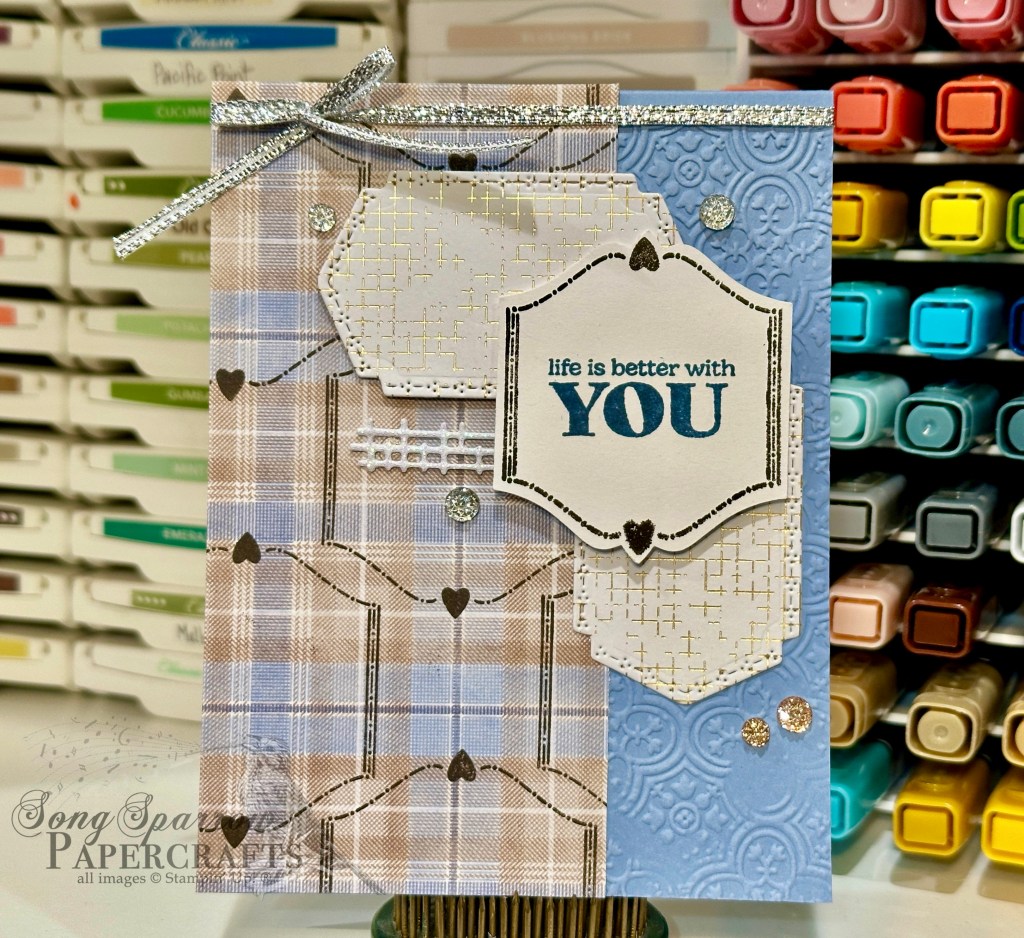
This week, our designs are focused on the combination of texture and sentiments. Today, I’m veering away from the simplicity of the design theme just a smidge as I incorporate more products in this design as we combine the Soft Waves embossing folder with the Wildflower Birthday accessories. And you may notice that while this design has a lot more accoutrement, it lacks nothing in the texture department – from embossing to chunky glimmer paper, there’s a lot going on here!

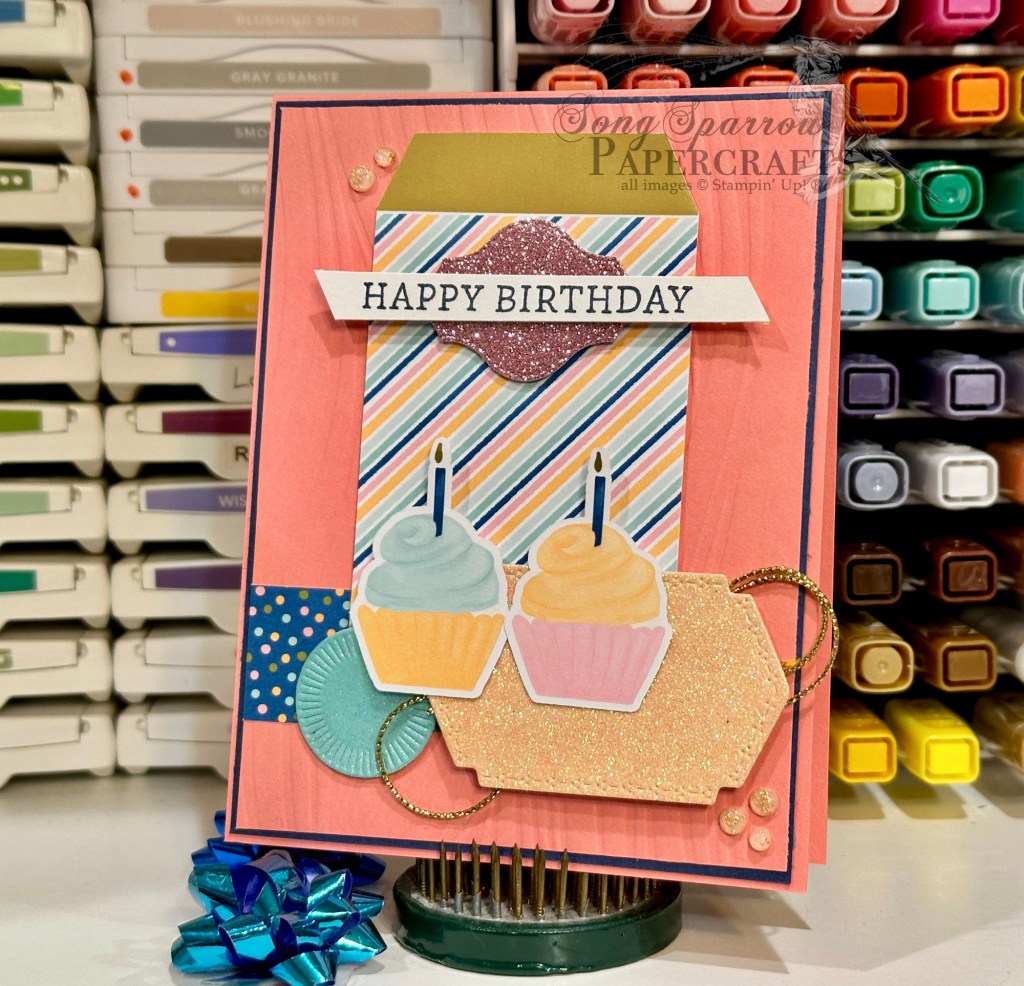
Our card gets started with a base of Flirty Flamingo cardstock. The background is a quarter-sheet of Flirty Flamingo that has been machine embossed with the Soft Waves embossing folder and then mounted on a mat of Night of Navy cardstock. Our focal section has a lot of elements from the Wildflower Birthday accessories, including the strip of blue polka-dotted paper that serves as the anchor element. Then we have the foiled and striped tag that serves as the base for everything else in our focal panel. Our cupcakes sit atop a piece of the pastel ombre glimmer paper that is diecut with the Mixed Labels dies and the small circle cut with the Spotlight on Nature dies. Dimensionals provide some depth and give plenty of room for our pop of gold thread. The sentiment from Simply Said is stamped in Night of Navy on white and then cut with paper snips and mounted on top of the decorative banner cut with the Mixed Labels die from a sheet of Petunia Pop glimmer paper. Petal Pink foil gems finish things off and tie all our peachy colored elements together.

Tomorrow we’ll be pairing up our weekly design theme with a sketch. Any guesses on what catalog I may choose?

Product List
Inspiration

Blissful Thanks

This week, our designs feature texture and sentiments. It’s so easy to grab for the pretty paper, but our embossing tools allow us to add texture that can be just as stunning and eye-catching as a beautiful sheet of patterned paper. Today, we’re combining the Distressed Tile embossing folder with the With You in Mind stamp set.

Our design begins with a base of Blackberry Bliss cardstock. I machine embossed a quarter-sheet of Pool Party cardstock with the Distressed Tiles embossing folder and then cut it down to leave about one-third of the base showing at the top. I covered the seam between the two colors with a combination of Very Vanilla satin ribbon and Blackberry Bliss & gold ribbon. The sentiment from With You in Mind is stamped in Blackberry Bliss on Very Vanilla and then diecut using the Something Fancy set. The sentiment mat is cut from pastel ombré glimmer paper. I added some regal foil gems to the sentiment panel for a little sparkle. The sentiment panel is adhered over the ribbon with dimensionals. Some vanilla natural tones shimmer gems across the front finish things off and help the eye move across our design.

A fairly clean and simple design that packs some eye-catching punch, don’t you think? Tune in tomorrow to see where our design theme takes us next!

Product List
Inspiration

Hey Friend

This week, we’re having fun with textures and sentiments. While we all love to reach for those gorgeous patterned papers, we can make equally as wonderful designs when our embossing tools take center stage. Today we’re combining a new Sale-a-Bration embossing folder called Starstruck with the Friends for Life bundle and a selection of In Colors to create a cheery design for a friend.

Our card design gets started with a base of Petunia Pop cardstock. Our background panel of Peach Pie is machine embossed with the SAB Starstruck embossing folder and oriented so that the negative side is facing up. I tied a strip of Summer Splash trim around the center of the embossed panel before adhering it to the base with dimensionals. The sentiment from Saying Hey is stamped in Petunia Pop ink before getting punch with the Heartfelt Hexagon punch and then adhered over the ribbon with dimensionals. I cut the word FRIEND from two different glimmer papers. The outline is from Summer Splash glimmer paper while the word FRIEND itself is from the pastel ombre glimmer paper. An extra layer of dimensionals helps FRIEND to stand out. A few purple sequins and some Sunny Days transparent dots bring the eye squarely to the party in the middle.

I just love how the embossed panel in this design almost looks to be a sheet of patterned paper, and it does make you think about how patterned papers ultimately get started. Sometimes the inspiration is literally a textured pattern.

Tune in tomorrow as things turn a bit more regal for some thankful thoughts.

Product List
Inspiration

He Will Direct Your Path

Welcome to a bright and shiny new week, crafty friends! It was a busy weekend around here as we did indeed finish up our big storage unit swap. Not something I really wanted to do but it was great to clean out and pare down through the process. We had record high temps here in North Texas, so we were completely spent by the time we wrapped up our big project!

BUT a cold and dreary day on Sunday meant an afternoon playing in the crafty goodness, working on designing for this week’s theme. I’ve been dialed in in all of the pretty patterned papers here lately and have been neglecting some of my favorite crafty tools—embossing tools. This week, our designs will focus on texture and sentiments. And today we get started with the Beautiful Butterflies embossing folder and the scripture from the You Are Beautiful stamp set.

We get started with a base of white cardstock. Our textured backdrop is a sheet of Lost Lagoon cardstock that is machine embossed with the Beautiful Butterflies embossing folder. I stamped the scripture from You Are Beautiful in Pretty Peacock on white cardstock and then cut using the Countryside Corners die. Two sparkly banners cut from Pretty Peacock glimmer paper with the Nested Essentials dies flank our sentiment and make it the eye-catching showpiece of our design. I looped a faux bow of iridescent striped ribbon behind the sentiment panel and riverside irregular pearls on either side of the panel for some added pop.

Tomorrow we’re paying homage to our friends with a fun and funky color palette. I hope you’ll come check it out!

Product List
Holidays

Love You Lots

This week, our design theme revolves around love. While love doesn’t really have a season, we do tend to focus on it a little bit more as we get into February each year. My main goal for this week’s design theme is to show you how you can use what’s in your crafting stash to make beautiful cards that really show a recipient how much you care.

Today’s card uses the current SU! Online Exclusive bundle called Otterly Adorable and it’s just as adorable as its name implies! We’re pairing up the adorable paper from the bundle with the Soft Waves embossing folder to create this design. I just love how these product pairing makes you feel like you’re by the river peeking in on these two twitterpated otters.

We get started on today’s card with a base of Lost Lagoon cardstock. The background panel consists of the Lost Lagoon base and Pretty Peacock glimmer paper, both of which have been embossed with the Soft Waves embossing folder to give the look of a moving brook. Our focal panel combines two patterns in the Otterly Adorable paper pack – the river rock and water weeds – and sits on a base of white cardstock for stability. This panel has been diecut using the Countryside Corners dies. For our scene, I started by cutting a pair of rocks from the mottled gray paper in the Otterly Adorable paper pack using the coordinating dies. I also cut some older water weeds from Crumb Cake and Pecan Pie, also using the coordinating Otterly Amazing dies. Our pair of otters is cut from the Otterly Adorable paper using the larger scene die from the set. I layered all of these elements on dimensionals to give depth to our focal scene and then mounted the full focal panel on the sparkly background with dimensionals. Some Lost Lagoon soft cording tied around the panel under the focal scene draws the eye in to both the focal scene and sentiment. The sentiment from Otterly Amazing is stamped in Pretty Peacock on white cardstock and then diecut with the smaller Countryside Corners die. A few riverside pearls and heart sequins finish off our scene and the theme of this card design.

Tomorrow we’re going to be headed to the mailbox. I hope you’ll pop in and check it out!

Products used in today’s card:
Lost Lagoon, Crumb Cake, Pecan Pie, Basic White cardstock
Three Color Glimmer, Otterly Adorable DSP
Otterly Amazing, Countryside Corners dies
Soft Waves embossing folder
Lost Lagoon soft cording
Heart sequins, riverside irregular pearls
Dimensionals
Adhesives

Product List
Holidays · Sale-a-Bration

Love You More Than…

This week we’re diving into our crafty stash to create cards for our favorite Valentines. Maybe it’s your kiddo or your spouse or a niece or nephew. I think one of the most fun things is creating a card with a certain person in mind. And today’s design is inspired by a family joke about my love of everything potato but most especially fries and chips! The new Sale-a-Bration stamp set called Friendly Seagulls is absolutely perfect for pulling off today’s Valentine for one of my fellas.

We get started on today’s card with a base of Crumb Cake cardstock. The background is a combination of Petal Pink and Pretty Peacock glimmer paper that is embossed using the Soft Waves embossing folder. I cut along the embossed wave pattern to create two separate sea panels and adhered them over the sunset backdrop with layers of dimensionals. I used the Otterly Amazing dies to cut 3 separate poles from Crumb Cake and Gray Granite cardstock to peek up out of the water. Our flock of seagulls from the Friendly Seagulls stamp set is stamped on white cardstock, colored with Stampin’ Blends, and then fussy cut with paper snips before being adhered to our scene with dimensionals. I even included the little box of fries to carry out our theme beyond just the bird with a few fries in its beak. The sentiments are each stamped on white cardstock and then diecut with several different dies, including the banner from Countryside Corners, the rough board from Friends for Life, and the oval from Changing Leaves. Each one is adhered over a pole with dimensionals. I finished things off with some hearts scattered around the sentiment.

I just love these seagulls. There are so many possibilities to create adorable scenes. And the sentiments included in the stamp set make it a breeze to create cute Valentines! I hope you’ll pop in tomorrow to see what other critters might come to our warm & fuzzy party.

Products used in today’s card:
Crumb Cake, Gray Granite, Basic White cardstock
Three color glimmer paper
Friendly Seagulls stamps
Soft Waves embossing folder
Countryside Corners, Friends for Life, Changing Leaves, Otterly Amazing dies
Stampin Blends
Heart sequins
Dimensionals
Adhesives

Product List
January Mini Catalog

Life Is Better With You

This week we’re having fun with the Hugs for Love bundle that released in the Stampin’ Up! January Mini catalog. Today, we’re playing with patterns with a mixture of stamping, embossing, and patterned papers. And I really love this combination of our featured bundle with the new Timeless Plaid paper, the Distressed Tile embossing folder & the Nature’s Sweetness foiled paper.

Our design today gets started with a base of Boho Blue cardstock. I used the Distressed Tile embossing folder to make a partial impression of the plate on the card front. Using the Hugs for Love label stamp, I stamped a repeating pattern in Early Espresso directly on the sheet of Timeless Plaid paper. A strip of silver trim is tied at the top. The sentiment panel combines the label stamp and sentiment from the Hugs for Love stamp set and is punched with the coordinating To the Point label punch. I cut 2 panels of the Nature’s Sweetness foiled grid paper using the largest Mixed Labels dies and used them to reiterate our patterns and ground the sentiment panel for emphasis. Using the Mixed Labels die, I cut a small grid detail from white glimmer paper and tucked it behind the sentiment, tying our sentiment panel elements together nicely. A combination of silver and gold Drusy embellishments pull together all of the shimmery elements, giving a cohesive look to the entire design.

Tomorrow we’re going to play with a sketch from the new mini catalog. I hope you’ll stop by and check it out!

Products used in today’s design:
Boho Blue, Basic White cardstock
Timeless Plaid, Nature’s Sweetness, white glimmer DSP
Hugs for Love bundle
Silver trim
Drusy embellishments
Dimensionals
Adhesives

Product List
Coming Soon · January Mini Catalog

Here for You

We’re rounding out our up-close look at the Beautiful Butterflies suite today. This gorgeous suite of products launches on Tuesday in the Stampin’ Up! January Mini catalog and includes stamps, dies, hybrid embossing folder, and designer paper. Today’s design keeps it simple by pairing the stamps and dies with the lovely Regal Winter paper.

We get started with a base of Pretty Peacock cardstock. I chose the coordinating plaid pattern from the Regal Winter designer series paper pack as the backdrop and matted with silver foil specialty paper. The plaid is embossed with the Beautiful Butterflies embossing folder, and I love how the folder gives a deep impression that scars the paper so the white center shows through for a distressed look. The two smaller butterflies are cut from silver foil specialty paper with the bodies cut basic black cardstock using the Beautiful Butterflies dies. The sentiment from the Beautiful Butterflies stamp set is stamped on white cardstock and then diecut with the smallest Mixed Labels die and matted with a portion of the largest banner die from the Beautiful Butterflies set. A few drusy embellishments scattered across the card front draw the eye across the full embossed panel. I finished the sentiment on the inside message pael and added a few butterflies to complete our theme.

Next week we’re going to be working with the Mixed Florals bundle. I hope you’ll stop by to see how this bundle can work for you!

Products used in today’s design:
Pretty Peacock, Basic White, Basic Black cardstock
Regal Winter, Silver foil DSP
Beautiful Butterflies bundle (coming soon)
Beautiful Butterflies embossing folder (coming soon)
Mixed Labels dies (coming soon)
Drusy embellishments
Dimensionals
Adhesives

Coming Soon · January Mini Catalog

You Make Me Smile

Happy New Year, everyone! We had a delightful evening, enjoying a steak dinner, some s’mores around the firepit, a family movie in our pjs, and some celebratory poppers & bubbles to ring in the new year. What about you? Did you do something fun to ring in the new year?

Today, we’re working with the Beautiful Butterflies bundle that will release on January 7th with the new Stampin’ Up! January Mini Catalog. This bundle includes stamps, dies, and a hybrid embossing folder. And today, the hybrid embossing folder takes center stage in our design, along with the new patterned paper called Beautiful Bokeh.

We start our design today with a backdrop of Fresh Freesia cardstock. I chose a coordinating sheet of Beautiful Bokeh as the focal panel and embossed it using the Beautiful Butterflies embossing folder and, at the same time, I cut the large butterfly from the center of the embossed panel using the coordinating die. To bring out the detail in the embossed butterfly that has been cut from the center, I went over it with my finger and silver ink. I added some pastel ombre wing tips for extra sparkle and color. Both the focal panel and butterfly are adhered to the card base using dimensionals of varying heights. A strip of Fresh Freesia seam binding ribbon behind the butterfly really brings out the purple hues in our backdrop. The sentiment from Hugs for Love is stamped on white cardstock and punched with the coordinating Hugs for Love punch and then adhered in the bottom-right corner of our focal panel. A few purple sequins add that extra touch of sparkle that draws the eye across the card.

I hope you’ll tune in tomorrow as we continue to explore all of the lovely designs we can make using the Beautiful Butterflies bundle.

Products used in today’s design:
Fresh Freesia, Basic White cardstock
Beautiful Bokeh (coming soon), pastel ombre glimmer (coming soon) DSP
Beautiful Butterflies dies & embossing folder (coming soon)
Hugs for Love bundle (coming soon)
Fresh Freesia seam binding ribbon (coming soon)
Purple sequins (coming soon)
Dimensionals
Adhesives

Coming Soon · January Mini Catalog

Heartfelt Thanks

Today we’re rounding out our quick peeks at some of my favorite products from the upcoming Stampin’ Up! January Mini and Sale-a-Bration catalogs. This is a super easy design that uses the new Memories & More kit called Mixed Media Florals and the gorgeous new Plaster Painting embossing folder.

Our design begins today with a base of Petal Pink cardstock. The focal panel backdrop is a piece of Beautiful Bokeh patterned paper that is embossed with the new Plaster Painting embossing folder. I made sure to give the panel a deep impression, which allows the white center of the paper to show through. I really loved this distressed look ad how it brings out the white elements of our focal panel. Our focal panel is one of the smaller cards from the Mixed Media Florals Memories & More kit, along with one of the included sentiments from the same. The focal panel is adhered to the backdrop over the Petal Pink diagonal trim using dimensionals. I added Wink of Stella across the wings of the butterfly and adhered to the corner of the focal panel with dimensionals. A few shiny sequins and foiled gems help draw the eye across our design and settle on the sentiment.

Next week, we’ll be taking more in-depth looks at all of these new products and we’ll be getting started with the Beautiful Butterflies bundle. I hope you’ll come along as we combine a few products from the upcoming catalog to make gorgeous projects!

Products used in today’s design:
Petal Pink cardstock
Beautiful Bokeh DSP (coming soon)
Mixed Media Florals Memories & More (coming soon)
Plaster Painting embossing folder (coming soon)
Petal Pink diagonal ribbon
Petal Pink & Gold foiled gems, shiny sequins
Paper butterfly
Wink of Stella
Dimensionals
Adhesives