Welcome to hump day. Midweek. Middle of the road. It always seems like the weeks go more quickly as we get into December. Is it just me?
This week we’re whipping up some super quick Christmas cards. And today I’m still hanging out with the Christmas Tags & More pack and getting a closer look at the and more part, in particular, as the tags take center stage.
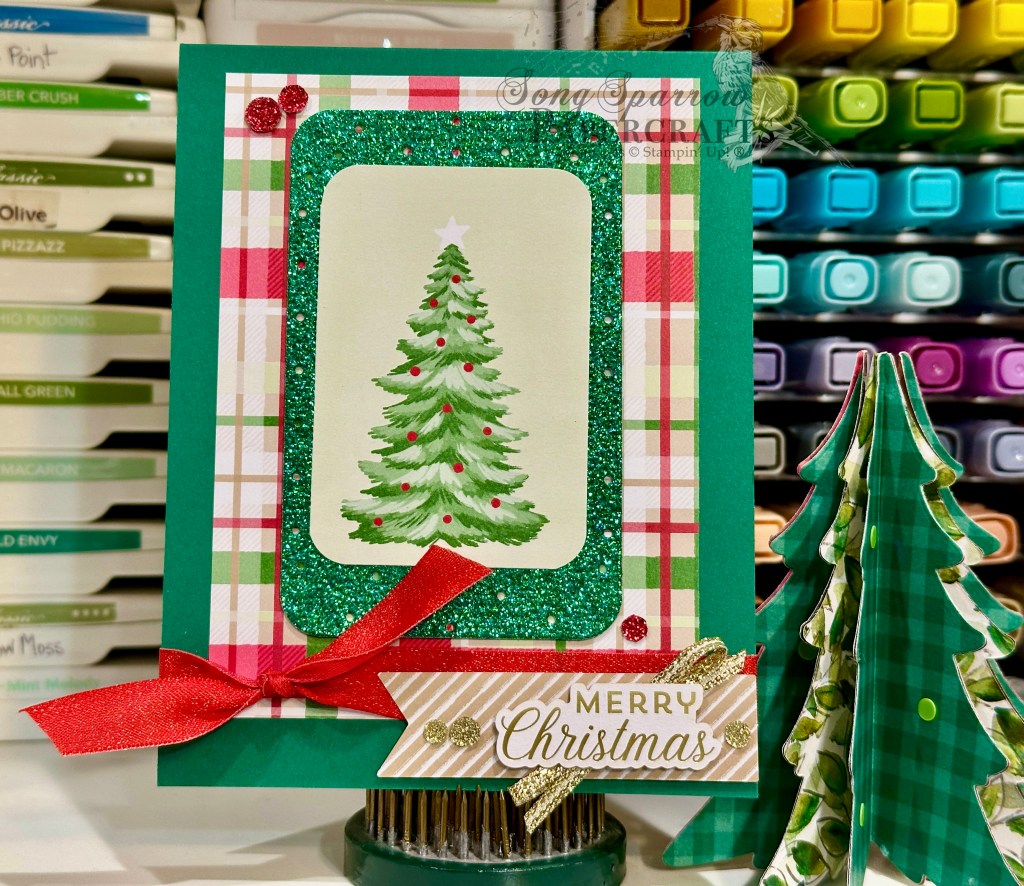
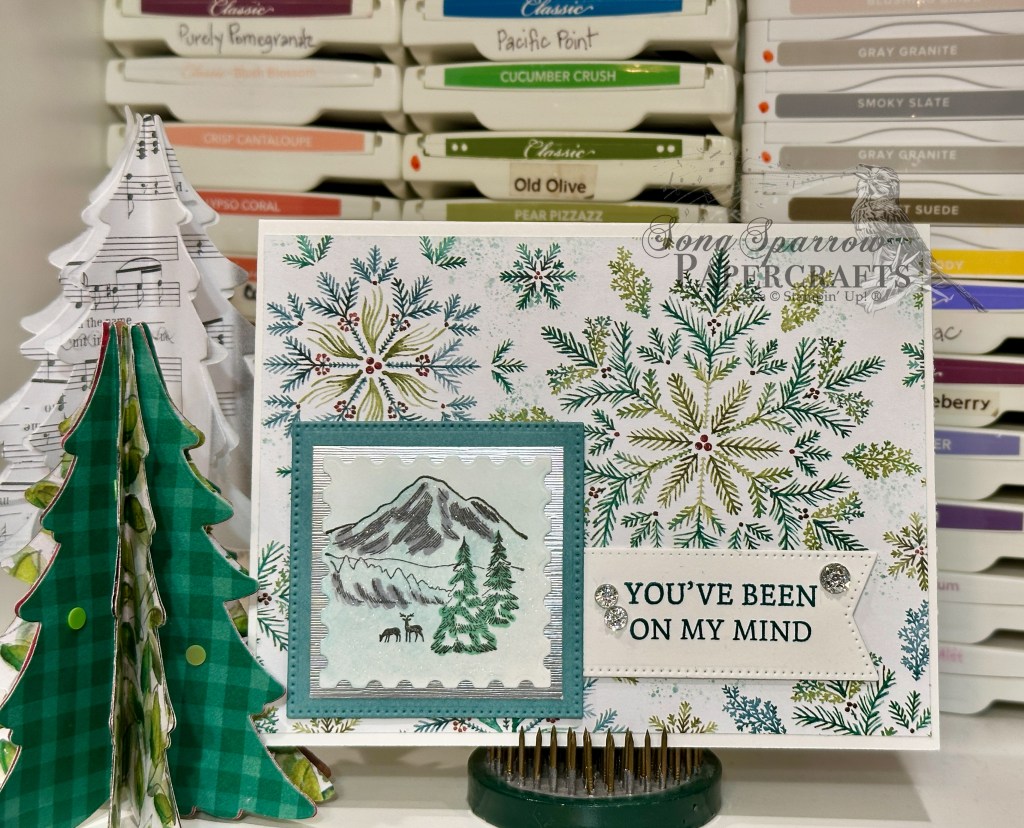
Today’s card gets started with a base of Shaded Spruce cardstock. The Christmas plaid paper from the Christmas Tags & More pack serves as our festive backdrop for the main attraction. The focal image is the Christmas tree tag from the pack that has been cut with one of the smaller dies from the Sentimental Framing set. A larger die from the same set gives us our dazzling spruce glimmer mat, which really helps our tree pop against the plaid. Our sentiment — from the Greetings for You ephemera pack — sits atop a twist of gold ribbon and a banner of Crumb Cake stripes. The bow of Real Red shiny ribbon and festive sequins scattered across the front finish things off with the perfect amount of holiday twinkle.
I hope you’ll tune in tomorrow as we pair up some more fun holiday goodies from the crafty stash to make another quick and easy card for the holiday card list!
Product List![Shaded Spruce 8-1/2" X 11" Cardstock [ 146981 ]](https://assets1.tamsnetwork.com/images/EC042017NF/146981s.jpg "Shaded Spruce 8-1/2\" X 11\" Cardstock [ 146981 ]")
![Christmas Tags & More 6" X 6" (15.2 X 15.2 Cm) Mix & Match Specialty Designer Series Paper [ 165907 ]](https://assets1.tamsnetwork.com/images/EC042017NF/165907s.jpg "Christmas Tags & More 6\" X 6\" (15.2 X 15.2 Cm) Mix & Match Specialty Designer Series Paper [ 165907 ]")
![Festive 12" X 12" (30.5 X 30.5 Cm) Glimmer Paper [ 164106 ]](https://assets1.tamsnetwork.com/images/EC042017NF/164106s.jpg "Festive 12\" X 12\" (30.5 X 30.5 Cm) Glimmer Paper [ 164106 ]")
![Sentimental Framing Dies [ 165476 ]](https://assets1.tamsnetwork.com/images/EC042017NF/165476s.jpg "Sentimental Framing Dies [ 165476 ]")
![Greetings For You Mix & Match Ephemera Pack (English) [ 166208 ]](https://assets1.tamsnetwork.com/images/EC042017NF/166208s.jpg "Greetings For You Mix & Match Ephemera Pack (English) [ 166208 ]")
![Gold & Silver 1/8" (3.2 Mm) Trim Combo Pack [ 161633 ]](https://assets1.tamsnetwork.com/images/EC042017NF/161633s.jpg "Gold & Silver 1/8\" (3.2 Mm) Trim Combo Pack [ 161633 ]")
![Real Red 1/2" (1.3 Cm) Shiny Ribbon [ 165876 ]](https://assets1.tamsnetwork.com/images/EC042017NF/165876s.jpg "Real Red 1/2\" (1.3 Cm) Shiny Ribbon [ 165876 ]")
![Traditional Sparkling Sequins [ 165875 ]](https://assets1.tamsnetwork.com/images/EC042017NF/165875s.jpg "Traditional Sparkling Sequins [ 165875 ]")
![Stampin' Dimensionals [ 104430 ]](https://assets1.tamsnetwork.com/images/EC042017NF/104430s.jpg "Stampin' Dimensionals [ 104430 ]")
![Crumb Cake 8-1/2" X 11" Cardstock [ 120953 ]](https://assets1.tamsnetwork.com/images/EC042017NF/120953s.jpg "Crumb Cake 8-1/2\" X 11\" Cardstock [ 120953 ]")
![Take A Bow 6" X 6" (15.2 X 15.2 Cm) Designer Series Paper [ 164309 ]](https://assets1.tamsnetwork.com/images/EC042017NF/164309s.jpg "Take A Bow 6\" X 6\" (15.2 X 15.2 Cm) Designer Series Paper [ 164309 ]")

![Basic White 8 1/2" X 11" Cardstock [ 166780 ]](https://assets1.tamsnetwork.com/images/EC042017NF/166780s.jpg "Basic White 8 1/2\" X 11\" Cardstock [ 166780 ]")
![Season Of Elegance 12" X 12" (30.5 X 30.5 Cm) Specialty Designer Series Paper [ 164144 ]](https://assets1.tamsnetwork.com/images/EC042017NF/164144s.jpg "Season Of Elegance 12\" X 12\" (30.5 X 30.5 Cm) Specialty Designer Series Paper [ 164144 ]")
![Traditions Of Christmas 12" X 12" (30.5 X 30.5 Cm) Specialty Designer Series Paper [ 165853 ]](https://assets1.tamsnetwork.com/images/EC042017NF/165853s.jpg "Traditions Of Christmas 12\" X 12\" (30.5 X 30.5 Cm) Specialty Designer Series Paper [ 165853 ]")
![Regal Distressed Patterns 12" X 12" (30.5 X 30.5 Cm) Specialty Designer Series Paper [ 164037 ]](https://assets1.tamsnetwork.com/images/EC042017NF/164037s.jpg "Regal Distressed Patterns 12\" X 12\" (30.5 X 30.5 Cm) Specialty Designer Series Paper [ 164037 ]")
![Gold Foil Sheets [ 132622 ]](https://assets1.tamsnetwork.com/images/EC042017NF/132622s.jpg "Gold Foil Sheets [ 132622 ]")
![Cajun Craze 8-1/2" X 11" Cardstock [ 119684 ]](https://assets1.tamsnetwork.com/images/EC042017NF/119684s.jpg "Cajun Craze 8-1/2\" X 11\" Cardstock [ 119684 ]")
![Country Woods 12" X 12" (30.5 X 30.5 Cm) Designer Series Paper [ 163393 ]](https://assets1.tamsnetwork.com/images/EC042017NF/163393s.jpg "Country Woods 12\" X 12\" (30.5 X 30.5 Cm) Designer Series Paper [ 163393 ]")
![Oxidized Copper 12" X 12" (30.5 X 30.5 Cm) Specialty Designer Series Paper [ 162190 ]](https://assets1.tamsnetwork.com/images/EC042017NF/162190s.jpg "Oxidized Copper 12\" X 12\" (30.5 X 30.5 Cm) Specialty Designer Series Paper [ 162190 ]")
![Sentimental Framing Photopolymer Stamp Set (English) [ 165475 ]](https://assets1.tamsnetwork.com/images/EC042017NF/165475s.jpg "Sentimental Framing Photopolymer Stamp Set (English) [ 165475 ]")
![Gathering Moments Cling Stamp Set (English) [ 165970 ]](https://assets1.tamsnetwork.com/images/EC042017NF/165970s.jpg "Gathering Moments Cling Stamp Set (English) [ 165970 ]")
![Traditional Labels Dies [ 165864 ]](https://assets1.tamsnetwork.com/images/EC042017NF/165864s.jpg "Traditional Labels Dies [ 165864 ]")
![Everyday Arches Dies [ 164629 ]](https://assets1.tamsnetwork.com/images/EC042017NF/164629s.jpg "Everyday Arches Dies [ 164629 ]")
![Label Me Grateful Dies [ 166111 ]](https://assets1.tamsnetwork.com/images/EC042017NF/166111s.jpg "Label Me Grateful Dies [ 166111 ]")
![Gathering Moments Dies [ 165979 ]](https://assets1.tamsnetwork.com/images/EC042017NF/165979s.jpg "Gathering Moments Dies [ 165979 ]")
![Crumb Cake Classic Stampin' Pad [ 147116 ]](https://assets1.tamsnetwork.com/images/EC042017NF/147116s.jpg "Crumb Cake Classic Stampin' Pad [ 147116 ]")
![Early Espresso Classic Stampin' Pad [ 147114 ]](https://assets1.tamsnetwork.com/images/EC042017NF/147114s.jpg "Early Espresso Classic Stampin' Pad [ 147114 ]")
![Cajun Craze & Gold Dots [ 165984 ]](https://assets1.tamsnetwork.com/images/EC042017NF/165984s.jpg "Cajun Craze & Gold Dots [ 165984 ]")
![Timid Tiger 3/8" (1 Cm) Faux Linen Ribbon [ 165275 ]](https://assets1.tamsnetwork.com/images/EC042017NF/165275s.jpg "Timid Tiger 3/8\" (1 Cm) Faux Linen Ribbon [ 165275 ]")
![Early Espresso 8-1/2" X 11" Cardstock [ 119686 ]](https://assets1.tamsnetwork.com/images/EC042017NF/119686s.jpg "Early Espresso 8-1/2\" X 11\" Cardstock [ 119686 ]")
![Very Vanilla 8 1/2" X 11" Cardstock [ 166784 ]](https://assets1.tamsnetwork.com/images/EC042017NF/166784s.jpg "Very Vanilla 8 1/2\" X 11\" Cardstock [ 166784 ]")
![Earthen Toned Metallic 12" X 12" (30.5 X 30.5 Cm) Specialty Paper [ 165901 ]](https://assets1.tamsnetwork.com/images/EC042017NF/165901s.jpg "Earthen Toned Metallic 12\" X 12\" (30.5 X 30.5 Cm) Specialty Paper [ 165901 ]")
![Gathering Together 12" X 12" (30.5 X 30.5 Cm) Specialty Designer Series Paper [ 165969 ]](https://assets1.tamsnetwork.com/images/EC042017NF/165969s.jpg "Gathering Together 12\" X 12\" (30.5 X 30.5 Cm) Specialty Designer Series Paper [ 165969 ]")
![Vellum 12" X 12" (30.5 X 30.5 Cm) Specialty Paper [ 167099 ]](https://assets1.tamsnetwork.com/images/EC042017NF/167099s.jpg "Vellum 12\" X 12\" (30.5 X 30.5 Cm) Specialty Paper [ 167099 ]")
![With You In Mind Photopolymer Stamp Set (English) [ 164747 ]](https://assets1.tamsnetwork.com/images/EC042017NF/164747s.jpg "With You In Mind Photopolymer Stamp Set (English) [ 164747 ]")
![Versamark Pad [ 102283 ]](https://assets1.tamsnetwork.com/images/EC042017NF/102283s.jpg "Versamark Pad [ 102283 ]")
![Metallics Wow! Embossing Powder [ 165678 ]](https://assets1.tamsnetwork.com/images/EC042017NF/165678s.jpg "Metallics Wow! Embossing Powder [ 165678 ]")
![Spotlight On Nature Dies [ 163580 ]](https://assets1.tamsnetwork.com/images/EC042017NF/163580s.jpg "Spotlight On Nature Dies [ 163580 ]")
![Mossy Meadow & Gold 1/4" (6.4 Mm) [ 166158 ]](https://assets1.tamsnetwork.com/images/EC042017NF/166158s.jpg "Mossy Meadow & Gold 1/4\" (6.4 Mm) [ 166158 ]")

![Pretty Peacock 8-1/2" X 11" Cardstock [ 150880 ]](https://assets1.tamsnetwork.com/images/EC042017NF/150880s.jpg "Pretty Peacock 8-1/2\" X 11\" Cardstock [ 150880 ]")
![Elegant Pine Snowflakes 12" X 12" (30.5 X 30.5 Cm) Designer Series Paper [ 166066 ]](https://assets1.tamsnetwork.com/images/EC042017NF/166066s.jpg "Elegant Pine Snowflakes 12\" X 12\" (30.5 X 30.5 Cm) Designer Series Paper [ 166066 ]")
![Nests Of Winter 12" X 12" (30.5 X 30.5 Cm) Designer Series Paper [ 164183 ]](https://assets1.tamsnetwork.com/images/EC042017NF/164183s.jpg "Nests Of Winter 12\" X 12\" (30.5 X 30.5 Cm) Designer Series Paper [ 164183 ]")
![Words Of Beauty Bundle (English) [ 167090 ]](https://assets1.tamsnetwork.com/images/EC042017NF/167090s.jpg "Words Of Beauty Bundle (English) [ 167090 ]")
![Pretty Peacock & Gold 3/8" (1 Cm) Metallic Ribbon [ 162588 ]](https://assets1.tamsnetwork.com/images/EC042017NF/162588s.jpg "Pretty Peacock & Gold 3/8\" (1 Cm) Metallic Ribbon [ 162588 ]")
![Drusy Adhesive Backed Embellishments [ 164223 ]](https://assets1.tamsnetwork.com/images/EC042017NF/164223s.jpg "Drusy Adhesive Backed Embellishments [ 164223 ]")
![Words Of Beauty Photopolymer Stamp Set (English) [ 167083 ]](https://assets1.tamsnetwork.com/images/EC042017NF/167083s.jpg "Words Of Beauty Photopolymer Stamp Set (English) [ 167083 ]")
![Adhesive Backed Snowflake Assortment [ 162129 ]](https://assets1.tamsnetwork.com/images/EC042017NF/162129s.jpg "Adhesive Backed Snowflake Assortment [ 162129 ]")
![Adhesive Backed Heart Sequins [ 164920 ]](https://assets1.tamsnetwork.com/images/EC042017NF/164920s.jpg "Adhesive Backed Heart Sequins [ 164920 ]")
![Secret Sea 8 1/2" X 11" Cardstock [ 165624 ]](https://assets1.tamsnetwork.com/images/EC042017NF/165624s.jpg "Secret Sea 8 1/2\" X 11\" Cardstock [ 165624 ]")
![Cloud Cover 8 1/2" X 11" Cardstock [ 165621 ]](https://assets1.tamsnetwork.com/images/EC042017NF/165621s.jpg "Cloud Cover 8 1/2\" X 11\" Cardstock [ 165621 ]")
![Lost Lagoon 8-1/2" X 11" Cardstock [ 133679 ]](https://assets1.tamsnetwork.com/images/EC042017NF/133679s.jpg "Lost Lagoon 8-1/2\" X 11\" Cardstock [ 133679 ]")
![Smoky Slate 8-1/2" X 11" Cardstock [ 131202 ]](https://assets1.tamsnetwork.com/images/EC042017NF/131202s.jpg "Smoky Slate 8-1/2\" X 11\" Cardstock [ 131202 ]")
![Outdoor Adventure Bundle (English) [ 168009 ]](https://assets1.tamsnetwork.com/images/EC042017NF/168009s.jpg "Outdoor Adventure Bundle (English) [ 168009 ]")
![Light & Wonder Dies [ 165762 ]](https://assets1.tamsnetwork.com/images/EC042017NF/165762s.jpg "Light & Wonder Dies [ 165762 ]")
![Secret Sea Classic Stampin' Pad [ 165285 ]](https://assets1.tamsnetwork.com/images/EC042017NF/165285s.jpg "Secret Sea Classic Stampin' Pad [ 165285 ]")
![Pretty Peacock Classic Stampin’ Pad [ 150083 ]](https://assets1.tamsnetwork.com/images/EC042017NF/150083s.jpg "Pretty Peacock Classic Stampin’ Pad [ 150083 ]")
![Gray Granite Classic Stampin' Pad [ 147118 ]](https://assets1.tamsnetwork.com/images/EC042017NF/147118s.jpg "Gray Granite Classic Stampin' Pad [ 147118 ]")
![Frosted Iridescent Dots [ 165766 ]](https://assets1.tamsnetwork.com/images/EC042017NF/165766s.jpg "Frosted Iridescent Dots [ 165766 ]")
![Mini Glue Dots [ 103683 ]](https://assets1.tamsnetwork.com/images/EC042017NF/103683s.jpg "Mini Glue Dots [ 103683 ]")
![Timeless Plaid 6" X 6" (15.2 X 15.2 Cm) Designer Series Paper [ 164678 ]](https://assets1.tamsnetwork.com/images/EC042017NF/164678s.jpg "Timeless Plaid 6\" X 6\" (15.2 X 15.2 Cm) Designer Series Paper [ 164678 ]")
![Perennial Postage Dies [ 162607 ]](https://assets1.tamsnetwork.com/images/EC042017NF/162607s.jpg "Perennial Postage Dies [ 162607 ]")
![Textured Notes Dies [ 165555 ]](https://assets1.tamsnetwork.com/images/EC042017NF/165555s.jpg "Textured Notes Dies [ 165555 ]")
![Cajun Craze Classic Stampin' Pad [ 147085 ]](https://assets1.tamsnetwork.com/images/EC042017NF/147085s.jpg "Cajun Craze Classic Stampin' Pad [ 147085 ]")
![Natural Tones Linen Thread [ 164071 ]](https://assets1.tamsnetwork.com/images/EC042017NF/164071s.jpg "Natural Tones Linen Thread [ 164071 ]")
![Brushed Silver And Gold Foil 12" X 12" (30.5 X 30.5 Cm) Specialty Paper [ 164861 ]](https://assets1.tamsnetwork.com/images/EC042017NF/164861s.jpg "Brushed Silver And Gold Foil 12\" X 12\" (30.5 X 30.5 Cm) Specialty Paper [ 164861 ]")
![Winter Scenes Cling Stamp Set (English) [ 166088 ]](https://assets1.tamsnetwork.com/images/EC042017NF/166088s.jpg "Winter Scenes Cling Stamp Set (English) [ 166088 ]")
![Stylish Shapes Dies [ 159183 ]](https://assets1.tamsnetwork.com/images/EC042017NF/159183s.jpg "Stylish Shapes Dies [ 159183 ]")
![Shaded Spruce Stampin' Blends Combo Pack [ 154903 ]](https://assets1.tamsnetwork.com/images/EC042017NF/154903s.jpg "Shaded Spruce Stampin' Blends Combo Pack [ 154903 ]")
![Smoky Slate Stampin' Blends Combo Pack [ 154904 ]](https://assets1.tamsnetwork.com/images/EC042017NF/154904s.jpg "Smoky Slate Stampin' Blends Combo Pack [ 154904 ]")
![Clear Wink Of Stella Glitter Brush [ 141897 ]](https://assets1.tamsnetwork.com/images/EC042017NF/141897s.jpg "Clear Wink Of Stella Glitter Brush [ 141897 ]")
