Flowering Zinnias · Shop the catalog

My Person

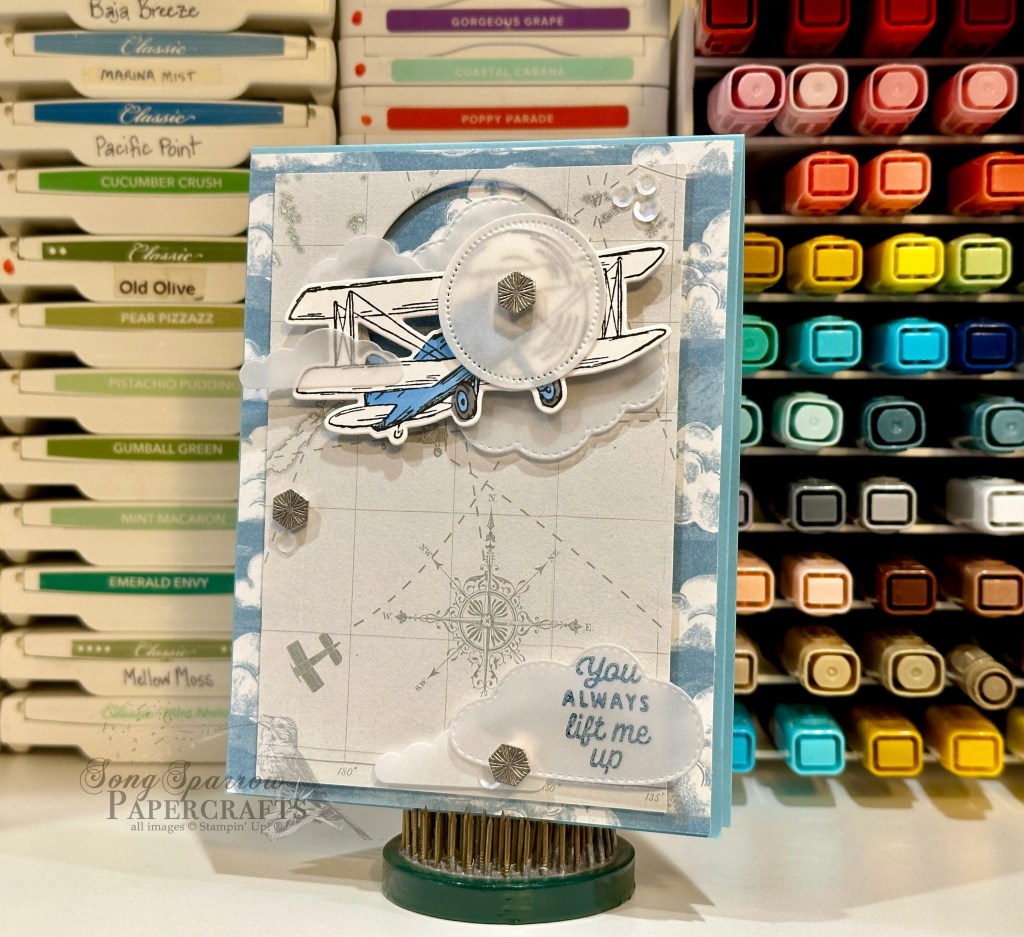
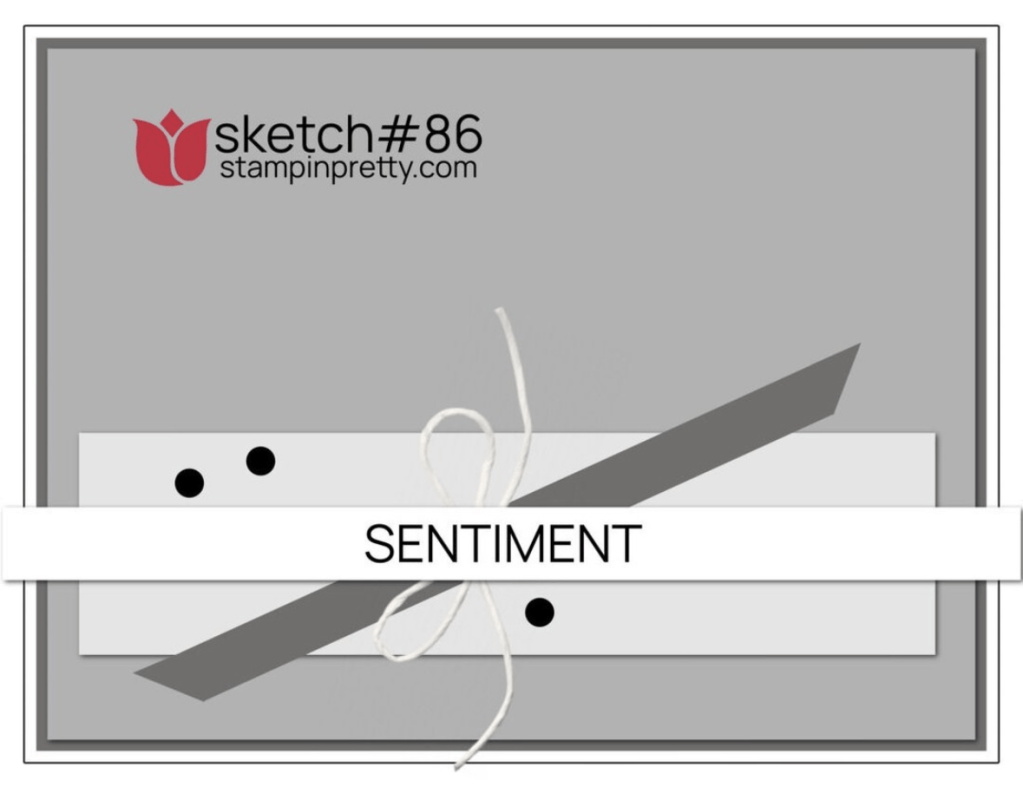
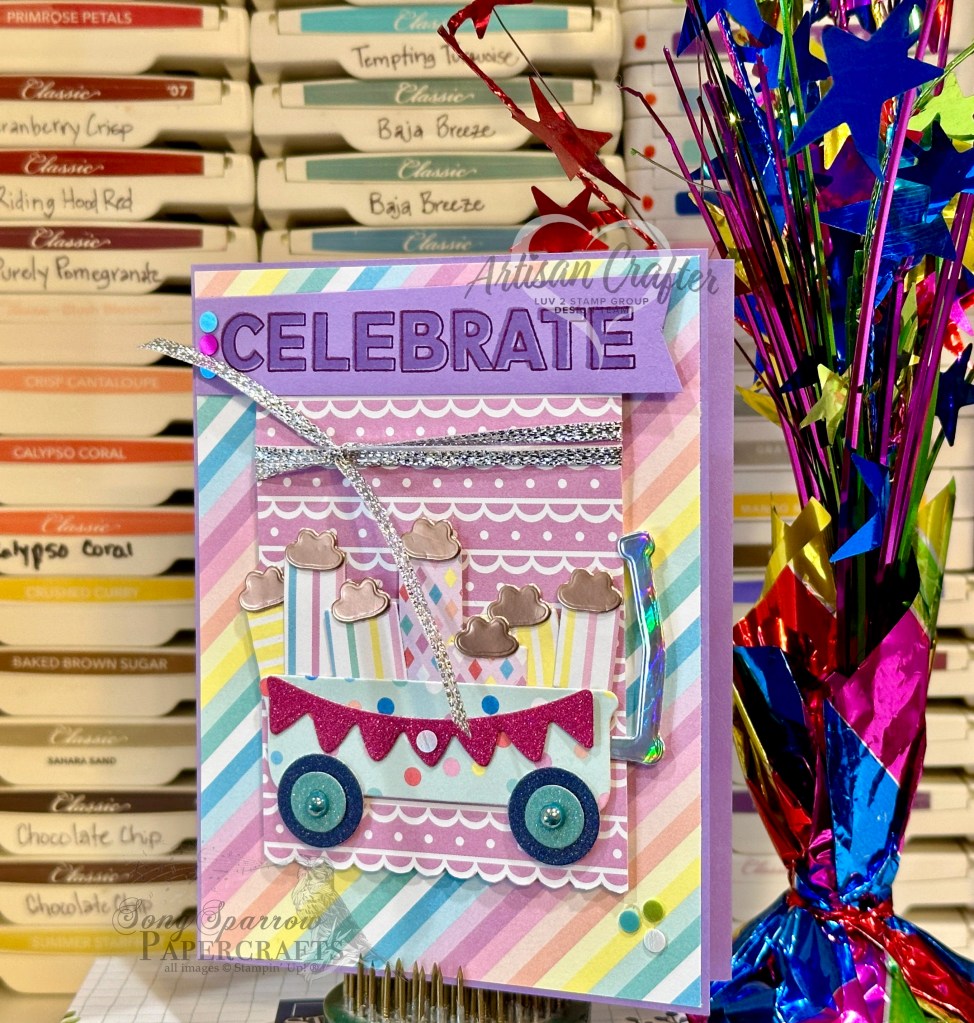
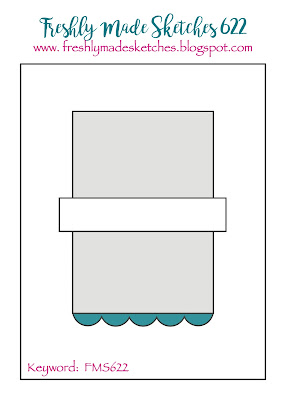
I really love a good sketch. A good sketch allows for so many different applications with a wide array of looks. Today’s card is based on a sketch that is in my go-to stash in the sketch book. Our product focus this week is the Flowering Zinnias suite of products and today we’re focusing on the largest image from the stamp and die bundle, as well as the designer paper. This card only has a few elements, but I love how it’s a show-stopper.

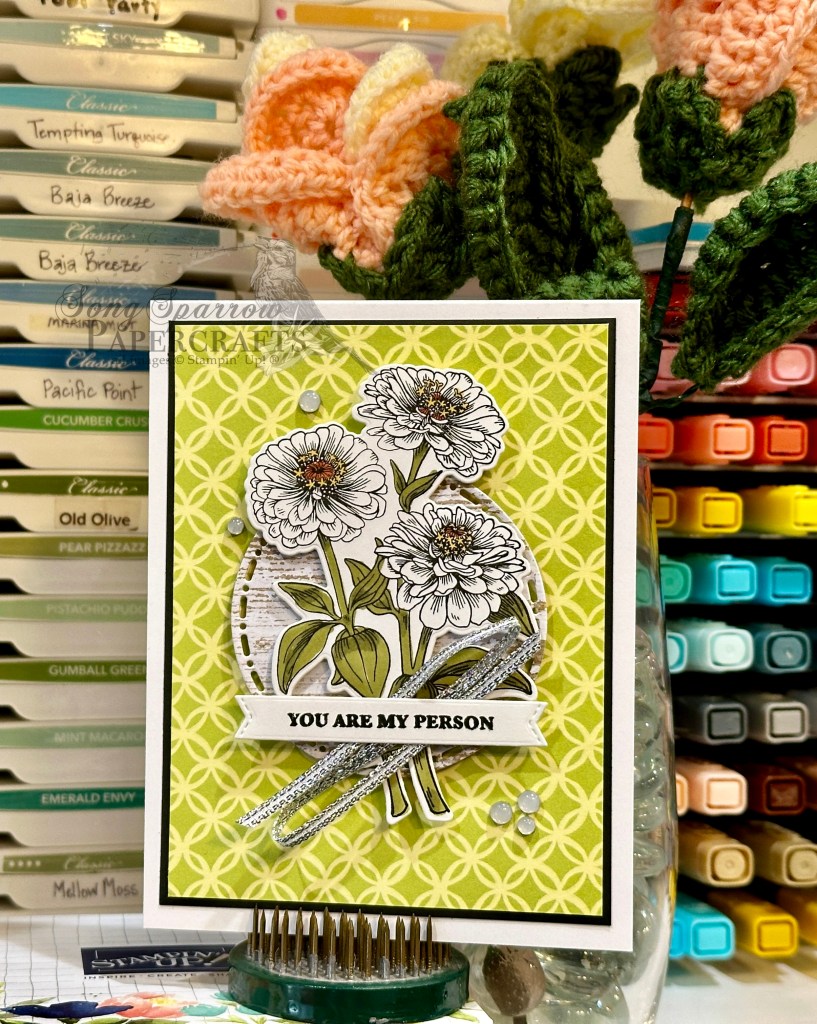
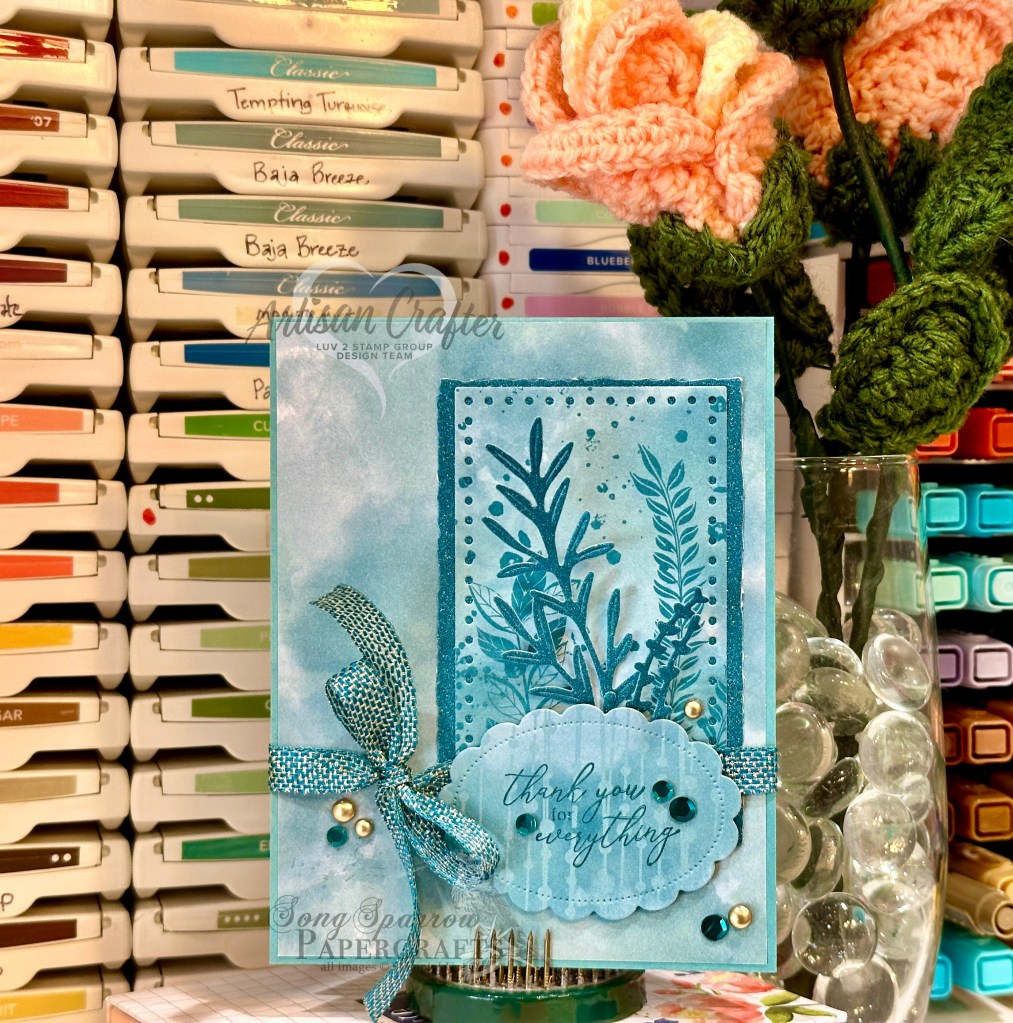
This card design is built on a base of Basic White cardstock. The focal panel base is sheet of lattice pattern from the Flowering Zinnias designer paper pack that is matted with Basic Black cardstock. The focal panel itself consists of the background circle panel cut from the white woodgrain sheet from the Country Woods designer paper pack using the middle circle size of the Spotlight on Nature dies and adhered using dimensionals. Our focal image is the largest image in the Simply Zinnia stamp set stamped on white cardstock and then diecut using the coordinating Simply Zinnia die. I used Stampin’ Blends to color the stems and zinnia centers, leaving the flowers themselves white. I originally intended to color the flowers but loved the look of the white flowers against the busy background of this design. The (partial) sentiment from Wonderful Thoughts is stamped on white cardstock and then diecut using the Happy Little Things banner die. A bit of silver and white trim behind the sentiment panel adds a little sparkle and works together with the transparent dots to draw the eye across the design to the sentiment.

Tomorrow we will be closing out our series featuring the Flowering Zinnias suite and our project is going to highlight the gorgeous designer series paper and show how you can use the coordinating dies to add dimension to patterned paper. I hope you’ll pop by to see the end result!

Products used in today’s card:
Basic White, Basic Black cardstock
Flowering Zinnias DSP
Simply Zinnia stamps & dies
Wonderful Thoughts stamps
Spotlight on Nature, Happy Little Things dies
Silver & white trim
Transparent dots
Dimensionals
Adhesives

Coming Soon

Lifting Me Higher

Our journey through the skies comes to an end today as we round out our aviation-themed trek through the Stampin’ Up! lineup. And today’s card is a full sneak peek at the brand NEW suite of products called Take to the Sky. The full suite includes stamps, coordinating dies, designer series paper, and silver trinkets. This suite will have you soaring when it releases in May!

Our card today begins with a base of Balmy Blue cardstock. The backdrop for our focal panel is a sheet of the cloud pattern designer paper. On top is another sheet with a radar view pattern. I cut a hole towards the top of the radar sheet using the Everyday Details dies, which allows the cloud pattern to peek through. And I reinforced this peek-through look by diecutting clouds from vellum using the Bright Skies and Hot Air Balloon dies. I stamped the largest plane from the Adventurous Skies stamp set onto white cardstock, colored the body of the plane with Stampin’ Blends, and then diecut with the coordinating die. I drew further attention to the spinning propeller by diecutting the smallest circle from Everyday Details from vellum. I added an Industrial Trinket to give a realistic look to the center of the spinning propeller. The sentiment from Adventurous Sky is stamped directly on vellum and then diecut using the Bright Skies dies. I scattered a few additional trinkets and some translucent sequins to tie things together and help the eye move across the card.

There are so, so many more designs I would like to try with this super fun suite of products that I plan to highlight this suite for a full week once it releases with the brand new Annual Catalog in May. In the meantime, next week we’ll be romping through the grassy plains and fields of flowers. I hope you’ll come along!

Products used in today’s card:
Balmy Blue, Basic White, vellum cardstock
Take to the Sky DSP (coming soon!)
Adventurous Sky bundle (coming soon!)
Industrial trinkets (coming soon!)
Stampin’ Blends
Sequins trio
Dimensionals
Adhesives

Luv 2 Stamp Artisan Design Team · sketches

Time to Celebrate

Preparing for my son’s birthday last week had birthday front and center in the design line-up. And today’s card is a second take on a sketch by Stampin’ Pretty — with a flip of the smaller background panel and a little shift on the position of the decorative element.

This card begins with a base of Night of Navy cardstock. I chose two star patterns from the Bright & Beautiful designer series paper pack to serve as the backdrop. I used a strip of More Dazzle specialty paper and Night of Navy & gold sheer ribbon to bridge the divide between the two patterns. For the decorative element, I chose the balloons from the new Filled with Fun die set and diecut them from all of the shades of the Soft Shimmer specialty paper pack. The sentiment from Filled with Fun is stamped on white shimmer paper and the decorative element is white glimmer paper diecut using the Thoughtful Expressions set. A few Night of Navy tinsel gems finish off this sparkly celebration in an envelope!

This week, we’ll be exploring some botanical designs. I hope you’ll follow along!

Products used in today’s design:
Night of Navy cardstock
Bright & Beautiful, Soft Shimmer, Glimmer, More Dazzle DSP
Filled With Fun stamps
Filled With Fun, Thoughtful Expressions dies
Tinsel gems
Gold cord, Night of Navy & gold sheer ribbon
Dimensionals
Adhesives


All ads on this site are posted by WordPress.  Song Sparrow Papercrafts is not responsible for ad content.

Luv 2 Stamp Artisan Design Team · sketches

Heart Blooms

Today, we’re taking another look at the Filled With Fun bundle, which includes an adorable photopolymer stamp set and coordinating dies. This Online Exclusive from Stampin’ Up! can be used in so many different ways and will pair with any number of other super cute sets. One of the many things I love about SU! is that they design products to mix and match, which means your stamps and dies can serve you in a LOT of ways. I’m not always the best at thinking of creative or different ways to use my stamp sets, but someone in my great, big world of crafty friends has!

I’ve been coloring a lot outside of my usual design lines lately. And today’s stretch uses patterns. There are some patterned papers that really just stump me. Outside of having them stand alone and take center stage, I’m not sure what to do with them. But one of the things you can learn by following stampers who have completely different styles from your own is how to do things differently and IT WORKS! For today’s card, we’re using two very busy patterns from the Delightfully Eclectic designer series paper pack and they work together beautifully! Sometimes it’s all about figuring out how your patterns can compliment one another and remembering that a pattern doesn’t have to take center stage in a design.

Today, we’re using a sketch from Stampin’ Pretty as the inspiration for our card layout. We start with a base of Fresh Freesia cardstock. I really like how this color brought out the deeper pink tones in both patterns of the Delightfully Eclectic DSP. Rather than using the full wagon image from Filled With Fun, I chose to use a portion of it as a planter for the lovely flowers from the stamp set. Our Stampin’ Blends provide the beautiful flowers with their coordinating color. I love how perfectly the sweet turtle from Playing in the Rain pairs with this scene and sentiment. The sparkle for this design comes compliments of the white and Bubble Bath shimmer papers, along with the Blooming Pearls, adhesive hearts & flowers, and Bubble Bath sequins from Sequins Trio.

Today’s card doesn’t follow the sketch to the letter, but that’s the beauty of inspiration – it’s not your ruler, it’s just your guide!

In honor of my son’s birthday, I will be giving away 3 mystery packets of 6×6 designer series paper – both current and retired designs. To be entered to win, simply comment on any of my social media posts (WordPress, Facebook, Instagram) and tell me your favorite Stampin’ Up! color(s). I’ll have my son draw a winner at 3 PM CST tomorrow (March 29).

Products used in today’s design:
Fresh Freesia, Basic White cardstock
Delightfully Eclectic, Bubble Bath soft shimmer, white shimmer DSP
Filled With Fun, Playing in the Rain stamps & dies
Hearts & flowers, Blooming pearls, Sequins trio
Dimensionals
Adhesives


All ads on this site are posted by WordPress.  Song Sparrow Papercrafts is not responsible for ad content.

Luv 2 Stamp Artisan Design Team · sketches

Celebration Wagon

One of the most recent Stampin’ Up! Online Exclusive releases is called Filled With Fun. This bundle includes an adorable wagon-themed set of stamps and dies. There are so many cute possibilities with this set! I’ve had so many ideas swirling in my head ever since I saw it.

So today, we’re pairing this adorable wagon with another sketch by the crew over at Freshly Made Sketches. When I saw this sketch, I was immediately drawn to the scallop element at the bottom of the focal section. I remembered the sheet of paper in the Lighter Than Air paper pack that had the scalloped element and wanted to give it a try as the focal panel for my card design. And it’s worked beautifully!

Our card begins with a base of Highland Heather cardstock. I chose the cross-stripe pattern from the Lighter Than Air designer paper pack as the background. From there, I began building my wagon. I diecut the wagon using the coordinating dies and a sheet of the polka-dotted paper. I used Night of Navy and Lost Lagoon glimmer paper for the wagon wheels and hubcabs of Blooming Pearls for a little extra pizzazz. The wagon handle is diecut from the Holographic Trio specialty paper. I wanted to fully lean into the celebratory theme of this card design, so I diecut the banner from Berry Burst shimmer paper and hung it on the side of the wagon.

The Filled With Fun stamp set includes a birthday-themed stamp with presents and cake, but I wanted to fill the wagon with presents alone without all the fussy cutting. And that’s when I remembered that the Merriest Trees die set included packages! I selected several different patterns from the Lighter Than Air paper pack and began diecutting packages. I chose to use the Rose Gold specialty paper as the bows for a little additional colorful sparkle. The packages are layered on dimensionals to give depth of field to the scene.

This card is finished with a beautiful CELEBRATE banner at the top of the focal panel. The sentiment from Happy Little Things is stamped on Highland Heather and then cut with the paper trimmer. A twist of silver & white trim and a few carefully placed iridescent discs draw the eye across the design and tie everything together.

Tune in tomorrow for another fun design using Filled With Fun and a new sketch plus a GIVEAWAY. You won’t want to miss it!

Products used in today’s design:
Highland Heather cardstock
Lighter Than Air, soft shimmer, Holographic trio, Rose Gold DSP
Filled With Fun, Happy Little Things stamps
Filled With Fun, Merriest Trees dies
Silver trim
Iridescent discs
Blooming Pearls
Dimensionals
Adhesives


All ads on this site are posted by WordPress.  Song Sparrow Papercrafts is not responsible for ad content.

Luv 2 Stamp Artisan Design Team · sketches

Thankful for Everything

Do you like to find inspiration for your card designs? Or are you able to just start from scratch on your own each time? Every once in a while, I have a concept that comes to me and I’m able to turn out a card from start to finish without any underlying inspiration. But most of the time, I have an inspiration card from a fellow crafter or a sketch that gets everything started. We’re continuing our look into how sketches can be a super useful tool in the craft room.

Today, I have a sketch from Stampin’ Pretty that serves as the layout for my card. My color palette is inspired by several sheets of designer paper from the Hello, Irresistible paper pack. We begin this design with a base of Lost Lagoon cardstock. I chose a cloudy pattern of designer paper to serve as the background for the focal pieces. The rectangle element is a sheet of greenery pattern that is matted with a sheet of Pretty Peacock shimmer paper. I used nesting rectangles from the Deckled Rectangles and Everyday Details die sets to diecut these pieces. The greenery dies are from the Painted Lavender die set. The sentiment from Botanical Layers is stamped in Pretty Peacock on another pattern from Hello, Irresistible and diecut using the *soon-to-be-released* Unbounded Love die set. The Pretty Peacock and gold metallic ribbon, brushed metallic dots, and Pretty Peacock sequins are just the ticket to tie everything together.

This card came together with very little change from the original sketch. There are plenty of times when my finished design might look nothing like the original inspiration by the time I’ve moved elements around to get everything just right. But having a place to start is the key.

Tune in tomorrow to see how I use a NEW Online Exclusive and a sketch!

Products used in today’s design:
Lost Loagoon cardstock
Hello, Irresistible; Pretty Peacock shimmer DSP
Botanical Layers stamps
Deckled Rectangles, Everyday Details, Painted Lavender, Unbounded Love (sneak peek!) dies
Pretty Peacock & gold metallic ribbon
Sequins trio
Brushed metallic dots
Dimensionals
Adhesives


All ads on this site are posted by WordPress.  Song Sparrow Papercrafts is not responsible for ad content.

Luv 2 Stamp Artisan Design Team · sketches

Celebrate Spring

Sketches are such a great crafting tool. I turn to them often when looking for design inspiration. And you don’t have to follow them to the letter (I often don’t), but they give you a great place to get started. I’ve gotten a lot of mileage out of the latest sketch by the crew over at Freshly Made Sketches.

For today’s card, I pulled one of my favorite 6×6 paper packs called Meandering Meadow. This pack is full of beautiful watercolor, impressionistic-looking designs and there’s a color palette for everyone! I decided to get out of my comfort zone and try working with yellow. The sheet of black-eyed Susans in Meandering Meadow serves as the square element in the sketch. And I built the remainder of the design around it. A sheet of Daffodil Delight serves as the card base and as the background panel. The background panel has been machine embossed using the Zinnia embossing folder, which is currently available as an Online Exclusive. For the circle element, I diecut a sheet of the white glimmer paper using the Thoughtful Expressions dies. The sentiment from Happy Little Things is stamped in Crushed Curry on a strip of Daffodil Delight and then cut using the paper trimmer and snips. A strip of silver trim, along with some white sequins, help tie the white and sparkly details together. I finished off the design with a paper butterfly.

I don’t often use yellow as a focal color in my designs because, quite frankly, I find it a little intimidating and often very overwhelming to my eye. But I really love how this design came together. Sometimes you just need the right combination of products to make a “hard color” work for you.

We’re going to continue our look into using sketches as our go-to starting point for our designs this week. I hope you’ll follow along and maybe even give one or two a try!

Products used in today’s design:
Daffodil Delight cardstock
Meandering Meadow, white shimmer DSP
Happy Little Things stamps
Thoughtful Expressions dies
Zinnia embossing folder
Silver trim
Neutrals sequins
Paper butterfly
Dimensionals
Adhesives


All ads on this site are posted by WordPress.  Song Sparrow Papercrafts is not responsible for ad content.

Luv 2 Stamp Artisan Design Team

You Mean the World

One of my go-to design tools is a good sketch. If I run across a great card layout, whether it’s an actual card or just a sketch, it goes in my inspiration folder for reference later. Sketches are a great resource when you get in a creative rut, have zero ideas, or just want a quick way to turn out a lot of cards.

This week’s sketch from Freshly Made Sketches really resonated with me creatively and I quickly had a bunch of ideas for how I would use this sketch. Yesterday, I showed how I tweaked this sketch to work for the elements I wanted to use on the card I was making. Today, I’m sticking closer to the original sketch for this card.

We get started with a base of Lost Lagoon cardstock. I used the Perennial Lavender designer paper for this design. The background panel from Perennial Lavender is diecut using the largest die in the Deckled Rectangles die set. For the square element of the sketch, I chose a mat of Pretty Peacock glimmer paper and a decorative sheet of the Perennial Lavender and diecut each with the nesting dies from Thoughtful Expressions. The circle element is diecut from Crumb Cake with Everyday Essentials and then dry embossed with Elegant Eucalyptus embossing folder. I felt this really helped make all of the patterns and color palette more cohesive. The sentiment from Botanical Layers is stamped on Lost Lagoon that has been diecut with the Everyday Essentials die. The ribbon and twine and foiled gems help draw the eye to the focal point in the center of the card and unite the color palette.

Products used in today’s design:
Lost Lagoon, Crumb Cake cardstock
Perennial Lavender, Pretty Peacock glimmer DSP
Pretty Peacock foiled gems
Pretty Peacock & gold metallic ribbon, linen thread
Dimensionals
Adhesives


All ads on this site are posted by WordPress.  Song Sparrow Papercrafts is not responsible for ad content.

Dies · Gone Fishing

Hooked on Father’s Day

Thus far, I’ve showcased the Pansy Patch set from the new catalog. This week we’ll be taking a look at the Gone Fishing Suite. June is a busy month in our family between Father’s Day and birthdays, and this set will be perfect!

The Gone Fishing Suite includes the stamps, dies, designer paper, and the Twisted Rope 3D embossing folder. (Buy the suite here) For this design, I used the stamps, dies, and paper. I included jute ribbon in the background to give the look of netting and add a little visual interest. The center panel is popped up on dimensionals to ensure it stood out against the patterned paper, and the fishing tackle elements are also layered on dimensionals for visual interest.

I’m really loving this set so far and can’t wait to show you more designs with this suite all this week!

Products used:
Let’s Go Fishing DSP
Night of Navy cardstock
Gone Fishing stamp set
Gone Fishing dies
Adhesive-backed pearls
Dimensionals
Adhesives
Stitched Nested Labels dies (retired)
Jute ribbon (retired)

All ads on this site are posted by WordPress and are based on your personal browsing history. I do not control ad content.