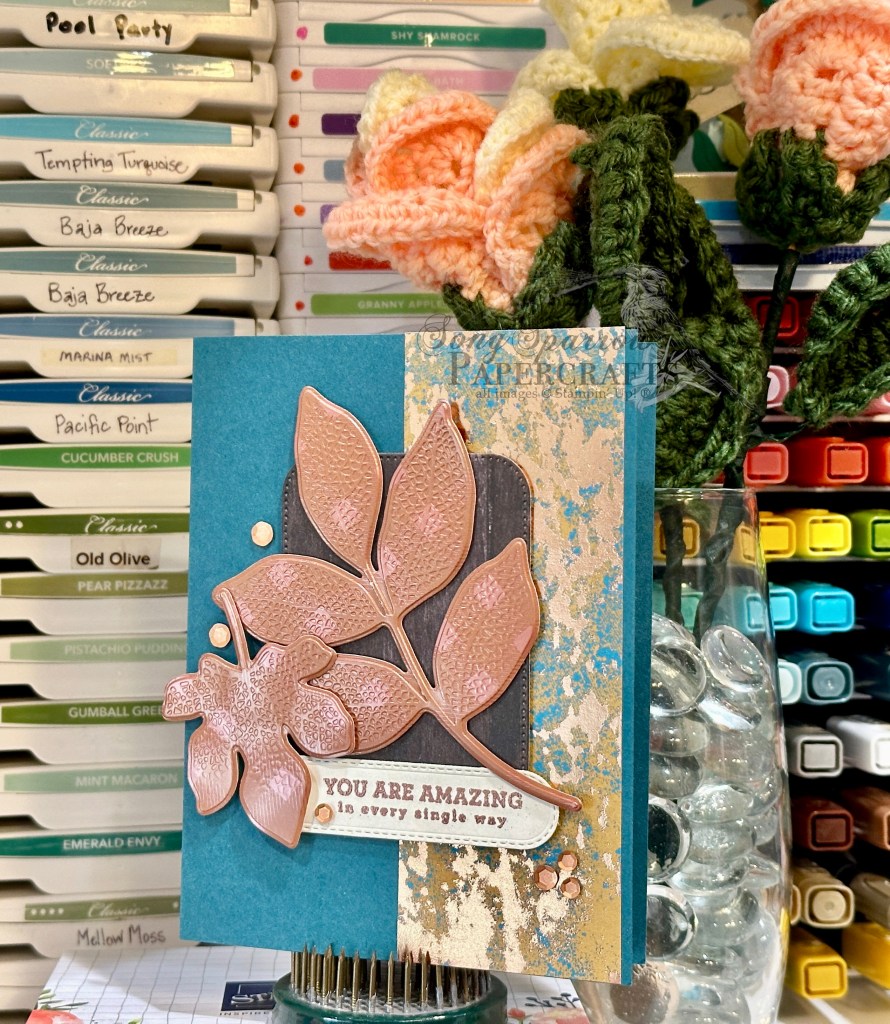
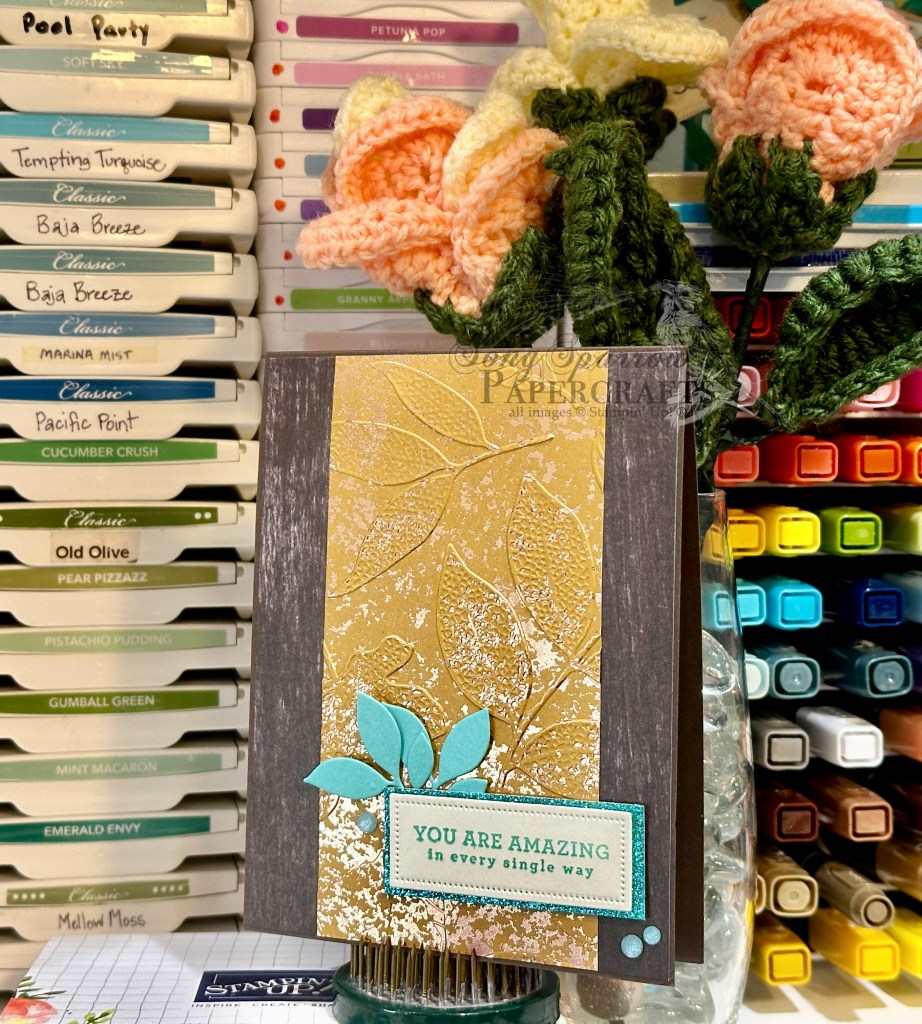
Botanicals · sketches

Hi, Friend

Howdy, friends! Thanks for popping by today for another look at the Inspiring Snapdragons stamps and dies bundle. Snapdragons were one of my Granny’s favorite seasonal flowers. She had the best green thumb when it came to snapdragons. I, however, did not inherit that part of her gardening skills. I have the worst luck with snapdragons, even though I enjoy them a lot. *grin*

We’re revisiting our sketch from yesterday … with a little twist. The fun thing about sketches is that they give you a place to start with design and give you the flexibility to adapt them. And today’s card is a perfect example of adapting, where I scaled down and adjusted the placement of the image panel to allow more of my background panel to show.

So let’s get started on today’s card. We begin with a base of Pretty in Pink cardstock. The background panel is a sheet of Meandering Meadow designer series paper. I chose a sheet that had flowers that, to me, had similar shape and look to snapdragons. I tied silver & white trim around the designer paper panel before adhering to the card base.

The image panel is a base of white cardstock diecut using the Everyday Details dies. I chose to make several snapdragons in the pink color family to really pull the pink blossoms forward in the background paper. I used a combination of cardstock and glimmer paper for the snapdragon blooms, including Berry Burst, Melon Mambo, Pretty in Pink, white, and Petunia Pop. Each blossom consists of two layers—a base and detail layer. I adhered the snapdragon blossoms to the image panel and varied the height of each using dimensionals. The image panel is adhered to the background layer using dimensionals.

The sentiment panel is cut from white cardstock using the Spotlight on Nature dies. The sentiment from Wonderful Thoughts is stamped in black in the center. The sentiment panel mat is diecut from Pretty in Pink using a larger die from the Spotlight on Nature die set. The layers are adhered using dimensionals and then affixed to the card front using stacked dimensionals to ensure the sentiment panel stands above the layered snapdragons. I added a dragonfly cut from In Color glimmer paper above the snapdragon blossoms and then finished things off with iridescent foil gems.

I hope you’ll pop in tomorrow to see how we can use this fabulous bundle to build a scene! You won’t want to miss it.

Products used in today’s card:
Pretty in Pink, Petunia Pop, Melon Mambo, Basic White cardstock
Meandering Meadow, In Color glimmer DSP
Wonderful Thoughts stamps
Inspiring Snapdragons, Everyday Details, Spotlight on Nature dies
Silver & white trim
Iridescent foil gems
Dimensionals
Adhesives

Botanicals · sketches

Snapdragon Love

This week, we’re going to be working with the Inspiring Snapdragons bundle by Stampin’ Up! This bundle includes cling stamps and coordinating dies. We’ll be looking at all of the ways that we can use these stamps and dies, both together and apart, to create beautiful cards.

And today’s card is based on a sketch from my sketch book. When I come across a great card, I typically take a screenshot and add it to my inspiration folder. Sometimes I am saving a card because I’m inspired by product usage, but a lot of times, I’m saving it as inspiration for layout when using products from my own stash. I often share with you guys when I found inspiration for a layout but don’t usually include a sketch. I have begun converting awesome layouts into digital sketches and thought I would begin sharing them with you as I use them. Love a sketch? Please feel free to save it to your own sketch collection.

Today’s card starts with Pretty in Pink cardstock. The patterned background layer is a sheet of the Unbounded Beauty designer series paper. For the image panel, I started with a sheet of white cardstock diecut using the Everyday Details dies. The image panel mat is diecut from Petunia Pop In Color Glimmer paper using the Deckled Rectangles dies. On the white panel, I stamped the two smaller snapdragon images using Bubble Bath, Pretty in Pink, and Petunia Pop ink. I then adhered the two panels together using my adhesive runner.

Next, I diecut the sentiment panel and mat. The sentiment panel mat is diecut from white glimmer paper and the sentiment panel itself is diecut from white cardstock using nesting circles from the Spotlight on Nature dies. The sentiment is from the Country Flowers set. I first stamped the word “sending” in black ink towards the top of the blank sentiment panel. Then I stamped “love” in Petunia Pop underneath, allowing part of the L to overlap the word “sending.” Adhere these two panels together with adhesive. TIP: To prevent stamping any portion of the word “sending” while stamping the remaining portion of your sentiment, I covered it with a piece of tape — any tape will do. I have tried cleaning my stamp in between stamping portions, but I still manage to get a ghost image of the previously inked portion. And I’ve found the taping method to be the most effective way to prevent that.

To finish things off, adhere the image panel on the top-right portion of the card. Tie sheer ribbon around the bottom third of the card, covering the bottom of the image panel. I chose to tie the sheer ribbon in a knot, but a bow could also work. Next, adhere the sentiment panel over the ribbon and bottom-left portion of the image panel using dimensionals. I added a gold glimmer dragonfly and In Color resin dots to finish things off.

Tomorrow, we’re going to take our sketch for another spin with a little variation. I hope you’ll pop in and let me know what you think!

Products used in today’ card:
Pretty in Pink, Basic White cardstock
Unbounded Beauty, In Color Glimmer DSP
Inspiring Snapdragons, Country Flowers stamps
Iridescent striped trim
In Color resin dots
Dimensionals
Adhesives

Flowering Zinnias · Fun Folds · Shop the catalog

Wishing Strength

We’re finishing out this week’s tour of the Flowering Zinnias suite with a beautiful fun fold featuring the designer series paper. The paper in this suite is what initially caught my eye, but once it was all said and done, I ended up with all of the coordinating products after being inspired by what other crafters were able to do with the suite as a whole.

Today’s card design uses a double fold-over panel fun fold and showcases the Flowering Zinnias DSP. We’re using the coordinating Simply Zinnia dies to accentuate elements of the gorgeous paper.

We start this card with a standard base of Mossy Meadow cardstock, which is scored in the center. The front panel is cut diagonally to make a smaller fold-over panel in order to reveal more of the gorgeous designer paper on the fold-over panel underneath. This small panel is then covered with the leaves and stems patterned sheet from the Flowering Zinnias paper pack, which is matted with a piece of Soft Sea Foam cardstock. Each layer is 1/8-inch smaller than the next.

Next, we move to assembling the overlapping front sentiment panel. The base layer is Mossy Meadow cardstock that has been diecut with the second largest hexagon from the Nested Essentials die set. Cut an identical size hexagon from Soft Sea Foam and then cut a sliver from the center so that a small border of Mossy Meadow is exposed on either side at top and bottom when the two hexagons are adhered together. The sentiment panel is cut from white cardstock with the next-smallest nesting hexagon from the die set and the sentiment from the Inspiring Snapdragons stamp set is stamped in the center. All three layers are adhered together in one flat panel and adhered directly to the bottom of the front fold-over panel. I cut a second sentiment panel from white cardstock and stamped the sentiment from Something Fancy in the center. This is adhered to the back of the hexagon on the inside of the small fold-over panel.

Now we move to assembling the inside fold-over panel. This panel also begins with a base of Mossy Meadow cardstock, which is cut so that there is a 1-inch flap to adhere to the card base and serve as the hinge for this panel. The sheet of designer paper from the Flowering Zinnias pack is matted with a sheet of Soft Sea Foam and then adhered to the flap base. Each layer is 1/8-inch smaller than the one underneath. The inside message panel is a plain white sheet of paper that has been left blank for an extended message.

We finish off the card design by accentuating the zinnias in the patterned paper panel. Using the Simply Zinnia dies, I assembled two blooms. The petals are cut from Calypso Coral and Flirty Flamingo, while the flower centers are cut from Daffodil Delight and Pumpkin Pie. I also cut a single bloom from the edge of the sheet of blooms paper from the paper pack and adhered a flower center to the top to add that bit of realism to it, as well. The partial flower is adhered to the left side of the sentiment panel to cover the center seam of the Soft Sea Foam layer. The two diecut zinnia blooms are placed so that they give some life and realism to the two DSP panels—one over the stems and leaves flap and one nestled in the floral DSP panel just under the sentiment. Everything is finished off with sequins and a butterfly.

Click here to download the detailed PDF tutorial for today’s card. Don’t be intimidated by the number of steps! I break things up into bite-sized pieces to help ME not miss a step the next time I pull out my directions. *wink*

Tomorrow we’re (finally) going to get a look at those By Your Side Kit alternatives. I hope you’ll pop in to see how you can make a few little tweaks to kits to give them a fresh look.

Products used in today’s card design:
Mossy Meadow, Soft Sea Foam, Calypso Coral, Flirty Flamingo, Pumpkin Pie, Daffodil Delight, Basic White cardstock
Flowering Zinnias DSP
Simply Zinnia, Nested Essentials dies
Inspiring Snapdragons, Something Fancy stamps
Paper butterfly
Shiny sequins, sequins trio
Dimensionals
Adhesives

Flowering Zinnias · Shop the catalog

My Person

I really love a good sketch. A good sketch allows for so many different applications with a wide array of looks. Today’s card is based on a sketch that is in my go-to stash in the sketch book. Our product focus this week is the Flowering Zinnias suite of products and today we’re focusing on the largest image from the stamp and die bundle, as well as the designer paper. This card only has a few elements, but I love how it’s a show-stopper.

This card design is built on a base of Basic White cardstock. The focal panel base is sheet of lattice pattern from the Flowering Zinnias designer paper pack that is matted with Basic Black cardstock. The focal panel itself consists of the background circle panel cut from the white woodgrain sheet from the Country Woods designer paper pack using the middle circle size of the Spotlight on Nature dies and adhered using dimensionals. Our focal image is the largest image in the Simply Zinnia stamp set stamped on white cardstock and then diecut using the coordinating Simply Zinnia die. I used Stampin’ Blends to color the stems and zinnia centers, leaving the flowers themselves white. I originally intended to color the flowers but loved the look of the white flowers against the busy background of this design. The (partial) sentiment from Wonderful Thoughts is stamped on white cardstock and then diecut using the Happy Little Things banner die. A bit of silver and white trim behind the sentiment panel adds a little sparkle and works together with the transparent dots to draw the eye across the design to the sentiment.

Tomorrow we will be closing out our series featuring the Flowering Zinnias suite and our project is going to highlight the gorgeous designer series paper and show how you can use the coordinating dies to add dimension to patterned paper. I hope you’ll pop by to see the end result!

Products used in today’s card:
Basic White, Basic Black cardstock
Flowering Zinnias DSP
Simply Zinnia stamps & dies
Wonderful Thoughts stamps
Spotlight on Nature, Happy Little Things dies
Silver & white trim
Transparent dots
Dimensionals
Adhesives

Flowering Zinnias · Shop the catalog

Thanks, Friend

This week is all about the Stampin’ Up! Flowering Zinnias suite. And today we are looking at the Zinnia embossing folder and Simply Zinnia dies. What I think this card design illustrates so beautifully is how easily you can pair the Flowering Zinnias products with other gems from the Stampin’ Up! lineup, like the Friends for Life bundle featured here.

We get started with a card base of the new In Color Petunia Pop. I also cut a quarter-sheet and embossed using the Zinnia embossing folder. This embossed panel is cut 1/8-inch smaller than the card base and adhered with dimensionals. For the focal section of this card design, I diecut a square of Petunia Pop using the largest square die from the Nested Essentials die set and built the focal elements on top. The zinnias are diecut using the Simply Zinnia die set. The petals are cut from Pretty in Pink with each flower having Peach Pie and Lemon Lolly centers. The lovely foliage is cut from Shy Shamrock using the Friends for Life dies. Dimensionals help give a layered look to the zinnias. The sentiment panel base is white cardstock diecut using the banner die from Friends for Life. Thanks is stamped in black on one end of the panel using the Wonderful Thoughts stamp set. The word friend is mounted next to it. Friend is shadowed with black cardstock and a white glimmer paper helps the word sparkle and pop on the card front. The sentiment panel has extra layers of dimensionals to ensure it stands tall above the rest of the design and catches the eye.

Tomorrow we’re going to be keeping things simple. I hope you’ll pop in to see how a stamp, paper, and die can make a beautiful card in a snap.

Products used in today’s card design:
Petunia Pop, Pretty in Pink, Peach Pie, Lemon Lolly, Shy Shamrock, Basic Black, Basic White cardstock
Flowering Zinnias, glimmer DSP
Simply Zinnia, Friends for Life dies
Zinnia embossing folder
Wonderful Thoughts stamps
Shiny sequins
Dimensionals
Adhesives

Flowering Zinnias · Shop the catalog

Flower-filled Thoughts

We’re spending this week getting to know the Flowering Zinnias suite by Stampin’ Up! This suite includes designer series paper, stamps, coordinating dies, coordinating embossing folder, and a package of embellishments. (See the whole suite here.).

Today’s card combines the designer paper and coordinating dies. I saw a similar design layout posted by Mitosu Crafts and just fell in love and thought why didn’t I think of that! Do you ever have those lightbulb moments when you see a design you absolutely love? It just seems so obvious to put it together that way.

What I love about this layout is that I immediately feel like I’m standing in a garden row of zinnias. I may have mentioned before that zinnias are one of my favorite summer flowers. If I had room to have a whole section of my gardening space devoted to zinnias, I most certainly would!

We start this card design with a base of Granny Apple Green cardstock. I chose the leaf and stems patterned sheet from the Flowering Zinnias paper pack and mounted it with a very thin mat of Basic Black. This full panel is adhered directly to the card base. Building the beautiful zinnia blooms is snap with the coordinating dies for this suite. I chose to use the new In Color called Peach Pie — a soft, muted orange. The flower centers are a combination of Pumpkin Pie and Lemon Lolly. I used a single dimensional to adhere the two petal layers together and then a combination of glue dots and glue pen for the centers and then finished each flower with a Pumpkin Pie shiny sequin. Having flowers disappear from the frame gives the feeling of looking through a window or looking a snapshot, and I just love that effect here. The sentiment from the coordinating Simply Zinnia set is stamped on Basic White and diecut using the Friends for Life die. The sentiment is adhered with a layer of dimensionals so that it stands tallest in the overall design. A few carefully placed Garden Green Blooming Pearls draw the eye down and across the design so that the eye rests on the sentiment.

What I love about this suite of products is how you can create designs that look intricate and complicated but are actually a breeze to put together. TIP: when making a card with the zinnia blooms, cut extra pieces to make your next card come together in a snap. Make it even easier by having fully assembled flowers in your stash!

Tomorrow, the embossing folder takes center stage. I hope you’ll come check it out!

Products used in today’s card design:
Granny Apple Green, Peach Pie, Pumpkin Pie, Lemon Lolly, Basic Black, Basic White cardstock
Flowering Zinnias DSP
Simply Zinnia stamps & dies
Friends for Life dies
Shiny sequins, blooming pearls
Dimensionals
Adhesives

Flowering Zinnias · Shop the catalog

Words Fail

Howdy, everyone! The next two weeks are going to be pretty busy as my little wraps up another school year. How did a whole school year go by already?! It’s good to be back home and able to do a little crafting.

This week we’re going to focus on the Flowering Zinnias suite of products. When I first saw this product suite, I immediately fell in love with the designer paper, but I wasn’t really won over by the coordinating stamps and dies. But as I worked more with the paper, I realized what I was missing. So this week, I want to show you how much further you can take your designs with the coordinating stamp/die bundle.

For today’s design, we’re starting with a base of Melon Mambo. The two patterns of designer paper are both from the Flowering Zinnias paper pack. The background piece is cut 1/8-inch smaller than the card base and then I distressed the edges using paper snips. This piece is mounted to the card base using dimensionals. The zinnia pattern is diecut using the Spotlight on Nature dies and one small section is cut from the side for an off-set mount with dimensionals on the patterned background. I slipped some iridescent striped trim underneath to add sparkle and draw the eye. The sentiment from the Simply Zinnia set is stamped on white cardstock and then diecut using the Autumn Leaves dies using the extension method. I mounted the sentiment on Berry Burst glimmer paper that was diecut using the Deckled Rectangles set. I added Melon Mambo shiny sequins to finish things off.

Tomorrow we’re going to walk through the zinnia patch. I hope you’ll come along!

Products used in today’s card design:
Melon Mambo, Basic White cardstock
Berry Burst glimmer, Flowering Zinnias DSP
Simply Zinnia stamps
Spotlight on Nature, Autumn Leaves, Deckled Rectangles dies
Iridescent striped trim
Shiny sequins
Dimensionals
Adhesives

Country Flowers · Shop the catalog

Previewing Country Flowers

My box of goodies from the new Stampin’ Up! Annual Catalog came a bit ago, but I haven’t had time to play with much of it just yet. But as soon as I took a look at few of the items I got from the new Country Woods Suite, I knew I wanted to start with those.

I really love the Country Woods designer series paper and chose to have it serve as the backdrop of this card design. We get started with a base of Basic White cardstock. The main background panel is a sheet of the lighter woodgrain pattern from the Country Woods paper pack. I diecut the sheet of Pool Party woodgrain from the same designer paper pack using the largest die in the Spotlight on Nature dies set. I stamped the stool from the Country Flowers stamp set onto the darker woodgrain pattern sheet and then diecut using the coordinating die. I stamped all of the greenery, along with the bucket and teapot, onto white cardstock using the Country Flowers stamps and then colored them with my Stampin’ Blends. I layered everything up with dimensionals to build a lot of different layers on the card front so that it gives it a more realistic look. I finished things off with some of the pearlized sequins from the Sequins Trio set and a double twist of the Iridescent Striped Trim. I chose not to have a sentiment on the front so that I could easily choose an inside sentiment on the fly once I’m ready to send it out.

This whole suite of products is fabulous. There are so many different ways that you can take it — masculine, feminine, shabby chic, country, and the list goes on. I’ve seen so many wonderful ideas that I’ve put in my inspiration folder!

I hope to bring you some more designs later this week, assuming we get to go home from the hospital.

Products used on this card:
Basic White cardstock
Country Woods DSP
Country Flowers stamps & dies
Stampin’ Blends
Iridescent striped trim, linen thread
Sequins trio
Dimensionals
Adhesives

Mother’s Day

Sure of Things Unseen

Happy Mother’s Day, everyone!

Faith is being sure of what we cannot see is the theme of today’s card design. As a mom and, in particular, a mom who struggled with infertility, these words resonate a little differently. Faith has to become a part of your inmost being—to simply trust that you will carry a baby to term and hold that precious and healthy part of you in your arms and have the privilege of raising this baby to adulthood.

It is such an honor to be a mom! It teaches you so much about our Creator and His love. And it teaches you a lot about humility and faith.

Today we’re wrapping up a series using a sketch and a small stash of crafty supplies. I loved this sentiment from the Unbounded Love stamp set and thought it was the perfect compliment to Mother’s Day.

We get started on today’s card with a base of Berry Burst cardstock. I also cut a quarter- sheet and embossed it using the Dotted Circles embossing folder. To give a bit more definition to the embossed pattern, I used my finger to spread a very light layer of white craft ink over the panel. Once dry, which didn’t take too long, I cut the embossed panel to be just a smidge smaller than the card base. I cut a small strip of the Thoughtful Journey designer paper so that a small scene would be exposed and then adhered it to the right side of the embossed panel. The embossed panel is adhered to the card base using dimensionals, and the sentiment panel is also adhered using dimensionals. The sentiment from Unbounded Love is stamped on white cardstock that is diecut using the Autumn Leaves die set. I chose to stamp the word faith in Fresh Freesia ink to emphasize the word and draw the eye to the sentiment. I wanted to add a soft eye-catching element behind the sentiment panel and chose to diecut some sprigs of greenery from vellum using the Painted Lavender dies and then added a paper butterfly and some paper white sequins from the Sequins Trio.

I hope that you are able to enjoy this Mother’s Day—whether through a family celebration or a remembrance.

I hope to be able to post a little more regularly in the coming week, assuming we’re able to come home from the hospital.

Products used in this card design:
Berry Burst, Basic White, vellum cardstock
Thoughtful Journey DSP
Unbounded Love stamps
Autumn Leaves, Painted Lavender dies
Dotted Circles embossing folder
Paper butterflies
Sequins trio
Dimensionals
Adhesives

Clean and Simple

True Blessing

Thus far this week, we’ve been exploring how a sketch and a few supplies can give you to terrific cards in no time flat. Today’s card is a slight variation on yesterday’s card design with a slightly wider designer paper section that begins on the edge of the embossed panel.

I really love this particular sheet of the Thoughtful Journey designer paper pack. The cedars set on the hill with the wildflowers down below reminds me of the prairie that was behind my childhood home.

This card begins with a base of Berry Burst. I cut an additional quarter-panel and embossed with the Eyelet embossing folder then cut the panel down to be one-quarter inch smaller, leaving just a small border behind on the base. I wanted to ensure that the beautiful embossed pattern stood out to compliment the soft white in the patterned paper, so I used my finger to rub a thin layer of silver ink over the top of the pattern. Then I adhered the designer paper panel to the right side of the embossed panel before adhering the full panel to the base using dimensionals. The sentiment from Unbounded Love is stamped on white cardstock diecut using the coordinating Unbounded Love dies. To draw the eye to the sentiment, I finished the card with tinsel gems and silver trim tied in a small bow.

Tomorrow, I’ll be rounding out this series with one final variation. I hope you’ll come check it out!

Products used in this card design:
Berry Burst, Basic White cardstock
Thoughtful Journey DSP
Unbounded Love stamps & dies
Eyelet embossing folder
Tinsel gems
Silver trim
Dimensionals
Adhesives