Fun Folds

Brighter Tomorrow

Hello, friends! I hope your week has gotten off to a good start. Thanks so much for hanging with me as I took a little break to tend to my hubby who was in the hospital. I’m pleased to report that we are now home! And as the saying goes, there really IS no place like home!

Over the weekend, I had a small bit of time to play around with some of the products I purchased from the new Annual Catalog. I kept things really simple and used a few sketches that I pulled from my sketch book.

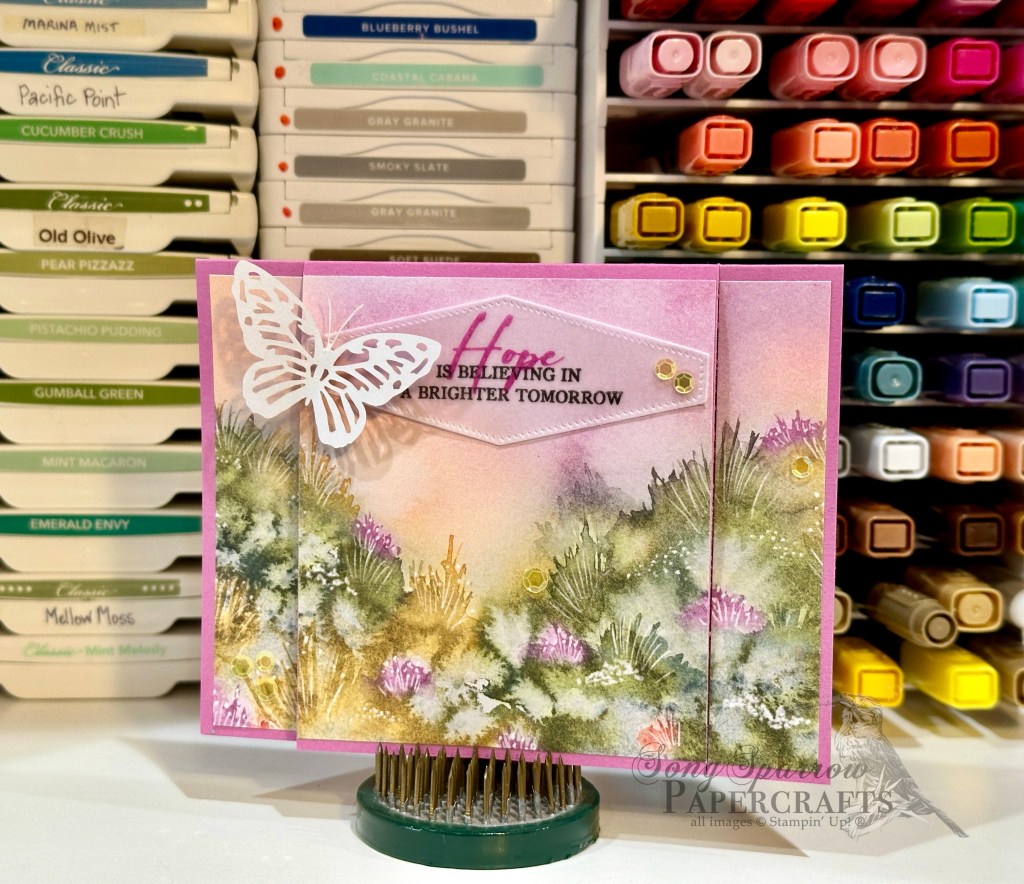
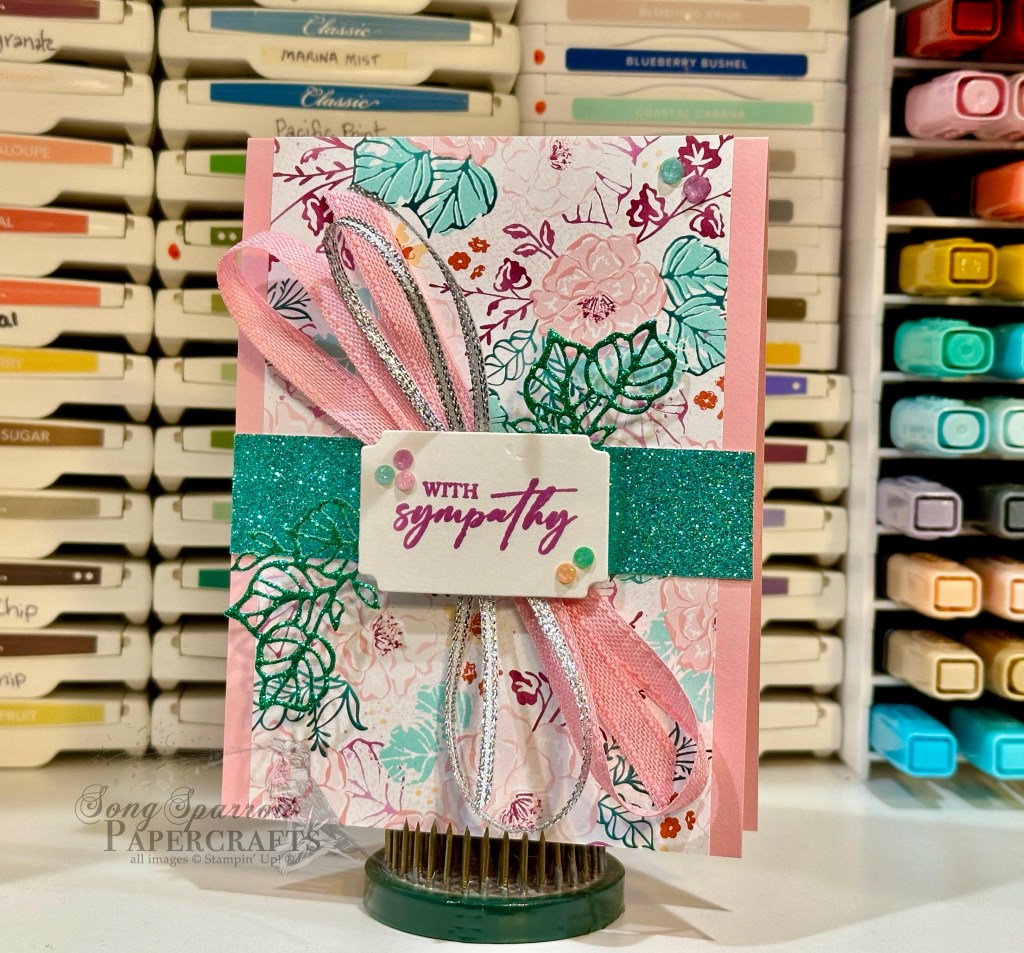
Today’s card is a faux fold-over fun fold card. The center section lifts up, just as a fold-over would, but this card is constructed entirely of the card base without any extra layers like the usual fold-over design has. The front panel of the card is cut to give you a large center section and the two small side sections are adhered to the card base so that, rather than the entire card front opening, only the panel in the middle opens. I like to call this a fun fold cheat because it has all the pretty and half as much work — haha!

We begin with a base of Petunia Pop cardstock, which is one of the new In Colors. The base is cut to standard size and scored in the center. After selecting a side to serve as the card front, cut a one-inch strip on each side of the card front, leaving a larger panel in the center. Be sure you’re only cutting from the bottom edge to the center score line. Next, choose and cut a piece of the Thoughtful Journey designer paper so that it is slightly smaller than the entire card front. Then cut a three-quarter inch strip from each side. This will leave you a center piece of designer paper that should lay perfectly over the entire center flap of the card front, leaving only the small border of Petunia Pop on the top and bottom. The sentiment from Unbounded Love is stamped in Petunia Pop and black on a piece of vellum diecut using the Nested Essentials set. It’s adhered to the center section using glue dots on each end. A few sequins and a paper butterfly finish things off and draw the eye across the card to rest on the sentiment.

I have a few more cards to share this week from my weekend crafting mini session and hope to get back into the swing of things as we settle into an appointment schedule here at home.

Products used in today’s card:
Petunia Pop, vellum cardstock
Thoughtful Journey DSP
Unbounded Love stamps
Nested Essentials dies
Paper butterflies
Shiny sequins
Dimensionals
Adhesives

Retiring · Zany Zoo

Celebrate with Confetti

Thanks for joining me today for another Zoo Crew adventure. This week, we’ve been following along as the members of the Zany Zoo have taken their turns in the spotlight before they bid adieu one final time as the 2023-24 Annual Catalog retires. Today, we get to tag along with the birthday puppers as he celebrates a special someone’s big day.

The fun fold card is known as a double flap fold-over or flip top fun fold. I first learned this fold from fellow Stampin’ Up! demo Jackie Bolhuis over at Klompen Stampers. This fold is great when you have designer paper you’d like to showcase or perhaps multiple images you want to display in one card design. For this particular card design, I wanted to highlight the fun patterns on the backs of the Zoo Crew designer paper.

We get started with a standard base of Pool Party cardstock. I cut the black herringbone pattern so that there’s a quarter-inch border around each edge. For the fold-over portion, I chose a piece of Lost Lagoon cardstock. Most of the sheet serves as the front fold-over panel. I elected to have a one-inch portion serve as the anchor on the inside of the card base, which is covered by the message panel. The fold-over panel is covered with the white polka dot pattern for a nice contrast of dark and light. The focal image panel is a piece of Pretty Peacock soft shimmer paper that is diecut using the Perennial Postage dies. The cute puppers is fussy cut from the sheet of Zoo Crew designer paper and mounted on dimensionals. The sentiment from the Unbounded Love stamp set (coming soon!) is stamped on white cardstock and diecut using the Everyday Details dies. I added an extra layer of dimensionals to adhere the sentiment to ensure it stands out against the busy background. A twist of Pool Party crinkle ribbon and a few adhesive-backed glitter sequins finish things off nicely.

I hope you’ll pop in tomorrow to check out a fun way to use those Zany Zoo dies!

Products used in today’s card:
Pool Party, Lost Lagoon, Basic White cardstock
Zoo Crew, soft shimmer DSP
Unbounded Love stamps (coming soon!)
Pool Party crinkle ribbon (retired)
Glitter sequins (retired)
Dimensionals
Adhesives

Retiring · Zany Zoo

S’more For You

We’re tagging along with the Zoo Crew this week as they take a few more adventures before retiring with the 2023-24 Annual Catalog. I’m going to miss these guys! The stamps and designer papers have offered so many fun design opportunities.

Today’s card has us gathering with friends around a campfire. We get started with a base of Pretty Peacock cardstock. The focal section of the card consists of a background of two patterns of designer series paper — Inked Botanicals and Bright & Beautiful — and a piece of white cardstock. Using the outdoor adventure sheet of the Zoo Crew designer series paper, I fussy cut several characters, as well as groups of trees and several mountain ranges, to build this scene. Dimensionals help give the scene depth. The sentiment from Charming Sentiments is stamped on Lemon Lime Twist and diecut with the Zany Zoo banner die. A strip of the ribbon duo tied off with linen thread, along with the bits of sparkle from the sequins, tinsel gems, and glitter sequins, finish things off by moving the eye across the design.

Tune in tomorrow to see what our zoo friends get up to next!

Products used in today’s card:
Pretty Peacock, Lemon Lime Twist, Basic White cardstock
Zoo Crew, Inked Botanicals, Bright & Beautiful DSP
Charming Sentiments stamps
Ribbon duo, linen thread
Pastel sequins, Tinsel gems, Glitter sequins (retired)
Dimensionals
Adhesives

Retiring · Zany Zoo

Hooray for Birthdays

This week, the Zoo Crew is taking us on one last adventure before they retire with the 2023-24 Annual Stampin’ Up! Catalog. These guys are so easy to incorporate into designs. I’m still a little surprised that this crew of adorable critters isn’t carrying over into the new catalog! Maybe we can all petition for them to stay on as Online Exclusives. *grin*

Today, the fox is riding in to bring some birthday wishes. We get started with a base of Lost Lagoon cardstock. The background panel is a piece of the Zoo Crew designer series paper cut so that there is a half-inch border on either side. Our cute fox is punched from the DSP using the Decorative Circle punch and matted with a slightly larger plain circle punched from a different sheet of the DSP. Both are then matted on a piece of the Lost Lagoon soft shimmer paper that has been punched with the 2 3/8-inch circle. The sentiment from Hot Air Balloon is stamped on white cardstock and then diecut with the Nested Essentials dies using the extension method, which gives just a smidge of added length to the banner to allow for the whole sentiment. I tied some Lost Lagoon bordered ribbon around the card and tucked it behind the focal image panel and then added some rainbow adhesive-backed dots to create a visual triangle between the focal image and sentiment.

Today’s layout is inspired by my upline and Luv 2 Stamp team leader Patty Bennett. One of the things I love about this card layout is how quickly everything comes together. This is a go-to in my sketch book. Do you have any go-to layout favorites?

I hope you’ll join me tomorrow for another wild Zoo Crew adventure!

Products used in today’s card:
Lost Lagoon, Basic White cardstock
Zoo Crew, soft shimmer DSP
Hot Air Balloon stamps
Decorative circle, 2 3/8” circle punch
Nested Essentials dies
Lost Lagoon bordered ribbon
Rainbow adhesive-backed dots
Dimensionals
Adhesives

Retiring · Zany Zoo

Zany Celebration

This week, we’re headed into the wild with the Zoo Crew. The Zany Zoo suite will be retiring with the current catalog, and I’m just a little sad about it. I love all of these fun critters and all of the many adventures they’ve had. So we’re tagging along for one last ride before the 2023-24 Annual Catalog retires.

What better way to celebrate a birthday than with a juggling koala?! Today’s fun fold card begins with a base of Granny Apple Green cardstock. The Zoo Crew designer paper provides our neutral black and white base panels, as well as our main character on the focal panel. The focal panel consists of a small panel of white cardstock, along with two circles punched from Bright & Beautiful and Hello Irresistible designer paper packs. The sentiment from Something Fancy is stamped on white cardstock and then cut with paper snips into a banner. A small strip of More Dazzle specialty paper adds some sparkle. The koala is elevated on dimensionals to ensure it stands above the scene and draws the eye to the action. The iridescent discs bring the eye to our focal panel and add some visual interest.

Tune in tomorrow to see what our zoo friends get up to!

Products used in today’s card:
Granny Apple Green, Basic White cardstock
Zoo Crew, More Dazzle, Hello Irresistible, Bright & Beautiful DSP
Something Fancy stamps
Circle punch
Iridescent discs
Dimensionals
Adhesives

Coming Soon

Unbounded Sympathy

We’re wrapping up our week in the fields and flowers with a sneak peek of some product from the NEW 2024-25 Annual Catalog that Stampin’ Up! will release in May. The Unbounded Love suite includes gorgeous papers, stamps, dies, and embellishments.

No one really likes to have to send sympathy cards, but I do love knowing that I have designed a very personal card with the recipient in mind.

This design begins with a base of the NEW Pretty in Pink In Color cardstock. The focal panel is a sheet of the Unbounded Beauty floral paper pack. I really wanted this stunning paper to take center stage, so I kept the remainder of the card design very simple. A strip of the new Summer Splash In Color glimmer paper serves as the backdrop for the sentiment panel. The sentiment from the new Unbounded Love set is stamped in the new Petunia Pop ink on white cardstock and diecut with the coordinating Unbounded Love dies. The leaves are cut from the new Shy Shamrock In Color glimmer paper. A twist of the new Pretty in Pink bordered ribbon and silver trim and a few new In Color shimmer gems finish things off and really help draw the eye to the sentiment.

Next week, I’m planning to take things to the zoo — the Zoo Crew, that is. I hope you’ll come along as we bid farewell to one of my favorites from the 2023-24 Annual Catalog!

Products used in this card design:
Pretty in Pink (coming soon!), Basic White cardstock
Unbounded Beauty, 2024-26 In Color glimmer DSP
Unbounded Love stamps & dies
Pretty in Pink bordered ribbon, silver trim
2024-26 In Color shimmer gems
Dimensionals
Adhesives

Coming Soon

Sending Flowers

We’re finishing off our frolic in the fields with a look at some brand NEW product that will be available in the 2024-25 Annual Catalog releasing in May.

The Thoughtful Journey 6×6 paper pack offers a whole array of watercolor images in soft tones. There are floral landscapes and beautiful abstract backgrounds. These papers will lend themselves to any number of occasions with ease.

Today’s card is a very clean and simple design. The base is white cardstock with a single strip of designer paper offset to the right side. I chose the lovely thistle pattern with soft tones of Petunia Pop and Pretty in Pink — two of the NEW In Colors. The sentiment from Simply Zinnia is stamped in Petunia Pop and heat embossed with clear embossing powder on a strip of vellum. A strip of white diagonal trim is tied around the bottom of the sentiment in a simple square knot. I finished things off with a small paper butterfly and shimmer gems in the new 2024-2026 In Colors.

Join me this afternoon as I give a quick preview of another NEW bundle of products from the upcoming 2024-25 Annual Catalog called Unbounded Beauty.

Products used in this card:
Basic White, vellum cardstock
Thoughtful Journey DSP (coming soon!)
Simply Zinnia stamps
White diagonal trim
Clear embossing powder
2024-26 In Color shimmer gems
Dimensionals
Adhesives

Botanicals · Mother’s Day

Lavender for You

This week, we’re touring fields and flowers as we explore some of my favorite Stampin’ Up! products. And stopping to smell the lavender from yesterday’s lovely hillside was just too tempting. In fact, today we have a whole bouquet.

From top to bottom, the Perennial Lavender suite in the January Mini Catalog is one of my favorite releases to date. There is not one single element in the suite of products that leaves me wondering what I’ll do with it, which is honestly pretty rare for me. Portions of this suite of products will be fully retired when the new Annual Catalog releases. So if you’ve been on the fence about buying this suite, time is of the essence before portions of it are gone for good!

Being that Mother’s Day is just around the corner, it seemed fitting to design a card perfect for the occasion. Today’s card design begins with a base of Highland Heather cardstock. The focal panel base is a sheet of the Perennial Lavender designer series paper, and I have distressed the edges with my paper trimmers to give it a well-worn look. The lavender bunch is stamped on white cardstock using the Painted Lavender stamp set and then diecut using the coordinating die set. To give the fronds of lavender a more realistic look, I used three different shades of purple — Highland Heather, Gorgeous Grape, and Fresh Freesia. The flower bunch is tied together with linen thread. The sentiment from the Perennial Postage set is stamped on white cardstock and diecut using the Thoughtful Expressions dies. I cut a coordinating mat from white glimmer paper using the next die size up. I added a paper butterfly to further soften the feel of the card and finished things off with classic matte dots and purple shimmer gems.

Later today, we’ll be enjoying another fresh bouquet. I’ll hope you’ll pop back by to check it out!

Products used in today’s card:
Highland Heather, Basic White cardstock
Perennial Lavender, white glimmer DSP
Painted Lavender stamps & dies
Perennial Postage stamps
Thoughtful Expressions dies
Paper butterfly
Classic matte dots, purple shimmer gems
Linen thread
Dimensionals
Adhesives

Botanicals

Hello, Lavender Fields

As promised, I’m back! Thanks for hanging with me as I worked to get my husband settled in back home for a few days before we head back to the hospital for the next big surgery. Hats off to all of the full-time caregivers out there — it’s definitely a big job!

I’m super excited to get back to scheduled programming and take a stroll through the hills and fields of flowers. I’m going to showcase some of my favorites from the current and soon-to-release Stampin’ Up! lineup. I hope you’ll plan to come along for the whole trip!

Today, we’re walking the Hills of Tuscany, using the stamp set by the same name. This lovely stamp set is on the Last Chance list, and I’m sad to see it go! But this is a set that will definitely be staying in my crafting stash for making beautiful landscape scenes.

Now, let’s take a closer look at how today’s card came together. I chose to have a lavender theme for this landscape. We get started with a base of Crumb Cake cardstock. The back panel of the focal section of this card is a quarter-sheet of Crumb Cake that has been diecut with the largest Deckled Rectangles die and then machine embossed with the Distressed Tile embossing folder. To help the beautiful embossed detailing stand out a bit more, I gave it an aged look by sponging Crumb Cake ink over the top. It’s also elevated with dimensionals to give depth to the design. The focal panel mat is Gorgeous Grape cardstock that has been diecut with the Deckled Rectangles dies, while the focal panel is a sheet of white cardstock diecut with the nesting rectangle from the same set of dies. The focal panel landscape scene is stamped using the Hills of Tuscany stamp set.

The sentiment panel is diecut from Crumb Cake cardstock using the soon-to-release Unbounded Love dies. The lavender bunch is diecut from Gorgeous Grape using the Painted Lavender dies and tied together using linen thread. The frame is adhered directly to the focal panel, while the sentiment portion is popped up on dimensionals to ensure the sentiment isn’t lost in the scene.

Two strips of the Perennial Lavender designer series paper behind the focal panel finish off this design. They serve to begin the eye’s journey across the card front. Notice how the purple elements form a visual triangle across the card front as your eye passes from this strip of DSP to the sentiment panel to the field of lavender in the landscape to the gems in the bottom-right corner.

TIP: when you overlap stamped images from this stamp set, it creates darker areas that add depth and shading. Notice the darker green path in the hill that was created in this fashion. I still have a lot to learn when it comes to this technique, but I have enjoyed experimenting with the layering. Should we make this an episode of Terrific Tuesdays? I would love to know your thoughts!

Products used in today’s card:
Crumb Cake, Gorgeous Grape, Basic White cardstock
Perennial Lavender DSP
Hills of Tuscany stamps
Deckled Rectangles, Unbounded Love (coming soon!) dies
Distressed Tile embossing folder
Purple fine shimmer gems
Linen thread
Dimensionals
Adhesives

Clean and Simple · Fun Folds

Picked for You

This week, we’ll be frolicking in the meadows and stopping to smell a few flowers along the way. Stampin’ Up! has a whole host of papers and stamps that put us squarely in the middle of beautiful fields and fragrant flower patches. And we’re going to explore some of my favorites throughout this week.

We begin today with a new take on an old fun fold. I recently ran across the hidden barn fold design and knew I had to give it a try. Why is it called a hidden fold? When the card is completely closed, the two sections of the front panel meet, they make the center cut virtually disappear.

So our take on this card begins with a base of Blackberry Bliss cardstock. The focal panel consists of a bottom mat of Lost Lagoon soft shimmer paper that is diecut using the largest Perennial Postage die, followed by a layer of Highland Heather cut just a tick smaller, and finally with our section of Meandering Meadow designer paper on top. To accomplish the two perfect sections, I cut the shimmery layer in half after I diecut it. I adhered the DSP and Highland Heather mat together first before also cutting them in half with the trimmer. Then these three layers were adhered together before carefully adhering them in place on the card front so that they meet together perfectly at the center. The sentiment from Charming Sentiments is stamped on white cardstock and diecut using the smallest Thoughtful Expressions die. The sentiment mat is cut from Lost Lagoon shimmer paper. A twist of silver & white sheer ribbon and Lost Lagoon bordered ribbon are adhered in between the two sentiment layers. Using dimensionals, the sentiment is adhered to the left flap of the card front. I added a few purple fine shimmer gems for sparkle and to move the eye diagonally across the card front.

This particular design is super easy to put together. And by changing the color palette and DSP, each card has a completely different look. This is going to be a go-to design for me if I need to make a whole host of simple yet beautiful cards!

Tune in tomorrow as we explore the rolling Hills of Tuscany!

Products used in today’s card:
Blackberry Bliss, Highland Heather, Basic White cardstock
Meandering Meadow, Lost Lagoon soft shimmer DSP
Charming Sentiments stamps
Thoughtful Expressions, Perennial Postage dies
Silver & white sheer trim, Lost Lagoon bordered ribbon
Purple fine shimmer gems
Dimensionals
Adhesives