Holiday Mini Catalog

When Words Are Too Much

Welcome to a brand new week. It’s the last day of September. Who else is reeling a little bit about that?!

This week, we’re starting a brand new series using the Stampin’ Up! Nests of Winter suite. We’re starting off super simple by letting the beautiful paper do all the talking. With so many of you dealing with the aftermath of Hurricane Helene, this sentiment felt appropriate today. The photos of the damage left behind is simply overwhelming! Our prayers are definitely with you all.

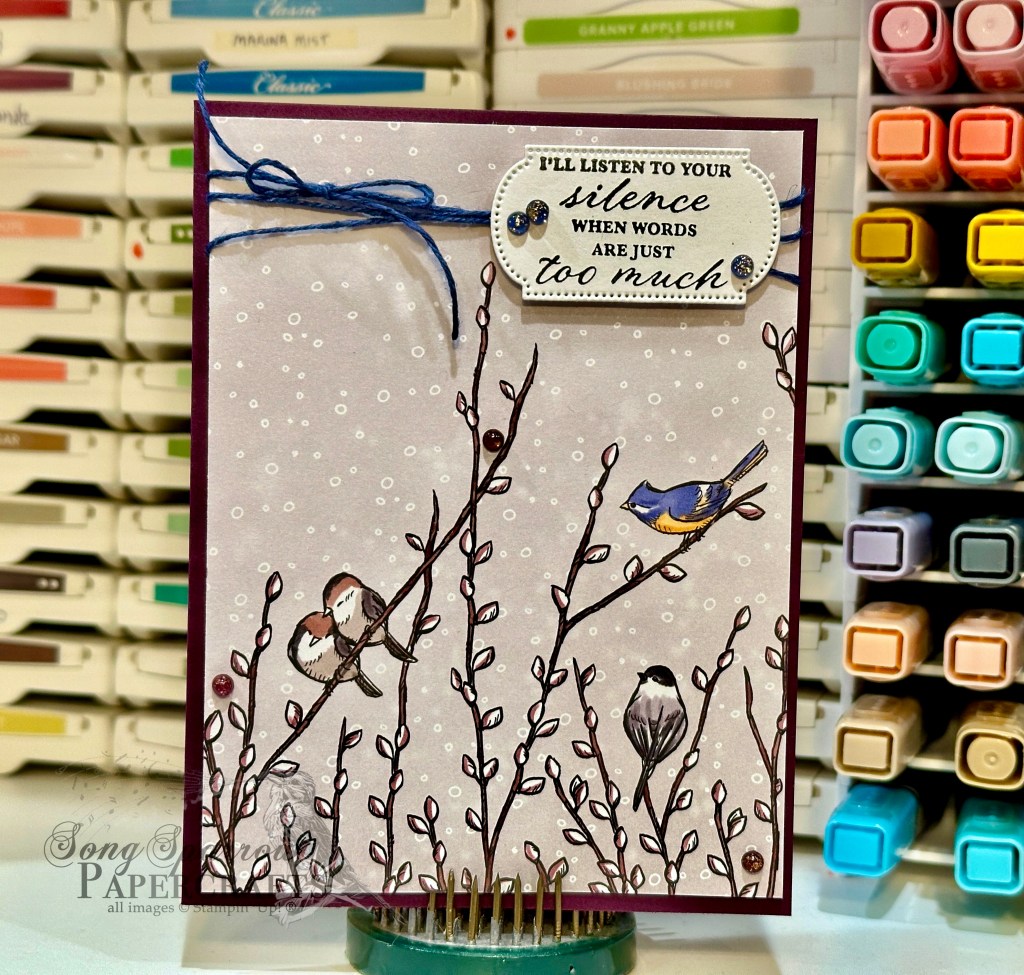
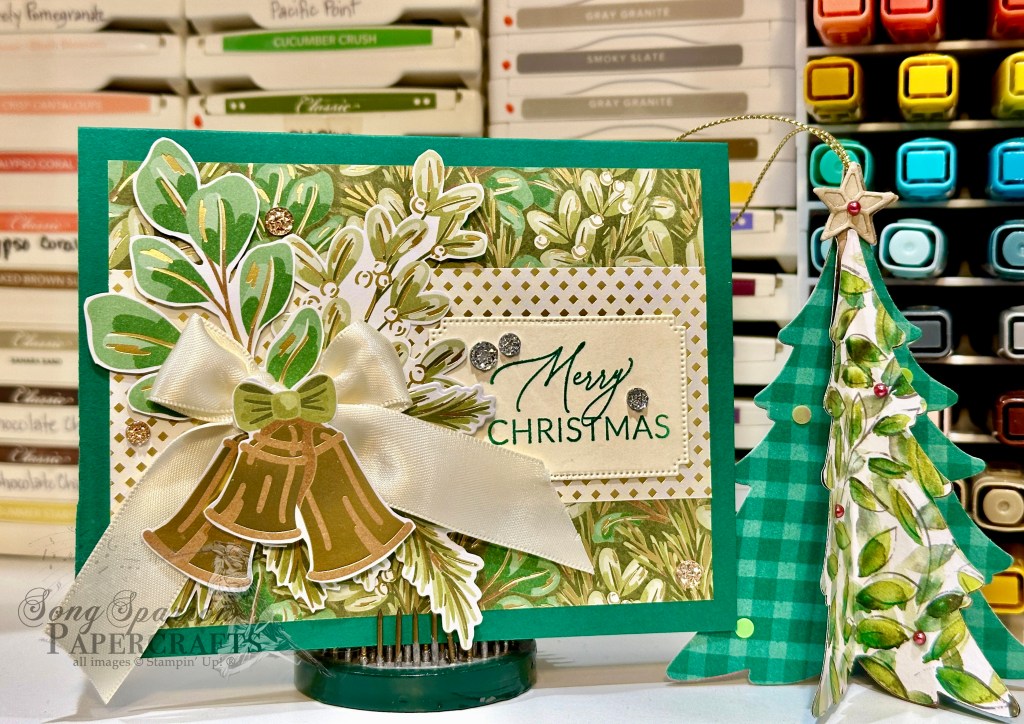
We start our card with a base of Blackberry Bliss cardstock. I love how that pulled the subtle purple hues in this paper more forward. I chose the one-sheet-wonder sheet from the Nests of Winter paper pack as our focal sheet for this card. I twisted the Night of Navy linen thread around the top. I love how this makes the little blue bird in our focal sheet really pop. The sentiment from Wonderful Thoughts is stamped in black on white cardstock and then diecut using the Greetings of the Season dies. I added a few regal foiled dots on the sentiment panel and scattered a few among the branches below.

This clean and simple design is a great way to let a gorgeous piece of paper do all the heavy lifting. Check in tomorrow to see more from this lovely suite of products.

Products used in today’s card:
Blackberry Bliss, Basic White cardstock
Nests of Winter DSP
Wonderful Thoughts stamps
Greetings of the Season dies
Natural Tones linen thread
Regal foiled dots
Dimensionals
Adhesives

Product List
Autumn · Holiday Mini Catalog

Autumn Birthday Greenery

It’s a beautiful weekend here in North Texas and things are beginning to feel a little more fall-like. The Great State Fair is now underway and morning temperatures are cooling off. I would be remiss if I didn’t express thoughtful concern for all of those who have been or will be impacted by Hurricane Helene. Please know that our thoughts and prayers are with you and we wish you fair weather for cleanup very soon!

Today we’re wrapping up our series of card designs using the Stampin’ Up! Season of Green & Gold suite, which is concluding with a mini series of fall designs using these products. One of the many ways that you can get more “bang for your buck” is to look for unique ways to use your crafting supplies. In the case of the Golden Greenery stamps and dies, we’re taking inspiration from all of the fall foliage that begins its color transformation this time of year. And today’s design highlights some fronds of fall foliage in the foreground of a field of Queen Anne’s lace.

We get started with a base of Cajun Craze cardstock. Our background panel is a sheet of Splendid Autumn patterned paper. Our fall foliage is diecut from Cajun Craze using the Golden Greenery dies. To create the buds on one of the stems, we use the heart die from the Filled with Fun set to cut hearts from a variety of cardstock colors, including Crushed Curry, Real Red, Garden Green, red Season of Elegance foiled paper, and blue Oxidized Copper paper, and then adhere them to the base stems with glue dots. Our rusty stems of foliage are adhered to our background panel with dimensionals. We then layer in a little sparkle in the background with some sprigs diecut from Peach Pie glimmer paper using the Changing Leaves dies. The sentiment from Greetings of the Season and Everyday Greetings is stamped in Copper Clay on white cardstock and then diecut using the Greetings of the Season banner die. Some gold trim is tied around the end and the panel is then adhered in front of our foliage with dimensionals. A few copper sequins finish things off and help the eye pass neatly over the card front and settle on the sentiment.

Next week we’re touring the Nests of Winter suite. I hope you’ll pop by and see all the ways you can make this beautiful suite of products work for you!

Products used in today’s card:
Cajun Craze, Crushed Curry, Real Red, Garden Green, Basic White cardstock
Season of Elegance, Oxidized Copper, In Color glimmer, Splendid Autumn DSP
Everyday Greetings, Greetings of the Season stamps
Golden Greenery, Filled with Fun, Changing Leaves, Greetings of the Season dies
Gold trim
Neutrals sequins
Dimensionals
Adhesives

Product List
Autumn · Holiday Mini Catalog · Sketchy Fridays

Sketchy Fridays: Birthday Greenery

We’ve made it to another Friday, and you know what that means? It’s time for another Sketchy Fridays!

Each week we’ll be using a card sketch to design our featured card. Right now, we’re working through a full series of designs using the card sketches found in current Stampin’ Up! catalogs.

This week’s card is based on Sketch #4 in the Holiday Mini catalog and features the Golden Greenery dies and the Splendid Autumn designer series paper in the new Stampin’ Up! Holiday Mini catalog.

One of my dearest girlfriends is celebrating a birthday in a few weeks, and I knew that I wanted to create something special for her. I’m always a little nervous creating things for her because she’s such a gifted artist. She draws, she paints, she watercolors….and everything is just stunning! So it seemed only fitting to use the beautiful Splendid Autumn designer series paper with its gorgeous watercolor look. And I really love how you can change the look and feel of the sheet of paper simply in the way that you selectively cut it to size.

Our design gets started with a base of Cajun Craze cardstock. The focal panel is a combination of Splendid Autumn patterned paper and gold mercury vellum as a mat. The Splendid Autumn paper in this design is trimmed so that only the trees from the scene are showcased in the panel. I think it’s such a neat look, especially considered in context with the full sheet of paper.

Our focal section consists of the sentiment panel. The sentiment from Everyday Greetings is stamped in Copper Clay on Very Vanilla and then diecut using the Autumn Leaves dies. We have two sets of fall foliage behind our sentiment panel. One is cut from Oxidized Copper, while the other is cut from Season of Elegance paper. Both are cut using the Golden Greenery dies. A twist of linen thread in between ties our fall color palette together nicely. And we finish things off with the sparkle of Earth Tones shimmer gems.

The next time you’re cutting down a sheet of patterned paper, think about how you can create a different and interesting look based on the overall feel you want to convey in your design. I think you’ll be surprised how it changes the look of the panel you trim down!

Tomorrow we’ll be finishing off our Season of Green & Gold series with another fall-inspired design. I hope you’ll drop in and check it out!

Products used in today’s card:
Cajun Craze, Very Vanilla cardstock
Splendid Autumn, gold mercury vellum, Oxidized Copper, Season of Elegance DSP
Everyday Greetings stamps
Golden Greenery, Autumn Leaves dies
Natural Tones linen thread
Earth Tones shimmer gems
Dimensionals
Adhesives

Product List
Christmas · Holiday Mini Catalog · Holidays

Bells & Boughs

This week, we’re exploring some of the ways we can use the Stampin’ Up! Season of Green & Gold suite of products. Today, we’re using it in a more traditional holiday-inspired layout.

Our design gets started with a base of Shaded Spruce cardstock. Our focal panel uses two patterns from the Season of Green & Gold designer series paper pack. I just love the gold-foiled patterns, and here we’re using the mistletoe and diamond patterns to create the backdrop for our focal section. The sentiment from Greetings of the Season is stamped in Shaded Spruce on Very Vanilla cardstock and then diecut with the Autumn Leaves die using the extension method. The greenery and bells are cut from a sheet of the Season of Green & Gold patterned paper and then adhered with several layers of dimensionals. The bells are adhered over a satin bow tied with the Very Vanilla satin ribbon. A mixture of drusy embellishments add sparkle and draw the eye across the card design.

I hope you’ll pop in tomorrow to see how we can use this suite to create a fall-inspired design.

Products used in this card:
Shaded Spruce, Very Vanilla cardstock
Season of Green & Gold DSP
Greetings of the Season stamps
Autumn Leaves dies
Very Vanilla satin ribbon
Drusy embellishments
Dimensionals
Adhesives

Product List
Christmas · Holiday Mini Catalog · Holidays

Happy Holidays Greenery

How excited was I to wake up to a rainy cold front this morning?! While it’s not exactly fall cool yet, we’re definitely headed in the right direction.

Today, we’re continuing a closer look at the Stampin’ Up! Season of Green & Gold suite of products. This suite includes beautiful gold-foiled patterned papers, coordinating vellum, stamps & dies, and lovely satin ribbon. Today’s card is another take on a traditional holiday design.

We started with a base of Basic Beige cardstock. Our background panel is a greenery pattern from the Season of Green & Gold designer series paper pack. Our focal panel background in the center is a strip of Basic Beige that is embossed using the Cute Crochet embossing folder and then matted with the backside foiled pattern of the background panel sheet. The sentiment panel is cut from Basic Beige using the Greetings of the Season dies. The sentiment from Greetings of the Season is stamped in Mossy Meadow toward the bottom of the tag. Using some of the leftover sprigs of greenery that I cut for yesterday’s card design, I affixed them to the sentiment panel to overlap the top of the tag and then tied a bow of Very Vanilla satin ribbon and affixed it in the center. A few drusy embellishments on either side of the sentiment help draw the eye and add a bit of finishing sparkle.

Tomorrow we’re going to round out our winter holiday designs before transitioning to a few out-of-the-box designs. I hope you’ll pop in.

Products used in today’s card:
Basic Beige cardstock
Season of Green & Gold DSP
Cute Crochet embossing folder
Golden Greenery dies
Greetings of the Season stamps &dies
Very Vanilla satin ribbon
Drusy embellishments
Dimensionals
Adhesives

Product List
Christmas · Holiday Mini Catalog · Holidays

Bright & Beautiful Greenery

Welcome to a brand new week and the start of FALL! Have I mentioned that fall is my absolute favorite season? Unfortunately, Texas isn’t being very cooperative with me right now, and it doesn’t feel a bit like fall. Not one bit!! In fact, it’s still feeling like we’ve been thrown into the deep end of the frying pan. But we’re only a couple of good cold fronts away from fall officially being here to stay! *wink-wink*

This week, we’re going to be spending time with the Season of Green & Gold suite of products by Stampin’ Up! And we’re going to mix it up with some obvious holiday designs and some out-of-the-box fall designs. Today’s card is solidly in the holiday mood.

We get started with a base of Shaded Spruce cardstock. Our focal panel is a sheet of white cardstock that has been diecut using the Dotted Circles embossing folder and then the panel is matted with gold mercury vellum. Using the Golden Greenery dies, we cut a variety of greenery from the Season of Green & Gold patterned paper with coordinating shapes. These are then layered on the focal panel using dimensionals to create several different visual planes. Our sentiment from Peaceful Season is stamped white cardstock in Versamark and then heat embossed with gold embossing powder. We cut it out with the smallest circle from the Everyday Details die set. This is then mounted on a circle of white glimmer paper cut using the Spotlight on Nature dies and adhered over a twist of Cherry Cobbler & Gold satin ribbon in the center of our greenery. A few iridescent faceted gems finish things off with a nice sparkle.

Tune in tomorrow as we keep things in the holiday zone.

Products used in today’s card:
Shaded Spruce, Basic White cardstock
White glimmer, gold mercury vellum, Season of Green & Gold DSP
Dotted Circles embossing folder
Golden Greenery, Spotlight on Nature, Everyday Details dies
Peaceful Season stamps
Versamark
Gold embossing powder
Cherry Cobbler & gold satin ribbon
Iridescent faceted gems
Dimensionals
Adhesives

Product List
Christmas · Holiday Mini Catalog · Sketchy Fridays

Sketchy Fridays: Holiday Joy

Do you ever have weeks where you aren’t sure which end is up much less what day it is? I’ve been confused about what day of the week it is all week and it’s NOT even a holiday week! Perhaps it’s a phase of the moon or something.

Today is another installment of Sketchy Fridays, where each week we’ll be using a card sketch to design our featured card. Right now, we’re working through a full series of designs using the card sketches found in current Stampin’ Up! catalogs.

This week’s card is based on Sketch #13 in the Holiday Mini catalog and features the Joyful ephemera packs and the fun Take a Bow designer series paper in the new Stampin’ Up! Holiday Mini catalog.

I know I probably say this often enough that you’re beginning to think that I’m a broken record, but what I love about using sketches to build a card design is that it’s merely a starting point. There aren’t any rules that say your card HAS to look exactly like the sketch that inspired it. Today, you’ll notice that I’ve taken some liberties with the sketch. Rather than using actual rectangles in the design, they’re a representation of the images from the Joyful Images ephemera pack. Can you see it?

We get started on this card design with a base of white cardstock. Our background panel is a sheet of the red polka dot Take a Bow patterned paper with a strip of the green star pattern from the same pack. In each of the places represented by rectangles in the sketch, I’ve put images from the Joyful Images ephemera pack, building a cute scene of a cup of cocoa surrounded by snacks you might enjoy with it. There’s a twist of the peppermint baker’s twine tied behind the images for a little visual interest. The sentiment down below is mounted on a banner from the Images pack while the word Joy is from the Joyful Sayings ephemera. A few adhesive peppermints and some drusy embellishments help the eye move across our design and add some pops of fun color and sparkle.

Tomorrow we’ll be rounding out this week’s series with a trip to grandma’s house. I hope you’ll come along!

Products used in today’s card:
Basic White cardstock
Take a Bow DSP
Joyful ephemera packs
Real Red & White twine
Real Red & White peppermints
Drusy embellishments
Dimensionals
Adhesives

Product List
Christmas · Fun Folds · Holidays

Season of Evergreens

We’ve made our way to another weekend and halfway through the month of September already! This week, we’ve been All About Christmas and have been exploring a whole selection of Stampin’ Up! holiday products. Today, we’re revisiting a set of products that carried over from last year’s holiday release. And it’s no wonder because the Merriest Trees set and the Winter Meadow paper pack both offer so many ways to create beautiful cards and not just holiday designs!

Today, we’re pairing up the Merriest Trees dies with one of my all-time favorite fun folds — the Center Step fun fold. I also gave a new coloring technique a try to make my own patterned paper for the trees. So let’s take a closer look at how this fun fold comes together.

We get started with a base of Pretty Peacock cardstock. A sheet of the Winter Meadow designer series paper serves as our backdrop for the center focal panel. Our pair of trees start with a custom coloring technique using Pretty Peacock and Old Olive ink. (Tune in on my YouTube channel on Tuesday for a full tutorial during the next episode of Terrific Tuesdays!) I also splatter some white craft ink to give the look of snowflakes falling in front of the branches. Using all of the various sizes of trees in the Merriest Trees die set, I cut out tree panels and then selected ones to layer to create each tree. Dimensionals on the bottom fringes of the branches help give a little dimension and the look of the stacked branches. Each tree is then decorated with garland and stars cut from textured gold specialty paper. The trees are adhered to the bottom of the center fold portion of the card base with dimensionals. Our sentiment consists of a mat of gold foil cut with the banner die from the Peaceful Season die set. The sentiment from Merriest Trees is heat embossed in gold on white cardstock and then diecut using the Peaceful Season dies. It’s adhered to the top of the center panel with dimensionals. I tucked a few bunnies by the trees for a little added interest and then scattered snowflakes in the background.

Next week we’re going to be exploring the new Christmas ephemera. I hope you’ll tag along!

Products used in today’s card:
Pretty Peacock, Basic White cardstock
Watercolor paper, Winter Meadow, gold foil, textured gold DSP
Merriest Trees stamps & dies
Peaceful Season, Grove dies
Gold embossing powder
Pretty Peacock, Old Olive reinker
Snowflakes, rhinestone jewels
Dimensionals
Adhesives

Product List
Christmas · Holiday Mini Catalog · Sketchy Fridays

Sketchy Fridays: Take a Bow, Frosty

Welcome to Friday, everyone! This week, we’ve been All About Christmas and have been taking a tour through all of the fun holiday products that Stampin’ Up! offers.

Today is another installment of Sketchy Fridays, where each week we’ll be using a card sketch to design our featured card. Right now, we’re working through a full series of designs using the card sketches found on page 22 of the current Stampin’ Up! Annual Catalog.

This week’s card is based on Sketch #17 and features the snowman from the Filled With Cheer stamp set and the fun Take a Bow designer series paper in the new Stampin’ Up! Holiday Mini catalog.

We get started with a base of Real Red cardstock. I chose a sheet of the new Take a Bow designer series paper for the strip elements in the sketch and used both sides of one sheet of paper. I felt like the focal panel needed to be more than simple strips of patterned paper and this is where I chose to add two additional layers to bring everything together. I used some of the red Festive glimmer paper as the mat immediately behind our paper strips, and this mat is cut using the Perennial Postage die. And then to help the whole focal panel pop against our card base, I added a mat of white cardstock that has been diecut with the Deckled Rectangle die and then embossed using the Snowflake Sky embossing folder. Our focal panel is stamped with the snowman from the Filled With Cheer stamp set and then diecut with the Perennial Postage dies so that we’re just capturing the snowman and Christmas tree. The snowman is colored with Stampin’ Blends. Red and white baker’s twine is twisted around the bottom of our panel to tie everything together (no pun intended). The top-right edge of our panel is lightly sponged with Real Red ink to create a nice backdrop for our separate sentiment panel. The sentiment from Greetings of the Season is stamped in red on white cardstock and then diecut with the circle die from Changing Leaves and then adhered over our sponged focal panel corner. The focal panel is adhered to the backdrop with dimensionals. A few peppermints and rhinestones finish things off and help draw the eye across and to the more important elements on our card.

I love sketches because they give me a great place to get started. Sometimes I stick to a sketch just as it is. And other times, like today, I venture just a tiny bit outside the lines. I really love the simplicity of today’s sketch, but as I started working with it in conjunction with all of the elements in today’s card design, I felt like we needed a few extra layers to be sure everything works together but also, and more importantly, to ensure that all of the elements really pop.

Tomorrow we’re revisiting a few old favorites as we make our way through the enchanted Christmas forest. I hope you’ll pop by and check it out!

Products used in today’s card:
Real Red, Basic White cardstock
Take a Bow, Festive glimmer DSP
Filled With Cheer, Greetings of the Season stamps
Stampin’ Blends
Snowflake Sky embossing folder
Perennial Postage, Deckled Rectangles, Changing Leaves dies
Red & white twine
Peppermints
Rhinestones
Dimensionals
Adhesives

Product List
Christmas · Holiday Mini Catalog · Holidays

Festive Christmas Gift

Do you ever include a gift with a Christmas card? Do you ever find yourself looking for cute and/or creative ways to include the gift? Today, we’re looking at a fun way to include a gift card with this year’s Christmas card to friends or relatives. This card is literally a gift that keeps giving!

For our special gift card, we’re pairing some of the beautiful new patterned paper packs with the dies from the Season of Elegance Suite included in the new Stampin’ Up! Holiday Mini catalog. So let’s take a closer look at how this all comes together.

We get started with a base of Real Red cardstock. Our focal gift panel also starts with a base of Real Red that is cut down to leave enough room at the top for our decorative gift card insert. Using the smaller square from the Peaceful Season dies, we cut squares from two sheets of the Season of Elegance paper and one sheet of the Season of Green & Gold paper pack. I alternated the red and cream-colored rows and tried to ensure the center squares lined up so that the Cherry Cobbler & Gold ribbon element ran cleanly from top to bottom. Our sentiment from the Trucking Along stamp set is stamped tone-on-tone on Real Red cardstock and then diecut using the Peaceful Season die, which is matted with the larger rectangle banner from the same die set. The sentiment panel is adhered at the bottom of our package focal panel using dimensionals. I added Drusy embellishments to the panel for added sparkle and to ensure the eye moves to the sentiment. We adhere our full focal panel to the card front using foam strips on three sides to create a pocket behind the panel.

Our gift card holder is a piece of Very Vanilla cardstock that is diecut with the largest tag in the Greetings of the Season die set. We create the bow for the top by cutting Garden Green Festive glimmer paper with the Peaceful Evergreens dies. The bow is assembled with glue dots and then adhered to the top of our tag with dimensionals. You can lightly hold a gift card in place by placing a few glue dots on the back and then placing it on the tag. Tuck it into the pocket and you have an instant gift in more ways than one!

I really love how this turned out and can’t wait to use this design this year. It’s always fun to be able to present a gift card in a fun and creative way and with a lengthier note.

Tune in tomorrow for a new Sketchy Fridays card design and see what our snowman is getting up to!

Products used in today’s card:
Real Red, Very Vanilla cardstock
Season of Elegance, Season of Green & Gold, Festive glimmer DSP
Trucking Along stamps
Peaceful Season, Peaceful Evergreens, Greetings of the Season dies
Cherry Cobbler & gold metallic ribbon
Drusy embellishments
Foam strips
Dimensionals
Adhesives

Product List