Christmas · Holidays

Christmas Greenery

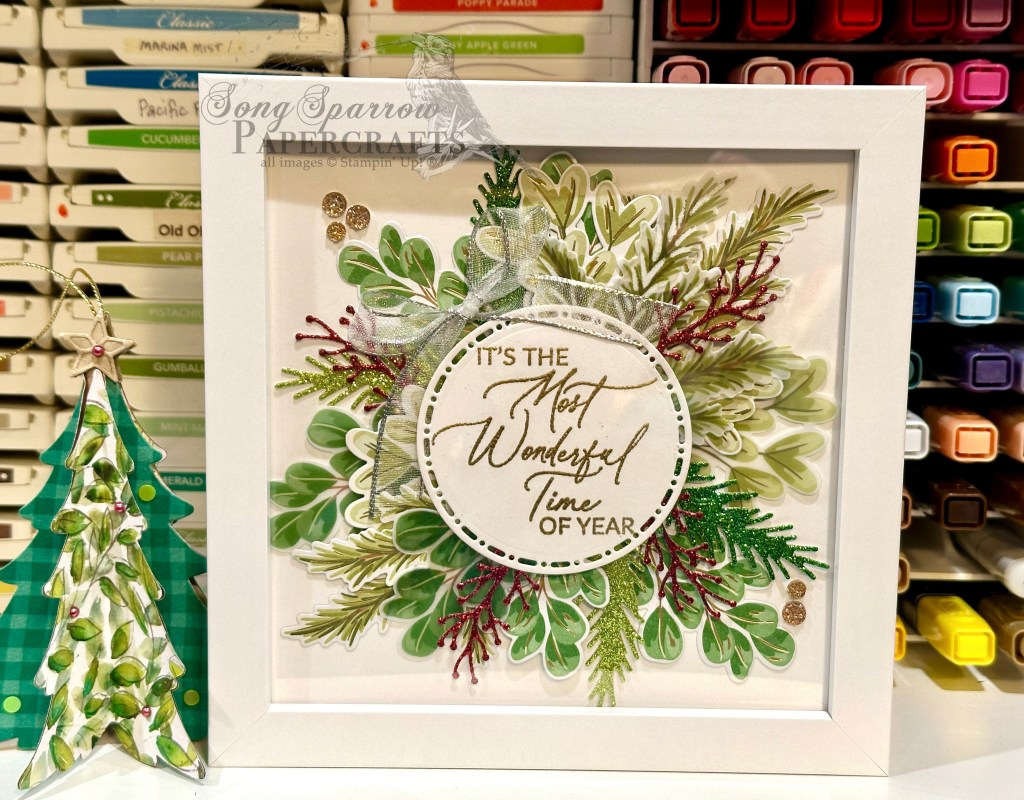
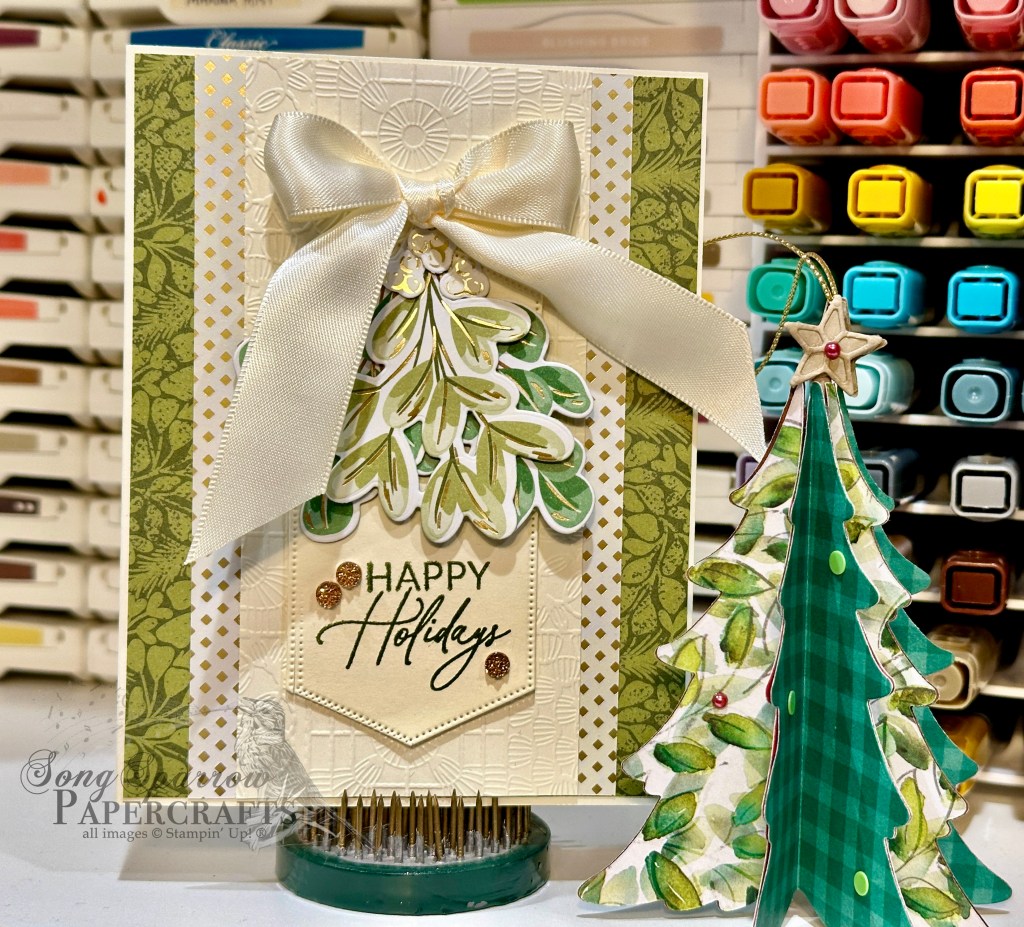
As soon as I saw the Seasons of Green & Gold suite of products by Stampin’ Up!, I immediately put it in my cart. Aside from the fact that one of my favorite things about the holidays is all of the evergreens, this suite had all of the festive sparkle that could be used beyond holiday card designs.

Today, I’m using a combination of evergreen colors with the glittering gold elements of the suite to create this elegant holiday design.

We get started with a base of Very Vanilla cardstock. Our background panel is a sheet of the golden greenery from the Seasons of Green & Gold paper pack. I used some of the leftover diecut greenery from last week’s home decor project to create an evergreen spray for the center focal point of this design. The greenery is diecut from the Graceful Greenery vellum and Seasons of Green & Gold patterned paper using the coordinating Golden Greenery dies. The sentiment combines the word Merry from the Joyful Sayings ephemera pack and elements diecut using the Peaceful Season dies and a combination of gold foil and festive glimmer papers. A faux bow of Shaded Spruce sheer ribbon adds a layer of green while dressing up the design. Dimensionals give us lots of layers between the card elements. We finish things off with a combination of earth tones shimmer gems and regal foiled dots.

Tomorrow, I’m going to share our newest dinner prayer with you — just in time for Advent.

Product List
Christmas · Holidays

Merry Stockings

Happy December, everyone. I don’t know about you, but I’m over here wondering how I ended up in a time warp! Every year, I feel like the fall months just whiz by and we end up at Christmas in the blink of an eye!

The last quarter of my year has definitely felt like it’s on fast forward after returning to work. I just can’t seem to find a good rhythm to keep all of the balls in the air. Each week, something has to give, it seems. So for those who have been following along for a while and for those who are new here, I’m still working on finding a good balance in order to find time in the craft room.

I was fortunate to have a few days at home over the Thanksgiving holiday and could carve out a little crafty time. I’m still working on Christmas cards and it’s going to be a race to the finish to get enough made to get them all out before Christmas! Today’s card uses the Joyful Ephemera packs to create a super simple and very festive holiday card.

We get started with a base of white cardstock. The focal panel is machine embossed using the Cute Crochet embossing folder that is then matted with some red Festive Glimmer paper. The mantle is a strip of the Take a Bow patterned paper pack that is mounted with dimensionals. The stockings and bows are from the Joyful Images ephemera pack and the banner sentiment is from the Joyful Sayings ephemera. A few iridescent discs finish things off with a twinkle and help the eye pass across the design.

I’ll be bringing you some more holiday designs as the week moves along. Thanks for dropping in!

Product List
Christmas · Holidays · L2S Group Instahop

Most Wonderful Time

Happy Thanksgiving, everyone! Our family has so very much to be thankful for this year. Most importantly is that we’re all here to celebrate together. After my husband’s very serious health crisis early in the year, we do not take for granted that he is here and he is healthy and recovering!

A quiet holiday week at work has turned out to be quite busy, and so once again, I’m mostly playing catchup this week. But I’m thankful to have a job that I really enjoy and that provides for my family. Even if it does cut into my favorite hobby! *wink-wink*

And speaking of my new job, I wanted to create a little festive holiday art that I could display in my bookshelf. And so today’s project uses the ever so lovely Seasons of Green and Gold Suite of products to create the festive 6×6 framed project. This is a simple white frame that I purchased on Amazon.

We start with a 6×6 piece of white cardstock as the base for our greenery spray. The greenery is diecut from the Season of Green & Gold patterned paper and Graceful Greenery vellum using the coordinating Golden Greenery dies. I also mixed in a few green Festive Glimmer paper sprigs for a pop of sparkly fun. Our pops of red are also diecut from Festive Glimmer paper but use the small sprig from the Changing Leaves die set. The greenery is adhered to the white cardstock in varying layers, which are created with dimensionals. The sentiment from Greetings of the Season is heat embossed in gold on white cardstock and diecut with the Spotlight on Nature die set. A ribbon of silver and white sheer ribbon dresses the sentiment panel with some shimmer. And drusy embellishments in the corners catch the eye and move it across our decorative piece. I really love how this turned out and can’t wait to put it out in my office!

Today’s card is a part of the Luv 2 Stamp Group Instagram Hop, which goes live at 9 AM Pacific Time (PST).  Click here to head over to my Instagram feed at 9 AM Pacific/11 AM Central and check out what the other demos in our L2S Group have created for you today! 

Product List
Christmas · Holidays · Winter

Sketchy Fridays: Snowy Wonder and Happiness

I really, really love this week’s theme, which is one of the reasons that I wanted to spend today showing you the designs I had planned for you throughout the last week. One of the most valuable things I have learned over the last several years is that flexibility is key when things don’t work out exactly as you planned.

So this post is the ode to Sketchy Fridays. Each week we’re using a card sketch to design our featured card. Right now, we’re working through a full series of designs using the card sketches found in current Stampin’ Up! catalogs.

This week’s card is based on Sketch #13 from the Stampin’ Up! Annual Catalog and features the Peaceful Evergreens and In the Grove Dies, along with the ever-lovely Snowflake Sky embossing folder. Today’s card design is inspired by the very talented demo known on Instagram as Craftsomnia.

This week’s design theme is stopping by the woods on a snowy evening. This Robert Frost poem is all about taking the time to bask in the wonder of falling snow, and I can’t help but think how well the idea of stopping to take in the wonder and joy everyday moments of life has to be one of the best life lessons. And outside of this wonderful life lesson, the theme lends itself so well to a variety of lovely winter cards, don’t you think?

We get started with a base of Balmy Blue cardstock. Our backdrop is a panel of Night of Navy that is machine embossed with the Snowflake Sky embossing folder and then lightly brushed with white craft ink to really bring out the beautiful soft snowflakes. Our snowbank is a simple piece of white cardstock that is torn to create the soft edges of a snowy hill. The Mossy Meadow trees are diecut with a combination of the In the Grove and Peaceful Evergreen dies. A touch of craft ink to the edges of the treeline and a bit of white glimmer paper on the larger evergreens in the foreground make for the perfect dusted evergreen grove. The sentiment from the Peaceful Season stamp set is stamped in Night of Navy in the center of a white banner cut with the Radiating Stitches die and then finished in the snowbank. Dimensionals help give lots of depth to our scene, and the silver trim and iridescent faceted gems lend the sparkle.

This design is even more stunning in person as the lighting in my craft room just wasn’t quite right today to capture the true colors and details. I hope you’ll drop in a little later as I bring you one final clean & simple design in this series.

Product List
Winter

Loads of Holiday Cheer

Well, to say that my week didn’t exactly go as planned is likely obvious to you all by now. I had everything planned out, but when all was said and done, I simply didn’t have the time to execute. I had to travel out of town for work and then had some other obligations that simply overran the time I allotted for them. Such is life sometimes, eh? So today, I’m going to play a little catchup and bring you all the content I had planned for Thursday, Friday, and Saturday of this week.

If you’re new here, for the last month or so, I’ve been working with themes to inspire designs. This week, we’re stopping by the woods on a snowy evening. And today’s card was inspired by a design that was recently posted by Stampin’ Up! Artisan crafter the Crafty O’ Ink Pen. When I saw her design, I knew it would be perfect for this week’s theme, and I wanted to do my own take on it. That’s the wonderful thing about design inspiration — you get to make it your own!

So we get started with a base of Night of Navy cardstock. The background panel is a sheet of Pool Party that is machine embossed with the Snowflake Sky embossing folder, which is then lightly inked with a sponge dauber and Pool Party ink to give the look of a cloudy sky. To create the snowdrifts, I tore a quarter panel of white cardstock in half and then very lightly inked the torn edges with the Pool Party ink to give some definition and detail and layered them to the snowdrifts. They’re ultimately adhered to the background panel with dimensionals. Using the Merriest Trees dies, I cut two of the smaller sized trees from Shaded Spruce cardstock and lightly rubbed some craft ink over the tops to give them the look of having a dusting of snow. They’re tucked in and behind the snowdrifts to give depth and dimension to the scene. The sled is diecut with the Sophisticated Sled and Filled With Fun die sets from gold foil and Early Espresso cardstocks and then cut in half to create the side view of our sled. Isn’t this brilliant?! Such a great idea, Crafty O’ Ink Pen! The sled is filled with holiday goodness which has been stamped on white cardstock using the Filled With Cheer stamp set and then colored with Stampin’ Blends. Our sentiment from Filled With Cheer is stamped in Night of Navy on white cardstock and then diecut using the Peaceful Season small banner die and adhered with dimensionals over some gold trim. Adhesives snowflakes finish our snowy scene with a little sparkle.

Check back in a little later in the afternoon for our Sketchy Fridays snowy evening design.

Product List
Christmas · Holiday Mini Catalog · Holidays

Bells & Boughs

This week, we’re exploring some of the ways we can use the Stampin’ Up! Season of Green & Gold suite of products. Today, we’re using it in a more traditional holiday-inspired layout.

Our design gets started with a base of Shaded Spruce cardstock. Our focal panel uses two patterns from the Season of Green & Gold designer series paper pack. I just love the gold-foiled patterns, and here we’re using the mistletoe and diamond patterns to create the backdrop for our focal section. The sentiment from Greetings of the Season is stamped in Shaded Spruce on Very Vanilla cardstock and then diecut with the Autumn Leaves die using the extension method. The greenery and bells are cut from a sheet of the Season of Green & Gold patterned paper and then adhered with several layers of dimensionals. The bells are adhered over a satin bow tied with the Very Vanilla satin ribbon. A mixture of drusy embellishments add sparkle and draw the eye across the card design.

I hope you’ll pop in tomorrow to see how we can use this suite to create a fall-inspired design.

Products used in this card:
Shaded Spruce, Very Vanilla cardstock
Season of Green & Gold DSP
Greetings of the Season stamps
Autumn Leaves dies
Very Vanilla satin ribbon
Drusy embellishments
Dimensionals
Adhesives

Product List
Christmas · Holiday Mini Catalog · Holidays

Happy Holidays Greenery

How excited was I to wake up to a rainy cold front this morning?! While it’s not exactly fall cool yet, we’re definitely headed in the right direction.

Today, we’re continuing a closer look at the Stampin’ Up! Season of Green & Gold suite of products. This suite includes beautiful gold-foiled patterned papers, coordinating vellum, stamps & dies, and lovely satin ribbon. Today’s card is another take on a traditional holiday design.

We started with a base of Basic Beige cardstock. Our background panel is a greenery pattern from the Season of Green & Gold designer series paper pack. Our focal panel background in the center is a strip of Basic Beige that is embossed using the Cute Crochet embossing folder and then matted with the backside foiled pattern of the background panel sheet. The sentiment panel is cut from Basic Beige using the Greetings of the Season dies. The sentiment from Greetings of the Season is stamped in Mossy Meadow toward the bottom of the tag. Using some of the leftover sprigs of greenery that I cut for yesterday’s card design, I affixed them to the sentiment panel to overlap the top of the tag and then tied a bow of Very Vanilla satin ribbon and affixed it in the center. A few drusy embellishments on either side of the sentiment help draw the eye and add a bit of finishing sparkle.

Tomorrow we’re going to round out our winter holiday designs before transitioning to a few out-of-the-box designs. I hope you’ll pop in.

Products used in today’s card:
Basic Beige cardstock
Season of Green & Gold DSP
Cute Crochet embossing folder
Golden Greenery dies
Greetings of the Season stamps &dies
Very Vanilla satin ribbon
Drusy embellishments
Dimensionals
Adhesives

Product List
Christmas · Holiday Mini Catalog · Holidays

Bright & Beautiful Greenery

Welcome to a brand new week and the start of FALL! Have I mentioned that fall is my absolute favorite season? Unfortunately, Texas isn’t being very cooperative with me right now, and it doesn’t feel a bit like fall. Not one bit!! In fact, it’s still feeling like we’ve been thrown into the deep end of the frying pan. But we’re only a couple of good cold fronts away from fall officially being here to stay! *wink-wink*

This week, we’re going to be spending time with the Season of Green & Gold suite of products by Stampin’ Up! And we’re going to mix it up with some obvious holiday designs and some out-of-the-box fall designs. Today’s card is solidly in the holiday mood.

We get started with a base of Shaded Spruce cardstock. Our focal panel is a sheet of white cardstock that has been diecut using the Dotted Circles embossing folder and then the panel is matted with gold mercury vellum. Using the Golden Greenery dies, we cut a variety of greenery from the Season of Green & Gold patterned paper with coordinating shapes. These are then layered on the focal panel using dimensionals to create several different visual planes. Our sentiment from Peaceful Season is stamped white cardstock in Versamark and then heat embossed with gold embossing powder. We cut it out with the smallest circle from the Everyday Details die set. This is then mounted on a circle of white glimmer paper cut using the Spotlight on Nature dies and adhered over a twist of Cherry Cobbler & Gold satin ribbon in the center of our greenery. A few iridescent faceted gems finish things off with a nice sparkle.

Tune in tomorrow as we keep things in the holiday zone.

Products used in today’s card:
Shaded Spruce, Basic White cardstock
White glimmer, gold mercury vellum, Season of Green & Gold DSP
Dotted Circles embossing folder
Golden Greenery, Spotlight on Nature, Everyday Details dies
Peaceful Season stamps
Versamark
Gold embossing powder
Cherry Cobbler & gold satin ribbon
Iridescent faceted gems
Dimensionals
Adhesives

Product List
Christmas · Holiday Mini Catalog · Holidays

Peace & Wonder

It’s hard to believe that we’re already to the end of another card series. I don’t know about you, but it seems like the closer we get to the end of a year the faster the time goes!

This week, we’ve been using the Joyful ephemera packs from Stampin’ Up! to create simple yet beautiful card designs. If you find yourself short on time, the full line of ephemera packs that SU! offers allow you to continue making beautiful cards. With or without any extras, ephemera cards are just as stunning.

Today, we’re mixing things up with a whole combination of elements from the crafting stash. I have a box of pre-cut card bases and typically have at least one or two pre-cut focal panel bases on hand, as well. And both were go-to items for creating this lovely card in a jiffy.

We get started with a base of Pretty Peacock cardstock. Our focal panel base is a sheet of the Season of Elegance designer series paper. I cut a circle from white glimmer paper using the Spotlight on Nature dies that is just a bit larger than the snowy cabin circle image from the Joyful Images ephemera pack. These are adhered with dimensionals over a twist of the Pretty Peacock & Gold metallic ribbon. The sentiment from Joyful Sayings is also adhered with dimensionals and just a bit higher than our image panel. Things are finished off with a few gold snowflakes with rhinestone centers for a bit of added twinkle.

Are you interested in learning how you can get started on your Christmas cards? Check out my upcoming card classes for both virtual and in-person options!

Next week, we’ll be using Season of Green & Gold to create our cards. I hope you’ll stop by and check it all out.

Products used in today’s card:
Pretty Peacock cardstock
Season of Elegance, white glimmer DSP
Spotlight on Nature dies
Joyful ephemera
Snowflake assortment, rhinestone jewels
Pretty Peacock & gold metallic ribbon
Dimensionals
Adhesives

Product List
Christmas · Holiday Mini Catalog · Sketchy Fridays

Sketchy Fridays: Holiday Joy

Do you ever have weeks where you aren’t sure which end is up much less what day it is? I’ve been confused about what day of the week it is all week and it’s NOT even a holiday week! Perhaps it’s a phase of the moon or something.

Today is another installment of Sketchy Fridays, where each week we’ll be using a card sketch to design our featured card. Right now, we’re working through a full series of designs using the card sketches found in current Stampin’ Up! catalogs.

This week’s card is based on Sketch #13 in the Holiday Mini catalog and features the Joyful ephemera packs and the fun Take a Bow designer series paper in the new Stampin’ Up! Holiday Mini catalog.

I know I probably say this often enough that you’re beginning to think that I’m a broken record, but what I love about using sketches to build a card design is that it’s merely a starting point. There aren’t any rules that say your card HAS to look exactly like the sketch that inspired it. Today, you’ll notice that I’ve taken some liberties with the sketch. Rather than using actual rectangles in the design, they’re a representation of the images from the Joyful Images ephemera pack. Can you see it?

We get started on this card design with a base of white cardstock. Our background panel is a sheet of the red polka dot Take a Bow patterned paper with a strip of the green star pattern from the same pack. In each of the places represented by rectangles in the sketch, I’ve put images from the Joyful Images ephemera pack, building a cute scene of a cup of cocoa surrounded by snacks you might enjoy with it. There’s a twist of the peppermint baker’s twine tied behind the images for a little visual interest. The sentiment down below is mounted on a banner from the Images pack while the word Joy is from the Joyful Sayings ephemera. A few adhesive peppermints and some drusy embellishments help the eye move across our design and add some pops of fun color and sparkle.

Tomorrow we’ll be rounding out this week’s series with a trip to grandma’s house. I hope you’ll come along!

Products used in today’s card:
Basic White cardstock
Take a Bow DSP
Joyful ephemera packs
Real Red & White twine
Real Red & White peppermints
Drusy embellishments
Dimensionals
Adhesives

Product List